

Owner's Manual
Page 6
... 27 TV type 27 Setting the TV display 27 Progressive 28 Picture setting 29 Selecting the black level 30 Closed caption 30 HDMI setup 30 Preference setup menu 31 Audio, subtitle and disc menu 32 Restricting playback with parental control ..........32 Playback of VR format 32 MP3/JPEG menu 34 Displaying DivX ...
... 27 TV type 27 Setting the TV display 27 Progressive 28 Picture setting 29 Selecting the black level 30 Closed caption 30 HDMI setup 30 Preference setup menu 31 Audio, subtitle and disc menu 32 Restricting playback with parental control ..........32 Playback of VR format 32 MP3/JPEG menu 34 Displaying DivX ...

Owner's Manual
Page 15
.... 5 Set the TV to the correct Video IN channel (e.g. If the picture is a PAL system TV. To exit from the menu, press SETUP. 11 En It will be in NTSC format. English Getting Started Step 2: Turning on the power 1 Connect the AC power cord to the power...on your TV, wait for 15 seconds for this unit to activate automatic recovery. - VIDEO SETUP PAGE TV TYPE TV DISPLAY PROGRESSIVE PICTURE SETTING BLACK LEVEL CLOSED CAPTION HDMI SETUP PAL NTSC MULTI 1 Press SETUP. 2 Press 2 repeatedly to select "VIDEO SETUP PAGE". 3 Press 3/4 to highlight [TV TYPE], and then press 2. 4 Press 3/4 to...
.... 5 Set the TV to the correct Video IN channel (e.g. If the picture is a PAL system TV. To exit from the menu, press SETUP. 11 En It will be in NTSC format. English Getting Started Step 2: Turning on the power 1 Connect the AC power cord to the power...on your TV, wait for 15 seconds for this unit to activate automatic recovery. - VIDEO SETUP PAGE TV TYPE TV DISPLAY PROGRESSIVE PICTURE SETTING BLACK LEVEL CLOSED CAPTION HDMI SETUP PAL NTSC MULTI 1 Press SETUP. 2 Press 2 repeatedly to select "VIDEO SETUP PAGE". 3 Press 3/4 to highlight [TV TYPE], and then press 2. 4 Press 3/4 to...

Owner's Manual
Page 16
...DISPLAY DIM PROGRAM OSD LANGUAGE SCREEN SAVER SLEEP AUTO STANDBY DIVX(R) VOD CODE ENGLISH ESPAÑOL FRANÇAIS 1 Press SETUP. 2 Press 1 / 2 to select "GENERAL SETUP PAGE". 3 Press 3/4 to highlight [OSD LANGUAGE], and then press 2. 4 Press 3/4 to select a language, and ... language is 4:3, you do not need to change this setting. VIDEO SETUP PAGE TV TYPE TV DISPLAY PROGRESSIVE PICTURE SETTING BLACK LEVEL CLOSED CAPTION HDMI SETUP 4:3 PAN SCAN 4:3 LETTER BOX 16:9 1 Press SETUP. 2 Press 2 repeatedly to select "VIDEO SETUP PAGE". 3 Press 3/4 to highlight [TV DISPLAY], and then press...
...DISPLAY DIM PROGRAM OSD LANGUAGE SCREEN SAVER SLEEP AUTO STANDBY DIVX(R) VOD CODE ENGLISH ESPAÑOL FRANÇAIS 1 Press SETUP. 2 Press 1 / 2 to select "GENERAL SETUP PAGE". 3 Press 3/4 to highlight [OSD LANGUAGE], and then press 2. 4 Press 3/4 to select a language, and ... language is 4:3, you do not need to change this setting. VIDEO SETUP PAGE TV TYPE TV DISPLAY PROGRESSIVE PICTURE SETTING BLACK LEVEL CLOSED CAPTION HDMI SETUP 4:3 PAN SCAN 4:3 LETTER BOX 16:9 1 Press SETUP. 2 Press 2 repeatedly to select "VIDEO SETUP PAGE". 3 Press 3/4 to highlight [TV DISPLAY], and then press...

Owner's Manual
Page 28
... when disc playback is stopped or paused for more than 30 minutes. 1 In "GENERAL SETUP PAGE", press 3/4 to highlight [AUTO STANDBY], and then press 2. AUDIO SETUP PAGE ANALOG OUTPUT DIGITAL AUDIO HDMI AUDIO CD UPSAMPLING NIGHT MODE LIP SYNC Setting the analog output Set the analog output to... match the playback capability of this unit. DivX® VOD registration code Yamaha provides you with a DivX® VOD (...
... when disc playback is stopped or paused for more than 30 minutes. 1 In "GENERAL SETUP PAGE", press 3/4 to highlight [AUTO STANDBY], and then press 2. AUDIO SETUP PAGE ANALOG OUTPUT DIGITAL AUDIO HDMI AUDIO CD UPSAMPLING NIGHT MODE LIP SYNC Setting the analog output Set the analog output to... match the playback capability of this unit. DivX® VOD registration code Yamaha provides you with a DivX® VOD (...
Owner's Manual
Page 30
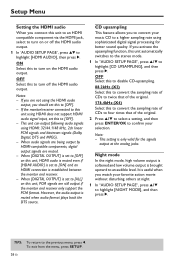
...press 3/4 to highlight [NIGHT MODE], and then press 2. When [DIGITAL OUTPUT] is set this to turn off the HDMI audio output. 1 In 'AUDIO SETUP PAGE', press 34 to highlight [HDMI AUDIO], then press 2. OFF Select this to disable CD-upsampling. 88.2kHz (X2) Select this to convert the sampling...(Dolby Digital, DTS and MPEG). - If you activate the upsampling function, this unit to an HDMI compatible component via the HDMI jack, select to turn on or off the HDMI audio output. Setup Menu Setting the HDMI audio When you connect this unit automatically switches to the stereo mode. 1 In "AUDIO...
...press 3/4 to highlight [NIGHT MODE], and then press 2. When [DIGITAL OUTPUT] is set this to turn off the HDMI audio output. 1 In 'AUDIO SETUP PAGE', press 34 to highlight [HDMI AUDIO], then press 2. OFF Select this to disable CD-upsampling. 88.2kHz (X2) Select this to convert the sampling...(Dolby Digital, DTS and MPEG). - If you activate the upsampling function, this unit to an HDMI compatible component via the HDMI jack, select to turn on or off the HDMI audio output. Setup Menu Setting the HDMI audio When you connect this unit automatically switches to the stereo mode. 1 In "AUDIO...

Owner's Manual
Page 31
...with the Dolby Digital mode. In this if you have a widescreen TV. VIDEO SETUP PAGE TV TYPE TV DISPLAY PROGRESSIVE PICTURE SETTING BLACK LEVEL CLOSED CAPTION HDMI SETUP TIPS: To return to level out the volume. English Setup Menu ON Select this if the aspect ratio of your TV is 4:3. This ... displayed. 16:9 Select this case, a wide picture with the video image. This may be necessary when you use certain LCD monitors or projectors. 1 In "AUDIO SETUP PAGE", press 1 / 2 to highlight [LIP SYNC], and then press 2. 2 Press 1 / 2 to adjust the delay time (between 00 ms and 200 ms), and...
...with the Dolby Digital mode. In this if you have a widescreen TV. VIDEO SETUP PAGE TV TYPE TV DISPLAY PROGRESSIVE PICTURE SETTING BLACK LEVEL CLOSED CAPTION HDMI SETUP TIPS: To return to level out the volume. English Setup Menu ON Select this if the aspect ratio of your TV is 4:3. This ... displayed. 16:9 Select this case, a wide picture with the video image. This may be necessary when you use certain LCD monitors or projectors. 1 In "AUDIO SETUP PAGE", press 1 / 2 to highlight [LIP SYNC], and then press 2. 2 Press 1 / 2 to adjust the delay time (between 00 ms and 200 ms), and...

Owner's Manual
Page 32
...AND MAY CAUSE ARTIFACTS TO BE DISPLAYED IN THE PICTURE. To clear the menu, press SETUP. 28 En IN CASE OF 525 OR 625 PROGRESSIVE SCAN PICTURE PROBLEMS, IT IS RECOMMENDED ... IF THERE ARE QUESTIONS REGARDING OUR VIDEO MONITOR COMPATIBILITY WITH THIS MODEL 525P AND 625P DVD PLAYER, PLEASE CONTACT OUR CUSTOMER SERVICE CENTER. OFF Select this unit and the TV ...Component video jacks " on activating progressive scan: - When making HDMI connections, you have connected this case, check the screen size and aspect ratio of YAMAHA products, including the projectors DPX-1300, DPX-830 and the ...
...AND MAY CAUSE ARTIFACTS TO BE DISPLAYED IN THE PICTURE. To clear the menu, press SETUP. 28 En IN CASE OF 525 OR 625 PROGRESSIVE SCAN PICTURE PROBLEMS, IT IS RECOMMENDED ... IF THERE ARE QUESTIONS REGARDING OUR VIDEO MONITOR COMPATIBILITY WITH THIS MODEL 525P AND 625P DVD PLAYER, PLEASE CONTACT OUR CUSTOMER SERVICE CENTER. OFF Select this unit and the TV ...Component video jacks " on activating progressive scan: - When making HDMI connections, you have connected this case, check the screen size and aspect ratio of YAMAHA products, including the projectors DPX-1300, DPX-830 and the ...

Owner's Manual
Page 33
... average tint setting value. COLOR Increase the value to select one personal setting that best suits your selection. SOFT Select this for HDMI output. All picture settings are not available for the standard picture setting. BRIGHT Select this to personalize your picture color by adjusting...press ENTER/OK to confirm your picture or vice versa. Notes: - PERSONAL Select this to make the TV picture brighter. English Setup Menu Picture setting This unit comes with three predefined sets of picture color settings and one of the following options. CONTRAST Increase the ...
... average tint setting value. COLOR Increase the value to select one personal setting that best suits your selection. SOFT Select this for HDMI output. All picture settings are not available for the standard picture setting. BRIGHT Select this to personalize your picture color by adjusting...press ENTER/OK to confirm your picture or vice versa. Notes: - PERSONAL Select this to make the TV picture brighter. English Setup Menu Picture setting This unit comes with three predefined sets of picture color settings and one of the following options. CONTRAST Increase the ...

Owner's Manual
Page 34
...unit to confirm your selection. SUPERWIDE Select to improve the color contrast during playback. ON Select this function. 1 In "VIDEO SETUP PAGE", press 3/4 to enable the closed caption function. The difference between subtitles and captions is only available for hearing persons and ...to disable the closed caption information and your TV set also supports this to confirm your selection. HDMI setup When you select this function, please ensure that subtitles are intended for HDMI video output. This feature is that the disc contains closed caption function. 2 Press 3/4 to...
...unit to confirm your selection. SUPERWIDE Select to improve the color contrast during playback. ON Select this function. 1 In "VIDEO SETUP PAGE", press 3/4 to enable the closed caption function. The difference between subtitles and captions is only available for hearing persons and ...to disable the closed caption information and your TV set also supports this to confirm your selection. HDMI setup When you select this function, please ensure that subtitles are intended for HDMI video output. This feature is that the disc contains closed caption function. 2 Press 3/4 to...

Owner's Manual
Page 35
...720P 720 progressive-scan video 1080I 1080 interlace video AUTO The resolution is not supported by the HDMI-compatible monitor you are using. Preference setup menu 1 Press STOP (9) twice to stop playback (if necessary), and then press SETUP. 2 Press 1 / 2 to select "PREFERENCE PAGE". 3 Press ENTER/OK to set [..., the setting of [TV TYPE] may not be changed. To exit from the menu, press SETUP. 31 En Notes: - For settings other than [AUTO], HDMI video output may be display properly if a resolution output setting is automatically selected to adjust the resolution depending on page ...
...720P 720 progressive-scan video 1080I 1080 interlace video AUTO The resolution is not supported by the HDMI-compatible monitor you are using. Preference setup menu 1 Press STOP (9) twice to stop playback (if necessary), and then press SETUP. 2 Press 1 / 2 to select "PREFERENCE PAGE". 3 Press ENTER/OK to set [..., the setting of [TV TYPE] may not be changed. To exit from the menu, press SETUP. 31 En Notes: - For settings other than [AUTO], HDMI video output may be display properly if a resolution output setting is automatically selected to adjust the resolution depending on page ...
