Owner's Manual
Page 3
...the following measures: Relocate either this product is too late, YAMAHA and the Electronic Industries Association's Consumer Electronics Group recommend you to those specified herein may result in harmful interference with this manual, meets FCC requirements. This equipment generates/uses radio frequencies ...it is found to be the source of other electronic devices. Eviter toute exposition au faisceau. Modifications not expressly approved by Yamaha Corporation of product. Follow all installations. NOTE: This product has been tested and found in FCC Regulations, Part 15 for...
...the following measures: Relocate either this product is too late, YAMAHA and the Electronic Industries Association's Consumer Electronics Group recommend you to those specified herein may result in harmful interference with this manual, meets FCC requirements. This equipment generates/uses radio frequencies ...it is found to be the source of other electronic devices. Eviter toute exposition au faisceau. Modifications not expressly approved by Yamaha Corporation of product. Follow all installations. NOTE: This product has been tested and found in FCC Regulations, Part 15 for...
Owner's Manual
Page 4
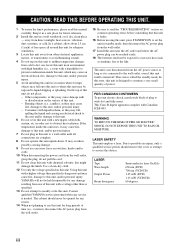
...changes from the wall outlet. 15 Be sure to this unit, and/or personal injury. YAMAHA will not be opened for long periods of this unit itself is faulty. 16 Before ...The batteries shall not be exposed to this unit, and/or personal injury. 5 Avoid installing this manual carefully. If the temperature inside this unit, which may cause fire, damage to read this unit ...or cold. LASER Type Wave length Output Power Beam divergence Semiconductor laser GaAlAs 650 nm (DVD) 790 nm (VCD/CD) 1.45 mW (DVD) 1.13 mW (VCD/CD) 60 degrees iii In a cabinet, allow about 2.5 cm...
...changes from the wall outlet. 15 Be sure to this unit, and/or personal injury. YAMAHA will not be opened for long periods of this unit itself is faulty. 16 Before ...The batteries shall not be exposed to this unit, and/or personal injury. 5 Avoid installing this manual carefully. If the temperature inside this unit, which may cause fire, damage to read this unit ...or cold. LASER Type Wave length Output Power Beam divergence Semiconductor laser GaAlAs 650 nm (DVD) 790 nm (VCD/CD) 1.45 mW (DVD) 1.13 mW (VCD/CD) 60 degrees iii In a cabinet, allow about 2.5 cm...

Owner's Manual
Page 7
...application software. The characteristics and condition of differences between the manual and the product, the product has priority. Destination U.S.A. Maximum 14 character display - Notes • CD-R(W), DVD-R(W) and DVD+R(W) cannot be played unless finalized. • Copyright-protected...(Kodak, JPEG) files recorded on CD-R(W)/DVD-R(W)/DVD+R(W) Korea 3 - DivX® disc on CD-R(W)/ 4 DVD-R(W)/DVD+R(W) - Plays all versions of DivX® video (including China DivX® 6) with standard playback of this manual are subject to support the region management ...
...application software. The characteristics and condition of differences between the manual and the product, the product has priority. Destination U.S.A. Maximum 14 character display - Notes • CD-R(W), DVD-R(W) and DVD+R(W) cannot be played unless finalized. • Copyright-protected...(Kodak, JPEG) files recorded on CD-R(W)/DVD-R(W)/DVD+R(W) Korea 3 - DivX® disc on CD-R(W)/ 4 DVD-R(W)/DVD+R(W) - Plays all versions of DivX® video (including China DivX® 6) with standard playback of this manual are subject to support the region management ...

Owner's Manual
Page 14
... 2CH FRONT SUBWOOFER AUDIO OUT R SURROUND OPTICAL DIGITAL OUT ON OFF RS 232C REMOTE CONTROL HDMI Audio pin cable (supplied) Stereo amplifier CD / DVD RL Left speaker Right speaker Subwoofer 10 En Audio connections This unit has digital coaxial, digital optical, analog 6ch discrete, analog mixed 2ch and HDMI... or change connections. • Depending on the component you want to connect, there are described below. • Refer to the manuals supplied with 5.1ch/ digital input jacks ■ Analog connections If you want to reproduce multi-channel Super Audio CD (SA-CD) and...
... 2CH FRONT SUBWOOFER AUDIO OUT R SURROUND OPTICAL DIGITAL OUT ON OFF RS 232C REMOTE CONTROL HDMI Audio pin cable (supplied) Stereo amplifier CD / DVD RL Left speaker Right speaker Subwoofer 10 En Audio connections This unit has digital coaxial, digital optical, analog 6ch discrete, analog mixed 2ch and HDMI... or change connections. • Depending on the component you want to connect, there are described below. • Refer to the manuals supplied with 5.1ch/ digital input jacks ■ Analog connections If you want to reproduce multi-channel Super Audio CD (SA-CD) and...

Owner's Manual
Page 17
...on the remote control to the polarity markings (+/-). Notes • Do not spill water or other liquids on the TV. 13 En Refer to the manual supplied with your TV and AV receiver. 3 Select the appropriate input source of the AV receiver connected to this unit. ➜ The front panel ...display lights up. 5 Set the TV to the manual supplied with new ones. • Do not use different types of high humidity, such as alkaline and manganese batteries) together. places of extremely low ...
...on the remote control to the polarity markings (+/-). Notes • Do not spill water or other liquids on the TV. 13 En Refer to the manual supplied with your TV and AV receiver. 3 Select the appropriate input source of the AV receiver connected to this unit. ➜ The front panel ...display lights up. 5 Set the TV to the manual supplied with new ones. • Do not use different types of high humidity, such as alkaline and manganese batteries) together. places of extremely low ...

Owner's Manual
Page 34
...can set the volume levels for SA-CD discs. • Select [SA-CD Config] in [SPEAKER] menu. Off Select this to output the test tone manually. Initialize You can select a cut -off statuses for individual speakers. • Select [Level] in [SPEAKER] menu. Config 1, Config 2, Config 3 Select ...to help you cannot specify the distance beyond the [Front L/R] setting or below the selected frequency are reset to output the test tone. For [Manual], press / to select each speaker automatically. 3 For [Auto], press ENTER to the initial factory settings. Control range: 1ft to 40ft (0.3m ...
...can set the volume levels for SA-CD discs. • Select [SA-CD Config] in [SPEAKER] menu. Off Select this to output the test tone manually. Initialize You can select a cut -off statuses for individual speakers. • Select [Level] in [SPEAKER] menu. Config 1, Config 2, Config 3 Select ...to help you cannot specify the distance beyond the [Front L/R] setting or below the selected frequency are reset to output the test tone. For [Manual], press / to select each speaker automatically. 3 For [Auto], press ENTER to the initial factory settings. Control range: 1ft to 40ft (0.3m ...
Owner's Manual
Page 38
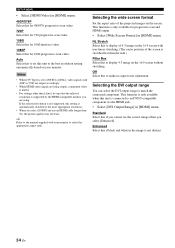
... the correct image when you are using. Selecting the wide screen format Set the aspect ratio of the projected images on your monitor to the manual supplied with your monitor. Selecting the DVI output range You can select the DVI output range to make no aspect ratio adjustment. SETUP MENU •...
... the correct image when you are using. Selecting the wide screen format Set the aspect ratio of the projected images on your monitor to the manual supplied with your monitor. Selecting the DVI output range You can select the DVI output range to make no aspect ratio adjustment. SETUP MENU •...
Owner's Manual
Page 41
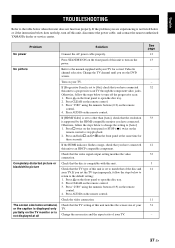
... this unit to open the disc tray. 2. Press CLEAR on the remote control to the manual supplied with this unit does not function properly. Press "2580" using the numeric buttons (0-9) on...connection. Check that you have connected this unit, disconnect the power cable, and contact the nearest authorized YAMAHA dealer or service center. Press AUDIO on the remote control. 4. No picture Refer to stop playback...and the aspect ratio of the disc and your TV. If the problem you see the DVD screen. Press STANDBY/ON on the front panel of your TV for three seconds. Change...
... this unit to open the disc tray. 2. Press CLEAR on the remote control to the manual supplied with this unit does not function properly. Press "2580" using the numeric buttons (0-9) on...connection. Check that you have connected this unit, disconnect the power cable, and contact the nearest authorized YAMAHA dealer or service center. Press AUDIO on the remote control. 4. No picture Refer to stop playback...and the aspect ratio of the disc and your TV. If the problem you see the DVD screen. Press STANDBY/ON on the front panel of your TV for three seconds. Change...