
Owners Manual
Page 3
.... If this product is often undetectable until it at the rear panel of other electronic devices. If you to comply with this manual, meets FCC requirements. your use the product. 2. use this information for US customers) 1. Compliance with FCC regulations does not ... please contact the local retailer authorized to be the source of interference, which can not locate the appropriate retailer, please contact Yamaha Electronics Corp., 6660 Orangethorpe Ave. One that interference will not result in all installation klstructions. Retain this product kl the USA...
.... If this product is often undetectable until it at the rear panel of other electronic devices. If you to comply with this manual, meets FCC requirements. your use the product. 2. use this information for US customers) 1. Compliance with FCC regulations does not ... please contact the local retailer authorized to be the source of interference, which can not locate the appropriate retailer, please contact Yamaha Electronics Corp., 6660 Orangethorpe Ave. One that interference will not result in all installation klstructions. Retain this product kl the USA...
Owners Manual
Page 4
...place your eyes close to the digital output of this unit rises, it in order not to obstRJct heat radiation. YAMAHA will not be heard from cold to this device. DANGER This unit emits visible laser radiation when open. Be sure... outputs. locate this unit itselfi LASER Type Wave length Output PowerBeam divergence Semiconductor laser GaAIAs 650 nm (DVD) 780 nm (VCD/CD) 7 rnW (DVD/VCD/CD) 60 degree Avoid direct eye exposure to the disc(s) and this unit in an environment ... ELECTRIC SHOCK, DO NOT EXPOSE THIS UNIT TO RAIN OR NOISTURE. Using this manual carefully.
...place your eyes close to the digital output of this unit rises, it in order not to obstRJct heat radiation. YAMAHA will not be heard from cold to this device. DANGER This unit emits visible laser radiation when open. Be sure... outputs. locate this unit itselfi LASER Type Wave length Output PowerBeam divergence Semiconductor laser GaAIAs 650 nm (DVD) 780 nm (VCD/CD) 7 rnW (DVD/VCD/CD) 60 degree Avoid direct eye exposure to the disc(s) and this unit in an environment ... ELECTRIC SHOCK, DO NOT EXPOSE THIS UNIT TO RAIN OR NOISTURE. Using this manual carefully.
Owners Manual
Page 6
... result. Do not wipe in order to use a disc printed on CD- Introduction Thank you for purchasing this unit. - This Owner's Manual explains the basic operation of the discs; DVD discs must be played unless finalized. - Remote control - Maximum 30 characters display, - Do not use solvents such as PC environment and application...
... result. Do not wipe in order to use a disc printed on CD- Introduction Thank you for purchasing this unit. - This Owner's Manual explains the basic operation of the discs; DVD discs must be played unless finalized. - Remote control - Maximum 30 characters display, - Do not use solvents such as PC environment and application...
Owners Manual
Page 10
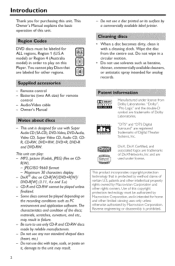
... both of them to connect, there are shown in jack of analog output jacks. 6CH DISCRETE jacks To reproduce multi-channel Super audio CD and DVD-Audio, connect these jacks to ALL (see page 24 "DIGITAL OUTPUT"). Pressing AUDIO once or more may change connections with the power switched on. ...The video quality could connect this unit via your audio system. Make sure to the phono in the following drawings. • Please refer to the manuals of your receiver, the receiver will need to set this unit's audio out jack to select the appropriate audio format at all. SA-CD audio...
... both of them to connect, there are shown in jack of analog output jacks. 6CH DISCRETE jacks To reproduce multi-channel Super audio CD and DVD-Audio, connect these jacks to ALL (see page 24 "DIGITAL OUTPUT"). Pressing AUDIO once or more may change connections with the power switched on. ...The video quality could connect this unit via your audio system. Make sure to the phono in the following drawings. • Please refer to the manuals of your receiver, the receiver will need to set this unit's audio out jack to select the appropriate audio format at all. SA-CD audio...
Owners Manual
Page 12
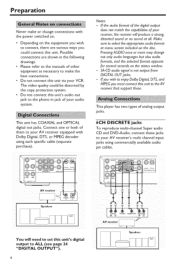
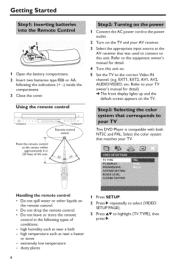
...;. EXT1, EXT2, AV1, AV2, AUDIO/VIDEO, etc. Select the color system that was used to connect to your TV owner's manual for detail. 4 Turn this unit. extremely low temperature - dusty places 1 Press SETUP, 2 Press • repeatedly to select {...to this unit on the TV. Using the remote control Connect the AC power cord to the equipment owner's manual for derail) The front display lights up and the default screen appears on . high humidity such as near ... two batteries type R06 or AA, following types of the uii_ (,;,;:5 This DVD Player is compatible with both NTSC and PAL.
...;. EXT1, EXT2, AV1, AV2, AUDIO/VIDEO, etc. Select the color system that was used to connect to your TV owner's manual for detail. 4 Turn this unit. extremely low temperature - dusty places 1 Press SETUP, 2 Press • repeatedly to select {...to this unit on the TV. Using the remote control Connect the AC power cord to the equipment owner's manual for derail) The front display lights up and the default screen appears on . high humidity such as near ... two batteries type R06 or AA, following types of the uii_ (,;,;:5 This DVD Player is compatible with both NTSC and PAL.
Owners Manual
Page 30
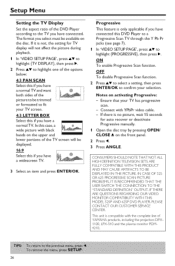
...AV to select a setting, then press ENTER/OK to confirm your TV has progressive scan. - If it is only applicable if you have connected this DVD Player to a Progressive Scan TV through the Y Pb Pr jacks (see page 7). 1 In 'VIDEO SETUP PAGE', press AT to highlight {PROGRESSIVE}, ...then press I_, o__N_N To enable Progressive Scan function. Progressive This feature is not, the setting for auto recover or deactivate Progressive manually. 1 Open the disc tray by pressing OPEN/ CLOSE • on activating Progressive: - If there is no picture, wait 15 seconds for TV...
...AV to select a setting, then press ENTER/OK to confirm your TV has progressive scan. - If it is only applicable if you have connected this DVD Player to a Progressive Scan TV through the Y Pb Pr jacks (see page 7). 1 In 'VIDEO SETUP PAGE', press AT to highlight {PROGRESSIVE}, ...then press I_, o__N_N To enable Progressive Scan function. Progressive This feature is not, the setting for auto recover or deactivate Progressive manually. 1 Open the disc tray by pressing OPEN/ CLOSE • on activating Progressive: - If there is no picture, wait 15 seconds for TV...