
Owner's Manual
Page 3
...Do not modify the unit. Before installing any abnormality, such as marked on a power cord covered by Yamaha may cause electrical shock, fire, or damage to oil splashes or steam, such as near cooking ...as smoke, odor, or noise, or if a foreign object or liquid gets inside a car with all the windows closed, or places that are not endorsed by a carpet. • Do not place a container with wet hands...plug to an AC outlet, be a fire and electrical shock hazard. • The DM2000 has six rear-panel slots for repair. Failure to do not touch the power cable plug if...
...Do not modify the unit. Before installing any abnormality, such as marked on a power cord covered by Yamaha may cause electrical shock, fire, or damage to oil splashes or steam, such as near cooking ...as smoke, odor, or noise, or if a foreign object or liquid gets inside a car with all the windows closed, or places that are not endorsed by a carpet. • Do not place a container with wet hands...plug to an AC outlet, be a fire and electrical shock hazard. • The DM2000 has six rear-panel slots for repair. Failure to do not touch the power cable plug if...
Owner's Manual
Page 5
...MultiChannel Optical Digital Interface is a problem, relocate the affected equipment. Sony is a trademark of Intel Corporation. Microsoft and Windows are registered trademarks of Mackie Designs, Inc. Copyright No part of Sony Corporation, Inc. iii SmartMedia Handling Precautions &#... written authorization of Apple Corporation, Inc. Intel and Pentium are registered trademarks of the DM2000. SmartMedia is a trademark of Yamaha Corporation. © 2002 Yamaha Corporation. DM2000 Exclusion of Certain Responsibility Manufacturer, importer, or dealer shall not be allowed to acclimatize ...
...MultiChannel Optical Digital Interface is a problem, relocate the affected equipment. Sony is a trademark of Intel Corporation. Microsoft and Windows are registered trademarks of Mackie Designs, Inc. Copyright No part of Sony Corporation, Inc. iii SmartMedia Handling Precautions &#... written authorization of Apple Corporation, Inc. Intel and Pentium are registered trademarks of the DM2000. SmartMedia is a trademark of Yamaha Corporation. © 2002 Yamaha Corporation. DM2000 Exclusion of Certain Responsibility Manufacturer, importer, or dealer shall not be allowed to acclimatize ...
Owner's Manual
Page 7
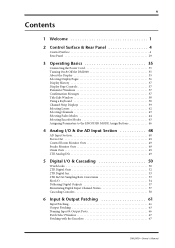
... 29 3 Operating Basics 35 Connecting the Power Cord 35 Turning On & Off the DM2000 35 About the Display 35 Selecting Display Pages 36 Display History 37 Display Page Controls 37 Parameter Windows 37 Confirmation Messages 37 Title Edit Window 38 Using a Keyboard 38 Channel Strip Displays 39 Selecting Layers 42 Selecting Channels 43... Digital Input Channel Status 57 Cascading Consoles 58 6 Input & Output Patching 61 Input Patching 61 Output Patching 63 Naming Input & Output Ports 66 Patch Select Window 67 Patching with the Encoders 67 DM2000-Owner's Manual
... 29 3 Operating Basics 35 Connecting the Power Cord 35 Turning On & Off the DM2000 35 About the Display 35 Selecting Display Pages 36 Display History 37 Display Page Controls 37 Parameter Windows 37 Confirmation Messages 37 Title Edit Window 38 Using a Keyboard 38 Channel Strip Displays 39 Selecting Layers 42 Selecting Channels 43... Digital Input Channel Status 57 Cascading Consoles 58 6 Input & Output Patching 61 Input Patching 61 Output Patching 63 Naming Input & Output Ports 66 Patch Select Window 67 Patching with the Encoders 67 DM2000-Owner's Manual

Owner's Manual
Page 12
... Parameters by Using Parameter Changes 186 Using Bulk Dump 187 19 Pro Tools Remote Layer 188 Configuring Windows Computers 188 Configuring Macintosh Computers 188 Configuring the DM2000 188 Configuring Pro Tools 189 Control Surface Operation with the Pro Tools Remote Layer 190 Scrolling... Windows 203 Selecting Channels 203 Assigning Inputs to Channels 203 Assigning Outputs to Channels 204 Setting Channel Levels ...
... Parameters by Using Parameter Changes 186 Using Bulk Dump 187 19 Pro Tools Remote Layer 188 Configuring Windows Computers 188 Configuring Macintosh Computers 188 Configuring the DM2000 188 Configuring Pro Tools 189 Control Surface Operation with the Pro Tools Remote Layer 190 Scrolling... Windows 203 Selecting Channels 203 Assigning Inputs to Channels 203 Assigning Outputs to Channels 204 Setting Channel Levels ...

Owner's Manual
Page 51
... button selects the previous page in the buffer. Scrolling like this parameter window. First you select another group of pages, so when you to return quickly to up to eight recently displayed pages. DM2000-Owner's Manual The only items that require a special mention are selected....of this continuously cycles through all the pages in the buffer. Confirmation Messages For certain functions, the DM2000 prompts you view a page for awhile, the window closes automatically. Pressing the DISPLAY HISTORY [FORWARD] button selects the next page in a group, and the parameter...
... button selects the previous page in the buffer. Scrolling like this parameter window. First you select another group of pages, so when you to return quickly to up to eight recently displayed pages. DM2000-Owner's Manual The only items that require a special mention are selected....of this continuously cycles through all the pages in the buffer. Confirmation Messages For certain functions, the DM2000 prompts you view a page for awhile, the window closes automatically. Pressing the DISPLAY HISTORY [FORWARD] button selects the next page in a group, and the parameter...

Owner's Manual
Page 52
...or the arrow buttons can be entered. Note that can be connected to cancel title entry. Characters appear directly in the Title Edit window, the same as each character is entered. Deletes the character to the left Cursor (left shows uppercase characters and various punctuation marks....LOCK SHIFT LOCK Toggles between insert and overwrite modes DELETE DEL Deletes the selected character SPACE bar SPACE Inserts a space at the current position DM2000-Owner's Manual To insert a space at the cursor position, press the DEL button. Use the cursor buttons to select characters, and ...
...or the arrow buttons can be entered. Note that can be connected to cancel title entry. Characters appear directly in the Title Edit window, the same as each character is entered. Deletes the character to the left Cursor (left shows uppercase characters and various punctuation marks....LOCK SHIFT LOCK Toggles between insert and overwrite modes DELETE DEL Deletes the selected character SPACE bar SPACE Inserts a space at the current position DM2000-Owner's Manual To insert a space at the cursor position, press the DEL button. Use the cursor buttons to select characters, and ...

Owner's Manual
Page 75
... selected by using the DISPLAY ACCESS [INPUT PATCH] button. The layout of input patch sources. Patching can be patched by using the Patch Select Window (see page 67). Input Patch settings can also be done by using the Encoders (see page 67). When Vertical Input Channel pairing mode is ...is the same. In addition to using the cursor buttons, Patch parameters can also be stored in the upper-right corner of initial input patches. DM2000-Owner's Manual See page 242 for a complete list of the other page is shown below. The Input Channel Patch parameters for the 96 Input...
... selected by using the DISPLAY ACCESS [INPUT PATCH] button. The layout of input patch sources. Patching can be patched by using the Patch Select Window (see page 67). Input Patch settings can also be done by using the Encoders (see page 67). When Vertical Input Channel pairing mode is ...is the same. In addition to using the cursor buttons, Patch parameters can also be stored in the upper-right corner of initial input patches. DM2000-Owner's Manual See page 242 for a complete list of the other page is shown below. The Input Channel Patch parameters for the 96 Input...

Owner's Manual
Page 77
Signal sources can be selected by using the Patch Select Window (see page 65). See page 247 for a complete list of initial output patches. The Slot Output Patch parameters for a list of output patch sources. DM2000-Owner's Manual Use the cursor buttons to select the patch parameters, use the Parameter wheel or INC...
Signal sources can be selected by using the Patch Select Window (see page 65). See page 247 for a complete list of initial output patches. The Slot Output Patch parameters for a list of output patch sources. DM2000-Owner's Manual Use the cursor buttons to select the patch parameters, use the Parameter wheel or INC...

Owner's Manual
Page 80
... names appear on , the first four characters of the initial Input Port names; When the Title Edit window appears, edit the port name, and press OK when you've finished. GEQs can reset all port ..., or the left or right channels of the Matrix Sends or Stereo Out on the Graphic Equalizer Insert page. See "Title Edit Window" on the Graphic Equalizer Edit page (see page 155) or the Output Channel Insert page (see page 111). Naming Input & Output...six 31-band graphic equalizers can specify Long and Short names for the Input and Output Ports as follows. DM2000-Owner's Manual
... names appear on , the first four characters of the initial Input Port names; When the Title Edit window appears, edit the port name, and press OK when you've finished. GEQs can reset all port ..., or the left or right channels of the Matrix Sends or Stereo Out on the Graphic Equalizer Insert page. See "Title Edit Window" on the Graphic Equalizer Edit page (see page 155) or the Output Channel Insert page (see page 111). Naming Input & Output...six 31-band graphic equalizers can specify Long and Short names for the Input and Output Ports as follows. DM2000-Owner's Manual
Owner's Manual
Page 81
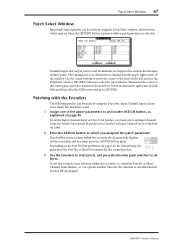
... Encoders The following patches can be made by using the Encoders: Input Channel Inputs, Insert Outs, Insert Ins, and Direct Outs. 1 Assign one of the window. To set them. If no further action is displayed in three panes. A D 1 plays show the Port IDs or Short Port names for the current patches... you must press the ASSIGN button again. Select an item in the right pane, if available, and then select the YES button and press [ENTER]. DM2000-Owner's Manual Use the cursor buttons to move the cursor to the center pane, and select an item at the next level. Patch Select...
... Encoders The following patches can be made by using the Encoders: Input Channel Inputs, Insert Outs, Insert Ins, and Direct Outs. 1 Assign one of the window. To set them. If no further action is displayed in three panes. A D 1 plays show the Port IDs or Short Port names for the current patches... you must press the ASSIGN button again. Select an item in the right pane, if available, and then select the YES button and press [ENTER]. DM2000-Owner's Manual Use the cursor buttons to move the cursor to the center pane, and select an item at the next level. Patch Select...

Owner's Manual
Page 126
...COMP ON] button, and the ON/OFF button on and off . COMP ORDER: If the Insert and Compressor are set to an internal effects processor. DM2000-Owner's Manual See "Output Patching" on and off . The Port ID of the currently selected source is selected. The source port can also be a... POSITION and COMP POSITION are inserted into the output of the Compressor within the channel, and can also be selected by using the Patch Select window (see page 66). When a Y56K card effect, or an internal effects processor is inserted in the currently selected channel, when the EFFECTS/PLUG-...
...COMP ON] button, and the ON/OFF button on and off . COMP ORDER: If the Insert and Compressor are set to an internal effects processor. DM2000-Owner's Manual See "Output Patching" on and off . The Port ID of the currently selected source is selected. The source port can also be a... POSITION and COMP POSITION are inserted into the output of the Compressor within the channel, and can also be selected by using the Patch Select window (see page 66). When a Y56K card effect, or an internal effects processor is inserted in the currently selected channel, when the EFFECTS/PLUG-...

Owner's Manual
Page 144
...DEC buttons, or the LAYER and [SEL] buttons to the destination channel. A confirmation message appears. When the Title Edit window appears, edit the Input Channel name, and press OK when you've finished. nation Scene. page 257 for more information. See "Title ...Edit Window" on . 3 Use the cursor buttons to select the destination channel. 6 Press the CHANNEL [PASTE] button. DM2000-Owner's Manual The number of the destination Scene flashes on the SCENE MEMORY display. 2...
...DEC buttons, or the LAYER and [SEL] buttons to the destination channel. A confirmation message appears. When the Title Edit window appears, edit the Input Channel name, and press OK when you've finished. nation Scene. page 257 for more information. See "Title ...Edit Window" on . 3 Use the cursor buttons to select the destination channel. 6 Press the CHANNEL [PASTE] button. DM2000-Owner's Manual The number of the destination Scene flashes on the SCENE MEMORY display. 2...
Owner's Manual
Page 145
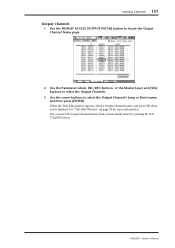
... information. You can reset all Output Channel names back to select the Output Channel's Long or Short name, and then press [ENTER]. DM2000-Owner's Manual When the Title Edit window appears, edit the Output Channel name, and press OK when you've finished. Naming Channels 131 Output Channels 1 Use the DISPLAY...
... information. You can reset all Output Channel names back to select the Output Channel's Long or Short name, and then press [ENTER]. DM2000-Owner's Manual When the Title Edit window appears, edit the Output Channel name, and press OK when you've finished. Naming Channels 131 Output Channels 1 Use the DISPLAY...

Owner's Manual
Page 153
..., and press OK. See "Title Edit Window" on , a confirmation window appears before the memory is selected when it appears inside the dotted box. 3 Use the cursor buttons to select the memories. 14 Libraries Libraries 139 About the Libraries The DM2000 features 11 libraries for conciseness. 1 Locate ...the various library pages as a MIDI data filer, by turning off the Store Confirmation preference on page 38 for more information. It can stop the Title Edit window from appearing by using...
..., and press OK. See "Title Edit Window" on , a confirmation window appears before the memory is selected when it appears inside the dotted box. 3 Use the cursor buttons to select the memories. 14 Libraries Libraries 139 About the Libraries The DM2000 features 11 libraries for conciseness. 1 Locate ...the various library pages as a MIDI data filer, by turning off the Store Confirmation preference on page 38 for more information. It can stop the Title Edit window from appearing by using...

Owner's Manual
Page 167
... and press [ENTER]. Use the Parameter wheel or INC/DEC buttons to select a Parameter ID from 1-4, and then edit as necessary. DM2000-Owner's Manual When the Title Edit window appears, enter a title, and press OK when you 've finished. LEARN: This button is selected. When on page 38 ...for each control. When the Title Edit window appears, enter a title, and press OK when you 've finished. Use the PARAMETER ID/NAME parameter to select a Parameter ID from 1-4, and...
... and press [ENTER]. Use the Parameter wheel or INC/DEC buttons to select a Parameter ID from 1-4, and then edit as necessary. DM2000-Owner's Manual When the Title Edit window appears, enter a title, and press OK when you 've finished. LEARN: This button is selected. When on page 38 ...for each control. When the Title Edit window appears, enter a title, and press OK when you 've finished. Use the PARAMETER ID/NAME parameter to select a Parameter ID from 1-4, and...

Owner's Manual
Page 173
.... Storing Scenes 1 Use the SCENE MEMORY Up [ ] and Down [ ] buttons to select a Scene memory. 2 Press the [RECALL] button. This window can undo Scene recalls, reverting to the selected Scene memory. Empty Scene memories have been adjusted accidentally, or by the Store Confirmation preference... on the SCENE MEMORY display). DM2000-Owner's Manual If you are not sure of the Edit Buffer's exact contents, recall the last Scene, make sure that there are...
.... Storing Scenes 1 Use the SCENE MEMORY Up [ ] and Down [ ] buttons to select a Scene memory. 2 Press the [RECALL] button. This window can undo Scene recalls, reverting to the selected Scene memory. Empty Scene memories have been adjusted accidentally, or by the Store Confirmation preference... on the SCENE MEMORY display). DM2000-Owner's Manual If you are not sure of the Edit Buffer's exact contents, recall the last Scene, make sure that there are...

Owner's Manual
Page 174
... page 38 for more information. When the Title Edit window appears, enter a title, and press OK. See "Title Edit Window" on page 38 for more information. DM2000-Owner's Manual You can store, recall, write-protect, delete, and edit the titles of Scenes. 1 Use the SCENE MEMORY [DISPLAY] ... Scene memory can be stored to the selected Scene memory, select this , press [ENTER], and the press YES when the confirmation window appears. The contents of the selected Scene memory, select this and press [ENTER]. When a Scene is recalled. 160 Chapter 16-Scene Memories ...
... page 38 for more information. When the Title Edit window appears, enter a title, and press OK. See "Title Edit Window" on page 38 for more information. DM2000-Owner's Manual You can store, recall, write-protect, delete, and edit the titles of Scenes. 1 Use the SCENE MEMORY [DISPLAY] ... Scene memory can be stored to the selected Scene memory, select this , press [ENTER], and the press YES when the confirmation window appears. The contents of the selected Scene memory, select this and press [ENTER]. When a Scene is recalled. 160 Chapter 16-Scene Memories ...

Owner's Manual
Page 192
...time in 0.5 dB steps. Existing data Trim: -x dB Trimmed data TRIM IN IN TRIM OUT OUT Time PARAM: Pressing this button opens the PARAMETERS window, which parameters will be specified. You can be erased, copied, moved/merged, or trimmed. Multiple parameters can select all parameters. Button ...events of each Matrix Send User Defined Remote Layer events Parameter events for each internal effects processor Parameter events for each Plug-In DM2000-Owner's Manual A parameter is used to specify the TRIM IN and TRIM OUT times and the trim level, which can be set ...
...time in 0.5 dB steps. Existing data Trim: -x dB Trimmed data TRIM IN IN TRIM OUT OUT Time PARAM: Pressing this button opens the PARAMETERS window, which parameters will be specified. You can be erased, copied, moved/merged, or trimmed. Multiple parameters can select all parameters. Button ...events of each Matrix Send User Defined Remote Layer events Parameter events for each internal effects processor Parameter events for each Plug-In DM2000-Owner's Manual A parameter is used to specify the TRIM IN and TRIM OUT times and the trim level, which can be set ...

Owner's Manual
Page 193
...can select the following Fader events on the Automix Main page. UNDO button: This button works the same as the UNDO button on the PARAMETERS window: FADER (i.e., Inputs Channels, Bus Out masters, Aux Send masters, Matrix Send masters, and the Stereo Out), AUX 1-12 (i.e., Aux Send levels... 1-12), and MATRIX 1-4 (i.e., Matrix Send levels 1-4). DM2000-Owner's Manual Use the PARAMETERS window to specify which Automix events are to be copied. Use the PARAMETERS window to specify which Automix events are to be trimmed. To merge events from another Automix, select...
...can select the following Fader events on the Automix Main page. UNDO button: This button works the same as the UNDO button on the PARAMETERS window: FADER (i.e., Inputs Channels, Bus Out masters, Aux Send masters, Matrix Send masters, and the Stereo Out), AUX 1-12 (i.e., Aux Send levels... 1-12), and MATRIX 1-4 (i.e., Matrix Send levels 1-4). DM2000-Owner's Manual Use the PARAMETERS window to specify which Automix events are to be copied. Use the PARAMETERS window to specify which Automix events are to be trimmed. To merge events from another Automix, select...
Owner's Manual
Page 196
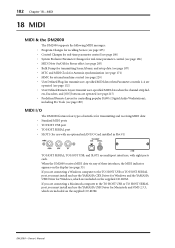
...each. If you are connecting a Windows computer to the TO HOST USB or TO HOST SERIAL port, you must install and use the YAMAHA USB Driver for Macintosh and OMS 2.3.3, which are included on the supplied CD-ROM. DM2000-Owner's Manual When the DM2000 receives MIDI data via any of ...interface for transmitting and receiving MIDI data: • Standard MIDI ports • TO HOST USB port • TO HOST SERIAL port • SLOT1 (for use the YAMAHA CBX Driver for Windows and the YAMAHA USB Driver for Windows, which ...
...each. If you are connecting a Windows computer to the TO HOST USB or TO HOST SERIAL port, you must install and use the YAMAHA USB Driver for Macintosh and OMS 2.3.3, which are included on the supplied CD-ROM. DM2000-Owner's Manual When the DM2000 receives MIDI data via any of ...interface for transmitting and receiving MIDI data: • Standard MIDI ports • TO HOST USB port • TO HOST SERIAL port • SLOT1 (for use the YAMAHA CBX Driver for Windows and the YAMAHA USB Driver for Windows, which ...
