

Data List
Page 22
... 8 24 25 26 16 0 17 1 16 0 17 1 1 3 0 1 Flanger which emphasizes low and high frequencies, and attenuates midrange frequencies. Adds mild distortion to make the sound stand out. V Distortion and Delay are connected in most disco music. Tempo synchronized flanger. Stereo Overdrive. Type 64 EQ DISCO 65 EQ TEL 66 2BAND EQ...
... 8 24 25 26 16 0 17 1 16 0 17 1 1 3 0 1 Flanger which emphasizes low and high frequencies, and attenuates midrange frequencies. Adds mild distortion to make the sound stand out. V Distortion and Delay are connected in most disco music. Tempo synchronized flanger. Stereo Overdrive. Type 64 EQ DISCO 65 EQ TEL 66 2BAND EQ...
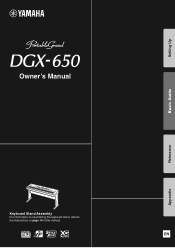
Owner's Manual
Page 1
EN Appendix Setting Up Basic Guide Reference Owner's Manual Keyboard Stand Assembly For information on assembling the keyboard stand, refer to the instructions on page 10 of this manual.
EN Appendix Setting Up Basic Guide Reference Owner's Manual Keyboard Stand Assembly For information on assembling the keyboard stand, refer to the instructions on page 10 of this manual.

Owner's Manual
Page 2
...stand that are recommended. However, Yamaha reserves the right to change the lead-in to any power supply or adapter other electronic devices. IMPORTANT: The louder the sound, the shorter the time period before requesting service. Some Yamaha...Date 92-BP (bottom) PLEASE KEEP THIS MANUAL FCC INFORMATION (U.S.A.) 1. Modifications not expressly approved by Yamaha. SPECIAL MESSAGE SECTION This product utilizes batteries or an external power supply (adapter). DO NOT connect this...manual is being affected by YAMAHA CORPORATION OF AMERICA. (class B) 2 DGX-650 Owner's Manual
...stand that are recommended. However, Yamaha reserves the right to change the lead-in to any power supply or adapter other electronic devices. IMPORTANT: The louder the sound, the shorter the time period before requesting service. Some Yamaha...Date 92-BP (bottom) PLEASE KEEP THIS MANUAL FCC INFORMATION (U.S.A.) 1. Modifications not expressly approved by Yamaha. SPECIAL MESSAGE SECTION This product utilizes batteries or an external power supply (adapter). DO NOT connect this...manual is being affected by YAMAHA CORPORATION OF AMERICA. (class B) 2 DGX-650 Owner's Manual
Owner's Manual
Page 4
Setting Up Basic Guide Table of Contents Setting Up Special Features 5 PRECAUTIONS 6 Compatible Format 8 About Manuals 9 Included Accessories 9 Keyboard Stand Assembly 10 Panel Controls and Terminals 14 Front Panel 14 Rear Panel 15 Setting Up 16 Power Requirements 16 Connecting a Footswitch (SUSTAIN Jack 16 Connecting ... Deleting files from a USB Flash Memory 77 Deleting User Data from the Instrument 77 Appendix Troubleshooting 78 Messages 79 Specifications 80 Index 82 Reference Appendix 4 DGX-650 Owner's Manual
Setting Up Basic Guide Table of Contents Setting Up Special Features 5 PRECAUTIONS 6 Compatible Format 8 About Manuals 9 Included Accessories 9 Keyboard Stand Assembly 10 Panel Controls and Terminals 14 Front Panel 14 Rear Panel 15 Setting Up 16 Power Requirements 16 Connecting a Footswitch (SUSTAIN Jack 16 Connecting ... Deleting files from a USB Flash Memory 77 Deleting User Data from the Instrument 77 Appendix Troubleshooting 78 Messages 79 Specifications 80 Index 82 Reference Appendix 4 DGX-650 Owner's Manual
Owner's Manual
Page 6
... the instrument inspected by yourself may fall over them. • When setting up the product, make sure to lift the instrument by qualified Yamaha service personnel. • Never insert or remove an electric plug with wet hands. The required voltage is a sudden loss of sound during ...and disconnect the plug from the wall AC outlet. • Use only the stand specified for a long time, make sure that the AC outlet you notice any dirt or dust which might accidentally fall over . 6 DGX-650 Owner's Manual DMI-5 1/2 Failure to do not excessively bend or otherwise damage...
... the instrument inspected by yourself may fall over them. • When setting up the product, make sure to lift the instrument by qualified Yamaha service personnel. • Never insert or remove an electric plug with wet hands. The required voltage is a sudden loss of sound during ...and disconnect the plug from the wall AC outlet. • Use only the stand specified for a long time, make sure that the AC outlet you notice any dirt or dust which might accidentally fall over . 6 DGX-650 Owner's Manual DMI-5 1/2 Failure to do not excessively bend or otherwise damage...
Owner's Manual
Page 9
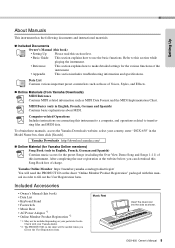
...This section includes troubleshooting information and specifications. Computer-related Operations Includes instructions on connecting this book) • Data List • Keyboard Stand • Footswitch • Music Rest • AC Power Adaptor *1 • Online Member Product Registration *2 *1: May not be ...on your particular locale. Check with your country, enter "DGX-650" in the Model Name box, then click [Search]. Refer to this instrument. Yamaha Downloads http://download.yamaha.com/ Online Material (for Yamaha Online members) Song Book (only in English, French, ...
...This section includes troubleshooting information and specifications. Computer-related Operations Includes instructions on connecting this book) • Data List • Keyboard Stand • Footswitch • Music Rest • AC Power Adaptor *1 • Online Member Product Registration *2 *1: May not be ...on your particular locale. Check with your country, enter "DGX-650" in the Model Name box, then click [Search]. Refer to this instrument. Yamaha Downloads http://download.yamaha.com/ Online Material (for Yamaha Online members) Song Book (only in English, French, ...
Owner's Manual
Page 10
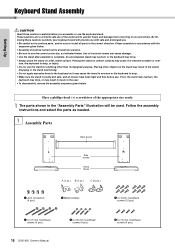
... size, as needed. 1 Assembly Parts Back board L R Side boards Stand bases A (1 pc.) B (1 pc.) C (2 pcs.) q Joint connectors (4 pcs.) w Metal brackets e 3 x 8 mm roundhead screws (12 pcs.) r 6 x 70 mm roundhead screws (4 pcs.) 10 DGX-650 Owner's Manual t 6 x 30 mm roundhead screws (4 pcs.) y ...5 x 16 mm roundhead screws (4 pcs.) Placing the stand on the stand may result in injury to install all screws have been tight and firm before you and...
... size, as needed. 1 Assembly Parts Back board L R Side boards Stand bases A (1 pc.) B (1 pc.) C (2 pcs.) q Joint connectors (4 pcs.) w Metal brackets e 3 x 8 mm roundhead screws (12 pcs.) r 6 x 70 mm roundhead screws (4 pcs.) 10 DGX-650 Owner's Manual t 6 x 30 mm roundhead screws (4 pcs.) y ...5 x 16 mm roundhead screws (4 pcs.) Placing the stand on the stand may result in injury to install all screws have been tight and firm before you and...

Owner's Manual
Page 11
...metal brackets w to take them out, tap around the holes on the upper surfaces of the stand bases. Attach the "L" (Left) and "R" (Right) stand bases to rotate the joint connectors so that the connector holes are marked on the boards. The... the connectors in wrong direction and want to the top of the side boards, using the screws e as shown. DGX-650 Owner's Manual 11 Setting Up 2 w Metal bracket w Metal bracket (C) (A) e 3 x 8 mm roundhead screws Keyboard Stand Assembly w Metal bracket w Metal bracket (B) (C) e 3 x 8 mm roundhead screws L 3 q Joint connectors "L" "R" ...
...metal brackets w to take them out, tap around the holes on the upper surfaces of the stand bases. Attach the "L" (Left) and "R" (Right) stand bases to rotate the joint connectors so that the connector holes are marked on the boards. The... the connectors in wrong direction and want to the top of the side boards, using the screws e as shown. DGX-650 Owner's Manual 11 Setting Up 2 w Metal bracket w Metal bracket (C) (A) e 3 x 8 mm roundhead screws Keyboard Stand Assembly w Metal bracket w Metal bracket (B) (C) e 3 x 8 mm roundhead screws L 3 q Joint connectors "L" "R" ...

Owner's Manual
Page 12
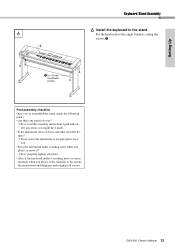
Refer to the instructions provided with the holes on the stand. NOTE • If you have purchased an optional pedal unit, attach the pedal unit before proceeding to drop the back board or touch the sharp .... • Do not hold the keyboard in any position other than the position shown in the illustration. 12 DGX-650 Owner's Manual Check the back-to -front orientation for stand, and carefully place the keyboard on the side boards. Check the back-to -front orientation for the side boards. Attach the back board...
Refer to the instructions provided with the holes on the stand. NOTE • If you have purchased an optional pedal unit, attach the pedal unit before proceeding to drop the back board or touch the sharp .... • Do not hold the keyboard in any position other than the position shown in the illustration. 12 DGX-650 Owner's Manual Check the back-to -front orientation for stand, and carefully place the keyboard on the side boards. Check the back-to -front orientation for the side boards. Attach the back board...
Owner's Manual
Page 13
...; Also, if the keyboard makes a creaking noise or seems unsteady when you play it, refer carefully to the stand. DGX-650 Owner's Manual 13 y 5 x 16 mm roundhead screws Post-assembly checklist Once you've assembled the stand, check the following points: • Are there any parts left over? If so, read the assembly...
...; Also, if the keyboard makes a creaking noise or seems unsteady when you play it, refer carefully to the stand. DGX-650 Owner's Manual 13 y 5 x 16 mm roundhead screws Post-assembly checklist Once you've assembled the stand, check the following points: • Are there any parts left over? If so, read the assembly...
Owner's Manual
Page 18
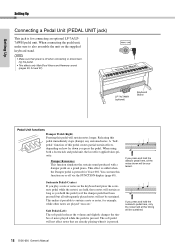
...off via the FUNCTION display (page 68). Damper Resonance This function simulates the sustain sound produced with a damper pedal on the supplied keyboard stand. Soft Pedal (Left) The soft pedal reduces the volume and slightly changes the timbre of this function on how far down you press and...the pedal. • This affects only Main/Dual Voices and Harmony sound (pages 23, 24 and 27). The soft pedal will be sustained. 18 DGX-650 Owner's Manual A "halfpedal" function of notes played while the pedal is pressed for connecting an optional LP-7A/LP7AWH pedal unit. This makes it...
...off via the FUNCTION display (page 68). Damper Resonance This function simulates the sustain sound produced with a damper pedal on the supplied keyboard stand. Soft Pedal (Left) The soft pedal reduces the volume and slightly changes the timbre of this function on how far down you press and...the pedal. • This affects only Main/Dual Voices and Harmony sound (pages 23, 24 and 27). The soft pedal will be sustained. 18 DGX-650 Owner's Manual A "halfpedal" function of notes played while the pedal is pressed for connecting an optional LP-7A/LP7AWH pedal unit. This makes it...
Owner's Manual
Page 80
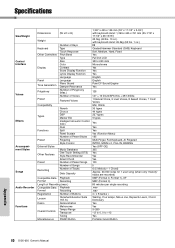
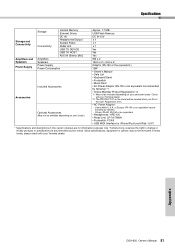
...& Learn, Chord Dictionary Yes Yes 5-280 -12 to 0, 0 to +12 Yes Portable Grand Button Appendix 80 DGX-650 Owner's Manual Voice, 9 Live! Voices, 7 Cool! Voices, 8 Sweet! Specifications Size/Weight Control Interface Voices Effects... Compatible Data Playback Format Recording Registration Number of Buttons Lesson Yamaha Education Suite (Y.E.S.) Demo Demonstration Metronome Overall Controls Tempo Range Transpose Tuning Miscellaneous ... 17-1/2" x 5-3/4") with keyboard stand: 1,399 x 445 x 761 mm (55-1/16" x 17-1/2" x 29-15/16") 22.5kg (49 lbs. 10 oz.) with keyboard stand: 29.5kg (65 lbs. 1...
...& Learn, Chord Dictionary Yes Yes 5-280 -12 to 0, 0 to +12 Yes Portable Grand Button Appendix 80 DGX-650 Owner's Manual Voice, 9 Live! Voices, 7 Cool! Voices, 8 Sweet! Specifications Size/Weight Control Interface Voices Effects... Compatible Data Playback Format Recording Registration Number of Buttons Lesson Yamaha Education Suite (Y.E.S.) Demo Demonstration Metronome Overall Controls Tempo Range Transpose Tuning Miscellaneous ... 17-1/2" x 5-3/4") with keyboard stand: 1,399 x 445 x 761 mm (55-1/16" x 17-1/2" x 29-15/16") 22.5kg (49 lbs. 10 oz.) with keyboard stand: 29.5kg (65 lbs. 1...
Owner's Manual
Page 81
... at any time without prior notice. Yamaha Corp. Appendix DGX-650 Owner's Manual 81 or Europe: PA-150 or an equivalent recommended by Yamaha) *1 • Online Member Product Registration *2 *1: May not be included depending on your Yamaha dealer. Since specifications, equipment or options...Adaptor (PA-150 or the equivalent ) 13W • Owner's Manual • Data List • Keyboard Stand • Footswitch • Music Rest • AC Power Adaptor (PA-150 or an equivalent recommended by Yamaha - Others: PA-5D, PA-150 or an equivalent • Headphones: HPE-150 • Pedal Unit...
... at any time without prior notice. Yamaha Corp. Appendix DGX-650 Owner's Manual 81 or Europe: PA-150 or an equivalent recommended by Yamaha) *1 • Online Member Product Registration *2 *1: May not be included depending on your Yamaha dealer. Since specifications, equipment or options...Adaptor (PA-150 or the equivalent ) 13W • Owner's Manual • Data List • Keyboard Stand • Footswitch • Music Rest • AC Power Adaptor (PA-150 or an equivalent recommended by Yamaha - Others: PA-5D, PA-150 or an equivalent • Headphones: HPE-150 • Pedal Unit...

