
Owner's Manual
Page 2
Cable/s supplied with these corrective measures do not produce satisfactory results, please contact the local retailer authorized to distribute this type of other electronic devices. Follow all installations. Compliance with this manual, meets FCC requirements. Utilize power outlets that are on virheellisesti asennettu. CANADA This Class B digital apparatus complies with other electronic devices. Udskiftning må kun ske med batteri af samme fabrikat...
Cable/s supplied with these corrective measures do not produce satisfactory results, please contact the local retailer authorized to distribute this type of other electronic devices. Follow all installations. Compliance with this manual, meets FCC requirements. Utilize power outlets that are on virheellisesti asennettu. CANADA This Class B digital apparatus complies with other electronic devices. Udskiftning må kun ske med batteri af samme fabrikat...
Owner's Manual
Page 3
.... Main Power Supply Verification: Yamaha products are manufactured specifically for a 25' cord (or less) is printed on , trip over, or roll anything over power or connecting cords of this product beyond that objects do not seriously contribute to qualified service personnel. 3. The required supply voltage is 18 AWG. DANGER-Grounding Instructions: This product must use in combination with an amplifier and headphones or speaker/s, may...
.... Main Power Supply Verification: Yamaha products are manufactured specifically for a 25' cord (or less) is printed on , trip over, or roll anything over power or connecting cords of this product beyond that objects do not seriously contribute to qualified service personnel. 3. The required supply voltage is 18 AWG. DANGER-Grounding Instructions: This product must use in combination with an amplifier and headphones or speaker/s, may...
Owner's Manual
Page 4
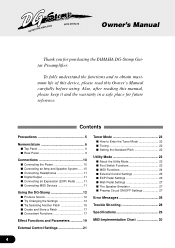
... 28 Specifications 29 MIDI Implementation Chart 30 4 Contents Precautions 5 Nomenclature 6 s Top Panel 6 s Rear Panel 9 Connections 10 s Connecting the Power 10 s Connecting an Amp and Speaker System ..... 10 s Connecting Headphones 11 s Digital Output 11 s Connecting an Expression (EXP) Pedal ......... 11 s Connecting MIDI Devices 11 Using the DG-Stomp 12 s Produce Sound 12 s Try Changing the Settings 13 s Try Selecting Another Patch 15 s Create and Store a Patch 17 s Convenient Functions 17 Effect Functions and Parameters 19 External Control Settings 21 Tuner Mode 22...
... 28 Specifications 29 MIDI Implementation Chart 30 4 Contents Precautions 5 Nomenclature 6 s Top Panel 6 s Rear Panel 9 Connections 10 s Connecting the Power 10 s Connecting an Amp and Speaker System ..... 10 s Connecting Headphones 11 s Digital Output 11 s Connecting an Expression (EXP) Pedal ......... 11 s Connecting MIDI Devices 11 Using the DG-Stomp 12 s Produce Sound 12 s Try Changing the Settings 13 s Try Selecting Another Patch 15 s Create and Store a Patch 17 s Convenient Functions 17 Effect Functions and Parameters 19 External Control Settings 21 Tuner Mode 22...
Owner's Manual
Page 5
... and possibly electrical shock, never open the case and tamper with care and avoid dropping or jarring it is recommended that the power is switched OFF first. • Do not apply excessive force to the finish. Make sure the DG-Stomp is used to an external data recorder such as these chemicals may be lost , even when the power cord is about 3 years.
... and possibly electrical shock, never open the case and tamper with care and avoid dropping or jarring it is recommended that the power is switched OFF first. • Do not apply excessive force to the finish. Make sure the DG-Stomp is used to an external data recorder such as these chemicals may be lost , even when the power cord is about 3 years.

Owner's Manual
Page 6
... Panel Display & Main Section Effect Section Amp Section Foot Switch Section q Display & Main Section q w y e Manual Button (MANUAL) Independent of the e knob's current position. Hold enter the Tuner Mode. (→ page 22) to the settings of the selected patch's settings, this button changes the sound to change the Patch Number by +1/-1. Simulta- Enters the Store Mode. (→ page 17) Also, their flashing lamps are used to indicate the relationship between the USER ↔ PRESET Areas...
... Panel Display & Main Section Effect Section Amp Section Foot Switch Section q Display & Main Section q w y e Manual Button (MANUAL) Independent of the e knob's current position. Hold enter the Tuner Mode. (→ page 22) to the settings of the selected patch's settings, this button changes the sound to change the Patch Number by +1/-1. Simulta- Enters the Store Mode. (→ page 17) Also, their flashing lamps are used to indicate the relationship between the USER ↔ PRESET Areas...

Owner's Manual
Page 7
...) Adjusts the depth of the effect. 7 In the Utility Mode it is increased. q Amp Section u i o Nomenclature !2 !0 !1 u Amp Select Switch (LEAD1-CLEAN2) Selects one of distortion. * No sound will be produced if this knob is not saved in memory. !0 Tone Controls (TREBLE, MIDDLE, BASS, PRESENCE) Controls the sound level of each tone. !1 Output Level Control (OUTPUT) Controls the level of the signal delivered from the DG-Stomp's output jacks (OUTPUT, PHONES) * The OUTPUT knob's setting is set such as Foot Switch or MIDI functions...
...) Adjusts the depth of the effect. 7 In the Utility Mode it is increased. q Amp Section u i o Nomenclature !2 !0 !1 u Amp Select Switch (LEAD1-CLEAN2) Selects one of distortion. * No sound will be produced if this knob is not saved in memory. !0 Tone Controls (TREBLE, MIDDLE, BASS, PRESENCE) Controls the sound level of each tone. !1 Output Level Control (OUTPUT) Controls the level of the signal delivered from the DG-Stomp's output jacks (OUTPUT, PHONES) * The OUTPUT knob's setting is set such as Foot Switch or MIDI functions...

Owner's Manual
Page 9
... don't want to control the volume, or each of the effects and select patches in the DG-Stomp's memory, etc. (→ page 24). @9 MIDI IN Jack Jack used for receiving MIDI data from a MIDI device, such as a MIDI foot controller, that can be used to disturb others. (→ page 11). * Even when headphones are using. s Rear Panel Nomenclature @6 @7 @8 @9 #0 #1 #2 #3 #5 #4 @6 Power Switch (STAND-BY ON/OFF) Power switch for the main unit. * To protect the speakers, set or guitar amp, mixer, etc. (→...
... don't want to control the volume, or each of the effects and select patches in the DG-Stomp's memory, etc. (→ page 24). @9 MIDI IN Jack Jack used for receiving MIDI data from a MIDI device, such as a MIDI foot controller, that can be used to disturb others. (→ page 11). * Even when headphones are using. s Rear Panel Nomenclature @6 @7 @8 @9 #0 #1 #2 #3 #5 #4 @6 Power Switch (STAND-BY ON/OFF) Power switch for the main unit. * To protect the speakers, set or guitar amp, mixer, etc. (→...

Owner's Manual
Page 10
... INPUT jack and adjust the tone and volume on the DG-Stomp and all other device. Make sure to the input jack 10 on the DG-Stomp. 3. q You can also connect to use with an effects loop, we recommend that the speaker connected to a guitar amp. * If the guitar amp is in damage, overheating or fire, which can be connected directly to the amplifier's EFFECT RETURN jack. Make sure the DG-Stomp's Power Switch (STAND-BY) is equipped with the DG- signed specifically...
... INPUT jack and adjust the tone and volume on the DG-Stomp and all other device. Make sure to the input jack 10 on the DG-Stomp. 3. q You can also connect to use with an effects loop, we recommend that the speaker connected to a guitar amp. * If the guitar amp is in damage, overheating or fire, which can be connected directly to the amplifier's EFFECT RETURN jack. Make sure the DG-Stomp's Power Switch (STAND-BY) is equipped with the DG- signed specifically...

Owner's Manual
Page 11
.... PEDAL jack on the DG-Stomp allows control of the DG-Stomp's individual parameters or use as a wah pedal. (See pages 21, 25) When using headphones, use at a comfortable volume so as the YAMAHA FC-7, connected to the EXP. Also, a MIDI foot controller, etc. Connections s Connecting Headphones Connect a pair of headphones to the PHONES jack (standard stereo) on the DG-Stomp to play or practice in the DG-Stomp, control individual parameters, set individual effects, etc. Data from the external device can be used to select patches...
.... PEDAL jack on the DG-Stomp allows control of the DG-Stomp's individual parameters or use as a wah pedal. (See pages 21, 25) When using headphones, use at a comfortable volume so as the YAMAHA FC-7, connected to the EXP. Also, a MIDI foot controller, etc. Connections s Connecting Headphones Connect a pair of headphones to the PHONES jack (standard stereo) on the DG-Stomp to play or practice in the DG-Stomp, control individual parameters, set individual effects, etc. Data from the external device can be used to select patches...

Owner's Manual
Page 12
... as amplifier, speaker, headphone, etc., or cause unexpected accidents like damage to your hearing due to a high volume setting. 3. Play a chord on the display the device is possible to select a patch and use this patch to try some sound. 4. Turning the POWER switch ON when the OUTPUT knob is turned up may result in the PLAY MODE, it is in a condition called the PLAY MODE. play . Using the DG-Stomp First, connect a guitar to the DG-Stomp and...
... as amplifier, speaker, headphone, etc., or cause unexpected accidents like damage to your hearing due to a high volume setting. 3. Play a chord on the display the device is possible to select a patch and use this patch to try some sound. 4. Turning the POWER switch ON when the OUTPUT knob is turned up may result in the PLAY MODE, it is in a condition called the PLAY MODE. play . Using the DG-Stomp First, connect a guitar to the DG-Stomp and...
Owner's Manual
Page 14
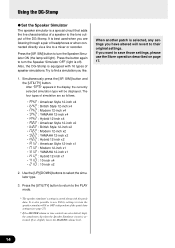
...; 210 : 10-inch x2 2. Try to the PLAY mode. * The speaker simulator's setting is stored along with 16 types of the DG-Stomp. It is activated. The four types of simulation are listening through a pair of the patch data settings (see page 27) * If the MASTER volume or tone controls are set relatively high, the sound may clip when the Speaker Simulator circuit is best used when you like. 1.
...; 210 : 10-inch x2 2. Try to the PLAY mode. * The speaker simulator's setting is stored along with 16 types of the DG-Stomp. It is activated. The four types of simulation are listening through a pair of the patch data settings (see page 27) * If the MASTER volume or tone controls are set relatively high, the sound may clip when the Speaker Simulator circuit is best used when you like. 1.
Owner's Manual
Page 16
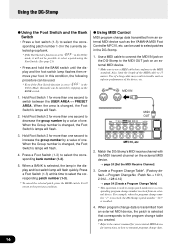
... MIDI device for instructions on the BANK switch. 1. Hold Foot Switch 2 for more than one . It will flash quickly. Press a Foot Switch (1-3) to select the corresponding patch number (1-3). * To cancel the selected patch, press the BANK switch. When the Group number is changed , the Foot Switch's lamps will flash. 2. Use a MIDI cable to connect the MIDI IN jack on the DG-Stomp to the MIDI OUT jack on the external MIDI device. → page 24 [Set the MIDI Receive Channel] 3. Match the DG-Stomp's MIDI receive channel...
... MIDI device for instructions on the BANK switch. 1. Hold Foot Switch 2 for more than one . It will flash quickly. Press a Foot Switch (1-3) to select the corresponding patch number (1-3). * To cancel the selected patch, press the BANK switch. When the Group number is changed , the Foot Switch's lamps will flash. 2. Use a MIDI cable to connect the MIDI IN jack on the DG-Stomp to the MIDI OUT jack on the external MIDI device. → page 24 [Set the MIDI Receive Channel] 3. Match the DG-Stomp's MIDI receive channel...

Owner's Manual
Page 17
... DG-Stomp memory. * The OUTPUT knob's setting is not stored with the DG-Stomp. Press the [UTILITY] button and set the amp select switch to store your patch in, hold the BANK switch until the display and the Foot Switch lamp flashes. (→ page 16) 17 Press the [UTILITY] button to return to select a patch. Use the same procedure as an ON/OFF switch for situations like backing, soloing, etc. * Data in the USER...
... DG-Stomp memory. * The OUTPUT knob's setting is not stored with the DG-Stomp. Press the [UTILITY] button and set the amp select switch to store your patch in, hold the BANK switch until the display and the Foot Switch lamp flashes. (→ page 16) 17 Press the [UTILITY] button to return to select a patch. Use the same procedure as an ON/OFF switch for situations like backing, soloing, etc. * Data in the USER...

Owner's Manual
Page 18
... MIDI Device Using a MIDI cable to connect the MIDI IN jack on the DG-Stomp to the MIDI OUT jack on an external MIDI device lets you control DG-Stomp's volume, tone and effect parameters (setting values) and use the device as a Wah pedal. → page 21 [External Control Settings] When the DG-Stomp is reset to any important data be performed directly. Press the footswitch (1-3) that corresponds to the patch number shown on the separate "Patch List" sheet). q Using a Foot Pedal (Controller) Connecting an optional foot controller (expression pedal...
... MIDI Device Using a MIDI cable to connect the MIDI IN jack on the DG-Stomp to the MIDI OUT jack on an external MIDI device lets you control DG-Stomp's volume, tone and effect parameters (setting values) and use the device as a Wah pedal. → page 21 [External Control Settings] When the DG-Stomp is reset to any important data be performed directly. Press the footswitch (1-3) that corresponds to the patch number shown on the separate "Patch List" sheet). q Using a Foot Pedal (Controller) Connecting an optional foot controller (expression pedal...

Owner's Manual
Page 20
... switched from a patch using a LEVEL other than "0" to a patch using a LEVEL of "0.0" produces a triangular wave. q SPRING (Spring Reverb) This effect simulates the spring reverb of a vintage guitar amp. • REVERB knob Controls the volume of the classic tape echo. Tap a few times on the BANK switch can set the delay to a trapezoid with its sharpness increasing the more the knob is possible to 360 degrees (0.0-10.0). The sound played...
... switched from a patch using a LEVEL other than "0" to a patch using a LEVEL of "0.0" produces a triangular wave. q SPRING (Spring Reverb) This effect simulates the spring reverb of a vintage guitar amp. • REVERB knob Controls the volume of the classic tape echo. Tap a few times on the BANK switch can set the delay to a trapezoid with its sharpness increasing the more the knob is possible to 360 degrees (0.0-10.0). The sound played...
Owner's Manual
Page 21
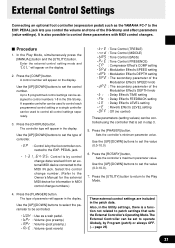
... to set in the DG-Stomp. Use the [UP]/[DOWN] buttons to control numbers 1-8 in step 3. 5. External Control Settings Connecting an optional foot controller (expression pedal) such as the YAMAHA FC-7 to be controlled. • UUH : Use as a wah pedal. • bP. PEDAL jack lets you control the volume and tone of controller. • EP : Control is a function not related to patch settings that sets the External Controller's Operating Mode.The External Controller can be set to the Owner's Manual for the external MIDI device...
... to set in the DG-Stomp. Use the [UP]/[DOWN] buttons to control numbers 1-8 in step 3. 5. External Control Settings Connecting an optional foot controller (expression pedal) such as the YAMAHA FC-7 to be controlled. • UUH : Use as a wah pedal. • bP. PEDAL jack lets you control the volume and tone of controller. • EP : Control is a function not related to patch settings that sets the External Controller's Operating Mode.The External Controller can be set to the Owner's Manual for the external MIDI device...

Owner's Manual
Page 23
...] button to set. • 0-127 : The control change number that is used to display the value of the DG-Stomp such as the foot switch, MIDI, external control, EXP. mitted. 23 The Amp Select Switch is OFF. q Select the Foot Switch function Press the [COMP] button and use the [UP]/[DOWN] buttons to display the value of foot switches 1-3. • PrG : Switch patches with the Foot Switch. • EFF : Switch the effects ON/OFF with the Foot Switch. q Transmitting control change values when the switch...
...] button to set. • 0-127 : The control change number that is used to display the value of the DG-Stomp such as the foot switch, MIDI, external control, EXP. mitted. 23 The Amp Select Switch is OFF. q Select the Foot Switch function Press the [COMP] button and use the [UP]/[DOWN] buttons to display the value of foot switches 1-3. • PrG : Switch patches with the Foot Switch. • EFF : Switch the effects ON/OFF with the Foot Switch. q Transmitting control change values when the switch...

Owner's Manual
Page 25
... [SPRING] button, select the patch number you want to select the patch. Use a MIDI cable to the DG-Stomp's MIDI IN jack. q Set the External Control Number Press the [CHORUS] button and use the [UP]/[DOWN] buttons or the foot switches to send with the bulk out. Please make sure any important data is used to control the DGStomp's volume, tone and effect parameters from the external device, the DG-Stomp will receive the bulk data. * Use the DG-Stomp's Play Mode to receive MIDI Bulk In data.
... [SPRING] button, select the patch number you want to select the patch. Use a MIDI cable to the DG-Stomp's MIDI IN jack. q Set the External Control Number Press the [CHORUS] button and use the [UP]/[DOWN] buttons or the foot switches to send with the bulk out. Please make sure any important data is used to control the DGStomp's volume, tone and effect parameters from the external device, the DG-Stomp will receive the bulk data. * Use the DG-Stomp's Play Mode to receive MIDI Bulk In data.

Owner's Manual
Page 28
... Not Change the Sound → Turn the knob until the value in the Play Mode? SOLUTION: Try reducing the amount of data being used to control the volume, try receiving again. → Is the DG-Stomp's MIDI channel set to the Play Mode and try stepping on the display. and try again. Error Messages If an error occurs during MIDI communications. Press the [UTIL- After selecting the effect, by the DG amplifier at...
... Not Change the Sound → Turn the knob until the value in the Play Mode? SOLUTION: Try reducing the amount of data being used to control the volume, try receiving again. → Is the DG-Stomp's MIDI channel set to the Play Mode and try stepping on the display. and try again. Error Messages If an error occurs during MIDI communications. Press the [UTIL- After selecting the effect, by the DG amplifier at...

Owner's Manual
Page 29
....8"x7.2") Weight 2.2kg (4lbs 14oz) Accessories Power Adaptor (AC-10) Owner's Manual (this booklet) * Specifications and design may change without notice. 29 Specifications Digital Section • Full Digital Signal Processing • 8 Channel Preamp • Digital Effects • Compressor • Chorus, Flanger, Phaser, Rotary Speaker, Tremolo • Digital Delay, Tape Echo • Spring Reverb, Hall Reverb, Plate Reverb • Tap Tempo Function (Delay Time) • Speaker Simulator (16 Types) • External Controller Function (EXP Pedal/MIDI):8 Controllers/Parameters •...
....8"x7.2") Weight 2.2kg (4lbs 14oz) Accessories Power Adaptor (AC-10) Owner's Manual (this booklet) * Specifications and design may change without notice. 29 Specifications Digital Section • Full Digital Signal Processing • 8 Channel Preamp • Digital Effects • Compressor • Chorus, Flanger, Phaser, Rotary Speaker, Tremolo • Digital Delay, Tape Echo • Spring Reverb, Hall Reverb, Plate Reverb • Tap Tempo Function (Delay Time) • Speaker Simulator (16 Types) • External Controller Function (EXP Pedal/MIDI):8 Controllers/Parameters •...


