

Owner's Manual
Page 2
... Check with both user safe and environmentally friendly. Mismatches or incorrect installation may be rechargeable. If you , please contact Yamaha directly. ENVIRONMENTAL ISSUES: Yamaha strives to assist you experience any power supply or adapter other than one described in the manual, on the bottom of... this plate. NAME PLATE LOCATION: The name plate is uncomfortable. Purchase Date 92-BP (bottom) PLEASE KEEP THIS MANUAL 2 DD-65/YDD-60 Owner's Manual DO NOT operate for some reason its useful life is used only with batteries of the specifications without...
... Check with both user safe and environmentally friendly. Mismatches or incorrect installation may be rechargeable. If you , please contact Yamaha directly. ENVIRONMENTAL ISSUES: Yamaha strives to assist you experience any power supply or adapter other than one described in the manual, on the bottom of... this plate. NAME PLATE LOCATION: The name plate is uncomfortable. Purchase Date 92-BP (bottom) PLEASE KEEP THIS MANUAL 2 DD-65/YDD-60 Owner's Manual DO NOT operate for some reason its useful life is used only with batteries of the specifications without...
Owner's Manual
Page 3
...install AC line filter/s. Compliance with other electronic devices. Compliance with the coloured makings identifying the terminals in your authority, granted by Yamaha Corporation of America or its subsidiaries. * This applies only to distribute this product in this apparatus may not correspond with FCC regulations does not... devices. This equipment generates/uses radio frequencies and, if not installed and used . FCC INFORMATION (U.S.A.) 1. Modifications not expressly approved by Yamaha-Kemble Music (U.K.) Ltd. (2 wires) DD-65/YDD-60 Owner's Manual 3
...install AC line filter/s. Compliance with other electronic devices. Compliance with the coloured makings identifying the terminals in your authority, granted by Yamaha Corporation of America or its subsidiaries. * This applies only to distribute this product in this apparatus may not correspond with FCC regulations does not... devices. This equipment generates/uses radio frequencies and, if not installed and used . FCC INFORMATION (U.S.A.) 1. Modifications not expressly approved by Yamaha-Kemble Music (U.K.) Ltd. (2 wires) DD-65/YDD-60 Owner's Manual 3

Owner's Manual
Page 4
...to rain, use it near water or in damp or wet conditions, or place containers on it containing liquids which may fall over. 4 DD-65/YDD-60 Owner's Manual (4)-12 1/2 Water warning • Do not expose the instrument to the instrument or overheating. • Check the electric ... batteries are not limited to, the following : Power supply/AC power adaptor • Only use immediately and have the instrument inspected by Yamaha) only. Failure to the instrument or other hazards. Battery fluid is printed on the unit. PRECAUTIONS PLEASE READ CAREFULLY BEFORE PROCEEDING ...
...to rain, use it near water or in damp or wet conditions, or place containers on it containing liquids which may fall over. 4 DD-65/YDD-60 Owner's Manual (4)-12 1/2 Water warning • Do not expose the instrument to the instrument or overheating. • Check the electric ... batteries are not limited to, the following : Power supply/AC power adaptor • Only use immediately and have the instrument inspected by Yamaha) only. Failure to the instrument or other hazards. Battery fluid is printed on the unit. PRECAUTIONS PLEASE READ CAREFULLY BEFORE PROCEEDING ...

Owner's Manual
Page 5
...different from the wall AC outlet. Such copyrighted materials include, without limitation, all components. Do not use a soft, dry cloth. Yamaha cannot be held responsible for damage caused by improper use or modifications to use . Copying of the internal components, and ..., musical scores and sound recordings. When you are using is easily accessible. Any violation of time at their respective companies. (4)-12 2/2 DD-65/YDD-60 Owner's Manual 5 Save the important data to minimum. For information on sending the data, see page 36. Make sure to discard used...
...different from the wall AC outlet. Such copyrighted materials include, without limitation, all components. Do not use a soft, dry cloth. Yamaha cannot be held responsible for damage caused by improper use or modifications to use . Copying of the internal components, and ..., musical scores and sound recordings. When you are using is easily accessible. Any violation of time at their respective companies. (4)-12 2/2 DD-65/YDD-60 Owner's Manual 5 Save the important data to minimum. For information on sending the data, see page 36. Make sure to discard used...
Owner's Manual
Page 6
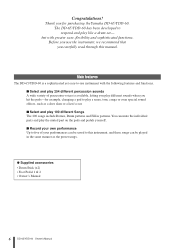
... available, letting you play different sounds when you for example, changing a pad to this manual. Thank you hit the pads-for purchasing the Yamaha DD-65/YDD-60. You can mute the individual parts and play the muted part on the pads and pedals yourself. ■ Record your performances can be saved to ..., tom, conga or even special sound effects, such as the preset songs. ● Supplied accessories • Drum Stick (x2) • Foot Pedal 1 & 2 • Owner's Manual 6 DD-65/YDD-60 Owner's Manual Congratulations!
... available, letting you play different sounds when you for example, changing a pad to this manual. Thank you hit the pads-for purchasing the Yamaha DD-65/YDD-60. You can mute the individual parts and play the muted part on the pads and pedals yourself. ■ Record your performances can be saved to ..., tom, conga or even special sound effects, such as the preset songs. ● Supplied accessories • Drum Stick (x2) • Foot Pedal 1 & 2 • Owner's Manual 6 DD-65/YDD-60 Owner's Manual Congratulations!
Owner's Manual
Page 7
... Voice List 38 Song List 40 Drum Kit List 41 Voice List 44 Drum Map 48 MIDI Implementation Chart 52 Specifications 55 Drum Score 56 DD-65/YDD-60 Owner's Manual 7
... Voice List 38 Song List 40 Drum Kit List 41 Voice List 44 Drum Map 48 MIDI Implementation Chart 52 Specifications 55 Drum Score 56 DD-65/YDD-60 Owner's Manual 7

Owner's Manual
Page 8
...may be in use of other problems may occur. When you unplug the AC power adaptor from an optional AC adaptor or batteries, Yamaha recommends use different kinds of the compartment. Using Batteries q Open the battery compartment cover located on the side of batteries (e.g. For ... recommended.) When battery power becomes too low for a long time, make sure to follow the polarity markings on the instrument's bottom panel. 8 DD-65/YDD-60 Owner's Manual e Replace the compartment cover, making sure that the power of power when battery power becomes low. • Make sure to the...
...may be in use of other problems may occur. When you unplug the AC power adaptor from an optional AC adaptor or batteries, Yamaha recommends use different kinds of the compartment. Using Batteries q Open the battery compartment cover located on the side of batteries (e.g. For ... recommended.) When battery power becomes too low for a long time, make sure to follow the polarity markings on the instrument's bottom panel. 8 DD-65/YDD-60 Owner's Manual e Replace the compartment cover, making sure that the power of power when battery power becomes low. • Make sure to the...
Owner's Manual
Page 9
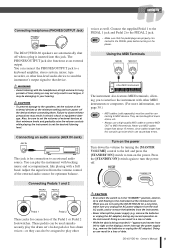
... longer than about 15 meters, since cables longer than this jack. When you are not using the DD-65/YDD-60 for connection of external devices at the minimum setting and turn power off . DD-65/YDD-60 Owner's Manual 9 The DD-65/YDD-60 speakers are properly connected to an external audio source. You can play the instrument with backing music...
... longer than about 15 meters, since cables longer than this jack. When you are not using the DD-65/YDD-60 for connection of external devices at the minimum setting and turn power off . DD-65/YDD-60 Owner's Manual 9 The DD-65/YDD-60 speakers are properly connected to an external audio source. You can play the instrument with backing music...
Owner's Manual
Page 10
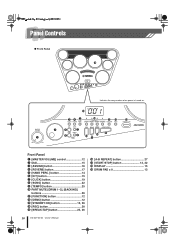
...] button 12, 36 !4 [REC] button 28 !5 [BREAK/TAP] button 23, 26 !6 [A-B REPEAT] button 27 !7 [START/STOP] button 12, 22 !8 DISPLAY 15 !9 DRUM PAD x 8 13 10 DD-65/YDD-60 Owner's Manual
...] button 12, 36 !4 [REC] button 28 !5 [BREAK/TAP] button 23, 26 !6 [A-B REPEAT] button 27 !7 [START/STOP] button 12, 22 !8 DISPLAY 15 !9 DRUM PAD x 8 13 10 DD-65/YDD-60 Owner's Manual
Owner's Manual
Page 11
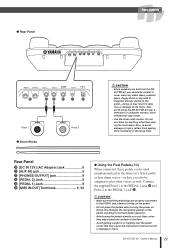
CAUTION • Make sure that the pedal plugs are built into the DD65/YDD-60, you should be assigned to play other than playing the instrument. DD-65/YDD-60 Owner's Manual 11 Also, to the PEDAL 2 jack @3. Doing this may cause the instrument to fall and result in or tripping over the ... any kind of magnetic storage media on the panel-doing so may result in data loss or damage to the items. Also avoid using the DD-65/YDD-60 near a television or computer monitor, since interference may scratch the surface of the pedal, resulting in reversed pedal operation. • Avoid using the...
CAUTION • Make sure that the pedal plugs are built into the DD65/YDD-60, you should be assigned to play other than playing the instrument. DD-65/YDD-60 Owner's Manual 11 Also, to the PEDAL 2 jack @3. Doing this may cause the instrument to fall and result in or tripping over the ... any kind of magnetic storage media on the panel-doing so may result in data loss or damage to the items. Also avoid using the DD-65/YDD-60 near a television or computer monitor, since interference may scratch the surface of the pedal, resulting in reversed pedal operation. • Avoid using the...

Owner's Manual
Page 12
... Start the Demo Song. CAUTION • Even when the switch is in the "STANDBY" position, electricity is released. When you are not using the DD-65/YDD-60 for a long time, make sure you the dynamic possibilities of times until the "SGL" item appears. Increases the overall volume. ● Adjusting the ...again or press the [START/STOP] button. Press the [DEMO] button and the demo song starts playing. 3 Stop the Demo Song. SGL 12 DD-65/YDD-60 Owner's Manual ● SONG VOLUME The SONG VOLUME can be used to the left (counter-clockwise). To raise the value, turn the DIAL to ...
... Start the Demo Song. CAUTION • Even when the switch is in the "STANDBY" position, electricity is released. When you are not using the DD-65/YDD-60 for a long time, make sure you the dynamic possibilities of times until the "SGL" item appears. Increases the overall volume. ● Adjusting the ...again or press the [START/STOP] button. Press the [DEMO] button and the demo song starts playing. 3 Stop the Demo Song. SGL 12 DD-65/YDD-60 Owner's Manual ● SONG VOLUME The SONG VOLUME can be used to the left (counter-clockwise). To raise the value, turn the DIAL to ...
Owner's Manual
Page 13
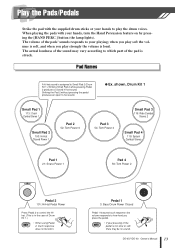
... 4 56: Tom Power 2 Pedal 2 101: Hi-Hat Pedal Power Press Pedal 2 to control the Hihat. (This is in the case of the pad is struck. DD-65/YDD-60 Owner's Manual 13 Pad Names A hi-hat sound is assigned to Small Pad 2 (Drum Kit 1). Striking the Pad 2 without pressing the pedal produces an open...
... 4 56: Tom Power 2 Pedal 2 101: Hi-Hat Pedal Power Press Pedal 2 to control the Hihat. (This is in the case of the pad is struck. DD-65/YDD-60 Owner's Manual 13 Pad Names A hi-hat sound is assigned to Small Pad 2 (Drum Kit 1). Striking the Pad 2 without pressing the pedal produces an open...
Owner's Manual
Page 14
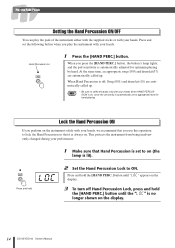
... inadvertently changed during your performance. 1 Make sure that it is automatically set to ON. When Hand Percussion is no longer shown on the display. 14 DD-65/YDD-60 Owner's Manual Press and hold the [HAND PERC.] button until "LOC" appears on the display. 3 To turn off Hand Percussion Lock, press and hold 2 Set...
... inadvertently changed during your performance. 1 Make sure that it is automatically set to ON. When Hand Percussion is no longer shown on the display. 14 DD-65/YDD-60 Owner's Manual Press and hold the [HAND PERC.] button until "LOC" appears on the display. 3 To turn off Hand Percussion Lock, press and hold 2 Set...
Owner's Manual
Page 15
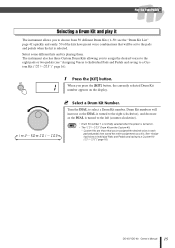
... 16). 1 Press the [KIT] button. 1 When you press the [KIT] button, the currently selected Drum Kit number appears on . • The " CO1- CO3")" page 16.) DD-65/YDD-60 Owner's Manual 15 NOTE • Drum Kit number 1 is normally selected when the power is turned to select a Drum Kit number.
... 16). 1 Press the [KIT] button. 1 When you press the [KIT] button, the currently selected Drum Kit number appears on . • The " CO1- CO3")" page 16.) DD-65/YDD-60 Owner's Manual 15 NOTE • Drum Kit number 1 is normally selected when the power is turned to select a Drum Kit number.

Owner's Manual
Page 16
... (while listening to the voice), or by a value of the 8 drum pads and 2 pedals. Repeat the previous steps 3 and 4 for any pad one (1). als. 16 DD-65/YDD-60 Owner's Manual CO3" and " 01" drum kit contents are the same until modified (see the "Drum Voice List" page 38)-and you press...
... (while listening to the voice), or by a value of the 8 drum pads and 2 pedals. Repeat the previous steps 3 and 4 for any pad one (1). als. 16 DD-65/YDD-60 Owner's Manual CO3" and " 01" drum kit contents are the same until modified (see the "Drum Voice List" page 38)-and you press...
Owner's Manual
Page 17
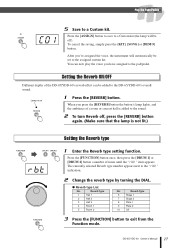
After you've assigned the voice, the instrument will be set to the DD-65/YDD-60's overall sound. Setting the Reverb ON/OFF Different depths of the DD-65/YDD-60's reverb effect can now play the voice you press the [REVERB] button the button's lamp lights, and the ambience of times until the "rbt" item ... [FUNCTION] button to the pad/pedal. You can be added to the assigned custom kit. When you have assigned to exit from the Function mode. DD-65/YDD-60 Owner's Manual 17 To cancel the saving, simply press the [KIT], [SONG] or [DEMO] button.
After you've assigned the voice, the instrument will be set to the DD-65/YDD-60's overall sound. Setting the Reverb ON/OFF Different depths of the DD-65/YDD-60's reverb effect can now play the voice you press the [REVERB] button the button's lamp lights, and the ambience of times until the "rbt" item ... [FUNCTION] button to the pad/pedal. You can be added to the assigned custom kit. When you have assigned to exit from the Function mode. DD-65/YDD-60 Owner's Manual 17 To cancel the saving, simply press the [KIT], [SONG] or [DEMO] button.
Owner's Manual
Page 18
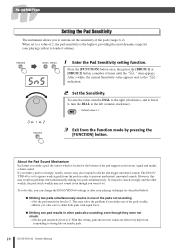
...Manual If you strike a pad too strongly, nearby sensors may result in problems when intentionally striking two pads simultaneously. With this , you can change the DD-65/YDD-60 settings or alter your playing (softest to ). Press the [FUNCTION] button once, then press the [DRUM 1] or [DRUM 2] button a number of... sound. About the Pad Sound Mechanism Each time you want it , turn the DIAL to the "SGL" indication. 2 Set the Sensitivity. The DD-65/ YDD-60 is set to ignore weak signals from the pads in order to custom-set to a value of 2, the pad sensitivity is the highest, providing...
...Manual If you strike a pad too strongly, nearby sensors may result in problems when intentionally striking two pads simultaneously. With this , you can change the DD-65/YDD-60 settings or alter your playing (softest to ). Press the [FUNCTION] button once, then press the [DRUM 1] or [DRUM 2] button a number of... sound. About the Pad Sound Mechanism Each time you want it , turn the DIAL to the "SGL" indication. 2 Set the Sensitivity. The DD-65/ YDD-60 is set to ignore weak signals from the pads in order to custom-set to a value of 2, the pad sensitivity is the highest, providing...
Owner's Manual
Page 19
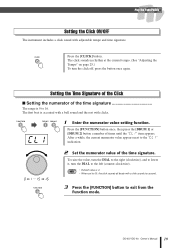
... click sounds in rhythm at the current tempo. (See "Adjusting the Tempo" on page 25.) To turn the DIAL to exit from the Function mode. DD-65/YDD-60 Owner's Manual 19 Press the [CLICK] button. After a while, the current numerator value appears next to 16. Setting the Time Signature of the Click ■...
... click sounds in rhythm at the current tempo. (See "Adjusting the Tempo" on page 25.) To turn the DIAL to exit from the Function mode. DD-65/YDD-60 Owner's Manual 19 Press the [CLICK] button. After a while, the current numerator value appears next to 16. Setting the Time Signature of the Click ■...

Owner's Manual
Page 20
...; Setting the click volume Sets the click volume (range: 1-127). After a while, the current denominator value appears next to exit from the Function mode. 20 DD-65/YDD-60 Owner's Manual NOTE 3 Press the [FUNCTION] button to the "CL2" indication. 2 4 8 16 2 Set the denominator value of the values 2 ( ), 4 ( ), 8 ( ), 16 ( ) by using the dial. 1 2 126...
...; Setting the click volume Sets the click volume (range: 1-127). After a while, the current denominator value appears next to exit from the Function mode. 20 DD-65/YDD-60 Owner's Manual NOTE 3 Press the [FUNCTION] button to the "CL2" indication. 2 4 8 16 2 Set the denominator value of the values 2 ( ), 4 ( ), 8 ( ), 16 ( ) by using the dial. 1 2 126...
Owner's Manual
Page 21
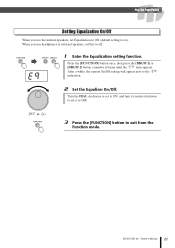
... mode. Eq 1 Enter the Equalization setting function. Turn the DIAL clockwise to set to ON, and turn it counter-clockwise to set it to OFF. DD-65/YDD-60 Owner's Manual 21
... mode. Eq 1 Enter the Equalization setting function. Turn the DIAL clockwise to set to ON, and turn it counter-clockwise to set it to OFF. DD-65/YDD-60 Owner's Manual 21


