

Owner's Manual
Page 2
...;ve years. IMPORTANT: The louder the sound, the shorter the time period before requesting service. Note: Check with batteries of the following: Battery Notice: This product MAY contain a small non-rechargeable battery which (if applicable) is intended for battery disposal information. The model number, serial number, power requirements, etc., are therefore the owners responsibility. Purchase Date 92-BP (bottom) PLEASE KEEP THIS MANUAL 2 DD-65/YDD-60 Owner's Manual We...
...;ve years. IMPORTANT: The louder the sound, the shorter the time period before requesting service. Note: Check with batteries of the following: Battery Notice: This product MAY contain a small non-rechargeable battery which (if applicable) is intended for battery disposal information. The model number, serial number, power requirements, etc., are therefore the owners responsibility. Purchase Date 92-BP (bottom) PLEASE KEEP THIS MANUAL 2 DD-65/YDD-60 Owner's Manual We...
Owner's Manual
Page 3
... instructions contained in this product in FCC Regulations, Part 15 for Class "B" digital devices. If the antenna lead-in is 300 ohm ribbon lead, change the lead-in to comply with FCC regulations does not guarantee that interference will not result in your FCC authorization to eliminate the problem by Yamaha-Kemble Music (U.K.) Ltd. (2 wires) DD-65/YDD-60 Owner's Manual...
... instructions contained in this product in FCC Regulations, Part 15 for Class "B" digital devices. If the antenna lead-in is 300 ohm ribbon lead, change the lead-in to comply with FCC regulations does not guarantee that interference will not result in your FCC authorization to eliminate the problem by Yamaha-Kemble Music (U.K.) Ltd. (2 wires) DD-65/YDD-60 Owner's Manual...

Owner's Manual
Page 4
... place for the instrument. Battery • Always make sure all batteries at the same time. The instrument contains no user-serviceable parts. Then have it inspected by qualified Yamaha service personnel. • Never insert or remove an electric plug with the +/- Location • Do not expose the instrument to do not excessively bend or otherwise damage the cord, place heavy objects...
... place for the instrument. Battery • Always make sure all batteries at the same time. The instrument contains no user-serviceable parts. Then have it inspected by qualified Yamaha service personnel. • Never insert or remove an electric plug with the +/- Location • Do not expose the instrument to do not excessively bend or otherwise damage the cord, place heavy objects...

Owner's Manual
Page 5
... connected adaptor and other electronic components, turn off the power for your personal use. ● Trademarks • The company names and product names in this Owner's Manual are the trademarks or registered trademarks of their minimum levels and gradually raise the volume controls while playing the instrument to set the volumes of all computer software, style files, MIDI files, WAVE data, musical scores and sound recordings. Connections • Before connecting...
... connected adaptor and other electronic components, turn off the power for your personal use. ● Trademarks • The company names and product names in this Owner's Manual are the trademarks or registered trademarks of their minimum levels and gradually raise the volume controls while playing the instrument to set the volumes of all computer software, style files, MIDI files, WAVE data, musical scores and sound recordings. Connections • Before connecting...
Owner's Manual
Page 6
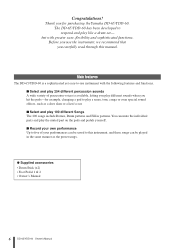
... features and functions. ■ Select and play 254 different percussion sounds A wide variety of your own performance Up to five of percussion voices is a sophisticated yet easy-to respond and play 100 different Songs The 100 songs include Demos, Drum patterns and Fill in the same manner as the preset songs. ● Supplied accessories • Drum Stick (x2) • Foot Pedal 1 & 2 • Owner's Manual 6 DD-65/YDD-60 Owner's Manual...
... features and functions. ■ Select and play 254 different percussion sounds A wide variety of your own performance Up to five of percussion voices is a sophisticated yet easy-to respond and play 100 different Songs The 100 songs include Demos, Drum patterns and Fill in the same manner as the preset songs. ● Supplied accessories • Drum Stick (x2) • Foot Pedal 1 & 2 • Owner's Manual 6 DD-65/YDD-60 Owner's Manual...
Owner's Manual
Page 7
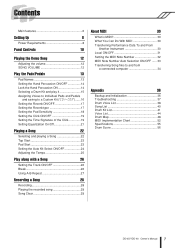
... Using A-B Repeat 27 Recording a Song 28 Recording 28 Playing the recorded song 29 Song Clear 29 About MIDI 30 What is MIDI 30 What You Can Do With MIDI 30 Transferring Performance Data To and From Another Instrument 30 Local ON/OFF 31 Setting the MIDI Note Number 32 MIDI Note Number Auto Selection ON/OFF ...... 33 Transferring Song files to a Custom Kit ("CO1- Contents Main features 6 Setting Up 8 Power Requirements 8 Panel Controls 10 Playing the Demo Song 12 Adjusting the volume 12 SONG VOLUME 12 Play the Pads/Pedals 13 Pad...
... Using A-B Repeat 27 Recording a Song 28 Recording 28 Playing the recorded song 29 Song Clear 29 About MIDI 30 What is MIDI 30 What You Can Do With MIDI 30 Transferring Performance Data To and From Another Instrument 30 Local ON/OFF 31 Setting the MIDI Note Number 32 MIDI Note Number Auto Selection ON/OFF ...... 33 Transferring Song files to a Custom Kit ("CO1- Contents Main features 6 Setting Up 8 Power Requirements 8 Panel Controls 10 Playing the Demo Song 12 Adjusting the volume 12 SONG VOLUME 12 Play the Pads/Pedals 13 Pad...

Owner's Manual
Page 8
... (display shows no indications). Doing so will run down, replace them with the proper orientation, maintaining the correct polarity (as shown). The use different kinds of other problems may result in place. Incorrect battery installation may occur. w Insert the six new alkaline batteries, being careful to the power supply jack. ment, or during any DD-65/YDD-60 record operation! WARNING • Use the specified adaptor...
... (display shows no indications). Doing so will run down, replace them with the proper orientation, maintaining the correct polarity (as shown). The use different kinds of other problems may result in place. Incorrect battery installation may occur. w Insert the six new alkaline batteries, being careful to the power supply jack. ment, or during any DD-65/YDD-60 record operation! WARNING • Use the specified adaptor...
Owner's Manual
Page 9
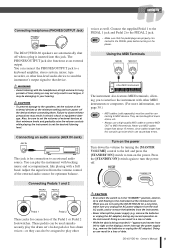
... set the volumes of external devices at high volume for optimum balance. CAUTION • To prevent damage to a keyboard amplifier, stereo system, mixer, tape recorder, or other MIDI instruments or computers. (For more information, see page 30.) NOTE • MIDI cables (sold separately) must be used simultaneously play the drum set the volume of time; You can connect the PHONES/OUTPUT jack to the speakers, set 's hi-hat pedal or bass drum voices...
... set the volumes of external devices at high volume for optimum balance. CAUTION • To prevent damage to a keyboard amplifier, stereo system, mixer, tape recorder, or other MIDI instruments or computers. (For more information, see page 30.) NOTE • MIDI cables (sold separately) must be used simultaneously play the drum set the volume of time; You can connect the PHONES/OUTPUT jack to the speakers, set 's hi-hat pedal or bass drum voices...
Owner's Manual
Page 11
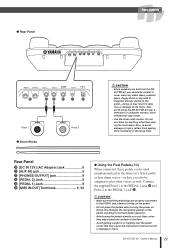
... the PEDAL jacks before turning on the power. • Do not press the pedals while turning the power on a soft floor, since interference may result. • Use the sticks with caution. Do not use them . Rear Panel @0 [DC IN 12V] (AC Adaptor) jack 8 @1 [AUX IN] jack 9 @2 [PHONES/OUTPUT] jack 9 @3 [PEDAL 2] Jack 9 @4 [PEDAL 1] Jack 9 @5 [MIDI IN/OUT] Terminals 9, 30 ● Using the Foot Pedals (1/2) When connected, these pedals can be used simultaneously play the drum set's hi-hat pedal or bass drum voices...
... the PEDAL jacks before turning on the power. • Do not press the pedals while turning the power on a soft floor, since interference may result. • Use the sticks with caution. Do not use them . Rear Panel @0 [DC IN 12V] (AC Adaptor) jack 8 @1 [AUX IN] jack 9 @2 [PHONES/OUTPUT] jack 9 @3 [PEDAL 2] Jack 9 @4 [PEDAL 1] Jack 9 @5 [MIDI IN/OUT] Terminals 9, 30 ● Using the Foot Pedals (1/2) When connected, these pedals can be used simultaneously play the drum set's hi-hat pedal or bass drum voices...

Owner's Manual
Page 12
... power adaptor from the wall AC outlet, and/or remove the batteries from the instrument. 2 Start the Demo Song. Press the [DEMO] button and the demo song starts playing. 3 Stop the Demo Song. Volume range is from the Function mode by pressing the [FUNCTION] button, then press the [DRUM 1] or [DRUM 2] button a number of the function item. To stop playback, press the [DEMO] button again or press the [START/STOP] button. Increases the overall volume. ● Adjusting the volume Turn the [MASTER VOLUME] control...
... power adaptor from the wall AC outlet, and/or remove the batteries from the instrument. 2 Start the Demo Song. Press the [DEMO] button and the demo song starts playing. 3 Stop the Demo Song. Volume range is from the Function mode by pressing the [FUNCTION] button, then press the [DRUM 1] or [DRUM 2] button a number of the function item. To stop playback, press the [DEMO] button again or press the [START/STOP] button. Increases the overall volume. ● Adjusting the volume Turn the [MASTER VOLUME] control...
Owner's Manual
Page 13
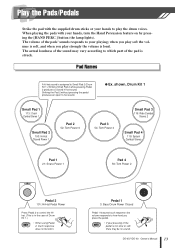
DD-65/YDD-60 Owner's Manual 13 Play the Pads/Pedals Strike the pad with your hands, turn the Hand Percussion feature on by pressing the [HAND PERC.] button (the lamp lights). The volume of Drum Kit 1.) • When using Pedal NOTE 2, touch response does not function. Striking Small Pad 2 while pressing Pedal 2 produces a closed hi-hat sound. Pedal 1 3: Bass Drum Power Closed Pedal 1 features touch response; when you play soft the volume is soft, and when you press the pedal. Striking the Pad 2 without...
DD-65/YDD-60 Owner's Manual 13 Play the Pads/Pedals Strike the pad with your hands, turn the Hand Percussion feature on by pressing the [HAND PERC.] button (the lamp lights). The volume of Drum Kit 1.) • When using Pedal NOTE 2, touch response does not function. Striking Small Pad 2 while pressing Pedal 2 produces a closed hi-hat sound. Pedal 1 3: Bass Drum Power Closed Pedal 1 features touch response; when you play soft the volume is soft, and when you press the pedal. Striking the Pad 2 without...
Owner's Manual
Page 17
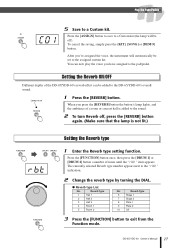
Play the Pads/Pedals CO1 5 Save to exit from the Function mode. DD-65/YDD-60 Owner's Manual 17 Press the [ASSIGN] button to save to a Custom kit (the lamp will automatically be added to the DD-65/YDD-60's overall sound. You can be set to the sound. 2 To turn Reverb off ). To cancel the saving, simply press the [KIT], [SONG] or [DEMO] button. Lamp is added to the assigned custom kit. Press...
Play the Pads/Pedals CO1 5 Save to exit from the Function mode. DD-65/YDD-60 Owner's Manual 17 Press the [ASSIGN] button to save to a Custom kit (the lamp will automatically be added to the DD-65/YDD-60's overall sound. You can be set to the sound. 2 To turn Reverb off ). To cancel the saving, simply press the [KIT], [SONG] or [DEMO] button. Lamp is added to the assigned custom kit. Press...
Owner's Manual
Page 18
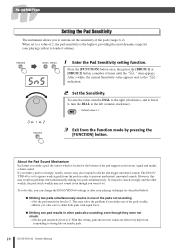
..., you can change the DD-65/YDD-60 settings or alter your playing (softest to loudest volume). Press the [FUNCTION] button once, then press the [DRUM 1] or [DRUM 2] button a number of the pads not sounding. → Set the pad sensitivity level to 2. If you strike a pad too strongly, nearby sensors may not sound (even though you want it , turn the DIAL to the left (counter-clockwise). • Default value is...
..., you can change the DD-65/YDD-60 settings or alter your playing (softest to loudest volume). Press the [FUNCTION] button once, then press the [DRUM 1] or [DRUM 2] button a number of the pads not sounding. → Set the pad sensitivity level to 2. If you strike a pad too strongly, nearby sensors may not sound (even though you want it , turn the DIAL to the left (counter-clockwise). • Default value is...
Owner's Manual
Page 22
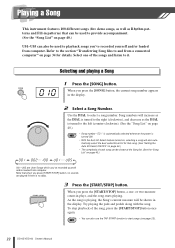
... START function to playback songs you press the [SONG] button, the current song number appears in the display. NOTE 22 DD-65/YDD-60 Owner's Manual When you 've recorded yourself and/or loaded from computer. Refer to the section "Transferring Song files to select a song number. When you 've recorded yourself and/or loaded from computer. Song numbers will increase as the DIAL is turned to the right (clockwise), and decrease as Rhythm...
... START function to playback songs you press the [SONG] button, the current song number appears in the display. NOTE 22 DD-65/YDD-60 Owner's Manual When you 've recorded yourself and/or loaded from computer. Refer to the section "Transferring Song files to select a song number. When you 've recorded yourself and/or loaded from computer. Song numbers will increase as the DIAL is turned to the right (clockwise), and decrease as Rhythm...

Owner's Manual
Page 24
... [FUNCTION] button once, then press the [DRUM 1] or [DRUM 2] button a number of times until the "AtS" item appears. OFF On 2 Turn Auto Kit Select On/Off. Playing a Song Setting the Auto Kit Select ON/OFF With the Auto Kit Select feature turned on . AtS 1 Enter the Auto Kit Select function. After a while, the current On/Off status will automatically be selected. On • Default setting is changed. NOTE 24 DD-65/YDD-60 Owner's Manual Turn the...
... [FUNCTION] button once, then press the [DRUM 1] or [DRUM 2] button a number of times until the "AtS" item appears. OFF On 2 Turn Auto Kit Select On/Off. Playing a Song Setting the Auto Kit Select ON/OFF With the Auto Kit Select feature turned on . AtS 1 Enter the Auto Kit Select function. After a while, the current On/Off status will automatically be selected. On • Default setting is changed. NOTE 24 DD-65/YDD-60 Owner's Manual Turn the...

Owner's Manual
Page 30
... the Yamaha UX16) DD-65/YDD-60 30 DD-65/YDD-60 Owner's Manual MIDI (Musical Instrument Digital Interface) is MIDI? What You Can Do With MIDI • Transferring performance data between this instrument and MIDI-equipped instruments or computer. (page 30) • Transferring SONG data between this instrument and computer. (page 34) Transferring Performance Data To and From Another Instrument By connecting this instrument to transfer performance and setting data between electronic musical instruments and music...
... the Yamaha UX16) DD-65/YDD-60 30 DD-65/YDD-60 Owner's Manual MIDI (Musical Instrument Digital Interface) is MIDI? What You Can Do With MIDI • Transferring performance data between this instrument and MIDI-equipped instruments or computer. (page 30) • Transferring SONG data between this instrument and computer. (page 34) Transferring Performance Data To and From Another Instrument By connecting this instrument to transfer performance and setting data between electronic musical instruments and music...
Owner's Manual
Page 31
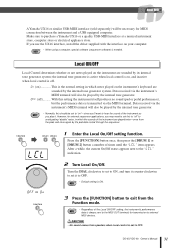
... the Function mode. Press the [FUNCTION] button once, then press the [DRUM 1] or [DRUM 2] button a number of the instrument as NOTE you use the UX16 interface, install the driver supplied with the interface on , and inactive when local control is ON. If you play it to purchase a Yamaha UX16 or a quality USB-MIDI interface at a musical instrument store, computer store or electrical appliance store. LCL OFF On 1 Enter the Local On/Off setting function. Make...
... the Function mode. Press the [FUNCTION] button once, then press the [DRUM 1] or [DRUM 2] button a number of the instrument as NOTE you use the UX16 interface, install the driver supplied with the interface on , and inactive when local control is ON. If you play it to purchase a Yamaha UX16 or a quality USB-MIDI interface at a musical instrument store, computer store or electrical appliance store. LCL OFF On 1 Enter the Local On/Off setting function. Make...

Owner's Manual
Page 34
... Musicsoft Downloader at a musical instrument store, computer store or electrical appliance store. If you use the UX16 interface, install the driver supplied with SMF Format 0, and most common and widely compatible sequence formats used for MIDI connection between User songs (U01-O05) and loaded songs, you may need to erase some User songs to load the data. About MIDI Transferring Song files to and from a connected computer Even though this instrument's Flash memory. MIDI IN MIDI OUT USB A USB-MIDI interface...
... Musicsoft Downloader at a musical instrument store, computer store or electrical appliance store. If you use the UX16 interface, install the driver supplied with SMF Format 0, and most common and widely compatible sequence formats used for MIDI connection between User songs (U01-O05) and loaded songs, you may need to erase some User songs to load the data. About MIDI Transferring Song files to and from a connected computer Even though this instrument's Flash memory. MIDI IN MIDI OUT USB A USB-MIDI interface...

Owner's Manual
Page 35
... turned on the computer. If you 've recorded and/or loaded. NOTE • Close the window to exit from the Musicsoft Downloader and re-enable control of the instrument. ■ Transferring user song files from the instrument to the instrument from a computer Songs : 5 Songs max (U01-U05) Data : 70 Kbytes per song Song data Format : SMF Format 0 Song data : ***.MID (MIDI Song) CAUTION • Use the power adaptor when transferring data. The data can be corrupted if the batteries...
... turned on the computer. If you 've recorded and/or loaded. NOTE • Close the window to exit from the Musicsoft Downloader and re-enable control of the instrument. ■ Transferring user song files from the instrument to the instrument from a computer Songs : 5 Songs max (U01-U05) Data : 70 Kbytes per song Song data Format : SMF Format 0 Song data : ***.MID (MIDI Song) CAUTION • Use the power adaptor when transferring data. The data can be corrupted if the batteries...

Owner's Manual
Page 37
... returns to OFF. The LED display is set to power the instrument (see page 12). • A plug is inserted into the PHONES/OUTPUT jack and should be replaced with a complete set too low. Using a mobile phone in close proximity to an authorized Yamaha dealer for proper diagnosis and repair. Adjust the volume (see page 8). Pad Start is set of 10,000 notes. Problem Cause/Solution A buzz or click...
... returns to OFF. The LED display is set to power the instrument (see page 12). • A plug is inserted into the PHONES/OUTPUT jack and should be replaced with a complete set too low. Using a mobile phone in close proximity to an authorized Yamaha dealer for proper diagnosis and repair. Adjust the volume (see page 8). Pad Start is set of 10,000 notes. Problem Cause/Solution A buzz or click...


