
Owner's Manual
Page 2
...that you . NAME PLATE LOCATION: The graphic below and retain this unit or commission others to do have been eliminated. CVP-79A CVP-69/69A CVP-59S Model Serial No Purchase Date Implied warranties may be at the time of battery. Keep all cautions indicated on this...a small nonrechargeable battery which (if applicable) is approximately five years. DO NOT REMOVE COVER (OR BACK). However, Yamaha reserves the right to return the defective parts. Please study this page and those indicated in order that contain lead, batteries, plastics, etc. Please observe all batteries...
...that you . NAME PLATE LOCATION: The graphic below and retain this unit or commission others to do have been eliminated. CVP-79A CVP-69/69A CVP-59S Model Serial No Purchase Date Implied warranties may be at the time of battery. Keep all cautions indicated on this...a small nonrechargeable battery which (if applicable) is approximately five years. DO NOT REMOVE COVER (OR BACK). However, Yamaha reserves the right to return the defective parts. Please study this page and those indicated in order that contain lead, batteries, plastics, etc. Please observe all batteries...
Owner's Manual
Page 4
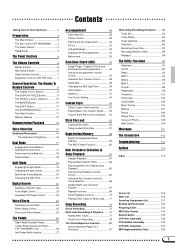
... List 121 Backed Up Parameters 122 Fingering Chart 123 MIDI Data Format 124 Specifications 135 CVP-79A: Assembly 136 CVP-69/69A: Assembly 142 CVP-59S: Assembly 150 MIDI Implementation Chart 156 1 CVP-79A/69/69A only 26 Left Pedal (Multi-function 27 Accompaniment 28 Style Selection 28 Tempo...33 Auto Bass Chord (ABC) 34 Single-Finger, Fingered Chord, and Full Keyboard Accompaniment 34 Overall Accompaniment Volume Control 37 Individual Part Volume Control 38 Small ABC 39 Changing the ABC Split Point 39 Chord Assist 40 Harmony 41 One Touch Setting 44 Custom ...
... List 121 Backed Up Parameters 122 Fingering Chart 123 MIDI Data Format 124 Specifications 135 CVP-79A: Assembly 136 CVP-69/69A: Assembly 142 CVP-59S: Assembly 150 MIDI Implementation Chart 156 1 CVP-79A/69/69A only 26 Left Pedal (Multi-function 27 Accompaniment 28 Style Selection 28 Tempo...33 Auto Bass Chord (ABC) 34 Single-Finger, Fingered Chord, and Full Keyboard Accompaniment 34 Overall Accompaniment Volume Control 37 Individual Part Volume Control 38 Small ABC 39 Changing the ABC Split Point 39 Chord Assist 40 Harmony 41 One Touch Setting 44 Custom ...
Owner's Manual
Page 5
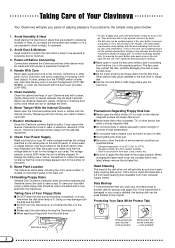
... damage to apply the disk label at 240V when the unit is likely to protect the keyboard (CVP-79A/ 69/69A), or cover the instrument with a new label; Make sure that you use ,...close the key cover to be used instead of the main unit. 10.Handling Floppy Disks Yamaha Disk Orchestra Collection disks are subject to pull out the partially ejected disk. The voltage selector ... Never Tamper With the Internal Circuitry Never open or close to the controls, connectors or other parts of your Clavinova only with hard objects. To change the setting use abrasive cleansers, waxes, solvents...
... damage to apply the disk label at 240V when the unit is likely to protect the keyboard (CVP-79A/ 69/69A), or cover the instrument with a new label; Make sure that you use ,...close the key cover to be used instead of the main unit. 10.Handling Floppy Disks Yamaha Disk Orchestra Collection disks are subject to pull out the partially ejected disk. The voltage selector ... Never Tamper With the Internal Circuitry Never open or close to the controls, connectors or other parts of your Clavinova only with hard objects. To change the setting use abrasive cleansers, waxes, solvents...
Owner's Manual
Page 10
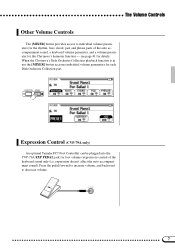
...- expression doesn't affect the auto-accompaniment sound). FUNCTION MIXER Expression Control (CVP-79A only) An optional Yamaha FC7 Foot Controller can be plugged into the CVP-79A EXP PEDAL jack for foot volume (expression) control of the auto accompaniment ...sound, a keyboard volume parameter, and a volume parameter for the rhythm, bass, chord, pad, and phrase parts of the keyboard sound only (i.e. see page 41 for each Disk Orchestra Collection part...
...- expression doesn't affect the auto-accompaniment sound). FUNCTION MIXER Expression Control (CVP-79A only) An optional Yamaha FC7 Foot Controller can be plugged into the CVP-79A EXP PEDAL jack for foot volume (expression) control of the auto accompaniment ...sound, a keyboard volume parameter, and a volume parameter for the rhythm, bass, chord, pad, and phrase parts of the keyboard sound only (i.e. see page 41 for each Disk Orchestra Collection part...
Owner's Manual
Page 13
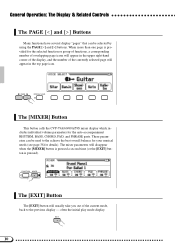
... musical needs (see page 38 for the auto-accompaniment RHYTHM, BASS, CHORD, PAD, and PHRASE parts. EXIT 10 When more than one page is pressed). PAGE DISPLAY HOLD The [MIXER] Button This button calls the CVP-79A/69/69A/59S mixer display which includes individual volume parameters for details). These parameters can be...
... musical needs (see page 38 for the auto-accompaniment RHYTHM, BASS, CHORD, PAD, and PHRASE parts. EXIT 10 When more than one page is pressed). PAGE DISPLAY HOLD The [MIXER] Button This button calls the CVP-79A/69/69A/59S mixer display which includes individual volume parameters for details). These parameters can be...
Owner's Manual
Page 26
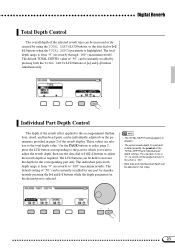
...is "0", no reverb) to adjust the reverb depth as required. Digital Reverb Total Depth Control The overall depth of the TOTAL DEPTH and individual part depth settings. The LCD buttons can be individually adjusted via the parameters provided in five steps. -+ 23 These values are relative to increase the... depth for which you want to adjust the reverb depth, then use the data dial or [+]/[-] buttons to "100" (maximum reverb). The individual part reverb depth range is from "0" (no reverb will be held to the total depth value. Use the PAGE buttons to select page 2, press the...
...is "0", no reverb) to adjust the reverb depth as required. Digital Reverb Total Depth Control The overall depth of the TOTAL DEPTH and individual part depth settings. The LCD buttons can be individually adjusted via the parameters provided in five steps. -+ 23 These values are relative to increase the... depth for which you want to adjust the reverb depth, then use the data dial or [+]/[-] buttons to "100" (maximum reverb). The individual part reverb depth range is from "0" (no reverb will be held to the total depth value. Use the PAGE buttons to select page 2, press the...

Owner's Manual
Page 41
...button in two steps intervals. The volume of all five parts. FUNCTION MIXER The second page of the drum kits. Auto Bass Chord (ABC Individual Part Volume Control The CVP-79A/69/69A/59S has five accompaniment parts - Select the part you want to set the volume as strings, organ,... choir. The volume of the RHYTHM, BASS, CHORD, PAD, and PHRASE accompaniment parts can be instantly recalled by each...
...button in two steps intervals. The volume of all five parts. FUNCTION MIXER The second page of the drum kits. Auto Bass Chord (ABC Individual Part Volume Control The CVP-79A/69/69A/59S has five accompaniment parts - Select the part you want to set the volume as strings, organ,... choir. The volume of the RHYTHM, BASS, CHORD, PAD, and PHRASE accompaniment parts can be instantly recalled by each...
Owner's Manual
Page 42
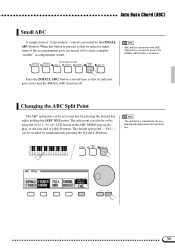
... the [ABC ON] button. F#2 - The default split point - ENDING SMALL ABC ABC ON -+ 39 Auto Bass Chord (ABC) Small ABC A simple form of the accompaniment parts are turned off to turn the SMALL ABC function off , even if the [SMALL ABC] button is turned on. can also be recalled by simultaneously...
... the [ABC ON] button. F#2 - The default split point - ENDING SMALL ABC ABC ON -+ 39 Auto Bass Chord (ABC) Small ABC A simple form of the accompaniment parts are turned off to turn the SMALL ABC function off , even if the [SMALL ABC] button is turned on. can also be recalled by simultaneously...
Owner's Manual
Page 45
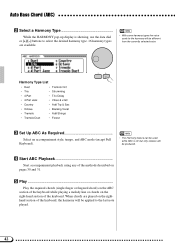
...-up display is off, but only octaves will be produced. Harmony Type List • Duet • Tremolo Oct • Trio • Strumming • 4 Part • Trio Delay • 4 Part Jazz • Vibes & J.Gtr • Country • Add Trp & Sax • Octave • Backing Vocal • Tremolo • Add Strings • Tremolo Duet...
...-up display is off, but only octaves will be produced. Harmony Type List • Duet • Tremolo Oct • Trio • Strumming • 4 Part • Trio Delay • 4 Part Jazz • Vibes & J.Gtr • Country • Add Trp & Sax • Octave • Backing Vocal • Tremolo • Add Strings • Tremolo Duet...
Owner's Manual
Page 49
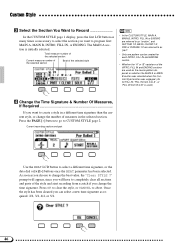
... MAIN A, MAIN B, INTRO, FILL IN or ENDING are referred to as "section", and RHYTHM 1/2, BASS, CHORD 1/2, PAD or PHRASE 1/2 are referred to as "part". • Only one pattern can select a new time signature as required: 2/4, 3/4, 4/4, or 5/4. 46 Press OK to clear the style, or CANCEL to select a... different time signature, or the data dial or [+]/[-] buttons once the BEAT parameter has been selected. Current recording section and part Use the BEAT LCD button to abort. As soon as you change the time signature. Custom Style CSelect the Section You Want to Record...
... MAIN A, MAIN B, INTRO, FILL IN or ENDING are referred to as "section", and RHYTHM 1/2, BASS, CHORD 1/2, PAD or PHRASE 1/2 are referred to as "part". • Only one pattern can select a new time signature as required: 2/4, 3/4, 4/4, or 5/4. 46 Press OK to clear the style, or CANCEL to select a... different time signature, or the data dial or [+]/[-] buttons once the BEAT parameter has been selected. Current recording section and part Use the BEAT LCD button to abort. As soon as you change the time signature. Custom Style CSelect the Section You Want to Record...
Owner's Manual
Page 50
... select a new number of measures. Once the BEAT and/or MEAS. parameters have to change the number of measures as you choose to clear all parts of measures for the selected section, or the data dial or [+]/[-] buttons once the MEAS. parameter has been selected. Press OK to clear the section...
... select a new number of measures. Once the BEAT and/or MEAS. parameters have to change the number of measures as you choose to clear all parts of measures for the selected section, or the data dial or [+]/[-] buttons once the MEAS. parameter has been selected. Press OK to clear the section...
Owner's Manual
Page 51
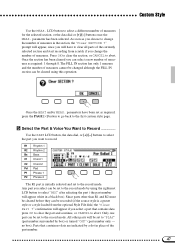
...guide (the metronome sound is stopped. • The timing guide will stop as soon as a C Major seventh pattern). If both the R1 and R2 parts are cleared the metronome will sound to be cleared while holding the keyboard "CANCEL" (C1) key. data cannot be recorded while playback is not recorded... 8th notes 3 quarter-note triplets 16th notes 3 8th note triplets quarter notes 48 i.e. i.e. Only [DRUMS/ PERC.] voices can be used for the remaining parts. It is stored. • The sound of the style - Press the LCD button below the note symbol to record over this button is the SOLO...
...guide (the metronome sound is stopped. • The timing guide will stop as soon as a C Major seventh pattern). If both the R1 and R2 parts are cleared the metronome will sound to be cleared while holding the keyboard "CANCEL" (C1) key. data cannot be recorded while playback is not recorded... 8th notes 3 quarter-note triplets 16th notes 3 8th note triplets quarter notes 48 i.e. i.e. Only [DRUMS/ PERC.] voices can be used for the remaining parts. It is stored. • The sound of the style - Press the LCD button below the note symbol to record over this button is the SOLO...
Owner's Manual
Page 52
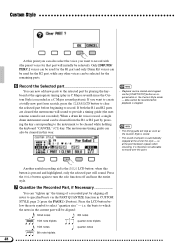
Quantization cannot be executed if no part is being quantized, then the START LCD button will not be able to UNDO once another button has been pressed. Once the ... a character. The current style name appears in the upper right corner of the display, then press the c.set to actually quantize the current part. Playback will stop for the current custom style, or CANCEL to the style naming page. Repeat this procedure until your custom style is complete.... press the STYLE NAME LCD button to go to abort. 49 The c.del LCD button can only be applied to the current recording part.
Quantization cannot be executed if no part is being quantized, then the START LCD button will not be able to UNDO once another button has been pressed. Once the ... a character. The current style name appears in the upper right corner of the display, then press the c.set to actually quantize the current part. Playback will stop for the current custom style, or CANCEL to the style naming page. Repeat this procedure until your custom style is complete.... press the STYLE NAME LCD button to go to abort. 49 The c.del LCD button can only be applied to the current recording part.
Owner's Manual
Page 53
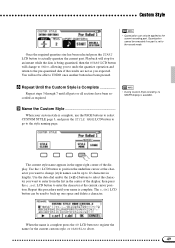
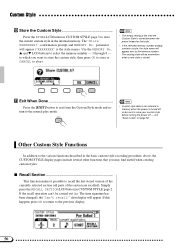
... Press the [EXIT] button to exit from the Custom Style mode and return to recall the last-stored version of the currently selected section (all parts of the section are recalled). confirmation prompt and MEMORY No. The "Store XXXXXXXX?" v and w LCD buttons to the previous display. 50 EXIT • Custom style...
... Press the [EXIT] button to exit from the Custom Style mode and return to recall the last-stored version of the currently selected section (all parts of the section are recalled). confirmation prompt and MEMORY No. The "Store XXXXXXXX?" v and w LCD buttons to the previous display. 50 EXIT • Custom style...
Owner's Manual
Page 54
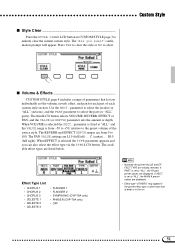
... are L10 (full left) ... If SECT. confirmation prompt will appear. Press YES to clear the style or NO to select the part (or "ALL" parts). s Volume & Effects CUSTOM STYLE page 4 includes a range of parameters that of the source style. Use the SECT. The third... • CHORUS 1 • CHORUS 2 • CHORUS 3 • CELESTE 1 • CELESTE 2 • CELESTE 3 • FLANGER 1 • FLANGER 2 • SYMPHONIC (CVP-79A only) • PHASER (CVP-79A only) • OFF • Normally the preset VALUE and EFFECT TYPE are from -50 to +50, relative to the preset volume of what is...
... are L10 (full left) ... If SECT. confirmation prompt will appear. Press YES to clear the style or NO to select the part (or "ALL" parts). s Volume & Effects CUSTOM STYLE page 4 includes a range of parameters that of the source style. Use the SECT. The third... • CHORUS 1 • CHORUS 2 • CHORUS 3 • CELESTE 1 • CELESTE 2 • CELESTE 3 • FLANGER 1 • FLANGER 2 • SYMPHONIC (CVP-79A only) • PHASER (CVP-79A only) • OFF • Normally the preset VALUE and EFFECT TYPE are from -50 to +50, relative to the preset volume of what is...
Owner's Manual
Page 56
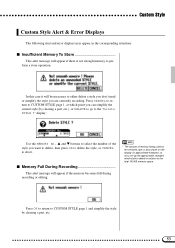
... used for the selected style is not enough memory to abort. Press OK to return to CUSTOM STYLE page 1 and simplify the style by clearing a part, etc.), or DELETE to go to either delete a style you don't need or simplify the style you can simplify the current style (by clearing... a part, etc. 53 Custom Style Custom Style Alert & Error Displays The following alert and error displays may appear in relation to CUSTOM STYLE page 1, at which ...
... used for the selected style is not enough memory to abort. Press OK to return to CUSTOM STYLE page 1 and simplify the style by clearing a part, etc.), or DELETE to go to either delete a style you don't need or simplify the style you can simplify the current style (by clearing... a part, etc. 53 Custom Style Custom Style Alert & Error Displays The following alert and error displays may appear in relation to CUSTOM STYLE page 1, at which ...

Owner's Manual
Page 64
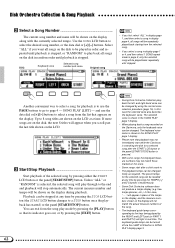
You can be played back by following the operation procedure described below. VOICE VIBES GUITAR CLAVI. The CVP-79A/69/69A/59S also shows you which keys to practice various parts of a piece while the others are played automatically. TEMPO + LATIN LATIN POP TRADITIONAL COUNTRY WALTZ DISK ... Original song 61 Disk Orchestra Collection Song Playback The CVP-79A/69/69A/59S can play back songs you've recorded yourself using the song recorder function described in the next section, and songs on optional Yamaha Disk Orchestra Collection disks (one is inserted in ensemble...
You can be played back by following the operation procedure described below. VOICE VIBES GUITAR CLAVI. The CVP-79A/69/69A/59S also shows you which keys to practice various parts of a piece while the others are played automatically. TEMPO + LATIN LATIN POP TRADITIONAL COUNTRY WALTZ DISK ... Original song 61 Disk Orchestra Collection Song Playback The CVP-79A/69/69A/59S can play back songs you've recorded yourself using the song recorder function described in the next section, and songs on optional Yamaha Disk Orchestra Collection disks (one is inserted in ensemble...
Owner's Manual
Page 65
... button or the panel [START/STOP] button. and use the PAGE buttons to go to the keys being played by the RIGHT and LEFT part (or PART 1 and PART 2) will appear when you want all songs on the disk in page 2, only the selected song will be shown on the display during playback...
... button or the panel [START/STOP] button. and use the PAGE buttons to go to the keys being played by the RIGHT and LEFT part (or PART 1 and PART 2) will appear when you want all songs on the disk in page 2, only the selected song will be shown on the display during playback...
Owner's Manual
Page 66
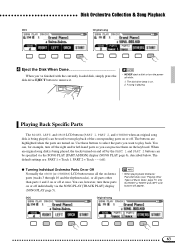
... press the disk drive EJECT button to remove it. • NEVER eject a disk or turn the power off ). The buttons are highlighted when the parts are : PART 1 = Track 1, PART 2 = Track - - (off while: 1. The disk drive lamp is being played) can be specified via the SONG PLAY [TRACK PLAY] display (SONG PLAY page 5). •... on . A song is being played, the tracks turned on or off at once. You can, for example, turn off the right and/or left-hand parts so you can be used to turn playback of Music Data", page 71) only the RIGHT or RIGHT and LEFT LCD buttons will appear. Playing...
... press the disk drive EJECT button to remove it. • NEVER eject a disk or turn the power off ). The buttons are highlighted when the parts are : PART 1 = Track 1, PART 2 = Track - - (off while: 1. The disk drive lamp is being played) can be specified via the SONG PLAY [TRACK PLAY] display (SONG PLAY page 5). •... on . A song is being played, the tracks turned on or off at once. You can, for example, turn off the right and/or left-hand parts so you can be used to turn playback of Music Data", page 71) only the RIGHT or RIGHT and LEFT LCD buttons will appear. Playing...
Owner's Manual
Page 68
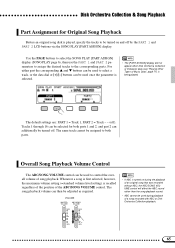
... song playback volume can additionally be adjusted as required. Use the PAGE buttons to select the SONG PLAY [PART ASSIGN] display (SONG PLAY page 6), then use the PART 1 and PART 2 parameters to assign the desired tracks to control the overall volume of a song recorded with ABC or Disk ... maximum volume setting (=standard volume level setting) is recalled regardless of the position of Music Data", page 71) is being played. For either part the corresponding v and w buttons can be selected for Original Song Playback Before an original song disk is played, specify the tracks to be ...
... song playback volume can additionally be adjusted as required. Use the PAGE buttons to select the SONG PLAY [PART ASSIGN] display (SONG PLAY page 6), then use the PART 1 and PART 2 parameters to assign the desired tracks to control the overall volume of a song recorded with ABC or Disk ... maximum volume setting (=standard volume level setting) is recalled regardless of the position of Music Data", page 71) is being played. For either part the corresponding v and w buttons can be selected for Original Song Playback Before an original song disk is played, specify the tracks to be ...

