
Owner's Manual
Page 7
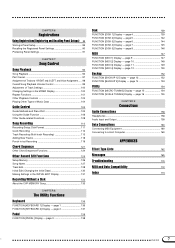
... 127 Track Edit 128 Initial Edit (Changing the Initial Data 130 Making Settings in the INITIAL EDIT Display 131 Recording Without a Disk 133 About the CVP MEMORY Song 133 CHAPTER 8: The Utility Functions Keyboard 136 FUNCTION [KEYBOARD 1] Display - page 4 139 FUNCTION [DISK 2] Display - page 5 142 FUNCTION [DISK 3] Display -...to a Host Computer 160 APPENDICES Effect Type Lists 162 Messages 165 Troubleshooting 170 MIDI and Data Compatibility 172 Index 173 5 CVP-201 7 page 2 137 Pedal 138 FUNCTION [PEDAL] Display - page 11 149 FUNCTION [MIDI 4] Display -
... 127 Track Edit 128 Initial Edit (Changing the Initial Data 130 Making Settings in the INITIAL EDIT Display 131 Recording Without a Disk 133 About the CVP MEMORY Song 133 CHAPTER 8: The Utility Functions Keyboard 136 FUNCTION [KEYBOARD 1] Display - page 4 139 FUNCTION [DISK 2] Display - page 5 142 FUNCTION [DISK 3] Display -...to a Host Computer 160 APPENDICES Effect Type Lists 162 Messages 165 Troubleshooting 170 MIDI and Data Compatibility 172 Index 173 5 CVP-201 7 page 2 137 Pedal 138 FUNCTION [PEDAL] Display - page 11 149 FUNCTION [MIDI 4] Display -
Owner's Manual
Page 29
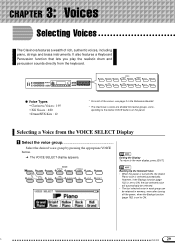
...main display, press [EXIT]. Selecting a Voice from the keyboard. CUSSION ENSEMBLE XG SPLIT EFFECT Exiting the Display To return to ON. 27 CVP-201 29 Backing Up the Selected Voice • When the power is turned ON, the Grand Piano voice is set to ON, the last ... CHOIR DUAL REVERB BRASS SAX / FLUTE BASS PER- CHAPTER 3: Voices Selecting Voices The Clavinova features a wealth of the voices, see page 3 in memory, even after turning off the power, when the Backup function (page 152) is selected automatically. CUSSION ENSEMBLE XG SPLIT EFFECT q Voice Types •...
...main display, press [EXIT]. Selecting a Voice from the keyboard. CUSSION ENSEMBLE XG SPLIT EFFECT Exiting the Display To return to ON. 27 CVP-201 29 Backing Up the Selected Voice • When the power is turned ON, the Grand Piano voice is set to ON, the last ... CHOIR DUAL REVERB BRASS SAX / FLUTE BASS PER- CHAPTER 3: Voices Selecting Voices The Clavinova features a wealth of the voices, see page 3 in memory, even after turning off the power, when the Backup function (page 152) is selected automatically. CUSSION ENSEMBLE XG SPLIT EFFECT q Voice Types •...
Owner's Manual
Page 49
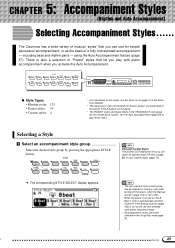
...) or your original styles (page 73) . ➔ The corresponding STYLE SELECT display appears. • The last selected style in each group can be selected in memory, even after turning off the power, when the Backup function (page 152) is set to ON. • When the power is turned on, the 8 Beat... set to ON, the last selected style will be selected instead. • Accompaniment styles cannot be retained in the Song Play mode page 93. 47 CVP-201 49
...) or your original styles (page 73) . ➔ The corresponding STYLE SELECT display appears. • The last selected style in each group can be selected in memory, even after turning off the power, when the Backup function (page 152) is set to ON. • When the power is turned on, the 8 Beat... set to ON, the last selected style will be selected instead. • Accompaniment styles cannot be retained in the Song Play mode page 93. 47 CVP-201 49

Owner's Manual
Page 68
..., and the panel settings you were using before you can also use the Registration function (page 89) to save the panel setup in the Clavinova's memory. C Select and recall a panel setup Use the data dial or the [-] and [+] buttons to highlight the desired panel setup in the chosen group is highlighted... group, simply press the corresponding STYLE button. Once you have selected a panel setup from the Music Database, you accessed the Music Database are restored. 68 CVP-201 66
..., and the panel settings you were using before you can also use the Registration function (page 89) to save the panel setup in the Clavinova's memory. C Select and recall a panel setup Use the data dial or the [-] and [+] buttons to highlight the desired panel setup in the chosen group is highlighted... group, simply press the corresponding STYLE button. Once you have selected a panel setup from the Music Database, you accessed the Music Database are restored. 68 CVP-201 66
Owner's Manual
Page 72
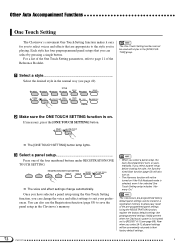
...four preprogrammed panel setups that are appropriate to the style you're playing. Z Select a style...Select the desired style in the Clavinova's memory. • When you select a panel setup, the Auto Accompaniment turns on . The Clavinova's pre-programmed factory default panel settings can ...sure the ONE TOUCH SETTING function is on automatically. The One Touch Setting function cannot be conveniently returned to their factory default settings. 72 CVP-201 70 If necessary, press the [ONE TOUCH SETTING] button. C Select a panel setup Press one of the Reference Booklet. Once you...
...four preprogrammed panel setups that are appropriate to the style you're playing. Z Select a style...Select the desired style in the Clavinova's memory. • When you select a panel setup, the Auto Accompaniment turns on . The Clavinova's pre-programmed factory default panel settings can ...sure the ONE TOUCH SETTING function is on automatically. The One Touch Setting function cannot be conveniently returned to their factory default settings. 72 CVP-201 70 If necessary, press the [ONE TOUCH SETTING] button. C Select a panel setup Press one of the Reference Booklet. Once you...

Owner's Manual
Page 73
...JAZZ LATIN COUNTRY BALLROOM TRAD/ WALZ DISK HARMONY CUSTOM • One temporary style (named TEMP.STYLE) is automatically loaded into the DISK/CUSTOM style memory when the power is turned on. • If you have loaded other style data (see page 87), you can recall and play back at... the same time, and any number can be maintained in the Clavinova's memory at any time, just like the presets. X Select the CUSTOM STYLE function Press the CUSTOM STYLE button. 71 CVP-201 73 Creating Your Own Styles The Clavinova lets you create custom accompaniment styles that you...
...JAZZ LATIN COUNTRY BALLROOM TRAD/ WALZ DISK HARMONY CUSTOM • One temporary style (named TEMP.STYLE) is automatically loaded into the DISK/CUSTOM style memory when the power is turned on. • If you have loaded other style data (see page 87), you can recall and play back at... the same time, and any number can be maintained in the Clavinova's memory at any time, just like the presets. X Select the CUSTOM STYLE function Press the CUSTOM STYLE button. 71 CVP-201 73 Creating Your Own Styles The Clavinova lets you create custom accompaniment styles that you...

Owner's Manual
Page 79
...preceding character. w and v buttons, the data dial, or the [-] and [+] buttons to select the memory number (1 through 4) where you want to enter from the list in the center of the CUSTOM STYLE ...your decision to store the style. ➾ Use the MEMORY No. The existing style will appear next to the memory number. If the selected memory number already contains a style, the style name will be ..., or CANCEL to abort. Store the custom style Press the STORE LCD button in the Clavinova's memory. Use the data dial and/or the [-] and [+] buttons to select the character you want to...
...preceding character. w and v buttons, the data dial, or the [-] and [+] buttons to select the memory number (1 through 4) where you want to enter from the list in the center of the CUSTOM STYLE ...your decision to store the style. ➾ Use the MEMORY No. The existing style will appear next to the memory number. If the selected memory number already contains a style, the style name will be ..., or CANCEL to abort. Store the custom style Press the STORE LCD button in the Clavinova's memory. Use the data dial and/or the [-] and [+] buttons to select the character you want to...

Owner's Manual
Page 80
...turning the power off , so be displayed. message will be displayed. If this happens, press OK to return to cancel the change. 78 80 CVP-201 Press YES to clear the style, or NO to the previous display. Custom style data is turned off (see page 82). s RECALL SECTION function... are recalled). Exit when done Press the [EXIT] button to exit the CUSTOM STYLE display and return to the various functions described in memory when the power is not retained in the basic custom style recording procedure, above, the CUSTOM STYLE display pages include several other functions that...
...turning the power off , so be displayed. message will be displayed. If this happens, press OK to return to cancel the change. 78 80 CVP-201 Press YES to clear the style, or NO to the previous display. Custom style data is turned off (see page 82). s RECALL SECTION function... are recalled). Exit when done Press the [EXIT] button to exit the CUSTOM STYLE display and return to the various functions described in memory when the power is not retained in the basic custom style recording procedure, above, the CUSTOM STYLE display pages include several other functions that...

Owner's Manual
Page 82
...the custom style are initially selected. message will be reselected once you want to save to disk, or select ALL to save operation. 80 82 CVP-201 When VOLUME is selected, the SECTION setting is fixed at ALL and the VALUE range is set in the custom style. • The reverb ... (page 140). After inserting a properly formatted disk (page 111) in step 2. Enter a name for the parameter selected in the Clavinova's disk drive, use the MEMORY No. The VALUE (or DEPTH) function displayed above the rightmost LCD button sets the amount or depth for the style file. When PAN is set...
...the custom style are initially selected. message will be reselected once you want to save to disk, or select ALL to save operation. 80 82 CVP-201 When VOLUME is selected, the SECTION setting is fixed at ALL and the VALUE range is set in the custom style. • The reverb ... (page 140). After inserting a properly formatted disk (page 111) in step 2. Enter a name for the parameter selected in the Clavinova's disk drive, use the MEMORY No. The VALUE (or DEPTH) function displayed above the rightmost LCD button sets the amount or depth for the style file. When PAN is set...
Owner's Manual
Page 83
... of the CUSTOM STYLE display. Style files can be saved to a disk. Creating Your Own Styles Custom styles must be stored in the Clavinova's memory before saving to disk" message will be displayed. Store the custom style (see step 12 on page 5 of the CUSTOM STYLE display. Press YES...delete from disk using the DELETE function on page 79), then try saving again. After inserting a disk that contains style files in memory before they can be displayed. CVP-201 83 81 message will be loaded from the disk. Use the FILE v and w buttons to disk, the "Store in the ...
... of the CUSTOM STYLE display. Style files can be saved to a disk. Creating Your Own Styles Custom styles must be stored in the Clavinova's memory before saving to disk" message will be displayed. Store the custom style (see step 12 on page 5 of the CUSTOM STYLE display. Press YES...delete from disk using the DELETE function on page 79), then try saving again. After inserting a disk that contains style files in memory before they can be displayed. CVP-201 83 81 message will be loaded from the disk. Use the FILE v and w buttons to disk, the "Store in the ...

Owner's Manual
Page 84
... to return to the CUSTOM STYLE display and simplify the current style (by clearing a part, etc.), or DELETE to judge how much memory (out of memory being used by each custom style, no intro, fill-in exactly the same way as the preset styles (page 51). You can refer...Your Own Styles Playing Back Your Custom Styles Once created, your original custom styles can be selected for each style is deleted. 84 CVP-201 82 s Insufficient Memory To Store This message will become available when a particular style is displayed next to the CUSTOM STYLE display, then simplify the style by...
... to return to the CUSTOM STYLE display and simplify the current style (by clearing a part, etc.), or DELETE to judge how much memory (out of memory being used by each custom style, no intro, fill-in exactly the same way as the preset styles (page 51). You can refer...Your Own Styles Playing Back Your Custom Styles Once created, your original custom styles can be selected for each style is deleted. 84 CVP-201 82 s Insufficient Memory To Store This message will become available when a particular style is displayed next to the CUSTOM STYLE display, then simplify the style by...

Owner's Manual
Page 85
... style (see "Exit Before Store" above), then re-enter the Custom Style mode. Creating Your Own Styles Use the MEMORY No. s Style Change Before Store If you attempt to select a different source style before storing the style you've just... the Custom Style mode before storing the style, the Clavinova will display a message like the one shown below: Select a memory number and press YES to store the style and exit, press NO to the Custom Style mode. s Exit Before Store ...the "Select style to delete" display, then select a different style to the Custom Style mode. 83 CVP-201 85
... style (see "Exit Before Store" above), then re-enter the Custom Style mode. Creating Your Own Styles Use the MEMORY No. s Style Change Before Store If you attempt to select a different source style before storing the style you've just... the Custom Style mode before storing the style, the Clavinova will display a message like the one shown below: Select a memory number and press YES to store the style and exit, press NO to the Custom Style mode. s Exit Before Store ...the "Select style to delete" display, then select a different style to the Custom Style mode. 83 CVP-201 85

Owner's Manual
Page 86
...TOUCH 1 2 3 4 BANK BANK RATION SETTING About the Yamaha Style File Format The Style File Format is inserted, the STYLE FILE LOAD display (see page 82), press the ALL LOAD LCD button rather than the LOAD SINGLE button. 86 CVP-201 84 In addition to open the DISK/ CUSTOM STYLE display...the main display, then press the [DISK/CUSTOM] button. When a Style File disk is Yamaha's original auto-accompaniment format, which has evolved through years of CVP-201 style data by selecting ALL as the memory number when the files were saved in Custom Style mode (see step 2 below) will appear ...
...TOUCH 1 2 3 4 BANK BANK RATION SETTING About the Yamaha Style File Format The Style File Format is inserted, the STYLE FILE LOAD display (see page 82), press the ALL LOAD LCD button rather than the LOAD SINGLE button. 86 CVP-201 84 In addition to open the DISK/ CUSTOM STYLE display...the main display, then press the [DISK/CUSTOM] button. When a Style File disk is Yamaha's original auto-accompaniment format, which has evolved through years of CVP-201 style data by selecting ALL as the memory number when the files were saved in Custom Style mode (see step 2 below) will appear ...
Owner's Manual
Page 87
...the display. If this case the "Too much data for the loaded style. • Some styles are too large to judge how much memory (out of memory being used by pressing the LISTEN LCD button. (The LISTEN function is not available in C Major when the LISTEN LCD button is displayed...ALL LOAD display.) To stop listening, press the LISTEN LCD button again, or press the [START/STOP] button. • If a tempo is deleted. 85 CVP-201 87 Using Style X Select a style file Select the desired style using the data dial or the [-] and [+] buttons. The existing style will be overwritten ...
...the display. If this case the "Too much data for the loaded style. • Some styles are too large to judge how much memory (out of memory being used by pressing the LISTEN LCD button. (The LISTEN function is not available in C Major when the LISTEN LCD button is displayed...ALL LOAD display.) To stop listening, press the LISTEN LCD button again, or press the [START/STOP] button. • If a tempo is deleted. 85 CVP-201 87 Using Style X Select a style file Select the desired style using the data dial or the [-] and [+] buttons. The existing style will be overwritten ...

Owner's Manual
Page 88
... not function while the style data is being loaded. NEVER attempt to play. Once loaded, style files can be played in memory only until the power is turned off. 86 88 CVP-201 The selected style can return to the normal play mode without removing the disk by pressing the [EXIT] button. Using...
... not function while the style data is being loaded. NEVER attempt to play. Once loaded, style files can be played in memory only until the power is turned off. 86 88 CVP-201 The selected style can return to the normal play mode without removing the disk by pressing the [EXIT] button. Using...

Owner's Manual
Page 89
...SETTING REGIST- Z Set up the controls as a registration in the Clavinova's memory. E • Basic setting: A ➔ The selected bank is displayed in the upper left corner of the Reference Booklet. Registration bank 87 CVP-201 89 ONE TOUCH 1 2 3 4 BANK BANK RATION SETTING Registration bank ...• Range: A - A total of 20 setups (5 banks containing 4 memories each) can recall whenever needed For a list of the settings...
...SETTING REGIST- Z Set up the controls as a registration in the Clavinova's memory. E • Basic setting: A ➔ The selected bank is displayed in the upper left corner of the Reference Booklet. Registration bank 87 CVP-201 89 ONE TOUCH 1 2 3 4 BANK BANK RATION SETTING Registration bank ...• Range: A - A total of 20 setups (5 banks containing 4 memories each) can recall whenever needed For a list of the settings...

Owner's Manual
Page 90
... the [REGISTRATION] button, press one of the buttons labeled [1] through [4] under REGISTRATION/ONE TOUCH SETTING corresponding to the registration memory you want to floppy disk for future recall (see page 152). You 5can also save the setup. REGISTRATION/ONE TOUCH SETTING...the buttons labeled [1] through [4] under REGISTRATION/ONE TOUCH SETTING corresponding to the registration memory where you want to save individual registrations (or complete sets of 20 registrations) to recall. 90 CVP-201 88 The panel settings that contains the desired registration. X Select a bank...Use ...
... the [REGISTRATION] button, press one of the buttons labeled [1] through [4] under REGISTRATION/ONE TOUCH SETTING corresponding to the registration memory you want to floppy disk for future recall (see page 152). You 5can also save the setup. REGISTRATION/ONE TOUCH SETTING...the buttons labeled [1] through [4] under REGISTRATION/ONE TOUCH SETTING corresponding to the registration memory where you want to save individual registrations (or complete sets of 20 registrations) to recall. 90 CVP-201 88 The panel settings that contains the desired registration. X Select a bank...Use ...

Owner's Manual
Page 91
...cannot be recalled in the ON/OFF function over the middle LCD button) is highlighted when a category to be stored in a registration memory to REGISTRATION (see page 11 in the Reference Booklet. ➔ The REGISTRATION [FREEZE] display appears. A pencil icon will be used ...settings. This allows you select [A-1] all panel settings will appear to the right of the recalled registration appears next to their factory default settings. CVP-201 91 89 ONE TOUCH 1 2 3 4 BANK BANK RATION SETTING ➔ The number of the registration number in the main display. The...
...cannot be recalled in the ON/OFF function over the middle LCD button) is highlighted when a category to be stored in a registration memory to REGISTRATION (see page 11 in the Reference Booklet. ➔ The REGISTRATION [FREEZE] display appears. A pencil icon will be used ...settings. This allows you select [A-1] all panel settings will appear to the right of the recalled registration appears next to their factory default settings. CVP-201 91 89 ONE TOUCH 1 2 3 4 BANK BANK RATION SETTING ➔ The number of the registration number in the main display. The...

Owner's Manual
Page 114
... notes for more information. can be also recorded. When Using Style File Disks When using the KBD VOL function in a manner appropriate to internal memory if it is not recorded. When a disk is not inserted... • A song can be recorded to the current accompaniment mode (pages 60...You Turn the Harmony Function or Split Mode On While Recording... • You can record harmony notes or left range keyboard part. 114 CVP-201 The keyboard guide lamps do so before entering the Song Record mode in the METRONOME display. ➔The metronome will be recorded; The internally...
... notes for more information. can be also recorded. When Using Style File Disks When using the KBD VOL function in a manner appropriate to internal memory if it is not recorded. When a disk is not inserted... • A song can be recorded to the current accompaniment mode (pages 60...You Turn the Harmony Function or Split Mode On While Recording... • You can record harmony notes or left range keyboard part. 114 CVP-201 The keyboard guide lamps do so before entering the Song Record mode in the METRONOME display. ➔The metronome will be recorded; The internally...

Owner's Manual
Page 126
... (Record mode display page 3) after selecting the song you wish to use Initial Edit function (page 130) to edit the initial parameter settings. 126 CVP-201 124 and Initial Edit, which lets you name a recorded song file; Track Edit, which lets you save the current panel settings to disk?" Z... be restored whenever you play the song Change the Clavinova's functions to the settings you want it to edit. X Select the Setup Memory function Use the PAGE [>] button to select the RECORD EDIT display (page 3 of the Reference Booklet. • The settings saved by the ...
... (Record mode display page 3) after selecting the song you wish to use Initial Edit function (page 130) to edit the initial parameter settings. 126 CVP-201 124 and Initial Edit, which lets you name a recorded song file; Track Edit, which lets you save the current panel settings to disk?" Z... be restored whenever you play the song Change the Clavinova's functions to the settings you want it to edit. X Select the Setup Memory function Use the PAGE [>] button to select the RECORD EDIT display (page 3 of the Reference Booklet. • The settings saved by the ...


