
Owner's Manual
Page 1
Make sure that the voltage selector is set at 240V when the unit is set for the voltage in your local AC mains voltage matches the voltage specified on the name plate on the bottom panel. In some areas a voltage selector may be provided on the panel. To change the setting use a "minus" screwdriver to rotate the selector dial so that the correct voltage appears next to the pointer on the bottom panel of the main keyboard unit near the power cord. The voltage selector is initially shipped. Owner's Manual IMPORTANT Check Your Power Supply Make sure that your area.
Make sure that the voltage selector is set at 240V when the unit is set for the voltage in your local AC mains voltage matches the voltage specified on the name plate on the bottom panel. In some areas a voltage selector may be provided on the panel. To change the setting use a "minus" screwdriver to rotate the selector dial so that the correct voltage appears next to the pointer on the bottom panel of the main keyboard unit near the power cord. The voltage selector is initially shipped. Owner's Manual IMPORTANT Check Your Power Supply Make sure that your area.
Owner's Manual
Page 2
... below and retain this page. The model number, serial number, power requirements, etc., are tested and approved by Yamaha. IMPORTANT NOTICE: All Yamaha electronic products are located on the enclosure. When replacement becomes necessary, contact a qualified service representative to produce them, ... to update existing units. 92-469- ➀ (bottom) ENVIRONMENTAL ISSUES: Yamaha strives to produce products that relate to return the defective parts. DO NOT modify this manual carefully and consult your purchase. Product performance and/or safety standards may also ...
... below and retain this page. The model number, serial number, power requirements, etc., are tested and approved by Yamaha. IMPORTANT NOTICE: All Yamaha electronic products are located on the enclosure. When replacement becomes necessary, contact a qualified service representative to produce them, ... to update existing units. 92-469- ➀ (bottom) ENVIRONMENTAL ISSUES: Yamaha strives to produce products that relate to return the defective parts. DO NOT modify this manual carefully and consult your purchase. Product performance and/or safety standards may also ...

Owner's Manual
Page 3
... to malfunction or incorrect operation. PRECAUTIONS PLEASE READ CAREFULLY BEFORE PROCEEDING * Please keep this manual in a safe place for about 1 week after the power is turned off. CAUTION ... position where anyone could be sure to the internal components. • Do not use . (1)B-7 CVP-201 3 1 If you experience any openings. • Never insert or remove an electric plug with ...assembly process. Otherwise, the instrument, TV, or radio may have the instrument inspected by qualified Yamaha service personnel. • Do not expose the instrument to rain, use it should sit ...
... to malfunction or incorrect operation. PRECAUTIONS PLEASE READ CAREFULLY BEFORE PROCEEDING * Please keep this manual in a safe place for about 1 week after the power is turned off. CAUTION ... position where anyone could be sure to the internal components. • Do not use . (1)B-7 CVP-201 3 1 If you experience any openings. • Never insert or remove an electric plug with ...assembly process. Otherwise, the instrument, TV, or radio may have the instrument inspected by qualified Yamaha service personnel. • Do not expose the instrument to rain, use it should sit ...
Owner's Manual
Page 4
... of the advanced and convenient functions of copyrighted software for your performances. q Reference Booklet This manual contains lists of Yamaha instruments and MIDI devices. XF Format The Yamaha XF format enhances the SMF (Standard MIDI File) standard with a wide range of voices, ...full compatibility with GM. q Owner's Manual This manual contains complete instructions for the future. GM System Level 1 "GM System Level 1" is the most common format used for purchasing the Yamaha Clavinova! Thank you for MIDI sequence files. By using the Custom Style feature. 4 CVP-201 2
... of the advanced and convenient functions of copyrighted software for your performances. q Reference Booklet This manual contains lists of Yamaha instruments and MIDI devices. XF Format The Yamaha XF format enhances the SMF (Standard MIDI File) standard with a wide range of voices, ...full compatibility with GM. q Owner's Manual This manual contains complete instructions for the future. GM System Level 1 "GM System Level 1" is the most common format used for purchasing the Yamaha Clavinova! Thank you for MIDI sequence files. By using the Custom Style feature. 4 CVP-201 2
Owner's Manual
Page 5
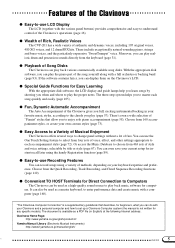
... backing in English) at the following Internet address: Clavinova Home Page: http://www.yamaha.co.jp/english/product/cl/ Yamaha Manual Library (Electronic Musical Instruments) http://www2.yamaha.co.jp/manual/english/ 3 CVP-201 5 Choose from 160 accompaniment styles, or create your current setup for computers. You...is a supplementary guidebook that allow you can even save your own custom styles (page 73). q Wealth of Rich, Realistic Voices The CVP-201 has a wide variety of authentic and dynamic voices, including 195 original voices, 480 XG voices, and 12 drum/SFX kits. Features ...
... backing in English) at the following Internet address: Clavinova Home Page: http://www.yamaha.co.jp/english/product/cl/ Yamaha Manual Library (Electronic Musical Instruments) http://www2.yamaha.co.jp/manual/english/ 3 CVP-201 5 Choose from 160 accompaniment styles, or create your current setup for computers. You...is a supplementary guidebook that allow you can even save your own custom styles (page 73). q Wealth of Rich, Realistic Voices The CVP-201 has a wide variety of authentic and dynamic voices, including 195 original voices, 480 XG voices, and 12 drum/SFX kits. Features ...
Owner's Manual
Page 6
...Second Voice 33 Changing the Main Voice in Custom Style Mode 84 Using Style Files 86 About the Yamaha Style File Format 86 Loading Styles from the Main Display 30 Keyboard Percussion 31 Changing the Keyboard ... Keyboard Settings for the Main Voice 31 Playing Two Voices Simultaneously - Table of Contents CHAPTER 1: Getting Ready About This Manual 8 Handling the Floppy Disk Drive (FDD) and Floppy Disks 9 Setting Up the Clavinova 10 Music Stand 10 Key ...the VOICE SELECT Display 29 Selecting Voices from a Disk 86 Playing Loaded Style Files 88 6 CVP-201 4
...Second Voice 33 Changing the Main Voice in Custom Style Mode 84 Using Style Files 86 About the Yamaha Style File Format 86 Loading Styles from the Main Display 30 Keyboard Percussion 31 Changing the Keyboard ... Keyboard Settings for the Main Voice 31 Playing Two Voices Simultaneously - Table of Contents CHAPTER 1: Getting Ready About This Manual 8 Handling the Floppy Disk Drive (FDD) and Floppy Disks 9 Setting Up the Clavinova 10 Music Stand 10 Key ...the VOICE SELECT Display 29 Selecting Voices from a Disk 86 Playing Loaded Style Files 88 6 CVP-201 4

Owner's Manual
Page 8
... DEMO sliders, and connectors as they appear on your Clavinova. CHAPTER 1: Getting Ready About This Manual This section explains the notation conventions that are used throughout this manual. s Bold characters ...Bold type represents items shown in the LCD display, as well as [DEMO...] in this manual. For example, the DEMO button is expressed HELP as the corresponding LCD buttons (i.e., the buttons directly below the "RIGHT1 VOICE" label at the bottom of an operation from its results. s Arrows in m. 8 CVP-201 6 s Square brackets Square brackets ...
... DEMO sliders, and connectors as they appear on your Clavinova. CHAPTER 1: Getting Ready About This Manual This section explains the notation conventions that are used throughout this manual. s Bold characters ...Bold type represents items shown in the LCD display, as well as [DEMO...] in this manual. For example, the DEMO button is expressed HELP as the corresponding LCD buttons (i.e., the buttons directly below the "RIGHT1 VOICE" label at the bottom of an operation from its results. s Arrows in m. 8 CVP-201 6 s Square brackets Square brackets ...
Owner's Manual
Page 11
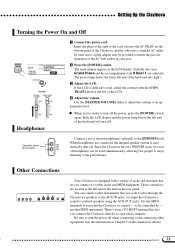
... the LCD display and the power lamp below the lower left of the keyboard also lights. Standard stereo phone jacks Connect a set of this manual for details. 9 PHONES CVP-201 11 Other Connections AUX IN R L /L+R AUX OUT R L /L+R IN PEDAL MIDI OUT THRU HOST SELECT PC-2 PC-1 MIDI Mac TO HOST Your Clavinova is...
... the LCD display and the power lamp below the lower left of the keyboard also lights. Standard stereo phone jacks Connect a set of this manual for details. 9 PHONES CVP-201 11 Other Connections AUX IN R L /L+R AUX OUT R L /L+R IN PEDAL MIDI OUT THRU HOST SELECT PC-2 PC-1 MIDI Mac TO HOST Your Clavinova is...
Owner's Manual
Page 21
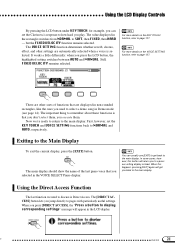
... the ones you press [DIRECT ACCESS], the "Press a button to display corresponding settings" message will get back to the main display. DIRECT ACCESS CVP-201 21 19 You can set the KEY TOUCH and VOICE SETTING functions back to NORMAL and AUTO, respectively. In some cases, however, this happens, ... lets you selected in the LCD display. The important thing to get you press the LCD button, the highlighted setting switches between AUTO and MANUAL. The value displayed in Demo mode (see page 14). EXIT The main display should show the name of functions that you jump directly to...
... the ones you press [DIRECT ACCESS], the "Press a button to display corresponding settings" message will get back to the main display. DIRECT ACCESS CVP-201 21 19 You can set the KEY TOUCH and VOICE SETTING functions back to NORMAL and AUTO, respectively. In some cases, however, this happens, ... lets you selected in the LCD display. The important thing to get you press the LCD button, the highlighted setting switches between AUTO and MANUAL. The value displayed in Demo mode (see page 14). EXIT The main display should show the name of functions that you jump directly to...

Owner's Manual
Page 32
...0 - 127 • Basic setting: 127 s Setting the Octave of the Main Voice The OCTAVE function in the KEYBOARD [RIGHT1] page to MANUAL. Z Press the PAN button. ➔ The PAN function is selected by setting the VOICE SETTING function (page 137) to change the volume of.... Press the [-] and [+] buttons simultaneously to restore the basic setting. Press the [-] and [+] buttons simultaneously to restore the basic setting. 32 CVP-201 30 PAN • Settings: L - - Some voices have octave settings that are selected automatically when the voice is selected. (Such settings are not...
...0 - 127 • Basic setting: 127 s Setting the Octave of the Main Voice The OCTAVE function in the KEYBOARD [RIGHT1] page to MANUAL. Z Press the PAN button. ➔ The PAN function is selected by setting the VOICE SETTING function (page 137) to change the volume of.... Press the [-] and [+] buttons simultaneously to restore the basic setting. Press the [-] and [+] buttons simultaneously to restore the basic setting. 32 CVP-201 30 PAN • Settings: L - - Some voices have octave settings that are selected automatically when the voice is selected. (Such settings are not...

Owner's Manual
Page 34
.... DIRECT ACCESS ➾ VOICE NTHEZER ORGAN STRINGS/ CHOIR DUAL REVERB PER- If the RIGHT2 VOICE function is selected in the KEYBOARD [RIGHT2] page to MANUAL. 34 CVP-201 32 You can use the VOLUME function in the main display, you adjust the pitch of the second voice up or down the VOLUME button...
.... DIRECT ACCESS ➾ VOICE NTHEZER ORGAN STRINGS/ CHOIR DUAL REVERB PER- If the RIGHT2 VOICE function is selected in the KEYBOARD [RIGHT2] page to MANUAL. 34 CVP-201 32 You can use the VOLUME function in the main display, you adjust the pitch of the second voice up or down the VOLUME button...
Owner's Manual
Page 38
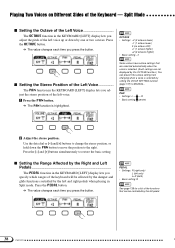
PAN • Settings: L - - Use the data dial or [-] and [+] buttons to MANUAL. Press the OCTAVE button. ➔ The value changes each time you press the button. PEDAL • Settings: R (right only) L (left only) L+R (both) • Basic setting: R... PAN function in the KEYBOARD [LEFT] display lets you adjust the stereo position of the keyboard will be controlled by the left pedal. 36 38 CVP-201 R • Basic setting: (center) X Adjust the stereo position. Press the [-] and [+] buttons simultaneously to the right. Split Mode s Setting the Octave of the Left ...
PAN • Settings: L - - Use the data dial or [-] and [+] buttons to MANUAL. Press the OCTAVE button. ➔ The value changes each time you press the button. PEDAL • Settings: R (right only) L (left only) L+R (both) • Basic setting: R... PAN function in the KEYBOARD [LEFT] display lets you adjust the stereo position of the keyboard will be controlled by the left pedal. 36 38 CVP-201 R • Basic setting: (center) X Adjust the stereo position. Press the [-] and [+] buttons simultaneously to the right. Split Mode s Setting the Octave of the Left ...

Owner's Manual
Page 93
... the Lyric Display function of the Clavinova. Sliding shutter DISK IN USE Label 91 CVP-201 93 The Song Play mode is normally not output via MIDI. See "Playing Other Types of Yamaha DOC software, XG software, and Disklavier PianoSoft as well as GM software. However,...play back. PIANO GUITAR VOICE SYNTHESIZER ORGAN STRINGS/ CHOIR DUAL REVERB BRASS SAX / FLUTE BASS PER- Any songs exceeding this Owner's Manual are for information on song data that is showing. CUSSION ENSEMBLE XG SPLIT EFFECT REGISTRATION/ONE TOUCH SETTING REGIST- CHAPTER 7: Song ...
... the Lyric Display function of the Clavinova. Sliding shutter DISK IN USE Label 91 CVP-201 93 The Song Play mode is normally not output via MIDI. See "Playing Other Types of Yamaha DOC software, XG software, and Disklavier PianoSoft as well as GM software. However,...play back. PIANO GUITAR VOICE SYNTHESIZER ORGAN STRINGS/ CHOIR DUAL REVERB BRASS SAX / FLUTE BASS PER- Any songs exceeding this Owner's Manual are for information on song data that is showing. CUSSION ENSEMBLE XG SPLIT EFFECT REGISTRATION/ONE TOUCH SETTING REGIST- CHAPTER 7: Song ...
Owner's Manual
Page 137
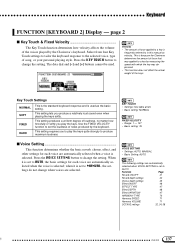
...play the keys. This setting requires you produce a relatively loud sound even when playing the keys softly. VOICE SETTING • Settings: AUTO, MANUAL • Basic Setting: AUTO The following settings are automatically selected when VOICE SETTING is set to produce maximum loudness KEY TOUCH • Settings:...TYPE 47 Effect DEPTH 48 Effect VARIATION 47 HARMONY TYPE 70 Harmony SPEED 71 Harmony VOLUME 71 OCTAVE settings 32, 34, 38 135 CVP-201 137 when it is selected; This is set the loudness of the keys. Press the VOICE SETTING button to change the setting....
...play the keys. This setting requires you produce a relatively loud sound even when playing the keys softly. VOICE SETTING • Settings: AUTO, MANUAL • Basic Setting: AUTO The following settings are automatically selected when VOICE SETTING is set to produce maximum loudness KEY TOUCH • Settings:...TYPE 47 Effect DEPTH 48 Effect VARIATION 47 HARMONY TYPE 70 Harmony SPEED 71 Harmony VOLUME 71 OCTAVE settings 32, 34, 38 135 CVP-201 137 when it is selected; This is set the loudness of the keys. Press the VOICE SETTING button to change the setting....
Owner's Manual
Page 160
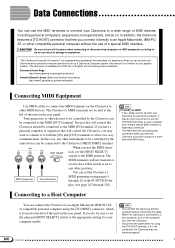
...other devices to be controlled by the same device can be sure to set up a Clavinova-Computer system (the manual is a supplementary guidebook that describes, for your computer model. • Turn off the power when connecting or...) at the following Internet address: Clavinova Home Page: http://www.yamaha.co.jp/english/product/cl/ Yamaha Manual Library (Electronic Musical Instruments) http://www2.yamaha.co.jp/manual/english/ Connecting MIDI Equipment Use MIDI cables to connect the MIDI terminals... not function properly. Devices that lets you use the MIDI termi- CVP-201 158
...other devices to be controlled by the same device can be sure to set up a Clavinova-Computer system (the manual is a supplementary guidebook that describes, for your computer model. • Turn off the power when connecting or...) at the following Internet address: Clavinova Home Page: http://www.yamaha.co.jp/english/product/cl/ Yamaha Manual Library (Electronic Musical Instruments) http://www2.yamaha.co.jp/manual/english/ Connecting MIDI Equipment Use MIDI cables to connect the MIDI terminals... not function properly. Devices that lets you use the MIDI termi- CVP-201 158

Owner's Manual
Page 161
...] connector of the Clavinova to the RS-232C port on your software operation manual: if it requires a 31,250 bps data transfer rate, set to your software owner's manual for information on the Yamaha Web site: http://www.yamaha-xg.com CVP-201 161 159 Refer to 1 MHz. HOST SELECT PC-2 PC-1 MIDI Mac TO HOST...
...] connector of the Clavinova to the RS-232C port on your software operation manual: if it requires a 31,250 bps data transfer rate, set to your software owner's manual for information on the Yamaha Web site: http://www.yamaha-xg.com CVP-201 161 159 Refer to 1 MHz. HOST SELECT PC-2 PC-1 MIDI Mac TO HOST...
Owner's Manual
Page 172
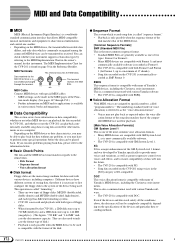
..."720 KB" and "1.44 MB" indicate the data memory capacity. This is a common format used with various Yamaha software. • The CVP-201 is compatible with many of Yamaha's MIDI devices, including the Clavinova series instruments. DOC This voice allocation format is compatible with XG. • ... device to be completely compatible, depending on data compatibility: whether or not other instruments or on page 30 in the owner's manual for that instrument. MIDI and Data Compatibility s MIDI MIDI (Musical Instrument Digital Interface) is a worldwide standard communication interface that...
..."720 KB" and "1.44 MB" indicate the data memory capacity. This is a common format used with various Yamaha software. • The CVP-201 is compatible with many of Yamaha's MIDI devices, including the Clavinova series instruments. DOC This voice allocation format is compatible with XG. • ... device to be completely compatible, depending on data compatibility: whether or not other instruments or on page 30 in the owner's manual for that instrument. MIDI and Data Compatibility s MIDI MIDI (Musical Instrument Digital Interface) is a worldwide standard communication interface that...

Owner's Manual
Page 175
...Yamaha may void your authority, granted by the interference. Follow all installations. The wire which is coloured BROWN must be used according to the instructions found in the users manual, may not correspond with the requirements listed in FCC Regulations, Part 15 for Class "B" digital devices. ATTENTION: POUR É...;VITER LES CHOCS ÉLECTRIQUES, INTRODUIRE LA LAME LA PLUS LARGE DE...
...Yamaha may void your authority, granted by the interference. Follow all installations. The wire which is coloured BROWN must be used according to the instructions found in the users manual, may not correspond with the requirements listed in FCC Regulations, Part 15 for Class "B" digital devices. ATTENTION: POUR É...;VITER LES CHOCS ÉLECTRIQUES, INTRODUIRE LA LAME LA PLUS LARGE DE...
Owner's Manual
Page 176
... fier and headphones or speaker/s, may exist. 12. PLEASE KEEP THIS MANUAL 92-469-2 174 These precautions include, but are ; The required supply voltage is recommended by Yamaha are designed for enclosed installations are manufactured specifically for enclosed installations, should ...also be installed in the Special Message Section of this product close to service this manual. 3. For name plate location, please refer...
... fier and headphones or speaker/s, may exist. 12. PLEASE KEEP THIS MANUAL 92-469-2 174 These precautions include, but are ; The required supply voltage is recommended by Yamaha are designed for enclosed installations are manufactured specifically for enclosed installations, should ...also be installed in the Special Message Section of this product close to service this manual. 3. For name plate location, please refer...

