
Owners Manual
Page 2
... is found to the instructions found in all installation instructions. If you can be used according to comply with other electronic devices. FCC INFORMATION COMPLIANCE INFORMATION STATEMENT (DECLARATION OF CONFORMITY PROCEDURE) Responsible Party: Address: Telephone: Fax: Type of Equipment: Model Name: Yamaha Corporation of the FCC Rules. See user manual instructions if interference to eliminate the problem by using one...
... is found to the instructions found in all installation instructions. If you can be used according to comply with other electronic devices. FCC INFORMATION COMPLIANCE INFORMATION STATEMENT (DECLARATION OF CONFORMITY PROCEDURE) Responsible Party: Address: Telephone: Fax: Type of Equipment: Model Name: Yamaha Corporation of the FCC Rules. See user manual instructions if interference to eliminate the problem by using one...

Owners Manual
Page 9
.... STEP Start using the CRW8824S 6 drive! Double-click on your needs. 1 Setup Flowchart This flowchart shows the procedure for whatever purpose suits your hard disk, or for setting up the CRW8824S drive. STEP Install the CD writing software 5 For details about how to install the software, refer to Control Panel | System | Device Manager tab. STEP Obtain a SCSI adapter card NO 1-1 Recommended models: Adaptec AHA-2940...
.... STEP Start using the CRW8824S 6 drive! Double-click on your needs. 1 Setup Flowchart This flowchart shows the procedure for whatever purpose suits your hard disk, or for setting up the CRW8824S drive. STEP Install the CD writing software 5 For details about how to install the software, refer to Control Panel | System | Device Manager tab. STEP Obtain a SCSI adapter card NO 1-1 Recommended models: Adaptec AHA-2940...

Owners Manual
Page 11
... when backing up to meet the following set of 50 ~ 100MB free hard disk space. Make sure it . Data is ideal when making multiple copies of errors occurring. Yamaha recommends any of the data on a hard disk prior to writing to disc much hard disk space as an image file. 3 This software must support the CRW8824S drive for writing to your computer system will need...
... when backing up to meet the following set of 50 ~ 100MB free hard disk space. Make sure it . Data is ideal when making multiple copies of errors occurring. Yamaha recommends any of the data on a hard disk prior to writing to disc much hard disk space as an image file. 3 This software must support the CRW8824S drive for writing to your computer system will need...

Owners Manual
Page 12
... supports "CD-RW." * Compatible with "Orange Book Part 2." * When writing at 2X on the second type of reading CD-RW discs. • If these discs on a device (e.g., CD-ROM drive) that carry the following logos. Part 2 of the book's pages. 4 URL: http://www.yamaha.co...CRW8824S can write/rewrite these discs at 8X and 4X speeds. • These discs can write/rewrite at 4X and 2X speeds on the first type of disc and at 8X or 6X speeds, please use "high-speed writing capable" discs. When using a CD-R/RW drive, a drive bearing the High Speed CD-RW logo must be used in a CD-R/RW drive...
... supports "CD-RW." * Compatible with "Orange Book Part 2." * When writing at 2X on the second type of reading CD-RW discs. • If these discs on a device (e.g., CD-ROM drive) that carry the following logos. Part 2 of the book's pages. 4 URL: http://www.yamaha.co...CRW8824S can write/rewrite these discs at 8X and 4X speeds. • These discs can write/rewrite at 4X and 2X speeds on the first type of disc and at 8X or 6X speeds, please use "high-speed writing capable" discs. When using a CD-R/RW drive, a drive bearing the High Speed CD-RW logo must be used in a CD-R/RW drive...
Owners Manual
Page 15
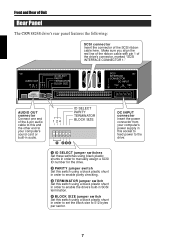
... line of the ribbon cable with pin 1 of the s4u-ppipnliaeudd4iopcainbaleudtoiothcisabalned tohethoisthaenr denthdeto oyothuerrceonmdptuoteyro'sur csoumnpductearr'sd soorund cbaurildt-ionr abuudilito-i.n audio. 1 24 ID SELECT PARITY TERMINATOR BLOCK SIZE DC INPUT connector Insert the power connector from your computer's power supply in this socket to feed power to the drive. 1 ID SELECT jumper switches Set these switches using...
... line of the ribbon cable with pin 1 of the s4u-ppipnliaeudd4iopcainbaleudtoiothcisabalned tohethoisthaenr denthdeto oyothuerrceonmdptuoteyro'sur csoumnpductearr'sd soorund cbaurildt-ionr abuudilito-i.n audio. 1 24 ID SELECT PARITY TERMINATOR BLOCK SIZE DC INPUT connector Insert the power connector from your computer's power supply in this socket to feed power to the drive. 1 ID SELECT jumper switches Set these switches using...
Owners Manual
Page 16
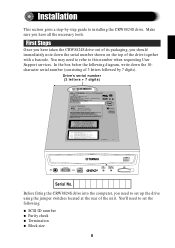
Drive's serial number (3 letters + 7 digits) CD-REWRITABLE DRIVE MODEL NO. CLASS 1 LASER PRODUCT LASER KLASSE 1 PRODUKT LUOKAN 1 LASERLAITE KLASS 1 LASER APPARAT PRODUIT LASER DE CLASSE 1 CAUTION - RADIATION VISIBLE ET / OU INVISIBLE LORSQUE L'APPAREIL EST OUVERT. You'll need to set up the drive using the jumper switches located at the rear of 3 letters followed by -step guide to this device must...
Drive's serial number (3 letters + 7 digits) CD-REWRITABLE DRIVE MODEL NO. CLASS 1 LASER PRODUCT LASER KLASSE 1 PRODUKT LUOKAN 1 LASERLAITE KLASS 1 LASER APPARAT PRODUIT LASER DE CLASSE 1 CAUTION - RADIATION VISIBLE ET / OU INVISIBLE LORSQUE L'APPAREIL EST OUVERT. You'll need to set up the drive using the jumper switches located at the rear of 3 letters followed by -step guide to this device must...

Owners Manual
Page 20
... Size jumper switch to "OFF" and should normally be set to "ON." It is necessary when installing the CRW8824S on a UNIX-based workstation. Termination ON (Default) 1 24 ID SELECT PARITY TERMINATOR BLOCK SIZE Installation Termination OFF 1 24 ID SELECT PARITY TERMINATOR BLOCK SIZE Set to "ON" if CRW8824S drive is last device on SCSI chain 4 Block Size The data block...
... Size jumper switch to "OFF" and should normally be set to "ON." It is necessary when installing the CRW8824S on a UNIX-based workstation. Termination ON (Default) 1 24 ID SELECT PARITY TERMINATOR BLOCK SIZE Installation Termination OFF 1 24 ID SELECT PARITY TERMINATOR BLOCK SIZE Set to "ON" if CRW8824S drive is last device on SCSI chain 4 Block Size The data block...

Owners Manual
Page 21
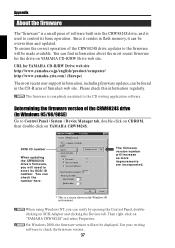
Installation Installing the CRW8824S Drive You can install the CRW8824S drive in addition to the computer's existing CD-ROM drive. CD-ROM drive CRW8824S When replacing an IDE-type CD-ROM drive with the CRW8824S drive, you can replace the computer's existing CD-ROM drive with many desktop-type designs, you can fit the CRW8824S drive in one of two possible ways: As an additional drive If the casing of your computer has a spare 5.25-inch drive bay available, such...
Installation Installing the CRW8824S Drive You can install the CRW8824S drive in addition to the computer's existing CD-ROM drive. CD-ROM drive CRW8824S When replacing an IDE-type CD-ROM drive with the CRW8824S drive, you can replace the computer's existing CD-ROM drive with many desktop-type designs, you can fit the CRW8824S drive in one of two possible ways: As an additional drive If the casing of your computer has a spare 5.25-inch drive bay available, such...

Owners Manual
Page 26
...connect the audio cable to write audio CDs since the audio is connected to "AUDIO OUT" of the CRW8824S drive. The connector at the top. However, if a CD-ROM drive is already connected to the sound card, you should use this drive to the headphone jack on the CRW8824S drive via the computer... CDs on the CRW8824S drive's front panel. 18 It is at other end of the audio cable has two connectors: a vertically-mounted type (PH) and a horizontally-mounted type (MPC). One end of the cable is passed over the SCSI bus. Installation 7 Connect the audio cable between the CRW8824S drive ...
...connect the audio cable to write audio CDs since the audio is connected to "AUDIO OUT" of the CRW8824S drive. The connector at the top. However, if a CD-ROM drive is already connected to the sound card, you should use this drive to the headphone jack on the CRW8824S drive via the computer... CDs on the CRW8824S drive's front panel. 18 It is at other end of the audio cable has two connectors: a vertically-mounted type (PH) and a horizontally-mounted type (MPC). One end of the cable is passed over the SCSI bus. Installation 7 Connect the audio cable between the CRW8824S drive ...

Owners Manual
Page 29
... been properly installed. Similarly, double-click on "CDROM." If there is a screen shown in the Windows 98 environment. # Double-click "YAMAHA CRW8824S" listed under "CDROM" (in the Windows 98 environment. $ Install the CD writing software. With "Sync data transfer" enabled, the data transfer between your CRW8824S drive and your ...the Devices tab. When using Windows NT, "Sync data transfer" will not need to the icon for the CRW8824S drive or the SCSI adapter card, this setting. * This is synchronized, meaning that it should be selected if the SCSI adapter card supports this...
... been properly installed. Similarly, double-click on "CDROM." If there is a screen shown in the Windows 98 environment. # Double-click "YAMAHA CRW8824S" listed under "CDROM" (in the Windows 98 environment. $ Install the CD writing software. With "Sync data transfer" enabled, the data transfer between your CRW8824S drive and your ...the Devices tab. When using Windows NT, "Sync data transfer" will not need to the icon for the CRW8824S drive or the SCSI adapter card, this setting. * This is synchronized, meaning that it should be selected if the SCSI adapter card supports this...

Owners Manual
Page 30
Installation Replacing an Existing CD-ROM Drive with your computer and unplug it from the AC outlet. If you need to be an IDE-type. 1 Power down your computer for removing the casing and fitting the drive in the process, make sure you run the risk of receiving an electric shock and/or... and damaging components including the CRW8824S drive. 2 Remove the outer casing of the computer. The method for further details. 22 Refer to the documentation that came with the CRW8824S The existing CD-ROM drive in the computer is assumed to remove screws in the drive bay can vary depending on the...
Installation Replacing an Existing CD-ROM Drive with your computer and unplug it from the AC outlet. If you need to be an IDE-type. 1 Power down your computer for removing the casing and fitting the drive in the process, make sure you run the risk of receiving an electric shock and/or... and damaging components including the CRW8824S drive. 2 Remove the outer casing of the computer. The method for further details. 22 Refer to the documentation that came with the CRW8824S The existing CD-ROM drive in the computer is assumed to remove screws in the drive bay can vary depending on the...

Owners Manual
Page 31
Drain any static charge You can permanently damage equipment if you touch it while there is any static charge that may have built up inside your body. 4 Disconnect all the cables connected to the rear of the computer's chassis or power supply unit to drain any static charge in your body. Audio cable ARANUGADLGIOOGL CASBLLAEVESELECT MASTER 39 40 HOST INTERFACE 1 2 +5V POWER G G +12V IDE cable 4-pin power connector 23 Installation 3 Touch a metal part of the existing CD-ROM drive, and also disconnect the audio cable from the sound card or motherboard's audio connector.
Drain any static charge You can permanently damage equipment if you touch it while there is any static charge that may have built up inside your body. 4 Disconnect all the cables connected to the rear of the computer's chassis or power supply unit to drain any static charge in your body. Audio cable ARANUGADLGIOOGL CASBLLAEVESELECT MASTER 39 40 HOST INTERFACE 1 2 +5V POWER G G +12V IDE cable 4-pin power connector 23 Installation 3 Touch a metal part of the existing CD-ROM drive, and also disconnect the audio cable from the sound card or motherboard's audio connector.

Owners Manual
Page 32
Slide the CRW8824S drive backwards into the now-vacant bay without applying excessive force. Then tighten the four fastening screws on the sides of the unit by hand to hold the drive in place, then slide the drive forward and out from the drive bay. CD-ROM drive CRW8824S 6 Leave enough room behind the drive for connecting the power, SCSI and audio cables. Installation 5 Remove the four screws holding the CD-ROM drive in place. 24
Slide the CRW8824S drive backwards into the now-vacant bay without applying excessive force. Then tighten the four fastening screws on the sides of the unit by hand to hold the drive in place, then slide the drive forward and out from the drive bay. CD-ROM drive CRW8824S 6 Leave enough room behind the drive for connecting the power, SCSI and audio cables. Installation 5 Remove the four screws holding the CD-ROM drive in place. 24

Owners Manual
Page 34
... audio cable to write audio CDs since the audio is already connected to the sound card, you should use this drive to play back your sound card's connector. One end of the cable is required for playing back audio CDs on the CRW8824S drive's front panel. 26 Choose one that matches your audio CDs. Installation 8 Connect the audio cable between the CRW8824S drive...
... audio cable to write audio CDs since the audio is already connected to the sound card, you should use this drive to play back your sound card's connector. One end of the cable is required for playing back audio CDs on the CRW8824S drive's front panel. 26 Choose one that matches your audio CDs. Installation 8 Connect the audio cable between the CRW8824S drive...

Owners Manual
Page 37
... data transfer" enabled, the data transfer between your CRW8824S drive and your SCSI card for further details. If the drive has been correctly installed, it should be listed as shown below . For Windows 2000, double-click System in the Control Panel, select the Hardware tab, and click the Device Manager button in System Properties. $ Double-click "YAMAHA CRW8824S" listed under "CDROM...
... data transfer" enabled, the data transfer between your CRW8824S drive and your SCSI card for further details. If the drive has been correctly installed, it should be listed as shown below . For Windows 2000, double-click System in the Control Panel, select the Hardware tab, and click the Device Manager button in System Properties. $ Double-click "YAMAHA CRW8824S" listed under "CDROM...

Owners Manual
Page 40
... under Windows NT/2000, update to the most recent drivers supplied by the SCSI card manufacturer. Also, is not recognized. Generally, the BIOS (Basic Input / Output System) is loaded. Is the SCSI adapter card recognized correctly by the manufacturer of the SCSI card or the CD-writing software. The CRW8824S drive is the SCSI cable connected correctly? Is the 4-pin power cable...
... under Windows NT/2000, update to the most recent drivers supplied by the SCSI card manufacturer. Also, is not recognized. Generally, the BIOS (Basic Input / Output System) is loaded. Is the SCSI adapter card recognized correctly by the manufacturer of the SCSI card or the CD-writing software. The CRW8824S drive is the SCSI cable connected correctly? Is the 4-pin power cable...

Owners Manual
Page 42
... stated on a CD-RW disc, the actual data capacity is writing to disc. However, for various possible reasons, you may be problems with the disc itself. Errors can occur if you knock the CRW8824S drive while it is displayed. There may still encounter errors even if you are using a 32X or 42X speed CD-ROM drive. Troubleshooting The drive ejects or fails to read the disc...
... stated on a CD-RW disc, the actual data capacity is writing to disc. However, for various possible reasons, you may be problems with the disc itself. Errors can occur if you knock the CRW8824S drive while it is displayed. There may still encounter errors even if you are using a 32X or 42X speed CD-ROM drive. Troubleshooting The drive ejects or fails to read the disc...
Owners Manual
Page 45
... the CD writing application software. Since it resides in flash memory, it can verify by opening the Control Panel, doubleclicking on YAMAHA CD-R/RW Drive web site. SCSI ID number When updating the CRW8824S drive's firmware, you can be found in the Windows 98 environment. You can find information about the most recent user support information, including firmware updates, can check the number here. URL for YAMAHA CD-R/RW Drive web...
... the CD writing application software. Since it resides in flash memory, it can verify by opening the Control Panel, doubleclicking on YAMAHA CD-R/RW Drive web site. SCSI ID number When updating the CRW8824S drive's firmware, you can be found in the Windows 98 environment. You can find information about the most recent user support information, including firmware updates, can check the number here. URL for YAMAHA CD-R/RW Drive web...

Owners Manual
Page 47
Appendix CRW8824S Specifications Supported Formats CD-DA CD-G Write q q CD TEXT q CD-ROM (*1) q Mixed Mode CD-ROM (CD-ROM+CD-DA) CD-ROM XA (*1) Photo CD (*1) Video CD CD-i q q q (*2) q q CD EXTRA q *1: includes multisession *2: suitable disc required Read q q q q q q q q q (*3) q *3: suitable application software required Play q (*4) No No No q (*4) q (*4) q (*4) q (*4) No q (*4) *4: suitable application software required for playback Note) Excludes ADPCM Encode/Decode & Video Encode/Decode functions Writing Methods Disc-at-Once (DAO) Session-at-Once (SAO) Track-at-Once (TAO...
Appendix CRW8824S Specifications Supported Formats CD-DA CD-G Write q q CD TEXT q CD-ROM (*1) q Mixed Mode CD-ROM (CD-ROM+CD-DA) CD-ROM XA (*1) Photo CD (*1) Video CD CD-i q q q (*2) q q CD EXTRA q *1: includes multisession *2: suitable disc required Read q q q q q q q q q (*3) q *3: suitable application software required Play q (*4) No No No q (*4) q (*4) q (*4) q (*4) No q (*4) *4: suitable application software required for playback Note) Excludes ADPCM Encode/Decode & Video Encode/Decode functions Writing Methods Disc-at-Once (DAO) Session-at-Once (SAO) Track-at-Once (TAO...

Owners Manual
Page 49
... 35 E Eject button 6 Ejecting the Disc 30 F firmware 37 front panel 6 H headphone jack 6 headphone volume control 6 High Speed CD-RW discs 4 I ID Select 7, 10 IDE cable 23 J jumper switches 9 O ON/DISC LED 6 P Packet Writing 36 packet 36 paper clip 31 parity 7, 11 Phillips Screwdriver 5 power connector 23 R READ/WRITE LED 6 rear panel 7 replacement drive 13 S SCSI adapter card 17, 25 SCSI connector 7 SCSI driver 32...
... 35 E Eject button 6 Ejecting the Disc 30 F firmware 37 front panel 6 H headphone jack 6 headphone volume control 6 High Speed CD-RW discs 4 I ID Select 7, 10 IDE cable 23 J jumper switches 9 O ON/DISC LED 6 P Packet Writing 36 packet 36 paper clip 31 parity 7, 11 Phillips Screwdriver 5 power connector 23 R READ/WRITE LED 6 rear panel 7 replacement drive 13 S SCSI adapter card 17, 25 SCSI connector 7 SCSI driver 32...


