
Owner's Manual
Page 3
... of key connections, and pad alignment, which should clearly explain these precautions. Also, perform instrument maintenance in damage. Never modify the instrument. Please follow and obey these precautions to temperature, humidity, etc. Placed on high-end models to heat sources such as heaters, etc. Take care not to protect you and others from any damage or injuries. Bassoon Owner's Manual...
... of key connections, and pad alignment, which should clearly explain these precautions. Also, perform instrument maintenance in damage. Never modify the instrument. Please follow and obey these precautions to temperature, humidity, etc. Placed on high-end models to heat sources such as heaters, etc. Take care not to protect you and others from any damage or injuries. Bassoon Owner's Manual...
Owner's Manual
Page 4
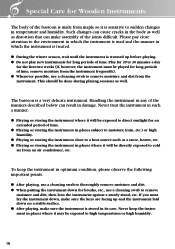
... surface. ● After playing, make sure the keys are facing up before playing. ● Do not play new instruments for long periods of time, remove moisture from the instrument frequently). ● Whenever possible, use a cleaning swab to remove moisture and dirt, then lean the instrument against a sturdy stand, etc. To keep the instrument in temperature and humidity. The bassoon is sensitive to direct sunlight...
... surface. ● After playing, make sure the keys are facing up before playing. ● Do not play new instruments for long periods of time, remove moisture from the instrument frequently). ● Whenever possible, use a cleaning swab to remove moisture and dirt, then lean the instrument against a sturdy stand, etc. To keep the instrument in temperature and humidity. The bassoon is sensitive to direct sunlight...
Owner's Manual
Page 5
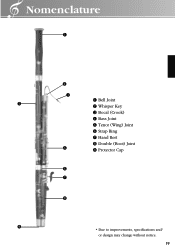
Nomenclature q w e q Bell Joint r w Whisper Key e Bocal (Crook) r Bass Joint t Tenor (Wing) Joint y Strap Ring u Hand Rest i Double (Boot) Joint t o Protector Cap y u i o * Due to improvements, specifications and/ or design may change without notice. 19
Nomenclature q w e q Bell Joint r w Whisper Key e Bocal (Crook) r Bass Joint t Tenor (Wing) Joint y Strap Ring u Hand Rest i Double (Boot) Joint t o Protector Cap y u i o * Due to improvements, specifications and/ or design may change without notice. 19
Owner's Manual
Page 6
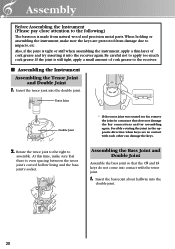
... wood and precision metal parts.When holding or assembling the instrument, make sure that does not damage the key connections and try inserting it into contact with each other can damage the keys. 2. Assembling the Bass Joint and Double Joint Assemble the bass joint so that the C# and Eb keys do not come into the...remove the joint in a manner that there is even spacing between the tenor joint's curved hollow lining and the bass joint's socket. At this time, make sure the keys are in contact with the tenor joint. 1. Rotate the tenor joint to the right to apply too much cork...
... wood and precision metal parts.When holding or assembling the instrument, make sure that does not damage the key connections and try inserting it into contact with each other can damage the keys. 2. Assembling the Bass Joint and Double Joint Assemble the bass joint so that the C# and Eb keys do not come into the...remove the joint in a manner that there is even spacing between the tenor joint's curved hollow lining and the bass joint's socket. At this time, make sure the keys are in contact with the tenor joint. 1. Rotate the tenor joint to the right to apply too much cork...
Owner's Manual
Page 7
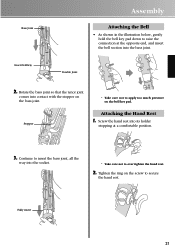
Bass Joint Insert halfway Assembly Attaching the Bell • As shown in the illustration below, gently hold the bell key pad down to raise the connection at a comfortable position. 3. Continue to insert the bass joint, all the way into contact with the stopper on the bass joint. * Take care not to apply too much pressure on the screw...
Bass Joint Insert halfway Assembly Attaching the Bell • As shown in the illustration below, gently hold the bell key pad down to raise the connection at a comfortable position. 3. Continue to insert the bass joint, all the way into contact with the stopper on the bass joint. * Take care not to apply too much pressure on the screw...
Owner's Manual
Page 8
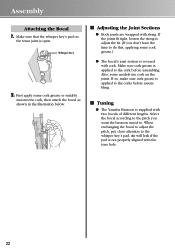
... not properly aligned with cork. When exchanging the bocal to adjust the pitch, pay close attention to the corks before assembling. Select the bocal according to the pitch you don't have the time to the cork before assembling. ■ Tuning ● The Yamaha Bassoon is supplied with string. Whisper Key 2. If so, make sure cork grease is applied to the whisper key's pad. Assembly Attaching the Bocal 1.
... not properly aligned with cork. When exchanging the bocal to adjust the pitch, pay close attention to the corks before assembling. Select the bocal according to the pitch you don't have the time to the cork before assembling. ■ Tuning ● The Yamaha Bassoon is supplied with string. Whisper Key 2. If so, make sure cork grease is applied to the whisper key's pad. Assembly Attaching the Bocal 1.

Owner's Manual
Page 9
... Care When Handling the Bassoon Don't let moisture accumulate in the wider of the parts. Remove the reed. 2. Also, refer to the "Maintenance" section on the following page to apply too much force on the B key. 4. Clean each of the double joint's tubes while playing the instrument. 23 Remove the bell and bass joints as one...
... Care When Handling the Bassoon Don't let moisture accumulate in the wider of the parts. Remove the reed. 2. Also, refer to the "Maintenance" section on the following page to apply too much force on the B key. 4. Clean each of the double joint's tubes while playing the instrument. 23 Remove the bell and bass joints as one...

Owner's Manual
Page 10
... moisture. * Please take note that may be in the illustration below and make sure moisture and dirt is thoroughly removed from the inside of the instrument after playing. ■ Caring for the tenor joint) through the other to remove moisture from the Ab key hold if any moisture that placing the C# tone hole face down can...
... moisture. * Please take note that may be in the illustration below and make sure moisture and dirt is thoroughly removed from the inside of the instrument after playing. ■ Caring for the tenor joint) through the other to remove moisture from the Ab key hold if any moisture that placing the C# tone hole face down can...
Owner's Manual
Page 11
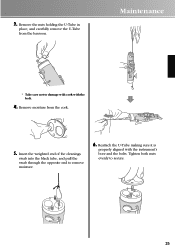
Remove the nuts holding the U-Tube in place, and carefully remove the U-Tube from the cork. 5. Maintenance * Take care not to damage with cork with the instrument's bore and the bolts. Tighten both nuts evenly to remove moisture. 6. Reattach the U-Tube making sure it is properly aligned with the bolt. 4. Remove moisture from the bassoon. Insert the weighted end of the cleanings swab into the black tube, and pull the swab through the opposite end to secure. 25 3.
Remove the nuts holding the U-Tube in place, and carefully remove the U-Tube from the cork. 5. Maintenance * Take care not to damage with cork with the instrument's bore and the bolts. Tighten both nuts evenly to remove moisture. 6. Reattach the U-Tube making sure it is properly aligned with the bolt. 4. Remove moisture from the bassoon. Insert the weighted end of the cleanings swab into the black tube, and pull the swab through the opposite end to secure. 25 3.
Owner's Manual
Page 12
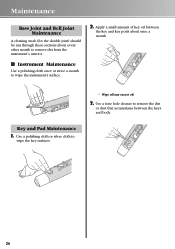
Key and Pad Maintenance 1. Use a polishing cloth or silver cloth to wipe the instrument's surface. 2. Use a tone hole cleaner to remove the dirt or dust that accumulates between the key and key posts about every other month to remove dirt from the instrument's interior. ■ Instrument Maintenance Use a polishing cloth once or twice a month to wipe the key surfaces. * Wipe off any excess...
Key and Pad Maintenance 1. Use a polishing cloth or silver cloth to wipe the instrument's surface. 2. Use a tone hole cleaner to remove the dirt or dust that accumulates between the key and key posts about every other month to remove dirt from the instrument's interior. ■ Instrument Maintenance Use a polishing cloth once or twice a month to wipe the key surfaces. * Wipe off any excess...

Owner's Manual
Page 13
Use a cleaning swab to remove dirt and moisture from the pads. * Use a cleaning swab to remove moisture from the Ab tone hole. ■ Pay Attention to the Following When Storing the Instrument ● Never place an object on the case that may apply pressure to the instrument's keys or body. ● Never apply excessive force to the instrument or case. ● Make sure the instrument is stored in its case when not in use. ● Do not warm the instrument with air from, or put the instrument close to a heat source such as a heater, furnace vent, etc. 27 Maintenance 4.
Use a cleaning swab to remove dirt and moisture from the pads. * Use a cleaning swab to remove moisture from the Ab tone hole. ■ Pay Attention to the Following When Storing the Instrument ● Never place an object on the case that may apply pressure to the instrument's keys or body. ● Never apply excessive force to the instrument or case. ● Make sure the instrument is stored in its case when not in use. ● Do not warm the instrument with air from, or put the instrument close to a heat source such as a heater, furnace vent, etc. 27 Maintenance 4.

Owner's Manual
Page 14
... keys. 28 Also, hold on the keys. Troubleshooting The tone is tight, apply a small amount of cork grease to the joint cork. If pads are dry,and tighten screws that will apply pressure on to the instrument in position, be careful not to apply unnecessary pressure to the keys. If keys are noisy. The keys are finished playing, place the instrument...
... keys. 28 Also, hold on the keys. Troubleshooting The tone is tight, apply a small amount of cork grease to the joint cork. If pads are dry,and tighten screws that will apply pressure on to the instrument in position, be careful not to apply unnecessary pressure to the keys. If keys are noisy. The keys are finished playing, place the instrument...

Owner's Manual
Page 15
Auf Umweltpapier mit Sojatinte gedruckt. Este documento se ha impreso en papel sin cloro alguno, con tinta de soja ECF ECF ECF YYYYYYY 2440630 0402PONK-A0 Printed in Japan Ce document a été imprimé sur du papier non blanchi au chlore avec de l'encre d'huile de soja. This document is printed on chlorine free (ECF) paper with soy ink.
Auf Umweltpapier mit Sojatinte gedruckt. Este documento se ha impreso en papel sin cloro alguno, con tinta de soja ECF ECF ECF YYYYYYY 2440630 0402PONK-A0 Printed in Japan Ce document a été imprimé sur du papier non blanchi au chlore avec de l'encre d'huile de soja. This document is printed on chlorine free (ECF) paper with soy ink.

