

Owner's Manual
Page 2
... the local retailer authorized to distribute this type of America or its subsidiaries. * This applies only to accessories and/or another product use this manual, meets FCC requirements. This equipment generates/uses radio frequencies and, if not installed and used . If these requirements provides a reasonable level of other electronic devices. IMPORTANT NOTICE FOR THE UNITED KINGDOM Connecting the Plug and Cord WARNING...
... the local retailer authorized to distribute this type of America or its subsidiaries. * This applies only to accessories and/or another product use this manual, meets FCC requirements. This equipment generates/uses radio frequencies and, if not installed and used . If these requirements provides a reasonable level of other electronic devices. IMPORTANT NOTICE FOR THE UNITED KINGDOM Connecting the Plug and Cord WARNING...
Owner's Manual
Page 3
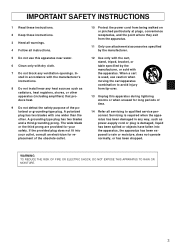
... any heat sources such as power-supply cord or plug is used, use caution when moving the cart/apparatus combination to qualified service personnel. The wide blade or the third prong are provided for long periods of time. 14 Refer all instructions. 5 Do not use attachments/accessories specified by the manufacturer. 12 Use only with the cart, stand, tripod, bracket, or table...
... any heat sources such as power-supply cord or plug is used, use caution when moving the cart/apparatus combination to qualified service personnel. The wide blade or the third prong are provided for long periods of time. 14 Refer all instructions. 5 Do not use attachments/accessories specified by the manufacturer. 12 Use only with the cart, stand, tripod, bracket, or table...

Owner's Manual
Page 4
... this product become damaged beyond repair, or for some areas, the servicer is operating as model number, power requirements, serial number, etc., can be of sufficient magnitude to constitute a risk of electrical shock. However, Yamaha reserves the right to change or modify any of the specifications without notice or obligation to return the defective parts. See rear of Amplifier for you may be...
... this product become damaged beyond repair, or for some areas, the servicer is operating as model number, power requirements, serial number, etc., can be of sufficient magnitude to constitute a risk of electrical shock. However, Yamaha reserves the right to change or modify any of the specifications without notice or obligation to return the defective parts. See rear of Amplifier for you may be...

Owner's Manual
Page 5
... "0" before switching the power ON/OFF. If there are lightning strikes, do not place: • Other components, as possible and unplug the device from the device. 5 q When connecting the speaker jack to a speaker, use the amplifier for connecting a speaker to the IEC60268 standard. Also, never stack the device excessively. q To protect the speaker from the device. q Do not use only a cable designed specifically for...
... "0" before switching the power ON/OFF. If there are lightning strikes, do not place: • Other components, as possible and unplug the device from the device. 5 q When connecting the speaker jack to a speaker, use the amplifier for connecting a speaker to the IEC60268 standard. Also, never stack the device excessively. q To protect the speaker from the device. q Do not use only a cable designed specifically for...

Owner's Manual
Page 6
... Panel 7 Rear Panel 8 Operating Instructions 10 Getting sound output 10 Adjusting the Input Level 10 Sound Setting 10 Storing and Recalling Patches 11 Detailed Parameter Settings 12 Amp Mode 12 Equalizer Mode 13 Compressor Mode 13 Utility Mode 14 Attaching the Rack Mount Adaptor 17 Air Flow 17 Attaching the Clamp Filter 17 Error Messages 18 Troubleshooting 18 Specifications 19 MIDI Implementation Chart 95 6 It is an all-digital bass amplifier that let you for purchasing the Yamaha BBT500H Bass Amplifier...
... Panel 7 Rear Panel 8 Operating Instructions 10 Getting sound output 10 Adjusting the Input Level 10 Sound Setting 10 Storing and Recalling Patches 11 Detailed Parameter Settings 12 Amp Mode 12 Equalizer Mode 13 Compressor Mode 13 Utility Mode 14 Attaching the Rack Mount Adaptor 17 Air Flow 17 Attaching the Clamp Filter 17 Error Messages 18 Troubleshooting 18 Specifications 19 MIDI Implementation Chart 95 6 It is an all-digital bass amplifier that let you for purchasing the Yamaha BBT500H Bass Amplifier...
Owner's Manual
Page 7
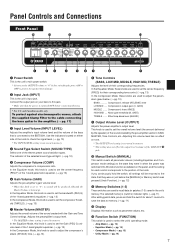
... sound created by the pre-amplifier section's GAIN, MASTER, Tone Controls, etc. and Canadian models only To protect against electromagnetic waves, attach the supplied Clamp Filter to the cable connecting the bass guitar to the amplifier. (→ pg. 17) e Input Level Volume (INPUT LEVEL) Adjusts the amplifier's input volume level and the volume of the eleven preset sound variation types. GAIN) MIDDLE ....... The selected memory's (switch's) indicator lights. (→ pg. 11) After editing patch data, press and hold the switch...
... sound created by the pre-amplifier section's GAIN, MASTER, Tone Controls, etc. and Canadian models only To protect against electromagnetic waves, attach the supplied Clamp Filter to the cable connecting the bass guitar to the amplifier. (→ pg. 17) e Input Level Volume (INPUT LEVEL) Adjusts the amplifier's input volume level and the volume of the eleven preset sound variation types. GAIN) MIDDLE ....... The selected memory's (switch's) indicator lights. (→ pg. 11) After editing patch data, press and hold the switch...

Owner's Manual
Page 8
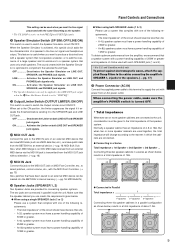
... LEVEL control, these jacks is delivered from the LINE OUT jack. Delivers the signal before it has been processed by the tone controls (the Sound Type is equipped with an output limiter and speaker simulator (can also be used to connect a tuner to select patch memory STATUS DATA/CTRL BANK MSB/MAX BANK LSB/MIN TOGGLE ON-OFF /NUMBER OF PGM 8.8.8. Mixer or Additional Amplifier Headphones Save patches to a MIDI device Use a MIDI controller to the BBT500H. Delivers...
... LEVEL control, these jacks is delivered from the LINE OUT jack. Delivers the signal before it has been processed by the tone controls (the Sound Type is equipped with an output limiter and speaker simulator (can also be used to connect a tuner to select patch memory STATUS DATA/CTRL BANK MSB/MAX BANK LSB/MIN TOGGLE ON-OFF /NUMBER OF PGM 8.8.8. Mixer or Additional Amplifier Headphones Save patches to a MIDI device Use a MIDI controller to the BBT500H. Delivers...
Owner's Manual
Page 9
... are connected to compliment the selected Sound Type. and Canadian models only To protect against electromagnetic waves, attach the supplied Clamp Filters to the cables connecting the amplifier's SPEAKER 1, 2 jacks to the speakers. (→ pg. 17) @5 Power Connector (AC IN) Connect the supplied power cable to this jack to the MIDI IN jack on MIDI Foot Controller, etc., to select patches, control volume, etc., with the Speaker Simulator is transmitted from an external MIDI device via the MIDI IN jack is...
... are connected to compliment the selected Sound Type. and Canadian models only To protect against electromagnetic waves, attach the supplied Clamp Filters to the cables connecting the amplifier's SPEAKER 1, 2 jacks to the speakers. (→ pg. 17) @5 Power Connector (AC IN) Connect the supplied power cable to this jack to the MIDI IN jack on MIDI Foot Controller, etc., to select patches, control volume, etc., with the Speaker Simulator is transmitted from an external MIDI device via the MIDI IN jack is...

Owner's Manual
Page 10
... setting also works well with an upright bass or an electric-acoustic bass. To protect the speakers, make sure that the POWER switch is switched OFF, then connect your bass to ∞, 16 steps) This adjusts the compressor's compression ratio and output levels simultaneously. Operating Instructions Getting sound output 1 First, make sure that the OUTPUT knob is set to "0" whenever switching the POWER switch ON or OFF. 3 First, set the INPUT LEVEL knob to its setting...
... setting also works well with an upright bass or an electric-acoustic bass. To protect the speakers, make sure that the POWER switch is switched OFF, then connect your bass to ∞, 16 steps) This adjusts the compressor's compression ratio and output levels simultaneously. Operating Instructions Getting sound output 1 First, make sure that the OUTPUT knob is set to "0" whenever switching the POWER switch ON or OFF. 3 First, set the INPUT LEVEL knob to its setting...

Owner's Manual
Page 11
... BBT500H provides five memory locations for later use one of the Memory Switches (1-5) until all of the front panel indicators light. Ex.) Press and hold the [MANUAL] button to the patch will the sound, even though you pressed Memory Switch [2]. The value "4.0" flashes on the display but pressed the [MANUAL] switch before you are turning the knob. Setting Value q The Useful "Undo" Function Press and hold any changes made...
... BBT500H provides five memory locations for later use one of the Memory Switches (1-5) until all of the front panel indicators light. Ex.) Press and hold the [MANUAL] button to the patch will the sound, even though you pressed Memory Switch [2]. The value "4.0" flashes on the display but pressed the [MANUAL] switch before you are turning the knob. Setting Value q The Useful "Undo" Function Press and hold any changes made...

Owner's Manual
Page 12
... settings in the display until a Memory is recalled, or a mode other than the Amp Mode is labeled on the panel. Amp Mode Each knob functions in the "Sound Setting" section (→ pg. 10). TION] switch. q w e r t y u i o !0 !1 Each control knob's function in the Amp Mode is the same as described in the manner it is selected. Detailed Parameter Settings The BBT500H also features more precise settings for defining the frequencies for each of the Tone Control...
... settings in the display until a Memory is recalled, or a mode other than the Amp Mode is labeled on the panel. Amp Mode Each knob functions in the "Sound Setting" section (→ pg. 10). TION] switch. q w e r t y u i o !0 !1 Each control knob's function in the Amp Mode is the same as described in the manner it is selected. Detailed Parameter Settings The BBT500H also features more precise settings for defining the frequencies for each of the Tone Control...
Owner's Manual
Page 13
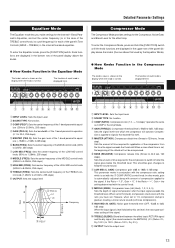
... changes to signals that used by the Equalizer Mode). q w e r t y u i o !0 !1 q INPUT LEVEL: Sets the Input Level w SOUND TYPE: No function. t MASTER (ATTACK): Compressor attack time (0msec to 18dB, 0.1dB step) This parameter works in the Compressor Mode The knob's value is shown on the display when the knob is turned. When a slow attack time is set with the control knob. Detailed Parameter Settings Equalizer Mode The Equalizer mode lets you have set...
... changes to signals that used by the Equalizer Mode). q w e r t y u i o !0 !1 q INPUT LEVEL: Sets the Input Level w SOUND TYPE: No function. t MASTER (ATTACK): Compressor attack time (0msec to 18dB, 0.1dB step) This parameter works in the Compressor Mode The knob's value is shown on the display when the knob is turned. When a slow attack time is set with the control knob. Detailed Parameter Settings Equalizer Mode The Equalizer mode lets you have set...

Owner's Manual
Page 14
... By connecting two BBT500Hs as shown in the Utility Mode In the Utility Mode, only the INPUT LEVEL, OUTPUT, and COMP knobs function. Detailed Parameter Settings Utility Mode The Utility Mode provides settings for more than that, only utL ap- Use the [MANUAL] switch and Memory Switches [1] through [5] to set to L50 (LPF 500Hz) to h00 (HPF 1000Hz), 93 steps When using a bi-amplified system, make sure that the INPUT LEVEL control...
... By connecting two BBT500Hs as shown in the Utility Mode In the Utility Mode, only the INPUT LEVEL, OUTPUT, and COMP knobs function. Detailed Parameter Settings Utility Mode The Utility Mode provides settings for more than that, only utL ap- Use the [MANUAL] switch and Memory Switches [1] through [5] to set to L50 (LPF 500Hz) to h00 (HPF 1000Hz), 93 steps When using a bi-amplified system, make sure that the INPUT LEVEL control...

Owner's Manual
Page 15
... meters in step 3-3, appears on the dis- q Selecting a Patch with MIDI 1 Using a MIDI cable, connect the MIDI IN jack on the BBT500H to the MIDI OUT jack on the display) to set the MIDI receive channel (1-16, ALL, oFF). Use of instrument type or maker. MIDI Receive Channel 2-3 Use Memory Switches [1] and [2] to a memory number. For example, when the BBT500H receives "Program Change Number 1" from the BBT500H's memory using an external MIDI device like the MFC10 Yamaha MIDI Foot Controller, etc. This is less than 3 seconds (until...
... meters in step 3-3, appears on the dis- q Selecting a Patch with MIDI 1 Using a MIDI cable, connect the MIDI IN jack on the BBT500H to the MIDI OUT jack on the display) to set the MIDI receive channel (1-16, ALL, oFF). Use of instrument type or maker. MIDI Receive Channel 2-3 Use Memory Switches [1] and [2] to a memory number. For example, when the BBT500H receives "Program Change Number 1" from the BBT500H's memory using an external MIDI device like the MFC10 Yamaha MIDI Foot Controller, etc. This is less than 3 seconds (until...

Owner's Manual
Page 16
... BBT500H by the BBT500H's MIDI IN jack transmitted without alteration to other MIDI Control Change messages. * The Main Volume data will not change, even if a different memory number is selected. * When the POWER is switched ON, the Main Volume data is set to its MAX value. * After the Main Volume data is changed, and the external MIDI device is disconnected, the pre-amp's volume level may not be sufficient. q About MIDI Bulk In Using a MIDI cable, connect the MIDI IN jack...
... BBT500H by the BBT500H's MIDI IN jack transmitted without alteration to other MIDI Control Change messages. * The Main Volume data will not change, even if a different memory number is selected. * When the POWER is switched ON, the Main Volume data is set to its MAX value. * After the Main Volume data is changed, and the external MIDI device is disconnected, the pre-amp's volume level may not be sufficient. q About MIDI Bulk In Using a MIDI cable, connect the MIDI IN jack...

Owner's Manual
Page 17
... Set Rack Mount Adaptor (supplied) B A C Air Flow The device utilizes a forced air cooling system, which cools the interior of the device. 3. In the same manner, attach the other supplied rack mount adaptor to the device. and Canadian models only) To protect against electromagnetic waves, attach the supplied Clamp Filters to the cable connecting the bass guitar to the amplifier's INPUT jack, and the cables connecting the amplifier's SPEAKER 1, 2 jacks...
... Set Rack Mount Adaptor (supplied) B A C Air Flow The device utilizes a forced air cooling system, which cools the interior of the device. 3. In the same manner, attach the other supplied rack mount adaptor to the device. and Canadian models only) To protect against electromagnetic waves, attach the supplied Clamp Filters to the cable connecting the bass guitar to the amplifier's INPUT jack, and the cables connecting the amplifier's SPEAKER 1, 2 jacks...
Owner's Manual
Page 18
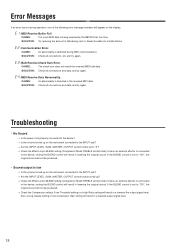
... original sound. E3: Bulk Receive Check Sum Error. Troubleshooting • No Sound → Is the power cord properly connected to the device? → Is the volume turned up ? → Check the Effect Loop's BLEND setting (Compressor Mode: TREBLE control knob). SOLUTION: Check all connections, etc. CAUSE: An abnormality is low → Is the volume turned up on the instrument connected to the INPUT jack? → Are the INPUT LEVEL, GAIN, MASTER, OUTPUT control knobs turned up...
... original sound. E3: Bulk Receive Check Sum Error. Troubleshooting • No Sound → Is the power cord properly connected to the device? → Is the volume turned up ? → Check the Effect Loop's BLEND setting (Compressor Mode: TREBLE control knob). SOLUTION: Check all connections, etc. CAUSE: An abnormality is low → Is the volume turned up on the instrument connected to the INPUT jack? → Are the INPUT LEVEL, GAIN, MASTER, OUTPUT control knobs turned up...

Owner's Manual
Page 19
... Switch (-20dB/+4dB), Effect Blend Control User Memory 5 User Memory (Sound Type, Amp Settings, Compressor, Effect Blend) MIDI Functions Receive Transmit Program Change, Control Change, Bulk In Program Change, Control Change, Bulk Out, Merge Out Controllers/Switches Front Panel Control Knobs x 11, Push Switches x 7 Rear Panel Control Knob x1, Slide Switches x4 Displays Push Switch LED x5 Sound Type LED x11 7-Segment LED x3 Digit Input Level LED x2 (Green, Red) Connections INPUT: Standard Monaural Phone Jack SPEAKER 1, 2: Standard Monaural Phone Jack PHONES: Standard Stereo Phone Jack...
... Switch (-20dB/+4dB), Effect Blend Control User Memory 5 User Memory (Sound Type, Amp Settings, Compressor, Effect Blend) MIDI Functions Receive Transmit Program Change, Control Change, Bulk In Program Change, Control Change, Bulk Out, Merge Out Controllers/Switches Front Panel Control Knobs x 11, Push Switches x 7 Rear Panel Control Knob x1, Slide Switches x4 Displays Push Switch LED x5 Sound Type LED x11 7-Segment LED x3 Digit Input Level LED x2 (Green, Red) Connections INPUT: Standard Monaural Phone Jack SPEAKER 1, 2: Standard Monaural Phone Jack PHONES: Standard Stereo Phone Jack...

Owner's Manual
Page 20
YAMAHA [ Bass Amplifier ] Date:23-Dec-2003 Model BBT500H MIDI Implementation Chart Version : 1.0 : : Transmitted : Recognized : Remarks : : Function ... : : : : :Basic Default : x : 1 - 16, off : memorized : :Channel Changed : x : 1 - 16, off : : : Default : x : 1,3 : memorized : :Mode Messages : x : x : : : Altered x : : :Note : x : x : : :Number : True voice x : : :Velocity Note ON : x : x : : : Note OFF : x : x : : :After Key's : x : x : : :Touch Ch's : x : x : : :Pitch Bender : x : x : : : ...
YAMAHA [ Bass Amplifier ] Date:23-Dec-2003 Model BBT500H MIDI Implementation Chart Version : 1.0 : : Transmitted : Recognized : Remarks : : Function ... : : : : :Basic Default : x : 1 - 16, off : memorized : :Channel Changed : x : 1 - 16, off : : : Default : x : 1,3 : memorized : :Mode Messages : x : x : : : Altered x : : :Note : x : x : : :Number : True voice x : : :Velocity Note ON : x : x : : : Note OFF : x : x : : :After Key's : x : x : : :Touch Ch's : x : x : : :Pitch Bender : x : x : : : ...

Patch List
Page 1
Patch Name 1 All Purpose 2 Modern Rock 3 Slap 4 Classic Rock 5 Rhythm & Blues 0 * These patches are made with a tweeter equipped speaker enclosure and the speaker simulator setting set ON. Printed in China Preset Patch List No.
Patch Name 1 All Purpose 2 Modern Rock 3 Slap 4 Classic Rock 5 Rhythm & Blues 0 * These patches are made with a tweeter equipped speaker enclosure and the speaker simulator setting set ON. Printed in China Preset Patch List No.


