
Additions And Changes In Version 1.2, 1.3
Page 3
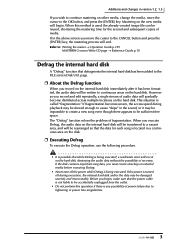
...Defrag" function that while Defrag is any possibility of audio data will gradually become distributed across multiple locations on the hard disk. However as you record and edit repeatedly, a single stream of power failure due to lightening or power line irregularities. 3 The "Defrag" function solves the problem of...be rearranged so that the data for the second and subsequent copies of media. page. Ì About the Defrag function When you record on the internal hard disk immediately after it may be sufficient free space. If fragmentation becomes severe, the access speed during ...
...Defrag" function that while Defrag is any possibility of audio data will gradually become distributed across multiple locations on the hard disk. However as you record and edit repeatedly, a single stream of power failure due to lightening or power line irregularities. 3 The "Defrag" function solves the problem of...be rearranged so that the data for the second and subsequent copies of media. page. Ì About the Defrag function When you record on the internal hard disk immediately after it may be sufficient free space. If fragmentation becomes severe, the access speed during ...
Additions And Changes In Version 1.2, 1.3
Page 6
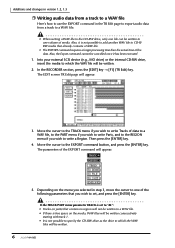
... (or parts) that contain no region will be written. 2. If the TRACK/PART menu parameter TRACK is set , and press the [ENTER] key. In the RECORDER section, press the [EDIT] key → [F1] (TR Edit) key. Then press the [ENTER] key. 4. Depending on the media, WAV files will be written...
... (or parts) that contain no region will be written. 2. If the TRACK/PART menu parameter TRACK is set , and press the [ENTER] key. In the RECORDER section, press the [EDIT] key → [F1] (TR Edit) key. Then press the [ENTER] key. 4. Depending on the media, WAV files will be written...
Additions And Changes In Version 1.2, 1.3
Page 11
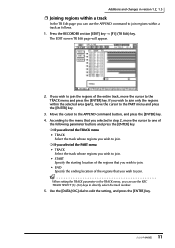
... menu and press the [ENTER] key. If you wish to join the regions of the following parameter buttons and press the [ENTER] key. Press the RECORDER section [EDIT] key → [F1] (TR Edit) key.
... menu and press the [ENTER] key. If you wish to join the regions of the following parameter buttons and press the [ENTER] key. Press the RECORDER section [EDIT] key → [F1] (TR Edit) key.
Additions And Changes In Version 1.2, 1.3
Page 12
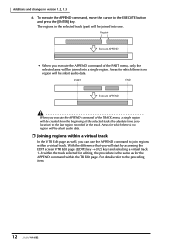
... region will be joined into one. Areas for which there is the same as well, you can use the APPEND command to the last region recorded in version 1.2, 1.3 6. With the difference that you will be silent audio data. Ì Joining regions within a virtual track In the V.TR Edit page as for...
... region will be joined into one. Areas for which there is the same as well, you can use the APPEND command to the last region recorded in version 1.2, 1.3 6. With the difference that you will be silent audio data. Ì Joining regions within a virtual track In the V.TR Edit page as for...
Additions And Changes In Version 1.2, 1.3
Page 14
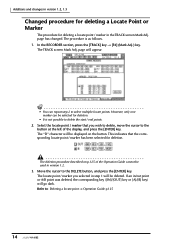
... appear. The TRACK screen Mark Adj. The locate point / marker you wish to delete, move the cursor to delete the start / end points. 2. In the RECORDER section, press the [TRACK] key → [F4] (Mark Adj.) key. This indicates that you selected in /out point or A/B point was deleted, the corresponding key...
... appear. The TRACK screen Mark Adj. The locate point / marker you wish to delete, move the cursor to delete the start / end points. 2. In the RECORDER section, press the [TRACK] key → [F4] (Mark Adj.) key. This indicates that you selected in /out point or A/B point was deleted, the corresponding key...
Additions And Changes In Version 1.2, 1.3
Page 16
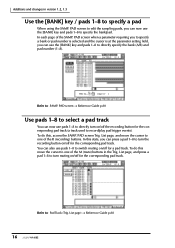
...is selected and the cursor is at the parameter setting field, you can press a pad 1-8 to turn the recording button on /off for the corresponding pad track (a track used to record/play pad trigger events). To do this, access the SAMP. List page, and press a pad 1-8 to one ...of the R (recording) buttons. List page, and move the cursor to turn on /off the recording button for the corresponding pad track. In each page of the M (mute) buttons in version 1.2, 1.3 Use the [BANK]...
...is selected and the cursor is at the parameter setting field, you can press a pad 1-8 to turn the recording button on /off for the corresponding pad track (a track used to record/play pad trigger events). To do this, access the SAMP. List page, and press a pad 1-8 to one ...of the R (recording) buttons. List page, and move the cursor to turn on /off the recording button for the corresponding pad track. In each page of the M (mute) buttons in version 1.2, 1.3 Use the [BANK]...
Additions And Changes In Version 1.2, 1.3
Page 19
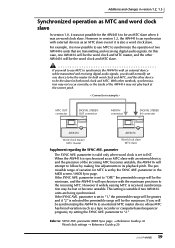
.... If the SYNC AVE. If the SYNC AVE. If you will be synchronizing the AW4416 to an external MTC master device whose MTC has broad variation (such as a tape recorder or computer-based sequencer program), try setting the SYNC AVE. Refer to "2." For example... Connection example > MTC OUT connector DIGITAL STEREO OUT connector PROFESSIONAL AUDIO WORKSTATION MIDI IN connector DIGITAL STEREO IN connector PROFESSIONAL AUDIO WORKSTATION AW4416 AW4416 Word clock master MTC master Word clock slave MTC slave Supplement regarding the SYNC AVE. parameter (MIDI Sync page) → Reference ...
.... If the SYNC AVE. If the SYNC AVE. If you will be synchronizing the AW4416 to an external MTC master device whose MTC has broad variation (such as a tape recorder or computer-based sequencer program), try setting the SYNC AVE. Refer to "2." For example... Connection example > MTC OUT connector DIGITAL STEREO OUT connector PROFESSIONAL AUDIO WORKSTATION MIDI IN connector DIGITAL STEREO IN connector PROFESSIONAL AUDIO WORKSTATION AW4416 AW4416 Word clock master MTC master Word clock slave MTC slave Supplement regarding the SYNC AVE. parameter (MIDI Sync page) → Reference ...
Owner's Manual
Page 5
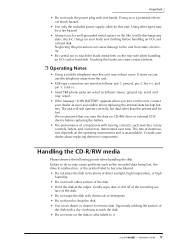
... connectors are wired as follows: pin 1: ground, pin 2: hot (+), and pin 3: cold (-). • Insert TRS phone jacks are wired as the recorded data being lost . Gently wipe dust or dirt off of the disk. • Do not wipe the disk with chemicals or detergents. • Do not... of direct sunlight, high temperature, or high humidity. • Do not touch either surface of the disk with wet hands. face of the recording sur- Neglecting this unit, contact your dealer about replacing the internal data backup battery. Doing so is unavoidable. Operation Guide v - We recommend...
... connectors are wired as follows: pin 1: ground, pin 2: hot (+), and pin 3: cold (-). • Insert TRS phone jacks are wired as the recorded data being lost . Gently wipe dust or dirt off of the disk. • Do not wipe the disk with chemicals or detergents. • Do not... of direct sunlight, high temperature, or high humidity. • Do not touch either surface of the disk with wet hands. face of the recording sur- Neglecting this unit, contact your dealer about replacing the internal data backup battery. Doing so is unavoidable. Operation Guide v - We recommend...
Owner's Manual
Page 7
... Important ❍ Warning The Yamaha Professional Audio Workstation is designed to your use of the Workstation (such as the Audio Home Recording Act and the Digital Millennium Copyright Act in some instances, the public performance, of all or a portion of a sound recording or musical composition protected by ...and related information and data that may otherwise violate copyright laws and other laws. In addition, laws (such as the Audio Home Recording Act and the Digital Millennium Copyright Act in USA), if you should consult a lawyer familiar with the law of copyright, including ...
... Important ❍ Warning The Yamaha Professional Audio Workstation is designed to your use of the Workstation (such as the Audio Home Recording Act and the Digital Millennium Copyright Act in some instances, the public performance, of all or a portion of a sound recording or musical composition protected by ...and related information and data that may otherwise violate copyright laws and other laws. In addition, laws (such as the Audio Home Recording Act and the Digital Millennium Copyright Act in USA), if you should consult a lawyer familiar with the law of copyright, including ...
Owner's Manual
Page 8
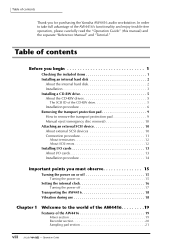
...CD-RW drive 5 Installation procedure 6 Removing the transport protection pad 9 How to the world of the AW4416 19 Features of the AW4416 19 Mixer section 19 Recorder section 20 Sampling pad section 21 viii - Table of contents Thank you must observe 15 Turning the ...11 About terminators 12 About SCSI errors 12 Installing I/O cards 13 About I/O cards 13 Installation procedure 14 Important points you for purchasing the Yamaha AW4416 audio workstation. Table of contents Before you begin 1 Checking the included items 1 Installing an internal hard disk 2 About the internal hard ...
...CD-RW drive 5 Installation procedure 6 Removing the transport protection pad 9 How to the world of the AW4416 19 Features of the AW4416 19 Mixer section 19 Recorder section 20 Sampling pad section 21 viii - Table of contents Thank you must observe 15 Turning the ...11 About terminators 12 About SCSI errors 12 Installing I/O cards 13 About I/O cards 13 Installation procedure 14 Important points you for purchasing the Yamaha AW4416 audio workstation. Table of contents Before you begin 1 Checking the included items 1 Installing an internal hard disk 2 About the internal hard ...

Owner's Manual
Page 9
Operation Guide Table of contents CD-RW drive (option 21 Other features 21 Signal flow within the AW4416 22 Input patch 23 Input channels 1-24 24 Return channels 1/2 25 Recorder input patching 26 Monitor channels 1-16 26 Digital cascade connections 27 Oscillator 27 Stereo output channel 27 Buses ...MODE section 34 MIXING LAYER section 35 [SEL] keys, [ON] keys, faders 37 Display section 38 Level meter/counter section 39 RECORDER section 40 AUTOMATION section 41 SCENE MEMORY section 41 CURSOR/JOG & SHUTTLE section 42 Locate section 43 Transport section 44 SAMPLING PAD section...
Operation Guide Table of contents CD-RW drive (option 21 Other features 21 Signal flow within the AW4416 22 Input patch 23 Input channels 1-24 24 Return channels 1/2 25 Recorder input patching 26 Monitor channels 1-16 26 Digital cascade connections 27 Oscillator 27 Stereo output channel 27 Buses ...MODE section 34 MIXING LAYER section 35 [SEL] keys, [ON] keys, faders 37 Display section 38 Level meter/counter section 39 RECORDER section 40 AUTOMATION section 41 SCENE MEMORY section 41 CURSOR/JOG & SHUTTLE section 42 Locate section 43 Transport section 44 SAMPLING PAD section...
Owner's Manual
Page 10
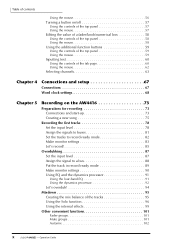
... channels 63 Chapter 4 Connections and setup 67 Connections 67 Word clock settings 68 Chapter 5 Recording on the AW4416 73 Preparations for recording 73 Connections and start-up 73 Creating a new song 75 Recording the first tracks 78 Set the input level 78 Assign the signals to buses 81 Set ...the tracks to record-ready mode 82 Make monitor settings 83 Let's record 85 Overdubbing 87 Set ...
... channels 63 Chapter 4 Connections and setup 67 Connections 67 Word clock settings 68 Chapter 5 Recording on the AW4416 73 Preparations for recording 73 Connections and start-up 73 Creating a new song 75 Recording the first tracks 78 Set the input level 78 Assign the signals to buses 81 Set ...the tracks to record-ready mode 82 Make monitor settings 83 Let's record 85 Overdubbing 87 Set ...
Owner's Manual
Page 11
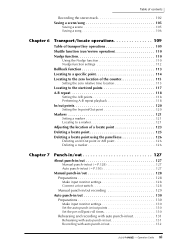
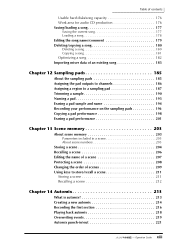
Operation Guide Table of contents Recording the stereo track 102 Saving a scene/song 105 Saving a scene 105 Saving a song 106 Chapter 6 ... Manual punch-in/out 128 Preparations 128 Make input monitor settings 128 Connect a foot switch 128 Manual punch-in/out recording 129 Auto punch-in/out 130 Preparations 130 Make input monitor settings 130 Set the auto punch-in/out points 130 Set... the pre-roll/post-roll times 130 Rehearsing and recording with auto punch-in/out 131 Rehearsing with auto punch-in/out 131 Recording with auto punch-in/out 132 xi -
Operation Guide Table of contents Recording the stereo track 102 Saving a scene/song 105 Saving a scene 105 Saving a song 106 Chapter 6 ... Manual punch-in/out 128 Preparations 128 Make input monitor settings 128 Connect a foot switch 128 Manual punch-in/out recording 129 Auto punch-in/out 130 Preparations 130 Make input monitor settings 130 Set the auto punch-in/out points 130 Set... the pre-roll/post-roll times 130 Rehearsing and recording with auto punch-in/out 131 Rehearsing with auto punch-in/out 131 Recording with auto punch-in/out 132 xi -
Owner's Manual
Page 12
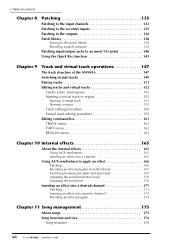
Operation Guide Table of contents Chapter 8 Patching 133 Patching to the input channels 133 Patching to the recorder inputs 135 Patching to the outputs 136 Patch library 138 Storing to the patch library 138 Recalling a patch program 139 Patching input/output jacks to... an insert I/O point 140 Using the Quick Rec function 143 Chapter 9 Track and virtual track operations 147 The track structure of the AW4416 147 Switching virtual tracks 149 Pairing tracks 151 Editing tracks and virtual tracks 152 Tracks, parts, and regions 152 Naming a virtual track or region 153...
Operation Guide Table of contents Chapter 8 Patching 133 Patching to the input channels 133 Patching to the recorder inputs 135 Patching to the outputs 136 Patch library 138 Storing to the patch library 138 Recalling a patch program 139 Patching input/output jacks to... an insert I/O point 140 Using the Quick Rec function 143 Chapter 9 Track and virtual track operations 147 The track structure of the AW4416 147 Switching virtual tracks 149 Pairing tracks 151 Editing tracks and virtual tracks 152 Tracks, parts, and regions 152 Naming a virtual track or region 153...
Owner's Manual
Page 13
... outputs to channels 186 Assigning a region to a sampling pad 187 Trimming a sample 190 Naming a pad 193 Erasing a pad sample and name 194 Recording your performance on the sampling pads 196 Copying a pad performance 198 Erasing a pad performance 201 Chapter 13 Scene memory 203 About scene memory 203 Parameters... store/recall a scene 211 Storing a scene 211 Recalling a scene 212 Chapter 14 Automix 213 What is automix 213 Creating a new automix 214 Recording the first section 216 Playing back automix 218 Overwriting events 219 Automix punch-in/out 221 xiii - Operation Guide
... outputs to channels 186 Assigning a region to a sampling pad 187 Trimming a sample 190 Naming a pad 193 Erasing a pad sample and name 194 Recording your performance on the sampling pads 196 Copying a pad performance 198 Erasing a pad performance 201 Chapter 13 Scene memory 203 About scene memory 203 Parameters... store/recall a scene 211 Storing a scene 211 Recalling a scene 212 Chapter 14 Automix 213 What is automix 213 Creating a new automix 214 Recording the first section 216 Playing back automix 218 Overwriting events 219 Automix punch-in/out 221 xiii - Operation Guide
Owner's Manual
Page 15
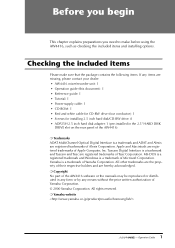
... Yamaha is a trademark and Tascam and Teac are registered trademarks of Alesis Corporation. Before you begin This chapter explains preparations you need to make sure that the package contains the following items. If any items are missing, please contact your dealer. • AW4416 mixer/recorder... is a trademark of Microsoft Corporation. Checking the included items Please make before using the AW4416, such as checking the included items and installing options. All rights reserved. ❍ Yamaha website 1 - MS-DOS is a registered trademark and Windows is a trademark and ADAT...
... Yamaha is a trademark and Tascam and Teac are registered trademarks of Alesis Corporation. Before you begin This chapter explains preparations you need to make sure that the package contains the following items. If any items are missing, please contact your dealer. • AW4416 mixer/recorder... is a trademark of Microsoft Corporation. Checking the included items Please make before using the AW4416, such as checking the included items and installing options. All rights reserved. ❍ Yamaha website 1 - MS-DOS is a registered trademark and Windows is a trademark and ADAT...

Owner's Manual
Page 16
... on the rear panel. Before you attempt to use the AW4416 without installing a hard disk, the recorder section and mixer section will fail to operate correctly, and the AW4416 will be aware that Yamaha Corporation will accept no responsibility for reproducing a composition (mixer settings, recorder settings, audio data etc.) is attached to the ADP25H 2.5 inch...
... on the rear panel. Before you attempt to use the AW4416 without installing a hard disk, the recorder section and mixer section will fail to operate correctly, and the AW4416 will be aware that Yamaha Corporation will accept no responsibility for reproducing a composition (mixer settings, recorder settings, audio data etc.) is attached to the ADP25H 2.5 inch...

Owner's Manual
Page 24
...the following types of storage device can be aware that Yamaha has obtained, connected to the SCSI connector. 10 - It is not possible to directly record or play back audio signals in realtime on the rear panel of the AW4416. Attaching an external SCSI device About external SCSI devices ...The external SCSI devices referred to here are storage devices used . • Type of the AW4416, and can be used to...
...the following types of storage device can be aware that Yamaha has obtained, connected to the SCSI connector. 10 - It is not possible to directly record or play back audio signals in realtime on the rear panel of the AW4416. Attaching an external SCSI device About external SCSI devices ...The external SCSI devices referred to here are storage devices used . • Type of the AW4416, and can be used to...

Owner's Manual
Page 27
For up-to-date information on the rear panel of the AW4416 in order to /from an ADAT format digital recorder. At present, the following website. Some types of MY card sold by installing an ADAT format compatible I/O card into an OPTION I/O slot, you ...XLR jacks). Operation Guide For example by other manufacturers may be installed in the OPTION I/O slots 1/2 located on available MY cards, contact your local Yamaha distributor or check the following types of I/O cards can transmit/receive eight channels of digital audio to add input/output ports. Installing I/O cards Before...
For up-to-date information on the rear panel of the AW4416 in order to /from an ADAT format digital recorder. At present, the following website. Some types of MY card sold by installing an ADAT format compatible I/O card into an OPTION I/O slot, you ...XLR jacks). Operation Guide For example by other manufacturers may be installed in the OPTION I/O slots 1/2 located on available MY cards, contact your local Yamaha distributor or check the following types of I/O cards can transmit/receive eight channels of digital audio to add input/output ports. Installing I/O cards Before...
Owner's Manual
Page 33
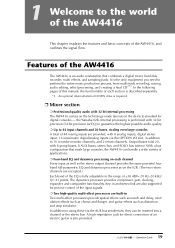
... powerful fourband full-parametric EQ and dynamics processor as distortion and amp simulator. the Yamaha 02R. Output buses total 20, with 32 bit internal processing The AW4416 carries on the technology made famous on each section is described separately. *1. Operation ...Up to perform the entire music production process, from multi-track recording, mixing, audio editing, effect processing, and creating a final CD(*1). With a bus configuration that combines a digital mixer, hard disk recorder, multi-effects, and sampling pads. The dynamics processor provides compressor,...
... powerful fourband full-parametric EQ and dynamics processor as distortion and amp simulator. the Yamaha 02R. Output buses total 20, with 32 bit internal processing The AW4416 carries on the technology made famous on each section is described separately. *1. Operation ...Up to perform the entire music production process, from multi-track recording, mixing, audio editing, effect processing, and creating a final CD(*1). With a bus configuration that combines a digital mixer, hard disk recorder, multi-effects, and sampling pads. The dynamics processor provides compressor,...


