
Owner's Manual
Page 10
... 4 Connections and setup 67 Connections 67 Word clock settings 68 Chapter 5 Recording on the AW4416 73 Preparations for recording 73 Connections and start-up 73 Creating a new song 75 Recording the first tracks 78 Set the input level 78 Assign the signals to buses 81 Set the tracks to record-ready mode 82 Make monitor settings 83 Let...
... 4 Connections and setup 67 Connections 67 Word clock settings 68 Chapter 5 Recording on the AW4416 73 Preparations for recording 73 Connections and start-up 73 Creating a new song 75 Recording the first tracks 78 Set the input level 78 Assign the signals to buses 81 Set the tracks to record-ready mode 82 Make monitor settings 83 Let...
Owner's Manual
Page 35
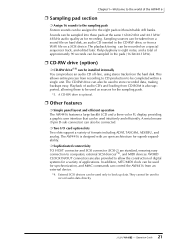
...only to back up data. Sampling sources can be used for synchronization, and MMC commands can control the AW4416 from a WAV file on a special sequencer track, and edited later. They cannot be used intuitively and efficiently. A CD-RW drive is ...designed with switchable A/B banks. Chapter1-Welcome to the world of the AW4416 ❒ Sampling pad section ❍ Assign 16 sounds to the sampling pads Sixteen sounds can be sampled into these to be used as for recording...
...only to back up data. Sampling sources can be used for synchronization, and MMC commands can control the AW4416 from a WAV file on a special sequencer track, and edited later. They cannot be used intuitively and efficiently. A CD-RW drive is ...designed with switchable A/B banks. Chapter1-Welcome to the world of the AW4416 ❒ Sampling pad section ❍ Assign 16 sounds to the sampling pads Sixteen sounds can be sampled into these to be used as for recording...

Owner's Manual
Page 40
...; BUS 1-8 The output signal of buses 1-8. ❍ DIRECT OUT 1-16 The direct output signal of the recorder section. Chapter1-Welcome to the world of the AW4416 Recorder input patching This section assigns the signals that are assigned to the track 1-16 outputs of input channels 1-16. According to the input monitor settings or the state of...
...; BUS 1-8 The output signal of buses 1-8. ❍ DIRECT OUT 1-16 The direct output signal of the recorder section. Chapter1-Welcome to the world of the AW4416 Recorder input patching This section assigns the signals that are assigned to the track 1-16 outputs of input channels 1-16. According to the input monitor settings or the state of...

Owner's Manual
Page 43
... output for inserting an external effect into each channel. ❍ RECORDER DIRECT OUT 1-16 The direct output of tracks 1-16 of the recorder section. 2 STEREO BUS1~8 AUX1~8 CH DIRECT OUT1~16 INSERT SEND 8 8 16 46 RECORDER DIRECT 16 OUT 1~16 OUTPUT PATCH DA DA DITHER METER METER ... OUT X 2 8 SLOT2 OUT OMNI OUT DA X 4 DA 0dB Internal effects 1/2 When the AW4416 is in OPTION I/O slots 1/2, and OMNI OUT jacks 1-4. Operation Guide The outputs of effects 1/2 are respectively assigned to the STEREO OUT jacks, DIGITAL STEREO OUT jack, I/O cards installed in its default state, the...
... output for inserting an external effect into each channel. ❍ RECORDER DIRECT OUT 1-16 The direct output of tracks 1-16 of the recorder section. 2 STEREO BUS1~8 AUX1~8 CH DIRECT OUT1~16 INSERT SEND 8 8 16 46 RECORDER DIRECT 16 OUT 1~16 OUTPUT PATCH DA DA DITHER METER METER ... OUT X 2 8 SLOT2 OUT OMNI OUT DA X 4 DA 0dB Internal effects 1/2 When the AW4416 is in OPTION I/O slots 1/2, and OMNI OUT jacks 1-4. Operation Guide The outputs of effects 1/2 are respectively assigned to the STEREO OUT jacks, DIGITAL STEREO OUT jack, I/O cards installed in its default state, the...
Owner's Manual
Page 44
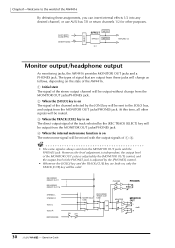
... When the [SOLO] key is on The direct output signal of the track selected by the [ON] key will be sent to the world of the AW4416 By defeating these jacks will change from these assignments, you can insert internal effects 1/2 into any desired channel, or use ...SOLO R METRONOME PHONES PHONES MIXER SOLO Logic RECORDER TRACK CUE Logic DA ON ATT MONITOR MONITOR OUT L +4dB R 30 - AUX7 (EFF1), 2 AUX8 (EFF2) 46 INSERT SEND SELECT EFFECT METER EFFECT METER X 2 RETURN 1/2 Monitor output/headphone output As monitoring jacks, the AW4416 provides MONITOR OUT jacks and a PHONES jack....
... When the [SOLO] key is on The direct output signal of the track selected by the [ON] key will be sent to the world of the AW4416 By defeating these jacks will change from these assignments, you can insert internal effects 1/2 into any desired channel, or use ...SOLO R METRONOME PHONES PHONES MIXER SOLO Logic RECORDER TRACK CUE Logic DA ON ATT MONITOR MONITOR OUT L +4dB R 30 - AUX7 (EFF1), 2 AUX8 (EFF2) 46 INSERT SEND SELECT EFFECT METER EFFECT METER X 2 RETURN 1/2 Monitor output/headphone output As monitoring jacks, the AW4416 provides MONITOR OUT jacks and a PHONES jack....
Owner's Manual
Page 46
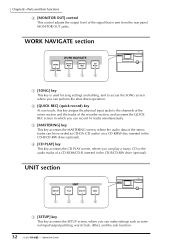
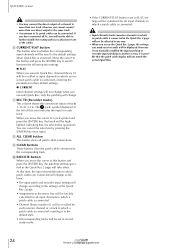
... UNIT SETUP FILE UTILITY MIDI PROFESSIONAL AUDIO WORKSTATION 1 [SETUP] key This key accesses the SETUP screen, where you can record 16 tracks simultaneously. B [QUICK REC] (quick record) key At one touch, this key assigns the physical input jacks to access the SONG screen where you can perform the shut-down operation. Chapter2-Parts and...output level of the signal that is used for song settings and editing, and to the channels of the mixer section and the tracks of the recorder section, and accesses the QUICK REC screen in which you can make settings such as CD-DA (CD audio) on a CD...
... UNIT SETUP FILE UTILITY MIDI PROFESSIONAL AUDIO WORKSTATION 1 [SETUP] key This key accesses the SETUP screen, where you can record 16 tracks simultaneously. B [QUICK REC] (quick record) key At one touch, this key assigns the physical input jacks to access the SONG screen where you can perform the shut-down operation. Chapter2-Parts and...output level of the signal that is used for song settings and editing, and to the channels of the mixer section and the tracks of the recorder section, and accesses the QUICK REC screen in which you can make settings such as CD-DA (CD audio) on a CD...
Owner's Manual
Page 54
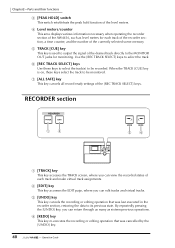
..., where you can view the recorded status of the desired track directly to be recorded. F [REC TRACK SELECT] keys Use these keys select the track to the MONITOR OUT jacks for each track and make virtual track assignments. RECORDER section RECORDER TRACK EDIT 12 PROFESSIONAL AUDIO WORKSTATION RECORDER TRACK EDIT UNDO REDO UNDO 3 REDO 4 1 [TRACK] key This key accesses the TRACK screen, where you can...
..., where you can view the recorded status of the desired track directly to be recorded. F [REC TRACK SELECT] keys Use these keys select the track to the MONITOR OUT jacks for each track and make virtual track assignments. RECORDER section RECORDER TRACK EDIT 12 PROFESSIONAL AUDIO WORKSTATION RECORDER TRACK EDIT UNDO REDO UNDO 3 REDO 4 1 [TRACK] key This key accesses the TRACK screen, where you can...

Owner's Manual
Page 61
... jacks These are balanced TRS phone jacks that output analog monitor signals such as the stereo bus, internal metronome, solo signal, or direct output from recorder tracks 1-16. to ST OUT in the SETUP screen ¡ Patch OUT page (¡ P.136). F INPUT 8 (HI-Z) jack This is -46 dB- +4 dB.... of manufacturers and models of hard disk that are known to work when installed in the AW4416, please refer to the website H OMNI OUT 1-4 jacks These are TRS phone jacks that output the analog signal assigned to be directly connected here. Instruments with a high output impedance such as for 3 INPUT ...
... jacks These are balanced TRS phone jacks that output analog monitor signals such as the stereo bus, internal metronome, solo signal, or direct output from recorder tracks 1-16. to ST OUT in the SETUP screen ¡ Patch OUT page (¡ P.136). F INPUT 8 (HI-Z) jack This is -46 dB- +4 dB.... of manufacturers and models of hard disk that are known to work when installed in the AW4416, please refer to the website H OMNI OUT 1-4 jacks These are TRS phone jacks that output the analog signal assigned to be directly connected here. Instruments with a high output impedance such as for 3 INPUT ...

Owner's Manual
Page 101
On the AW4416, you select the channel to be sent to recorder track 3 via bus 3. 1. Note that the level of a channel that is not paired will be operated here.) It is convenient to use the VIEW screen CH View page to the PAN/ROUTE area. Chapter5-Recording on . 4. Press the [VIEW] key ...the ST button off and the bus assign 3 button on the AW4416 Assign the signal to set bus assignments and pan for multiple channels at full left of input channel 8 will no longer be sent to select a channel. In the preceding section "Recording the first track," we used the PAN/ROUTE screen to...
On the AW4416, you select the channel to be sent to recorder track 3 via bus 3. 1. Note that the level of a channel that is not paired will be operated here.) It is convenient to use the VIEW screen CH View page to the PAN/ROUTE area. Chapter5-Recording on . 4. Press the [VIEW] key ...the ST button off and the bus assign 3 button on the AW4416 Assign the signal to set bus assignments and pan for multiple channels at full left of input channel 8 will no longer be sent to select a channel. In the preceding section "Recording the first track," we used the PAN/ROUTE screen to...

Owner's Manual
Page 147
... desired. The RECORDER TRACK INPUT ASSIGN column will indicate the patched status of signal Buses 1-8 Input channel direct out 1-16 135 - BUS 8 DIR 1 - Chapter8-Patching Patching to the recorder inputs When the AW4416 is not assigned to the [F1] key, press the [SHIFT] key + [F1] key to assign. Mixer section Buses 1-8 Recorder input patch Recorder section ×8 Tracks 1-8 ×8 Tracks 9-16...
... desired. The RECORDER TRACK INPUT ASSIGN column will indicate the patched status of signal Buses 1-8 Input channel direct out 1-16 135 - BUS 8 DIR 1 - Chapter8-Patching Patching to the recorder inputs When the AW4416 is not assigned to the [F1] key, press the [SHIFT] key + [F1] key to assign. Mixer section Buses 1-8 Recorder input patch Recorder section ×8 Tracks 1-8 ×8 Tracks 9-16...

Owner's Manual
Page 161
Chapter9-Track and virtual track operations 2. The virtual track number you can record and play back the newly selected virtual track without affecting the previous virtual track. 150 - Now you select will be highlighted. Operation Guide Move the cursor to the virtual track number that you wish to assign to track 1, and press the [ENTER] key.
Chapter9-Track and virtual track operations 2. The virtual track number you can record and play back the newly selected virtual track without affecting the previous virtual track. 150 - Now you select will be highlighted. Operation Guide Move the cursor to the virtual track number that you wish to assign to track 1, and press the [ENTER] key.

Owner's Manual
Page 166
... Edit page will show the available editing commands. Operation Guide A NAME EDIT popup window will return to the screen of the screen. 155 - In the RECORDER section, press the [EDIT] key ¡ [F1] key. Move the cursor to the NAME button and press the [ENTER] key. Chapter9... NAME menu options will be displayed. ❒ Naming a region 1. Editing commands 3. Move the cursor to the REGION button and press the [ENTER] key. You can assign a track name of the name will appear. 4. Move the cursor to the REGION menu and press the [ENTER] key. The cursor will move the cursor to...
... Edit page will show the available editing commands. Operation Guide A NAME EDIT popup window will return to the screen of the screen. 155 - In the RECORDER section, press the [EDIT] key ¡ [F1] key. Move the cursor to the NAME button and press the [ENTER] key. Chapter9... NAME menu options will be displayed. ❒ Naming a region 1. Editing commands 3. Move the cursor to the REGION button and press the [ENTER] key. You can assign a track name of the name will appear. 4. Move the cursor to the REGION menu and press the [ENTER] key. The cursor will move the cursor to...
Owner's Manual
Page 277
...RECORDER section 20, 40 RECORDING SOLO 97 Recording the first tracks 78 Region 152 Naming 155 REGION menu 163 Return channels 1/2 25 Review 110 Rollback function 113 S Sampling frequency 76 Sampling pad 185 Assigning a region 187 Assigning to channels 186 Copying a performance 198 Erasing a performance 201 Erasing a sample 194 Erasing name 194 Naming 193 Recording... channels 63 Set the input level 78, 87 Shut-down 17 Shuttle function 110 Simultaneously playable tracks 147 Simultaneously recordable tracks 147 Solo 96 Song 175 Backing up 246 comment 179 Copying 181 Creating songs 75 Deleting 180...
...RECORDER section 20, 40 RECORDING SOLO 97 Recording the first tracks 78 Region 152 Naming 155 REGION menu 163 Return channels 1/2 25 Review 110 Rollback function 113 S Sampling frequency 76 Sampling pad 185 Assigning a region 187 Assigning to channels 186 Copying a performance 198 Erasing a performance 201 Erasing a sample 194 Erasing name 194 Naming 193 Recording... channels 63 Set the input level 78, 87 Shut-down 17 Shuttle function 110 Simultaneously playable tracks 147 Simultaneously recordable tracks 147 Solo 96 Song 175 Backing up 246 comment 179 Copying 181 Creating songs 75 Deleting 180...

Reference Guide
Page 21
... 1) INPUT 1-8 of an I /O card (slot 2) DIN L/R DIGITAL STEREO IN jack (stereo) B EFFECT PATCH Select whether effects 1/2 will be assigned to each channel. SL2-7/8 INPUT 1/2-7/8 of an I /O card (slot 2) L/R channels of the DIGITAL STEREO IN jack Sampling pads 1-8 Internal metronome ...slot 1) SL2-1/2 - Internal effects." 14 - SET UP screen Patch IN page Patching a signal to a channel/track [Function] Assign signals to the inputs of input channels 1-24, return channels 1/2, and recorder tracks 1-16. [Key operation] 1 • [SETUP] key ¡ [F1] (Patch IN) key (*1) &#...
... 1) INPUT 1-8 of an I /O card (slot 2) DIN L/R DIGITAL STEREO IN jack (stereo) B EFFECT PATCH Select whether effects 1/2 will be assigned to each channel. SL2-7/8 INPUT 1/2-7/8 of an I /O card (slot 2) L/R channels of the DIGITAL STEREO IN jack Sampling pads 1-8 Internal metronome ...slot 1) SL2-1/2 - Internal effects." 14 - SET UP screen Patch IN page Patching a signal to a channel/track [Function] Assign signals to the inputs of input channels 1-24, return channels 1/2, and recorder tracks 1-16. [Key operation] 1 • [SETUP] key ¡ [F1] (Patch IN) key (*1) &#...

Reference Guide
Page 22
C RECORDER TRACK INPUT ASSIGN Here you can press the [SHIFT] key to assign the following function to Operation Guide "Chapter 8. SET UP screen s Additional functions in the Patch IN page, refer to the [F1] key. q Recorder inputs 1-16 Display BUS 1-BUS 8 DIR 1-DIR16 Signal type Bus 1-8 Input channel direct out 1- 16 ...Tip! SET UP 15 - For detai ls on operations in the Patch IN page In the Patch IN page you can be assigned to the inputs of tracks 1-16. Reference ...
C RECORDER TRACK INPUT ASSIGN Here you can press the [SHIFT] key to assign the following function to Operation Guide "Chapter 8. SET UP screen s Additional functions in the Patch IN page, refer to the [F1] key. q Recorder inputs 1-16 Display BUS 1-BUS 8 DIR 1-DIR16 Signal type Bus 1-8 Input channel direct out 1- 16 ...Tip! SET UP 15 - For detai ls on operations in the Patch IN page In the Patch IN page you can be assigned to the inputs of tracks 1-16. Reference ...

Reference Guide
Page 97
... be displayed as the name of "V.Tr x-y" (x=track number 1-16, y=virtual track number 1-8) will be assigned automatically. D V (virtual track) This column shows the virtual track number (1- 8) that is sent to the input (recorder input) of the virtual track currently selected for each track. When you record something on a track, a default name of a virtual track, but only the first eight characters...
... be displayed as the name of "V.Tr x-y" (x=track number 1-16, y=virtual track number 1-8) will be assigned automatically. D V (virtual track) This column shows the virtual track number (1- 8) that is sent to the input (recorder input) of the virtual track currently selected for each track. When you record something on a track, a default name of a virtual track, but only the first eight characters...
Reference Guide
Page 172
...channels. • 019. Pitch can also be made in the SETUP screen Patch IN page to assign the metronome to an output channel. sPlayback pitch is wrong • VARI may be using the ... Even when channels are not heard in the sound • Have you selected the virtual track that you recorded? • Are you are operat- sCan't use only the recommended internal hard disks. sMIDI... the master device operating in a stable way? • You may be selected. • Is the AW4416 operating on this setting, refer to page 39 "MIDI screen." • A computer application other than your...
...channels. • 019. Pitch can also be made in the SETUP screen Patch IN page to assign the metronome to an output channel. sPlayback pitch is wrong • VARI may be using the ... Even when channels are not heard in the sound • Have you selected the virtual track that you recorded? • Are you are operat- sCan't use only the recommended internal hard disks. sMIDI... the master device operating in a stable way? • You may be selected. • Is the AW4416 operating on this setting, refer to page 39 "MIDI screen." • A computer application other than your...

Reference Guide
Page 190
...SOLO Stereo in X 2 PRE/POST ON AUX RECORDER RECORDER REPRO1-16 RECORDER ST Trk L/R RECORDER MONI 1(...16) RETURN1 can not be assigned to AUX7 (EFF1) RETURN2 can not be assigned to AUX8 (EFF2) INPUT SELECT (1,2 only) 16 RECORDER INPUT 1-16 INPUT MONITOR (FL Display) METER METER...OUT X 2 8 SLOT2 OUT OMNI OUT DA X 4 0dB DA RECORDER DIRECT OUT 1 RECORDER DIRECT OUT 16 STEREO L STEREO R SOLO L SOLO R METRONOME PHONES PHONES MIXER SOLO Logic RECORDER TRACK CUE Logic DA ON ATT MONITOR MONITOR OUT L +4dB R AW4416 Block diagram MIC/LINE INPUT INPUT 1-2 INSERT I/O INPUT 3-8 Hi-z ...
...SOLO Stereo in X 2 PRE/POST ON AUX RECORDER RECORDER REPRO1-16 RECORDER ST Trk L/R RECORDER MONI 1(...16) RETURN1 can not be assigned to AUX7 (EFF1) RETURN2 can not be assigned to AUX8 (EFF2) INPUT SELECT (1,2 only) 16 RECORDER INPUT 1-16 INPUT MONITOR (FL Display) METER METER...OUT X 2 8 SLOT2 OUT OMNI OUT DA X 4 0dB DA RECORDER DIRECT OUT 1 RECORDER DIRECT OUT 16 STEREO L STEREO R SOLO L SOLO R METRONOME PHONES PHONES MIXER SOLO Logic RECORDER TRACK CUE Logic DA ON ATT MONITOR MONITOR OUT L +4dB R AW4416 Block diagram MIC/LINE INPUT INPUT 1-2 INSERT I/O INPUT 3-8 Hi-z ...

Version2.0 Manual Supplement
Page 3
... channel, move the cursor to the number box of the corresponding channel, and turn the [DATA/JOG] dial. B REC.TR (Recorder track) This area shows tracks 1-16 (Tr1-Tr16). Quickly assign input sources to tracks By using the appropriate page (Quick Rec 1 or Quick Rec 2), you can be cancelled. Operations corresponding to what was the...
... channel, move the cursor to the number box of the corresponding channel, and turn the [DATA/JOG] dial. B REC.TR (Recorder track) This area shows tracks 1-16 (Tr1-Tr16). Quickly assign input sources to tracks By using the appropriate page (Quick Rec 1 or Quick Rec 2), you can be cancelled. Operations corresponding to what was the...
Version2.0 Manual Supplement
Page 24
At this time, the input channels/tracks to which patch cables are connected will change as follows. • The input patch and recorder input settings will change according to the settings of the Quick Rec 2 page. • Assignments to the stereo bus will not change . QUICK REC screen • ...You may connect the direct output of a channel to more than one direct output to the same track. • A...
At this time, the input channels/tracks to which patch cables are connected will change as follows. • The input patch and recorder input settings will change according to the settings of the Quick Rec 2 page. • Assignments to the stereo bus will not change . QUICK REC screen • ...You may connect the direct output of a channel to more than one direct output to the same track. • A...


