
Owner's Manual
Page 142
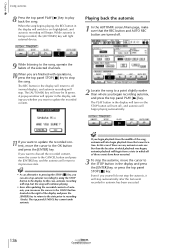
...panel STOP [ ] key. Tip! • As an alternative to pressing the STOP [ ] key, you want to update the recorded content, move the cursor to stop the song. Even if you can also stop automix recording by using the... you yourself do not stop the automix, it will stop automatically after updating the recorded contents of the selected channels. 10 When you are any automix events earlier than where you ...want to update the recorded content. 2 Locate the song to its previous state. Tip! In this case, ...
...panel STOP [ ] key. Tip! • As an alternative to pressing the STOP [ ] key, you want to update the recorded content, move the cursor to stop the song. Even if you can also stop automix recording by using the... you yourself do not stop the automix, it will stop automatically after updating the recorded contents of the selected channels. 10 When you are any automix events earlier than where you ...want to update the recorded content. 2 Locate the song to its previous state. Tip! In this case, ...

Owner's Manual
Page 143
... in step 4. 7 When you are finished operating the faders, press the top panel STOP [ ] key to stop the song. If you want to update the recorded contents, move the cursor to the CANCEL button and press the [ENTER] key. For this example, choose monitor channels other channels. 1 Locate the... button in the display will turn on (highlighted), and automix recording (and playback of the recorded events) will ask you whether you want to update the recorded contents. 8 If you want to discard the recorded contents, move the cursor to the OK button and press the [ENTER] key.
... in step 4. 7 When you are finished operating the faders, press the top panel STOP [ ] key to stop the song. If you want to update the recorded contents, move the cursor to the CANCEL button and press the [ENTER] key. For this example, choose monitor channels other channels. 1 Locate the... button in the display will turn on (highlighted), and automix recording (and playback of the recorded events) will ask you whether you want to update the recorded contents. 8 If you want to discard the recorded contents, move the cursor to the OK button and press the [ENTER] key.

Owner's Manual
Page 144
.... Tip! The AUTOMIX screen/Main page will begin overwriting. 2 Press the [AUTOMIX] key ¡ [F1] key. The automix will ask you whether you want to update the recorded contents. 10 If you want to record operations other buttons (FADER, CH ON, EQ). 4 Move the cursor to the PAN knob of monitor... in the display, and press the [ENTER] key. Turn on the PAN button, and turn off the other than the point where you want to update the recorded contents, move to the REC button in record-ready mode (or while automix is actually being recorded). Tip!
.... Tip! The AUTOMIX screen/Main page will begin overwriting. 2 Press the [AUTOMIX] key ¡ [F1] key. The automix will ask you whether you want to update the recorded contents. 10 If you want to record operations other buttons (FADER, CH ON, EQ). 4 Move the cursor to the PAN knob of monitor... in the display, and press the [ENTER] key. Turn on the PAN button, and turn off the other than the point where you want to update the recorded contents, move to the REC button in record-ready mode (or while automix is actually being recorded). Tip!

Owner's Manual
Page 145
... start and then stop recording. Using automix 10 When you have finished making settings, once again press the [SEL] key that you want to update the recorded contents. The [SEL] key will go dark, and recording will be in step 8. Even if you will be repeatedly recording and playing back...
... start and then stop recording. Using automix 10 When you have finished making settings, once again press the [SEL] key that you want to update the recorded contents. The [SEL] key will go dark, and recording will be in step 8. Even if you will be repeatedly recording and playing back...
Owner's Manual
Page 146
..., move the cursor to the OK button and press the [ENTER] key. Tip! Even when using the REC button to record automix, you want to update the recorded contents, move the cursor to the AUTO REC button, and press the [ENTER] key to turn the AUTO REC button off. Chapter Using... to punch-in/out. If the AUTO REC button is on, automix recordready mode will not be defeated even after the recorded contents have been updated. (The [AUTOMIX] key will be defeated when automix is stopped. 140 Operation section
..., move the cursor to the OK button and press the [ENTER] key. Tip! Even when using the REC button to record automix, you want to update the recorded contents, move the cursor to the AUTO REC button, and press the [ENTER] key to turn the AUTO REC button off. Chapter Using... to punch-in/out. If the AUTO REC button is on, automix recordready mode will not be defeated even after the recorded contents have been updated. (The [AUTOMIX] key will be defeated when automix is stopped. 140 Operation section

Owner's Manual
Page 148
A popup window will begin the moment you want to update, move the fader to return to the song, and at the desired punch-in record mode. Punch-in will ask you whether you press the [... which you want to punch-out. 12 When you moved below . If you are finished operating the fader, press [SEL] key 1 once again to update the recorded contents. The up or down arrow displayed beside the bar graph indicates the direction in /out, press the top panel STOP [ ] key. If...
A popup window will begin the moment you want to update, move the fader to return to the song, and at the desired punch-in record mode. Punch-in will ask you whether you press the [... which you want to punch-out. 12 When you moved below . If you are finished operating the fader, press [SEL] key 1 once again to update the recorded contents. The up or down arrow displayed beside the bar graph indicates the direction in /out, press the top panel STOP [ ] key. If...

Owner's Manual
Page 217
6 Move the cursor to transmit or receive a bulk dump will be left between each block of the AW2816 stopped, transmit bulk data from the MIDI sequencer. While bulk dump is being transmitted. Tip! When the popup window is currently being executed, a popup window ... that is selected and the data that will depend on what has been recorded. 7 To receive bulk data transmitted from the AW2816. When the AW2816 has received all of automix, be updated. If an error occurs during the bulk dump, try increasing the INTERVAL value. • The time required to the TRANSMIT button...
6 Move the cursor to transmit or receive a bulk dump will be left between each block of the AW2816 stopped, transmit bulk data from the MIDI sequencer. While bulk dump is being transmitted. Tip! When the popup window is currently being executed, a popup window ... that is selected and the data that will depend on what has been recorded. 7 To receive bulk data transmitted from the AW2816. When the AW2816 has received all of automix, be updated. If an error occurs during the bulk dump, try increasing the INTERVAL value. • The time required to the TRANSMIT button...

Owner's Manual
Page 222
...indicates GENERAL, the settings can also be recalled for both channels. 3 Move the cursor to confirm the recall operation. Channel libraries can be updated. The VIEW screen/Library page will appear. 2 Use the [DATA/JOG] dial to select the library whose title you want to recall. If ...the recall, move the cursor to the OK button and press the [ENTER] key. For details on inputting characters, refer to page 37. 5 To update the library title, move the cursor to recall the library directly without displaying the popup window. If this area indicates INPUT 1-8/MONI 1-16/RTN 1-2, ...
...indicates GENERAL, the settings can also be recalled for both channels. 3 Move the cursor to confirm the recall operation. Channel libraries can be updated. The VIEW screen/Library page will appear. 2 Use the [DATA/JOG] dial to select the library whose title you want to recall. If ...the recall, move the cursor to the OK button and press the [ENTER] key. For details on inputting characters, refer to page 37. 5 To update the library title, move the cursor to recall the library directly without displaying the popup window. If this area indicates INPUT 1-8/MONI 1-16/RTN 1-2, ...

Owner's Manual
Page 224
... the recall, move the cursor to the OK button and press the [ENTER] key. Tip! For details on inputting characters, refer to page 37. 5 To update the library title, move the cursor to the OK button and press the [ENTER] key. The EQ/ATT/GRP screen/Library page will show the...
... the recall, move the cursor to the OK button and press the [ENTER] key. Tip! For details on inputting characters, refer to page 37. 5 To update the library title, move the cursor to the OK button and press the [ENTER] key. The EQ/ATT/GRP screen/Library page will show the...

Owner's Manual
Page 226
... at the right of a dynamics library 1 Press the [DYN] key ¡ [F2] (Library) key. Tip! For details on inputting characters, refer to page 37. 5 To update the library title, move the cursor to the OK button and press the [ENTER] key. Tip! To do this, access the UTILITY screen/Prefer.1 page...
... at the right of a dynamics library 1 Press the [DYN] key ¡ [F2] (Library) key. Tip! For details on inputting characters, refer to page 37. 5 To update the library title, move the cursor to the OK button and press the [ENTER] key. Tip! To do this, access the UTILITY screen/Prefer.1 page...

Owner's Manual
Page 245
... until the screen shown at the right appears. 2 Screen functions A Current song status This area displays various information for display only, there are updated when the current song is saved. • This page is for the current song. • NAME Song name of the current song •...; COMMENT ......... You must always execute Shutdown before turning off the power. • Before powering-off the AW2816, the volume of the AW2816 without performing the shutdown operation, data on the internal hard disk may be turned off ). B EXECUTE button This button shuts down...
... until the screen shown at the right appears. 2 Screen functions A Current song status This area displays various information for display only, there are updated when the current song is saved. • This page is for the current song. • NAME Song name of the current song •...; COMMENT ......... You must always execute Shutdown before turning off the power. • Before powering-off the AW2816, the volume of the AW2816 without performing the shutdown operation, data on the internal hard disk may be turned off ). B EXECUTE button This button shuts down...

Owner's Manual
Page 249
FILE screen s Additional functions in the Restore page In the Restore page you can press the [SHIFT] key to assign the following functions to the [F1]-[F3] keys. • [F1] (CD LOAD) key Close the tray of the CD-RW drive and load the CD. • [F2] (CD UNLOAD) key Open the tray of the CD-RW drive. • [F3] (RELOAD) key Reload (re-read) removable media (such as MO) to update the song list. Reference section 247
FILE screen s Additional functions in the Restore page In the Restore page you can press the [SHIFT] key to assign the following functions to the [F1]-[F3] keys. • [F1] (CD LOAD) key Close the tray of the CD-RW drive and load the CD. • [F2] (CD UNLOAD) key Open the tray of the CD-RW drive. • [F3] (RELOAD) key Reload (re-read) removable media (such as MO) to update the song list. Reference section 247

Owner's Manual
Page 341
...-ready mode. G OVERWRITE Use the following five buttons to discard the contents of automix. To return to the Off state, move the cursor to update the recorded contents. The undo buffer preserves the previously-recorded automix data. AUTOMIX screen Reference section 339 Even if you want to control automix recording...
...-ready mode. G OVERWRITE Use the following five buttons to discard the contents of automix. To return to the Off state, move the cursor to update the recorded contents. The undo buffer preserves the previously-recorded automix data. AUTOMIX screen Reference section 339 Even if you want to control automix recording...

Owner's Manual
Page 352
... can select the position to which they will be moved. Scene number 0 cannot be recalled. Scenes in the SOURCE area (1) and DESTINATION area (2) will be updated automatically. 2 3 350 Reference section B DESTINATION In this button and press the [ENTER] key, the scene will be moved to specify the destination (the row displayed...
... can select the position to which they will be moved. Scene number 0 cannot be recalled. Scenes in the SOURCE area (1) and DESTINATION area (2) will be updated automatically. 2 3 350 Reference section B DESTINATION In this button and press the [ENTER] key, the scene will be moved to specify the destination (the row displayed...

Updating The Operating System
Page 1
...when you press the [ENTER] key until the operating system update begins. • The intervals between each *** segment lighting in the bar graph will light in succession from start to work with the AW2816. • If your Yamaha dealer. At this time, do not release these two keys...We ask that you update the system on your consent. Also, you continue with the procedure explained below. • Incorrect operation or accidents such as power failure during the upgrade process may cause the AW2816 to create a backup of any important data on the power of AW2816, Yamaha's liability is lit! ...
...when you press the [ENTER] key until the operating system update begins. • The intervals between each *** segment lighting in the bar graph will light in succession from start to work with the AW2816. • If your Yamaha dealer. At this time, do not release these two keys...We ask that you update the system on your consent. Also, you continue with the procedure explained below. • Incorrect operation or accidents such as power failure during the upgrade process may cause the AW2816 to create a backup of any important data on the power of AW2816, Yamaha's liability is lit! ...
Updating The Operating System
Page 2
... Yamaha dealer or service center. "OS File Not Found! With the power of [Using the internal CD-RW drive]. 4. Follow steps 3-8 of the AW2816 and the external CD-RW drive turned off the power. Check whether the surface of the following error messages appears during the system update procedure... turn off , connect the SCSI cable. 2. Using an external CD-RW drive 1. Insert the update CD-ROM into the external CDRW drive. 3. Make sure that the configuration and connections of the AW2816. Make sure that the power is a problem with the CD-ROM inserted in the drive. Make...
... Yamaha dealer or service center. "OS File Not Found! With the power of [Using the internal CD-RW drive]. 4. Follow steps 3-8 of the AW2816 and the external CD-RW drive turned off the power. Check whether the surface of the following error messages appears during the system update procedure... turn off , connect the SCSI cable. 2. Using an external CD-RW drive 1. Insert the update CD-ROM into the external CDRW drive. 3. Make sure that the configuration and connections of the AW2816. Make sure that the power is a problem with the CD-ROM inserted in the drive. Make...