
Owner's Manual
Page 2
... when installed as follows: The wire which can not locate the appropriate retailer, please contact Yamaha Corporation of interference, which is coloured GREEN and YELLOW must be connected to coaxial type cable. Follow all installations. Utilize power outlets that interference will not result in... intended to alert the user to the presence of uninsulated "dangerous voltage" within an equilateral triangle is coloured BROWN must be connected to accessories and/or another product use the product. 2. If this type of important operating and maintenance (servicing) instructions in...
... when installed as follows: The wire which can not locate the appropriate retailer, please contact Yamaha Corporation of interference, which is coloured GREEN and YELLOW must be connected to coaxial type cable. Follow all installations. Utilize power outlets that interference will not result in... intended to alert the user to the presence of uninsulated "dangerous voltage" within an equilateral triangle is coloured BROWN must be connected to accessories and/or another product use the product. 2. If this type of important operating and maintenance (servicing) instructions in...
Owner's Manual
Page 4
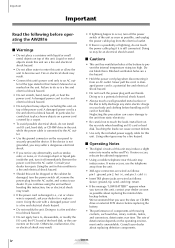
... leads can cause damage to prevent the internal temperature rising too high. Consult your dealer for repair. Important Important Read the following before operating the AW2816 s Warnings • Do not place a container with liquid or small metal objects on top of this unit. Fire or electrical shock may result...shock hazard. If noise occurs, use the telephone away from an AC outlet. Using the unit in the unit while the power cable is connected to the AC outlet. • Use the ground connector on the rear panel to touch the leads (metal feet) on the operating environment...
... leads can cause damage to prevent the internal temperature rising too high. Consult your dealer for repair. Important Important Read the following before operating the AW2816 s Warnings • Do not place a container with liquid or small metal objects on top of this unit. Fire or electrical shock may result...shock hazard. If noise occurs, use the telephone away from an AC outlet. Using the unit in the unit while the power cable is connected to the AC outlet. • Use the ground connector on the rear panel to touch the leads (metal feet) on the operating environment...
Owner's Manual
Page 5
...for the main unit and all peripherals, unplug the power cord for the main unit from the outlet, then disconnect the cables connecting the main unit with the law of copyright, including all or a portion of sound recordings or musical compositions protected by recording ...industry professionals. Responsibility for loss of data, etc. • Yamaha will accept no copyright problem, the duplication or transfer of commercially sold music/sound data without having obtained a proper license from damage due...
...for the main unit and all peripherals, unplug the power cord for the main unit from the outlet, then disconnect the cables connecting the main unit with the law of copyright, including all or a portion of sound recordings or musical compositions protected by recording ...industry professionals. Responsibility for loss of data, etc. • Yamaha will accept no copyright problem, the duplication or transfer of commercially sold music/sound data without having obtained a proper license from damage due...
Owner's Manual
Page 6
...25 CD-RW drive (option 26 Other features 26 Signal flow within the AW2816 27 Input patch 27 Input channels 1-8 28 Return channels 1/2 29 Recorder input patch 29 Monitor channels 1-16 30 Digital cascade connection 30 Oscillator 30 Stereo output channel 31 Buses 1-8 31 AUX buses 1-6... box 36 Using the additional function buttons .........37 Inputting text 37 Selecting a channel 38 Chapter3 Let's record on the AW2816 41 Connections and setup 41 Making connections 41 Creating a new song 42 Word clock settings 44 Recording the first track 46 Setting the input level 46 Pairing ...
...25 CD-RW drive (option 26 Other features 26 Signal flow within the AW2816 27 Input patch 27 Input channels 1-8 28 Return channels 1/2 29 Recorder input patch 29 Monitor channels 1-16 30 Digital cascade connection 30 Oscillator 30 Stereo output channel 31 Buses 1-8 31 AUX buses 1-6... box 36 Using the additional function buttons .........37 Inputting text 37 Selecting a channel 38 Chapter3 Let's record on the AW2816 41 Connections and setup 41 Making connections 41 Creating a new song 42 Word clock settings 44 Recording the first track 46 Setting the input level 46 Pairing ...
Owner's Manual
Page 7
... MIDI 187 What you can do using MIDI 187 MIDI connectors and the TO HOST connector 188 Using the MIDI connectors to connect the AW2816 to external devices 189 Making connections 189 Enabling the MIDI IN connector and MIDI OUT/THRU connector 189 Using the TO HOST connector to... connect the AW2816 and your computer....... 190 Making connections 190 Enabling the TO HOST connector 190 Using MTC to synchronize the AW2816 and an external device 192 Using MIDI clock to synchronize the AW2816 and an external device ....... 194 Using MMC to...
... MIDI 187 What you can do using MIDI 187 MIDI connectors and the TO HOST connector 188 Using the MIDI connectors to connect the AW2816 to external devices 189 Making connections 189 Enabling the MIDI IN connector and MIDI OUT/THRU connector 189 Using the TO HOST connector to... connect the AW2816 and your computer....... 190 Making connections 190 Enabling the TO HOST connector 190 Using MTC to synchronize the AW2816 and an external device 192 Using MIDI clock to synchronize the AW2816 and an external device ....... 194 Using MMC to...
Owner's Manual
Page 11
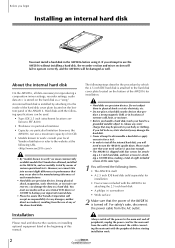
...Yamaha distributor or refer to the website at the beginning of this manual. The following specifications can be damaged as a "song." About the internal hard disk On the AW2816, all peripherals, unplug the power cord for the main unit from the outlet, then disconnect the cables connecting... a strong magnetic field, or in your work ," we cannot take into account slight differences in performance that Yamaha has obtained, installed in the AW2816 before starting installation work. 2 Operation section If you fail to do so, static electricity may damage the hard disk....
...Yamaha distributor or refer to the website at the beginning of this manual. The following specifications can be damaged as a "song." About the internal hard disk On the AW2816, all peripherals, unplug the power cord for the main unit from the outlet, then disconnect the cables connecting... a strong magnetic field, or in your work ," we cannot take into account slight differences in performance that Yamaha has obtained, installed in the AW2816 before starting installation work. 2 Operation section If you fail to do so, static electricity may damage the hard disk....
Owner's Manual
Page 13
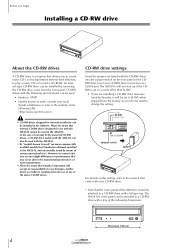
...that internal CD-RW drives designed for internal installation can be installed in the AW2816, and successfully tested by means of external SCSI-connected CD-RW drives, a CD-RW drive usable with your local Yamaha distributor or refer to the website at the following dimensions. CD-RW drive settings... Insert the jumper (included with the CD-RW drive) into account slight differences in the AW2816. In the case...
...that internal CD-RW drives designed for internal installation can be installed in the AW2816, and successfully tested by means of external SCSI-connected CD-RW drives, a CD-RW drive usable with your local Yamaha distributor or refer to the website at the following dimensions. CD-RW drive settings... Insert the jumper (included with the CD-RW drive) into account slight differences in the AW2816. In the case...
Owner's Manual
Page 14
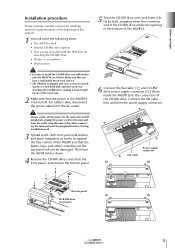
...safety's sake, disconnect the power cable from the AC outlet. 6 Connect the flat cable first, and then the power supply connector. Connect the flat cable (1) and CD-RW drive power supply connector (2) (from inside the AW2816) to the connectors of the CD-RW drive. Flat cable Power ...power for the main unit and all peripherals, unplug the power cord for the main unit from the outlet, then disconnect the cables connecting the main unit with the AW2816) for attaching the CD-RW drive • Philips (+) screwdriver • Work surface 5 Turn the CD-RW drive over your ...
...safety's sake, disconnect the power cable from the AC outlet. 6 Connect the flat cable first, and then the power supply connector. Connect the flat cable (1) and CD-RW drive power supply connector (2) (from inside the AW2816) to the connectors of the CD-RW drive. Flat cable Power ...power for the main unit and all peripherals, unplug the power cord for the main unit from the outlet, then disconnect the cables connecting the main unit with the AW2816) for attaching the CD-RW drive • Philips (+) screwdriver • Work surface 5 Turn the CD-RW drive over your ...
Owner's Manual
Page 17
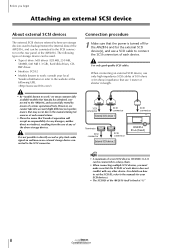
...The following URL. However, we mean commercially available models that Yamaha has obtained, connected to the manufacturing tolerances of each manufacturer. • Please be aware that are storage devices used . • Type of the AW2816. When connecting an external SCSI device, use only high impedance SCSI cables... 8 Operation section Use only good-quality SCSI cables. It is turned off for the AW2816 and for your local Yamaha distributor or refer to connect the SCSI connectors of the AW2816 itself is fixed at the following types of storage device can be used to backup...
...The following URL. However, we mean commercially available models that Yamaha has obtained, connected to the manufacturing tolerances of each manufacturer. • Please be aware that are storage devices used . • Type of the AW2816. When connecting an external SCSI device, use only high impedance SCSI cables... 8 Operation section Use only good-quality SCSI cables. It is turned off for the AW2816 and for your local Yamaha distributor or refer to connect the SCSI connectors of the AW2816 itself is fixed at the following types of storage device can be used to backup...
Owner's Manual
Page 18
... cables with the SCSI ID of the SCSI chain. Depending on the combination of SCSI devices, the order of connection, or on the length of each SCSI device (including the AW2816) does not conflict with 25-pin connectors at "6." If problems occur such as possible. It is ... use doubleshielded cables that uses a 25-pin connector, the problems may occur in terminator, turn it . Before you begin 2 Attach a terminator to the AW2816. q Daisy-chain connection Sometimes the operation of a SCSI bus will need to this procedure, refer to terminate the end of the terminator.
... cables with the SCSI ID of the SCSI chain. Depending on the combination of SCSI devices, the order of connection, or on the length of each SCSI device (including the AW2816) does not conflict with 25-pin connectors at "6." If problems occur such as possible. It is ... use doubleshielded cables that uses a 25-pin connector, the problems may occur in terminator, turn it . Before you begin 2 Attach a terminator to the AW2816. q Daisy-chain connection Sometimes the operation of a SCSI bus will need to this procedure, refer to terminate the end of the terminator.
Owner's Manual
Page 19
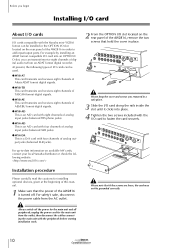
... About I/O cards I/O cards compatible with the Yamaha mini-YGDAI format can be installed in the OPTION I/O slot located on the rear panel of Alesis ADAT format digital signals. q MY8-AT This card transmits and receives eight channels of the AW2816 in order to /from an ADAT format digital... types of I / O slot, you removed in place. For safety's sake, disconnect the power cable from the outlet, then disconnect the cables connecting the main unit with four channels of analog output jacks (balanced XLR jacks). For example by installing an ADAT format compatible I/O card into place. ...
... About I/O cards I/O cards compatible with the Yamaha mini-YGDAI format can be installed in the OPTION I/O slot located on the rear panel of Alesis ADAT format digital signals. q MY8-AT This card transmits and receives eight channels of the AW2816 in order to /from an ADAT format digital... types of I / O slot, you removed in place. For safety's sake, disconnect the power cable from the outlet, then disconnect the cables connecting the main unit with four channels of analog output jacks (balanced XLR jacks). For example by installing an ADAT format compatible I/O card into place. ...
Owner's Manual
Page 20
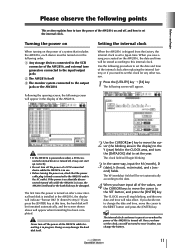
...the following order. 1 Any storage devices connected to the SCSI connector of the AW2816, and external tone generators connected to the input/output jacks B The AW2816 itself C The monitor system connected to the output jacks or the AW2816 Setting the internal clock When the AW2816 is shipped from the factory, the internal... (turned off . Following the opening screen, the following procedure to set the internal clock. If the power is firmly connected to the AW2816 and to set the year. The CLOCK area will stop blinking, and the new date and time will begin Please observe the ...
...the following order. 1 Any storage devices connected to the SCSI connector of the AW2816, and external tone generators connected to the input/output jacks B The AW2816 itself C The monitor system connected to the output jacks or the AW2816 Setting the internal clock When the AW2816 is shipped from the factory, the internal... (turned off . Following the opening screen, the following procedure to set the internal clock. If the power is firmly connected to the AW2816 and to set the year. The CLOCK area will stop blinking, and the new date and time will begin Please observe the ...

Owner's Manual
Page 21
... current song. 4 Use the CURSOR keys located in the following order. 1 The monitor system connected to the output jacks or the AW2816 B The AW2816 itself C Any storage devices connected to the SCSI connector of the AW2816, and external tone generators connected to turn off" appears, turn off the power while the access indicator which indicates the...
... current song. 4 Use the CURSOR keys located in the following order. 1 The monitor system connected to the output jacks or the AW2816 B The AW2816 itself C Any storage devices connected to the SCSI connector of the AW2816, and external tone generators connected to turn off" appears, turn off the power while the access indicator which indicates the...

Owner's Manual
Page 22
...below the clipping point. In order to mic inputs. Chapter 1 Parts and their functions This chapter explains the functions of each part of the AW2816's top panel, rear panel, and front panel. 1 Parts and their functions The names of controllers (keys and knobs etc.) on the top... panel Analog input/output section 2 34 1 A [GAIN] control These knobs adjust the input sensitivity of INPUT jacks 1-8 over a range of the headphones connected to the rear panel PHONES jack. C [PHONES] (headphones) control This knob adjusts the volume of +4 dB to distinguish them from the rear panel MONITOR...
...below the clipping point. In order to mic inputs. Chapter 1 Parts and their functions This chapter explains the functions of each part of the AW2816's top panel, rear panel, and front panel. 1 Parts and their functions The names of controllers (keys and knobs etc.) on the top... panel Analog input/output section 2 34 1 A [GAIN] control These knobs adjust the input sensitivity of INPUT jacks 1-8 over a range of the headphones connected to the rear panel PHONES jack. C [PHONES] (headphones) control This knob adjusts the volume of +4 dB to distinguish them from the rear panel MONITOR...
Owner's Manual
Page 31
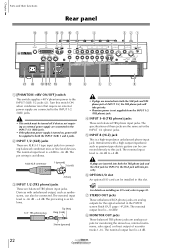
... 1 (ground) 3 (cold) 2 (hot) C INPUT 1/2 (TRS phone) jacks These are balanced TRS phone input jacks. If plugs are analog outputs for connecting balanced condenser mics or line level devices. The pin wiring is -10 dBV. The pin wiring is not supplied from the INPUT 1/2 (TRS phone) jack...card, refer to both the INPUT (XLR) 1 and 2 jacks. Instruments with unbalanced output, such as for INPUT 8, the Hi-Z jack will be connected. Tip! H MONITOR OUT jacks These balanced TRS phone jacks are analog outputs for monitoring the stereo bus, internal metronome, solo signal, or direct output...
... 1 (ground) 3 (cold) 2 (hot) C INPUT 1/2 (TRS phone) jacks These are balanced TRS phone input jacks. If plugs are analog outputs for connecting balanced condenser mics or line level devices. The pin wiring is -10 dBV. The pin wiring is not supplied from the INPUT 1/2 (TRS phone) jack...card, refer to both the INPUT (XLR) 1 and 2 jacks. Instruments with unbalanced output, such as for INPUT 8, the Hi-Z jack will be connected. Tip! H MONITOR OUT jacks These balanced TRS phone jacks are analog outputs for monitoring the stereo bus, internal metronome, solo signal, or direct output...
Owner's Manual
Page 32
K DIGITAL STEREO IN jack This is a coaxial jack for digital output of a stereo signal. You can be connected to record a song using an external SCSI device instead of the AW2816. It supports the IEC 958 consumer format. L DIGITAL STEREO OUT jack This is a coaxial jack for digital ...Turning the power off . External SCSI-2 devices such as the MONITOR OUT jacks. This jack will also help prevent hum and other than the Yamaha FC5 (or equivalent) may not operate correctly. I OMNI OUT jacks These unbalanced phone jacks are used when grounding the chassis of the internal...
K DIGITAL STEREO IN jack This is a coaxial jack for digital output of a stereo signal. You can be connected to record a song using an external SCSI device instead of the AW2816. It supports the IEC 958 consumer format. L DIGITAL STEREO OUT jack This is a coaxial jack for digital ...Turning the power off . External SCSI-2 devices such as the MONITOR OUT jacks. This jack will also help prevent hum and other than the Yamaha FC5 (or equivalent) may not operate correctly. I OMNI OUT jacks These unbalanced phone jacks are used when grounding the chassis of the internal...
Owner's Manual
Page 39
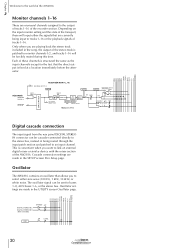
...-connected directly to the stereo bus, instead of being input to tracks 1-16 or the playback signals of tracks 1-16. Chapter INPUT PATCH BUS 1 BUS 2 BUS 3 BUS 4 BUS 5 BUS 6 BUS 7 BUS 8 STEREO L STEREO R SOLO L SOLO R AUX 1 AUX 4 AUX 5(EFF1) AUX 6(EFF2) Welcome to the world of the AW2816... before the attenuator. ... The oscillator signal can be sent to the output of tracks 1-16 of these will be forcibly muted during this time. Cascade connection settings are playing back the stereo track included in the UTILITY screen Oscillator page. BUS 1 BUS 2 BUS 3 BUS 4 BUS 5 BUS 6 BUS 7 BUS 8...
...-connected directly to the stereo bus, instead of being input to tracks 1-16 or the playback signals of tracks 1-16. Chapter INPUT PATCH BUS 1 BUS 2 BUS 3 BUS 4 BUS 5 BUS 6 BUS 7 BUS 8 STEREO L STEREO R SOLO L SOLO R AUX 1 AUX 4 AUX 5(EFF1) AUX 6(EFF2) Welcome to the world of the AW2816... before the attenuator. ... The oscillator signal can be sent to the output of tracks 1-16 of these will be forcibly muted during this time. Cascade connection settings are playing back the stereo track included in the UTILITY screen Oscillator page. BUS 1 BUS 2 BUS 3 BUS 4 BUS 5 BUS 6 BUS 7 BUS 8...
Owner's Manual
Page 42
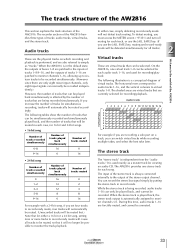
... of virtual tracks. The stereo track The "stereo track" is always connected internally to monitor channels 1/2. The AW2816 provides one virtual track 1-8 can be selected for each song. When the AW2816 is being recorded simultaneously. On the AW2816, one stereo track for each audio track 1-16, and used mainly... and the vertical columns to simply as a master track for simultaneous recording, tracks will no longer be possible to the world of the AW2816 Virtual tracks In either a 16 bit or a 24 bit song, setting nine or more tracks to record-ready mode will cause all tracks...
... of virtual tracks. The stereo track The "stereo track" is always connected internally to monitor channels 1/2. The AW2816 provides one virtual track 1-8 can be selected for each song. When the AW2816 is being recorded simultaneously. On the AW2816, one stereo track for each audio track 1-16, and used mainly... and the vertical columns to simply as a master track for simultaneous recording, tracks will no longer be possible to the world of the AW2816 Virtual tracks In either a 16 bit or a 24 bit song, setting nine or more tracks to record-ready mode will cause all tracks...
Owner's Manual
Page 49
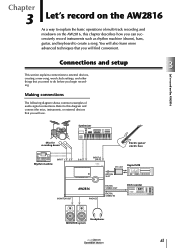
... successively record instruments such as rhythm machine (drums), bass, guitar, and keyboard to create a song. Let's record on the AW2816, this diagram and connect the mics, instruments, or external devices that you begin recording. Synthesizer Mics for recording drums Electric guitar/ electric bass INPUT 1...00 DAT VOL VOL MONITOR system Headphones Operation section 41 Chapter 3 Let's record on the AW2816 As a way to explain the basic operations of multi-track recording and mixdown on the AW2816 Making connections The following diagram shows common examples of audio signal...
... successively record instruments such as rhythm machine (drums), bass, guitar, and keyboard to create a song. Let's record on the AW2816, this diagram and connect the mics, instruments, or external devices that you begin recording. Synthesizer Mics for recording drums Electric guitar/ electric bass INPUT 1...00 DAT VOL VOL MONITOR system Headphones Operation section 41 Chapter 3 Let's record on the AW2816 As a way to explain the basic operations of multi-track recording and mixdown on the AW2816 Making connections The following diagram shows common examples of audio signal...
Owner's Manual
Page 50
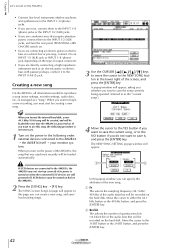
...the [ENTER] key. 42 Operation section Creating a new song On the AW2816, all information needed to reproduce a song (mixer settings, recorder settings, audio data, etc.) is turned on when the connected SCSI devices are directly connecting a high impedance instrument such as an electric guitar or electric bass with ... button or the 48 kHz button, and press the [ENTER] key. When you want to use condenser mics that require phantom power, connect them to the AW2816 ¡ the AW2816 itself ¡ your monitor system. If you want to save it to an INPUT 1/2 (XLR) jack or INPUT 1-8 (phone)...
...the [ENTER] key. 42 Operation section Creating a new song On the AW2816, all information needed to reproduce a song (mixer settings, recorder settings, audio data, etc.) is turned on when the connected SCSI devices are directly connecting a high impedance instrument such as an electric guitar or electric bass with ... button or the 48 kHz button, and press the [ENTER] key. When you want to use condenser mics that require phantom power, connect them to the AW2816 ¡ the AW2816 itself ¡ your monitor system. If you want to save it to an INPUT 1/2 (XLR) jack or INPUT 1-8 (phone)...
