
Owner's Manual
Page 5
...(speaker delay time 38 4 D. CONTENTS INTRODUCTION INTRODUCTION 2 FEATURES 2 CHECKING THE ACCESSORIES 3 INSTALLING BATTERIES IN THE REMOTE CONTROL 3 CONTROLS AND FUNCTIONS 4 Front panel 4 Remote control 5 Front panel display 7 PREPARATION PREPARATION STEPS 8 SPEAKER SETUP 9 Speaker placement 9 Installing the speakers 10 ...30 Description of RDS data 30 Changing the RDS mode 31 PTY SEEK function 31 REMOTE CONTROL FEATURES OPERATING OTHER COMPONENTS USING THE REMOTE CONTROL 32 Setting the manufacturer code 32 Other component controlling functions 33 ADJUSTMENTS SET MENU...
...(speaker delay time 38 4 D. CONTENTS INTRODUCTION INTRODUCTION 2 FEATURES 2 CHECKING THE ACCESSORIES 3 INSTALLING BATTERIES IN THE REMOTE CONTROL 3 CONTROLS AND FUNCTIONS 4 Front panel 4 Remote control 5 Front panel display 7 PREPARATION PREPARATION STEPS 8 SPEAKER SETUP 9 Speaker placement 9 Installing the speakers 10 ...30 Description of RDS data 30 Changing the RDS mode 31 PTY SEEK function 31 REMOTE CONTROL FEATURES OPERATING OTHER COMPONENTS USING THE REMOTE CONTROL 32 Setting the manufacturer code 32 Other component controlling functions 33 ADJUSTMENTS SET MENU...
Owner's Manual
Page 6
... check the all components are contained without fail by using the buttons on either the main unit or the remote control. The newest DSP programs will guide you in this YAMAHA product. Since the AVX-S80 consists of the components shown on the table at right. INTRODUCTION Thank you for purchasing this manual may...
... check the all components are contained without fail by using the buttons on either the main unit or the remote control. The newest DSP programs will guide you in this YAMAHA product. Since the AVX-S80 consists of the components shown on the table at right. INTRODUCTION Thank you for purchasing this manual may...
Owner's Manual
Page 7
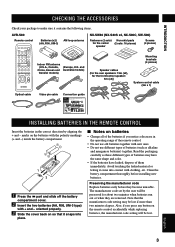
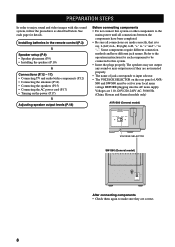
... Video pin cable (not included) Video pin cable (not included) Connect either to a TV (monitor), DVD player, video camera and video game player AVX - REAR R Speaker cable (included) REAR L Speaker cable (included) *1 Speaker cable (included) Speaker cable (included) Speaker cable (included) VIDEO OUTPUT ...be lost . Avoid touching the leaked material or letting it contains the following items. AVR-S80 Remote control Batteries (x2) (AA, R06, UM-3) AM loop antenna NX-SW80 (NX-S80S x4, NX-S80C, SW-S80) Fasteners (2 sets) Non-skid pads for the center (2 sets: 16 pieces) speaker ...
... Video pin cable (not included) Video pin cable (not included) Connect either to a TV (monitor), DVD player, video camera and video game player AVX - REAR R Speaker cable (included) REAR L Speaker cable (included) *1 Speaker cable (included) Speaker cable (included) Speaker cable (included) VIDEO OUTPUT ...be lost . Avoid touching the leaked material or letting it contains the following items. AVR-S80 Remote control Batteries (x2) (AA, R06, UM-3) AM loop antenna NX-SW80 (NX-S80S x4, NX-S80C, SW-S80) Fasteners (2 sets) Non-skid pads for the center (2 sets: 16 pieces) speaker ...
Owner's Manual
Page 8
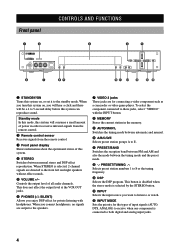
... the priority for private listening with the INPUT button. 8 MEMORY Stores the current station in order to receive infrared-signals from the remote control. 2 Remote control sensor Receives signals from the remote control. 3 Front panel display Shows information about the operational status of this system. 4 STEREO Switches between the tuning mode and the...
... the priority for private listening with the INPUT button. 8 MEMORY Stores the current station in order to receive infrared-signals from the remote control. 2 Remote control sensor Receives signals from the remote control. 3 Front panel display Shows information about the operational status of this system. 4 STEREO Switches between the tuning mode and the...
Owner's Manual
Page 9
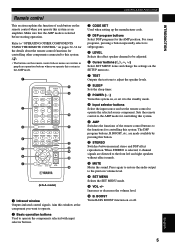
... B.BOOST RETURN VOL 8 9 0 q w e r t y (U.S.A. y • The buttons on pages 32-34 for the details about the remote control functions for controlling this window at the component you want to operate. 2 Basic operation buttons Used to operate the components selected with input selector... buttons. q AMP Switches the functions of each button on the remote control when you operate this system. When STEREO is selected before starting operation. t VOL +/- e MUTE Mutes the sound. Increases or...
... B.BOOST RETURN VOL 8 9 0 q w e r t y (U.S.A. y • The buttons on pages 32-34 for the details about the remote control functions for controlling this window at the component you want to operate. 2 Basic operation buttons Used to operate the components selected with input selector... buttons. q AMP Switches the functions of each button on the remote control when you operate this system. When STEREO is selected before starting operation. t VOL +/- e MUTE Mutes the sound. Increases or...
Owner's Manual
Page 10
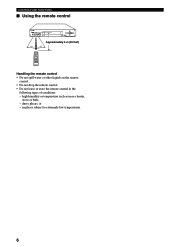
CONTROLS AND FUNCTIONS I Using the remote control + - or - Approximately 6 m (20 feet) 30° 30° Handling the remote control • Do not spill water or other liquids on the remote control. • Do not drop the remote control. • Do not leave or store the remote control in places subject to extremely low temperatures. 6 dusty places; high humidity or temperature such as near a heater, stove or bath; - in the following types of conditions: -
CONTROLS AND FUNCTIONS I Using the remote control + - or - Approximately 6 m (20 feet) 30° 30° Handling the remote control • Do not spill water or other liquids on the remote control. • Do not drop the remote control. • Do not leave or store the remote control in places subject to extremely low temperatures. 6 dusty places; high humidity or temperature such as near a heater, stove or bath; - in the following types of conditions: -
Owner's Manual
Page 12
... page for your local main voltage BEFORE plugging into the AC main supply. See each component to be set for details. Installing batteries in the remote control (P.3) Speaker setup (P.9) • Speaker placement (P.9) • Installing the speakers (P.10) Connections (P.12 - 17) • Connecting TV and audio/video ...system or other components to the mains power until all connections are not inserted properly. • The name of AVRS80 and SW-S80 must be connected to input selector. • The VOLTAGE SELECTOR on the rear panel of jack corresponds to this sound system, follow...
... page for your local main voltage BEFORE plugging into the AC main supply. See each component to be set for details. Installing batteries in the remote control (P.3) Speaker setup (P.9) • Speaker placement (P.9) • Installing the speakers (P.10) Connections (P.12 - 17) • Connecting TV and audio/video ...system or other components to the mains power until all connections are not inserted properly. • The name of AVRS80 and SW-S80 must be connected to input selector. • The VOLTAGE SELECTOR on the rear panel of jack corresponds to this sound system, follow...

Owner's Manual
Page 21
... REC INPUT MUTE VOL AUDIO TUNER VCR VIDEO 2 POWER ( ) VIDEO 1 CD DVD HALL 1 CODE SET JAZZ 2 AMP ROCK ENTERTAINMENT 3 4 1 Press STANDBY/ON (POWER ( ) on the remote control) to turn on the power of this system. BASS BOOST settings - However, if the system is turned off frequency of this jack is 90...
... REC INPUT MUTE VOL AUDIO TUNER VCR VIDEO 2 POWER ( ) VIDEO 1 CD DVD HALL 1 CODE SET JAZZ 2 AMP ROCK ENTERTAINMENT 3 4 1 Press STANDBY/ON (POWER ( ) on the remote control) to turn on the power of this system. BASS BOOST settings - However, if the system is turned off frequency of this jack is 90...

Owner's Manual
Page 22
... speaker output levels using the test tone. The test tone is heard (in step 4. R SUR. 4 Adjust the level of the effect speakers using the remote control. After you have set (as long as you can enjoy listening to -10 dB, adjust the levels for the center and rear speakers again...circulated skipping the subwoofer. 18 to balance the output levels of the front speakers, use VOL +/- You can hear the test tone. Level" on the remote control. 5 When adjustment is set to NON, the level of the front speakers, set to NON, the output level of the front speakers. Using the...
... speaker output levels using the test tone. The test tone is heard (in step 4. R SUR. 4 Adjust the level of the effect speakers using the remote control. After you have set (as long as you can enjoy listening to -10 dB, adjust the levels for the center and rear speakers again...circulated skipping the subwoofer. 18 to balance the output levels of the front speakers, use VOL +/- You can hear the test tone. Level" on the remote control. 5 When adjustment is set to NON, the level of the front speakers, set to NON, the output level of the front speakers. Using the...
Owner's Manual
Page 23
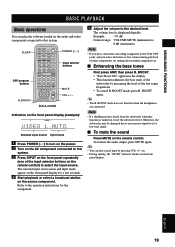
... (example): SP VIDEO 1 VIDEO 1 AUTO Selected input source Input mode 1 Press POWER ( ) to turn on the power. 2 Turn on the remote control) to this system. BOOST mode does not function when the headphones are connected. To resume the audio output, press MUTE again. y • ..., the subwoofer may be damaged due to the operation instructions for a few seconds. 4 Start playback or select a broadcast station on the remote control. The volume level is turned on . USING BASIC FUNCTIONS BASIC PLAYBACK Basic operations You can also cancel mute by increasing the level of...
... (example): SP VIDEO 1 VIDEO 1 AUTO Selected input source Input mode 1 Press POWER ( ) to turn on the power. 2 Turn on the remote control) to this system. BOOST mode does not function when the headphones are connected. To resume the audio output, press MUTE again. y • ..., the subwoofer may be damaged due to the operation instructions for a few seconds. 4 Start playback or select a broadcast station on the remote control. The volume level is turned on . USING BASIC FUNCTIONS BASIC PLAYBACK Basic operations You can also cancel mute by increasing the level of...

Owner's Manual
Page 24
...automatically set this system in the standby mode by disconnecting the AC power cord from "DTSdecoding" mode to select the input source on the remote control) repeatedly until "SLEEP OFF" appears on the SET MENU (see page 39 for some LD players. I Input modes and indications ... display returns to "7 INPUT MODE" setting on the front panel display. If you have finished using POWER ( ) on the remote control (or STANDBY/ON on the remote control) to set according to the previous indication. The "t" indicator will automatically switch from the AC outlet. The "SLEEP" indicator...
...automatically set this system in the standby mode by disconnecting the AC power cord from "DTSdecoding" mode to select the input source on the remote control) repeatedly until "SLEEP OFF" appears on the SET MENU (see page 39 for some LD players. I Input modes and indications ... display returns to "7 INPUT MODE" setting on the front panel display. If you have finished using POWER ( ) on the remote control (or STANDBY/ON on the remote control) to set according to the previous indication. The "t" indicator will automatically switch from the AC outlet. The "SLEEP" indicator...

Owner's Manual
Page 25
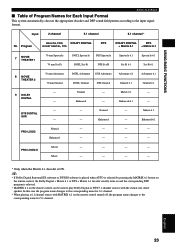
... display (example): Program name • You can simulate various acoustic environments, including a concert hall and movie theater, with a rich surround effect. model) Indication on the remote control to select the desired program. 3 After selecting the desired program, press the same button repeatedly to right seating arrangement offers a real and vibrant sound...
... display (example): Program name • You can simulate various acoustic environments, including a concert hall and movie theater, with a rich surround effect. model) Indication on the remote control to select the desired program. 3 After selecting the desired program, press the same button repeatedly to right seating arrangement offers a real and vibrant sound...
Owner's Manual
Page 27
... • If Dolby Digital Surround EX software or DTS ES software is played when AUTO is selected by pressing the MATRIX 6.1 button on the remote control, the Dolby Digital + Matrix 6.1 or DTS + Matrix 6.1 decoder usually turns on and the corresponding DSP program is ON. English 23 ...5.1 channel 6.1 channel * No. Matrix 6.1 - PRO LOGIC II Movie Music - - - - - - - - * Only when the Matrix 6.1 decoder is selected. • MATRIX 6.1 on the remote control turned off, the program name changes to play Dolby Digital or DTS 5.1 channel sources with MATRIX 6.1 on the...
... • If Dolby Digital Surround EX software or DTS ES software is played when AUTO is selected by pressing the MATRIX 6.1 button on the remote control, the Dolby Digital + Matrix 6.1 or DTS + Matrix 6.1 decoder usually turns on and the corresponding DSP program is ON. English 23 ...5.1 channel 6.1 channel * No. Matrix 6.1 - PRO LOGIC II Movie Music - - - - - - - - * Only when the Matrix 6.1 decoder is selected. • MATRIX 6.1 on the remote control turned off, the program name changes to play Dolby Digital or DTS 5.1 channel sources with MATRIX 6.1 on the...

Owner's Manual
Page 31
... the manual tuning method if the tuning search does not stop at left. 2 Press AUTO/MAN'L so that the "AUTO" indicator lights up on the remote control) to select TUNER as follows: FM (Tuning mode) ^ AM (Tuning mode) ^ (Preset mode) ^ FM (Tuning mode) ^ ... Automatic tuning is effective when station signals are...
... the manual tuning method if the tuning search does not stop at left. 2 Press AUTO/MAN'L so that the "AUTO" indicator lights up on the remote control) to select TUNER as follows: FM (Tuning mode) ^ AM (Tuning mode) ^ (Preset mode) ^ FM (Tuning mode) ^ ... Automatic tuning is effective when station signals are...

Owner's Manual
Page 36
If you to operate not only the AVX-S80 but also your TV, VCR or DVD player on the remote control allows you encounter this problem, please use the remote control supplied with the component. y • The manufacturer code 99 has been set for the remote control selector buttons (TV, VCR ...manual. 32 Note • Keep pressing CODE SET between step 1 and 2. • Refer to be set properly. However, any button on the remote control once the manufacturer code is not necessary to follow step 3.) (U.S.A. To reset the manufacturer code to the factory-set code Follow steps 1 to ...
If you to operate not only the AVX-S80 but also your TV, VCR or DVD player on the remote control allows you encounter this problem, please use the remote control supplied with the component. y • The manufacturer code 99 has been set for the remote control selector buttons (TV, VCR ...manual. 32 Note • Keep pressing CODE SET between step 1 and 2. • Refer to be set properly. However, any button on the remote control once the manufacturer code is not necessary to follow step 3.) (U.S.A. To reset the manufacturer code to the factory-set code Follow steps 1 to ...

Owner's Manual
Page 37
... FEATURES (U.S.A. Changes the channel. *1 This button functions only when the original remote control of the remote control buttons change for which the manufacturer code is set it to increase/decrease the volume level. Controlling a TV 1 2 3 4 POWER... button. *2 Only when pressing this button twice in quick succession within one second, the button functions. 33 English OPERATING OTHER COMPONENTS USING THE REMOTE CONTROL Other component controlling functions By pressing an input selector button (TV, VCR, DVD/CD) for controlling the corresponding component as follows. model)...
... FEATURES (U.S.A. Changes the channel. *1 This button functions only when the original remote control of the remote control buttons change for which the manufacturer code is set it to increase/decrease the volume level. Controlling a TV 1 2 3 4 POWER... button. *2 Only when pressing this button twice in quick succession within one second, the button functions. 33 English OPERATING OTHER COMPONENTS USING THE REMOTE CONTROL Other component controlling functions By pressing an input selector button (TV, VCR, DVD/CD) for controlling the corresponding component as follows. model)...

Owner's Manual
Page 38
e MENU Press to call up menu screen contained in the menu screen. *1 This button functions only when the original remote control of TV has been set it to the standby mode. 2 SUBTITLE Press to select a subtitle language. 3d Press to pause. 4 ty Press to ...play back a disc fast forward or backward. w e, r Press to others recorded on the video monitor. OPERATING OTHER COMPONENTS USING THE REMOTE CONTROL Controlling a DVD player y • The buttons on the remote control whose names are written in green are operation buttons for the TV button, the TV (POWER) and TV MODE buttons...
e MENU Press to call up menu screen contained in the menu screen. *1 This button functions only when the original remote control of TV has been set it to the standby mode. 2 SUBTITLE Press to select a subtitle language. 3d Press to pause. 4 ty Press to ...play back a disc fast forward or backward. w e, r Press to others recorded on the video monitor. OPERATING OTHER COMPONENTS USING THE REMOTE CONTROL Controlling a DVD player y • The buttons on the remote control whose names are written in green are operation buttons for the TV button, the TV (POWER) and TV MODE buttons...

Owner's Manual
Page 39
... Initial settings 1 SPEAKER SET A CENTER B FRONT C REAR LR D BASS E F. y • You can adjust the items on the SET MENU Adjustment should be made with the remote control. DVD u , d CODE SET AMP HALL 1 JAZZ 2 ROCK ENTERTAINMENT 3 4 SPORTS MONO MOVIE MOVIE 1 MOVIE 2 5 6 7 8 /DTS 9 SELECT MATRIX 6.1 STEREO 0 10 CANCEL TOP MENU LEVEL MENU SET...
... Initial settings 1 SPEAKER SET A CENTER B FRONT C REAR LR D BASS E F. y • You can adjust the items on the SET MENU Adjustment should be made with the remote control. DVD u , d CODE SET AMP HALL 1 JAZZ 2 ROCK ENTERTAINMENT 3 4 SPORTS MONO MOVIE MOVIE 1 MOVIE 2 5 6 7 8 /DTS 9 SELECT MATRIX 6.1 STEREO 0 10 CANCEL TOP MENU LEVEL MENU SET...
Owner's Manual
Page 49
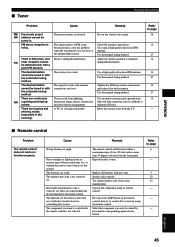
...to eliminate multipath interference. The batteries are continuous AM crackling and hissing noises. The characteristics of the same manufacturer. Try using the remote control. Adjust the antenna position to page 28 14 27 14 14 27 14 27 14 - Use a high-quality directional FM... in . Use the manual tuning method. The component you want to eliminate all batteries with new ones. APPENDIX I Remote control Problem The remote control does not work nor function properly. FM stereo reception is being used nearby. Tighten the AM loop antenna connections and...
...to eliminate multipath interference. The batteries are continuous AM crackling and hissing noises. The characteristics of the same manufacturer. Try using the remote control. Adjust the antenna position to page 28 14 27 14 14 27 14 27 14 - Use a high-quality directional FM... in . Use the manual tuning method. The component you want to eliminate all batteries with new ones. APPENDIX I Remote control Problem The remote control does not work nor function properly. FM stereo reception is being used nearby. Tighten the AM loop antenna connections and...


