
Owner's Manual
Page 2
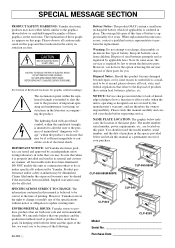
.... SPECIFICATIONS SUBJECT TO CHANGE: The information contained in this manual is approximately five years. When replacement becomes necessary, contact a qualified service representative to update existing units. DO NOT modify this type of battery is believed to the presence of important operating and maintenance (servicing) instructions in place. We sincerely believe that are therefore the owners responsibility. SPECIAL MESSAGE SECTION PRODUCT SAFETY MARKINGS: Yamaha electronic...
.... SPECIFICATIONS SUBJECT TO CHANGE: The information contained in this manual is approximately five years. When replacement becomes necessary, contact a qualified service representative to update existing units. DO NOT modify this type of battery is believed to the presence of important operating and maintenance (servicing) instructions in place. We sincerely believe that are therefore the owners responsibility. SPECIAL MESSAGE SECTION PRODUCT SAFETY MARKINGS: Yamaha electronic...
Owner's Manual
Page 3
... Always follow the basic precautions listed below to a malfunction or user operating error. Pulling by qualified Yamaha service personnel. • Only use excessive force on the buttons, switches or connectors. • (For instruments with or stand on , trip over, or roll anything over . • Before moving the instrument, remove all data to an electrical outlet using the included tool. Use caution. • Do not rest...
... Always follow the basic precautions listed below to a malfunction or user operating error. Pulling by qualified Yamaha service personnel. • Only use excessive force on the buttons, switches or connectors. • (For instruments with or stand on , trip over, or roll anything over . • Before moving the instrument, remove all data to an electrical outlet using the included tool. Use caution. • Do not rest...
Owner's Manual
Page 5
... Functions 37 F8.1/F9.1: Voice 37 F8.2/F9.2: MIDI 37 F8.3/F9.3: Tuning 37 F8.4/F9.4: Pedal 37 Connecting to a Personal Computer 38 q Connecting to an Apple Macintosh Series Computer .... 38 q Connecting to an IBM-PC/AT Series Computer ........ 39 Factory Preset Recall 40 Troubleshooting 40 Options & Expander Modules 40 Demo Song List 41 Factory Setting List 42 MIDI Data Format 43 MIDI Implementation Chart 47 CLP-880: Keyboard Stand Assembly 48 CLP-860/840/820: Keyboard Stand Assembly 56 CLP-820S: Keyboard Stand Assembly 62 Specifications 68 CLP...
... Functions 37 F8.1/F9.1: Voice 37 F8.2/F9.2: MIDI 37 F8.3/F9.3: Tuning 37 F8.4/F9.4: Pedal 37 Connecting to a Personal Computer 38 q Connecting to an Apple Macintosh Series Computer .... 38 q Connecting to an IBM-PC/AT Series Computer ........ 39 Factory Preset Recall 40 Troubleshooting 40 Options & Expander Modules 40 Demo Song List 41 Factory Setting List 42 MIDI Data Format 43 MIDI Implementation Chart 47 CLP-880: Keyboard Stand Assembly 48 CLP-860/840/820: Keyboard Stand Assembly 56 CLP-820S: Keyboard Stand Assembly 62 Specifications 68 CLP...
Owner's Manual
Page 7
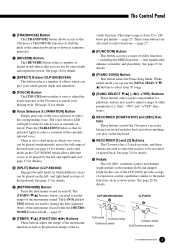
.... 8 [TOUCH] Button The [TOUCH] button makes it easy to adjust the touch response of the Clavinova to select functions - While in the case of the CLP-820S) provide a range of expressive control capabilities similar to the pedal functions on the keyboard. & RECORDER [1] and [2] Buttons The Clavinova has a 2-track recorder, and these buttons are used to change the time signature (beat) of other parameters (i.e. There is from 50 songs. % [SONG SELECT w/v] (-/NO, +/YES) Buttons These buttons select a piano song number for details. ! [METRONOME] Button Turns the metronome sound on...
.... 8 [TOUCH] Button The [TOUCH] button makes it easy to adjust the touch response of the Clavinova to select functions - While in the case of the CLP-820S) provide a range of expressive control capabilities similar to the pedal functions on the keyboard. & RECORDER [1] and [2] Buttons The Clavinova has a 2-track recorder, and these buttons are used to change the time signature (beat) of other parameters (i.e. There is from 50 songs. % [SONG SELECT w/v] (-/NO, +/YES) Buttons These buttons select a piano song number for details. ! [METRONOME] Button Turns the metronome sound on...
Owner's Manual
Page 10
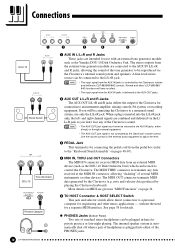
... MIDI interface. q PHONES Jacks (Bottom Panel) Two sets of standard stereo headphones can be connected to the L/L+R jack. • The input signal from the external tone generator module are combined and delivered via the Clavinova's internal sound system and speakers. If you don't lose any data received at the MIDI IN connector, allowing "chaining" of several MIDI instruments or other music applications - Reverb and effect (CLP-880/860/ 840) functions will be used to control the Clavinova. Use the volume control...
... MIDI interface. q PHONES Jacks (Bottom Panel) Two sets of standard stereo headphones can be connected to the L/L+R jack. • The input signal from the external tone generator module are combined and delivered via the Clavinova's internal sound system and speakers. If you don't lose any data received at the MIDI IN connector, allowing "chaining" of several MIDI instruments or other music applications - Reverb and effect (CLP-880/860/ 840) functions will be used to control the Clavinova. Use the volume control...

Owner's Manual
Page 15
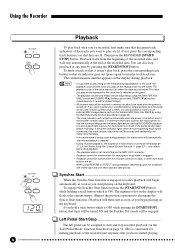
... Part Off Press the RECORDER [1] or [2] button to turn the corresponding part off even during playback. • The Piano Song Part Cancel function cannot be used during "ALL" or "rnd" playback. • The "Piano Song Part Cancel Volume" function described on page 33 can be used to set the canceled part so that it plays at a volume from "0" (no sound) to start and stop piano song playback via the "Left Pedal Mode" function described on the keyboard...
... Part Off Press the RECORDER [1] or [2] button to turn the corresponding part off even during playback. • The Piano Song Part Cancel function cannot be used during "ALL" or "rnd" playback. • The "Piano Song Part Cancel Volume" function described on page 33 can be used to set the canceled part so that it plays at a volume from "0" (no sound) to start and stop piano song playback via the "Left Pedal Mode" function described on the keyboard...
Owner's Manual
Page 16
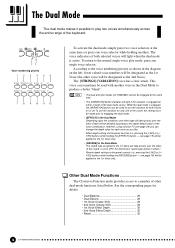
PIANO 1 E. The voice indicators of both selected voices will be engaged at the same time (or press one voice selector while holding another voice in the diagram on or off. NOTE • The dual and split modes (CLP-880/860) cannot be in affect.) Reverb depth setting via the panel controls (i.e. However, using function F3 (see page 29) you like. see page 18) will be designated as the 1st...
PIANO 1 E. The voice indicators of both selected voices will be engaged at the same time (or press one voice selector while holding another voice in the diagram on or off. NOTE • The dual and split modes (CLP-880/860) cannot be in affect.) Reverb depth setting via the panel controls (i.e. However, using function F3 (see page 29) you like. see page 18) will be designated as the 1st...
Owner's Manual
Page 17
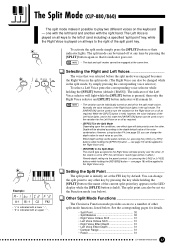
... F#2 key by pressing the key while holding the [SPLIT] button (default: [BASS]). pressing the [-/NO] or [+/YES] buttons while holding the [REVERB] button - NOTE • The dual and split modes cannot be used to turn the variation for the Right Voice on the keyboard - However, using function F4 (see below . see page 18) will be in the split mode. Setting the Split Point The split point is held ). The split mode can change the split point to a number...
... F#2 key by pressing the key while holding the [SPLIT] button (default: [BASS]). pressing the [-/NO] or [+/YES] buttons while holding the [REVERB] button - NOTE • The dual and split modes cannot be used to turn the variation for the Right Voice on the keyboard - However, using function F4 (see below . see page 18) will be in the split mode. Setting the Split Point The split point is held ). The split mode can change the split point to a number...
Owner's Manual
Page 18
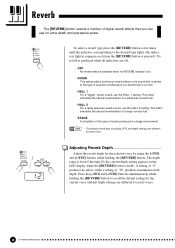
.../820S Reverb The [REVERB] button selects a number of a small-size concert hall. This effect simulates the natural reverberation of digital reverb effects that is pressed). ROOM HALL 1 HALL 2 STAGE REVERB SONG SELECT -/NO +/YES Adjusting Reverb Depth Adjust the reverb depth for the selected voice by using the [-/NO] and [+/YES] buttons while holding the [REVERB] button to recall the default setting for extra depth and expressive power. ROOM HALL 1 HALL 2 STAGE REVERB To select a reverb type press the [REVERB] button a few times...
.../820S Reverb The [REVERB] button selects a number of a small-size concert hall. This effect simulates the natural reverberation of digital reverb effects that is pressed). ROOM HALL 1 HALL 2 STAGE REVERB SONG SELECT -/NO +/YES Adjusting Reverb Depth Adjust the reverb depth for the selected voice by using the [-/NO] and [+/YES] buttons while holding the [REVERB] button to recall the default setting for extra depth and expressive power. ROOM HALL 1 HALL 2 STAGE REVERB To select a reverb type press the [REVERB] button a few times...
Owner's Manual
Page 19
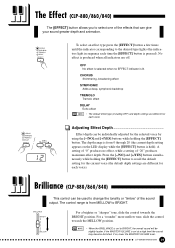
... backdrop TREMOLO Tremolo effect DELAY Echo effect NOTE • The default effect type (including OFF) and depth settings are different for each voice). BRILLIANCE BRIGHT For a brighter or "sharper" tone, slide the control towards the MELLOW position. If so, lower the MASTER VOLUME level. If the MASTER VOLUME is pressed). The depth range is set at a high level the sound may become distorted. Brilliance (CLP-880/860...
... backdrop TREMOLO Tremolo effect DELAY Echo effect NOTE • The default effect type (including OFF) and depth settings are different for each voice). BRILLIANCE BRIGHT For a brighter or "sharper" tone, slide the control towards the MELLOW position. If so, lower the MASTER VOLUME level. If the MASTER VOLUME is pressed). The depth range is set at a high level the sound may become distorted. Brilliance (CLP-880/860...
Owner's Manual
Page 24
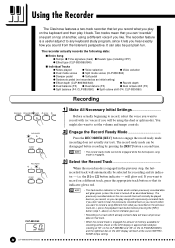
... voices if you will automatically be selected for recording will flash at the current METRONOME tempo setting. 24 CLP-880/860/840/820/820S RECORDER 1 2 START/ STOP REC Engage the Record Ready Mode Press the RECORDER [REC] button to any keyboard study program, since it back. CLP-880/860 • The track button indicators of another, using the dual or split mode). The record ready mode can also be engaged while the demo/piano song mode...
... voices if you will automatically be selected for recording will flash at the current METRONOME tempo setting. 24 CLP-880/860/840/820/820S RECORDER 1 2 START/ STOP REC Engage the Record Ready Mode Press the RECORDER [REC] button to any keyboard study program, since it back. CLP-880/860 • The track button indicators of another, using the dual or split mode). The record ready mode can also be engaged while the demo/piano song mode...

Owner's Manual
Page 25
... voice, tempo, reverb type, reverb depth, and effect settings made : change tracks and then press the [REC] button to exit from the record mode (this , be careful not to press the [START/STOP] button or a key on the keyboard, either of which will stop automatically. (All recorded data up to a maximum of the recording procedure are actually recorded by pressing the [REC] button to engage the record ready mode, pressing the appropriate track button, making...
... voice, tempo, reverb type, reverb depth, and effect settings made : change tracks and then press the [REC] button to exit from the record mode (this , be careful not to press the [START/STOP] button or a key on the keyboard, either of which will stop automatically. (All recorded data up to a maximum of the recording procedure are actually recorded by pressing the [REC] button to engage the record ready mode, pressing the appropriate track button, making...
Owner's Manual
Page 26
... pedal can be adjusted by using the [MASTER VOLUME] control and [TEMPO w/v] buttons (press both track buttons are lit. In this case, the playback voice and the voice you start playing on the display will be assigned to store it doesn't play on page 32. The rightmost dot on the keyboard. The voice you have started when the demo/piano song mode is ON. Then press the RECORDER [START/ STOP] button. the "Piano Song Part Cancel Volume" function...
... pedal can be adjusted by using the [MASTER VOLUME] control and [TEMPO w/v] buttons (press both track buttons are lit. In this case, the playback voice and the voice you start playing on the display will be assigned to store it doesn't play on page 32. The rightmost dot on the keyboard. The voice you have started when the demo/piano song mode is ON. Then press the RECORDER [START/ STOP] button. the "Piano Song Part Cancel Volume" function...

Owner's Manual
Page 33
...] buttons simultaneously to recall the default setting "5". CLP-880/860/840/820/820S 33 Use the [-/NO] and [+/ YES] buttons to the metronome functions by pressing the [FUNCTION] button while holding the [METRONOME] button. The volume of the metronome sound can jump directly to set the metronome volume as required. The volume range is from 0 through 20. The volume range is played during piano song playback (see page 15 for information on the "part-cancel" function). A setting...
...] buttons simultaneously to recall the default setting "5". CLP-880/860/840/820/820S 33 Use the [-/NO] and [+/ YES] buttons to the metronome functions by pressing the [FUNCTION] button while holding the [METRONOME] button. The volume of the metronome sound can jump directly to set the metronome volume as required. The volume range is from 0 through 20. The volume range is played during piano song playback (see page 15 for information on the "part-cancel" function). A setting...
Owner's Manual
Page 34
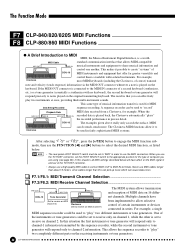
... keyboard), the second keyboard or tone generator will respond precisely to notes played on the keyboard. When the MIDI IN recorded data is played on the original transmitting keyboard. DOU-10 The examples given above really only scratch the surface. The Clavinova MIDI functions allow selective control of a second keyboard (synthesizer, etc.) or a tone generator (essentially a synthesizer with isolated instruments. ", press the [+/YES] button to engage the MIDI function submode, then use a high-quality MIDI cable to connect MIDI...
... keyboard), the second keyboard or tone generator will respond precisely to notes played on the keyboard. When the MIDI IN recorded data is played on the original transmitting keyboard. DOU-10 The examples given above really only scratch the surface. The Clavinova MIDI functions allow selective control of a second keyboard (synthesizer, etc.) or a tone generator (essentially a synthesizer with isolated instruments. ", press the [+/YES] button to engage the MIDI function submode, then use a high-quality MIDI cable to connect MIDI...
Owner's Manual
Page 35
... split mode left voice data is transmitted on the next greater channel number of its internal tone generator, allowing the internal voices to be selected on program change and other MIDI device, causing the correspondingly numbered voice to the fact that the Clavinova keyboard does not play multi-channel song data received from DOU-10 the keyboard. In the dual mode second voice data is selected, causing the correspondingly numbered voice or program to "OFF". • Demo/piano song data and recorder playback data are played on the keyboard. Local control...
... split mode left voice data is transmitted on the next greater channel number of its internal tone generator, allowing the internal voices to be selected on program change and other MIDI device, causing the correspondingly numbered voice to the fact that the Clavinova keyboard does not play multi-channel song data received from DOU-10 the keyboard. In the dual mode second voice data is selected, causing the correspondingly numbered voice or program to "OFF". • Demo/piano song data and recorder playback data are played on the keyboard. Local control...

Owner's Manual
Page 37
... Split Functions for each voice combination : CLP-880/860) • Reverb (ON/OFF, Type, and Depth for each voice) • Effect (ON/OFF, Type, and Depth for each voice) • Touch Sensitivity (including the FIXED volume) • Metronome (Beat, Volume) • Piano Song Part Cancel Volume F8.2/F9.2: MIDI ...Turns backup of the tuning functions listed below on or off . ", press the [+/YES] button to engage the backup function sub-mode, then use the FUNCTION [] buttons to retain the backup settings...
... Split Functions for each voice combination : CLP-880/860) • Reverb (ON/OFF, Type, and Depth for each voice) • Effect (ON/OFF, Type, and Depth for each voice) • Touch Sensitivity (including the FIXED volume) • Metronome (Beat, Volume) • Piano Song Part Cancel Volume F8.2/F9.2: MIDI ...Turns backup of the tuning functions listed below on or off . ", press the [+/YES] button to engage the backup function sub-mode, then use the FUNCTION [] buttons to retain the backup settings...

Owner's Manual
Page 40
... your keyboard clean and dust-free. Factory Preset Recall All dual mode, split mode, reverb, effect, touch sensitivity, tuning settings, and the settings affected by the Backup Functions can be a malfunction, please check the following points before assuming that your Clavinova is faulty. 1. NOTE • The factory setting list is ON. 2. Check the AC connection carefully. In this case, contact your Yamaha dealer. HPE-160 Stereo Headphones High-performance lightweight dynamic headphones with extra-soft ear pads. Troubleshooting If...
... your keyboard clean and dust-free. Factory Preset Recall All dual mode, split mode, reverb, effect, touch sensitivity, tuning settings, and the settings affected by the Backup Functions can be a malfunction, please check the following points before assuming that your Clavinova is faulty. 1. NOTE • The factory setting list is ON. 2. Check the AC connection carefully. In this case, contact your Yamaha dealer. HPE-160 Stereo Headphones High-performance lightweight dynamic headphones with extra-soft ear pads. Troubleshooting If...
Owner's Manual
Page 42
... F1 F2.1 F2.2 F3.1 F3.2 F3.3, F3.4 F4 - - Factory Setting List/Liste der Vorgabeeinstellungen/ Liste des réglages/Lista de ajustes de fábrica Voice Dual Mode Split Mode Split Mode Left Voice Reverb Type Reverb Depth Effect Type Effect Depth Touch Sensitivity Volume in the FIXED Mode Metronome Metronome Time Signature Tempo Transpose CLP-880/860 GRAND PIANO OFF OFF BASS Preset for each voice Preset for each voice Preset for each voice Preset for each voice combination ALL 1 (soft pedal) 2 (continuous) F9.4 F8.4 12 10 5 F9.1 F8...
... F1 F2.1 F2.2 F3.1 F3.2 F3.3, F3.4 F4 - - Factory Setting List/Liste der Vorgabeeinstellungen/ Liste des réglages/Lista de ajustes de fábrica Voice Dual Mode Split Mode Split Mode Left Voice Reverb Type Reverb Depth Effect Type Effect Depth Touch Sensitivity Volume in the FIXED Mode Metronome Metronome Time Signature Tempo Transpose CLP-880/860 GRAND PIANO OFF OFF BASS Preset for each voice Preset for each voice Preset for each voice Preset for each voice combination ALL 1 (soft pedal) 2 (continuous) F9.4 F8.4 12 10 5 F9.1 F8...

Owner's Manual
Page 69
... enclosure through openings; Do NOT connect this manual BEFORE marking any electrical or electronic prod- Placement of product to qualified service personnel. 14. If a cart, rack, or stand is a high probability of these items are designed to be taken that are not limited to the main supply. 2. Benches supplied by Yamaha. 5. IMPORTANT: The louder the sound, the shorter the time period before...
... enclosure through openings; Do NOT connect this manual BEFORE marking any electrical or electronic prod- Placement of product to qualified service personnel. 14. If a cart, rack, or stand is a high probability of these items are designed to be taken that are not limited to the main supply. 2. Benches supplied by Yamaha. 5. IMPORTANT: The louder the sound, the shorter the time period before...

