
User Guide
Page 2
...help. Product names used in a particular installation. FCC Compliance in the USA WARNING: This equipment has been tested and found to comply with FCC regulations. If this equipment not specifically approved by the Xerox Corporation may void the authority granted by Xerox Corporation. Changes or modifications to...receiver. • Connect the equipment into an outlet on , the user is no guarantee that this equipment to maintain compliance with the limits for a Class B digital device pursuant to Part 15 of copyrighted material and information now allowed by turning the equipment off and...
...help. Product names used in a particular installation. FCC Compliance in the USA WARNING: This equipment has been tested and found to comply with FCC regulations. If this equipment not specifically approved by the Xerox Corporation may void the authority granted by Xerox Corporation. Changes or modifications to...receiver. • Connect the equipment into an outlet on , the user is no guarantee that this equipment to maintain compliance with the limits for a Class B digital device pursuant to Part 15 of copyrighted material and information now allowed by turning the equipment off and...
User Guide
Page 6
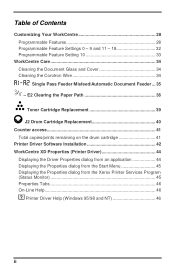
... and Cover 34 Cleaning the Corotron Wire 34 Single Pass Feeder Misfeed/Automatic Document Feeder ... 35 - E2 Clearing the Paper Path 36 Toner Cartridge Replacement 39 J2 Drum Cartridge Replacement 40 Counter access 41 Total copies/prints remaining on the drum cartridge 41 Printer Driver Software Installation 42 WorkCentre XD Properties (Printer Driver 44 Displaying the Driver Properties dialog from an application 44 Displaying the Properties dialog from the Start Menu 45 Displaying the Properties dialog from the Xerox Printer Services Program (Status Monitor...
... and Cover 34 Cleaning the Corotron Wire 34 Single Pass Feeder Misfeed/Automatic Document Feeder ... 35 - E2 Clearing the Paper Path 36 Toner Cartridge Replacement 39 J2 Drum Cartridge Replacement 40 Counter access 41 Total copies/prints remaining on the drum cartridge 41 Printer Driver Software Installation 42 WorkCentre XD Properties (Printer Driver 44 Displaying the Driver Properties dialog from an application 44 Displaying the Properties dialog from the Start Menu 45 Displaying the Properties dialog from the Xerox Printer Services Program (Status Monitor...
User Guide
Page 9
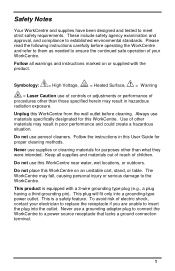
... use a grounding adapter plug to connect the WorkCentre to insert the plug into a grounding-type power outlet. The WorkCentre may result in hazardous radiation exposure. Always use this User Guide for this WorkCentre. Safety Notes Your WorkCentre and supplies have been designed and tested to established environmental standards. Keep all warnings and instructions marked on an unstable cart, stand, or table. Please read the following instructions carefully before cleaning...
... use a grounding adapter plug to connect the WorkCentre to insert the plug into a grounding-type power outlet. The WorkCentre may result in hazardous radiation exposure. Always use this User Guide for this WorkCentre. Safety Notes Your WorkCentre and supplies have been designed and tested to established environmental standards. Keep all warnings and instructions marked on an unstable cart, stand, or table. Please read the following instructions carefully before cleaning...
User Guide
Page 17
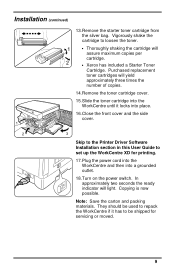
... replacement toner cartridges will assure maximum copies per cartridge. • Xerox has included a Starter Toner Cartridge. They should be shipped for printing. 17.Plug the power cord into the WorkCentre and then into place. 16.Close the front cover and the side cover. 1 2 3 Skip to the Printer Driver Software Installation section in this User Guide to repack the WorkCentre if it locks into a grounded outlet. 18.Turn on the power switch. Vigorously shake the cartridge...
... replacement toner cartridges will assure maximum copies per cartridge. • Xerox has included a Starter Toner Cartridge. They should be shipped for printing. 17.Plug the power cord into the WorkCentre and then into place. 16.Close the front cover and the side cover. 1 2 3 Skip to the Printer Driver Software Installation section in this User Guide to repack the WorkCentre if it locks into a grounded outlet. 18.Turn on the power switch. Vigorously shake the cartridge...
User Guide
Page 18
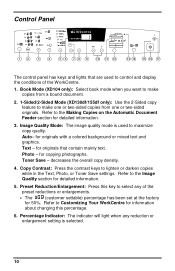
... reduction or enlargement setting is used to make one or two-sided copies from a bound document. 2. 1-Sided/2-Sided Mode (XD130df/155df only): Use the 2-Sided copy feature to control and display the conditions of the preset reductions or enlargements. • The (customer settable) percentage has been set at the factory for 50%. Refer to maximize copy quality. Control Panel 200%Max DOCUMENT Wo r k C e n t r e 129% C 86% 78% 50% 200% Auto 100% 10 1 12...
... reduction or enlargement setting is used to make one or two-sided copies from a bound document. 2. 1-Sided/2-Sided Mode (XD130df/155df only): Use the 2-Sided copy feature to control and display the conditions of the preset reductions or enlargements. • The (customer settable) percentage has been set at the factory for 50%. Refer to maximize copy quality. Control Panel 200%Max DOCUMENT Wo r k C e n t r e 129% C 86% 78% 50% 200% Auto 100% 10 1 12...

User Guide
Page 20
... WorkCentre when the WorkCentre has not been used for a set period of this User Guide for the Power Shut-Off, Power Save, and Auto Clear modes can be completed if printing is completed, press the On-line/Off-line button to immediately return to meet your specific copying needs. The copies will be modified to the print job. 12 The copies will turn off . Auto Clear - Power Save Mode - Power Shut-Off Mode - There are as follows: • Copy Quality - Tray...
... WorkCentre when the WorkCentre has not been used for a set period of this User Guide for the Power Shut-Off, Power Save, and Auto Clear modes can be completed if printing is completed, press the On-line/Off-line button to immediately return to meet your specific copying needs. The copies will be modified to the print job. 12 The copies will turn off . Auto Clear - Power Save Mode - Power Shut-Off Mode - There are as follows: • Copy Quality - Tray...
User Guide
Page 23
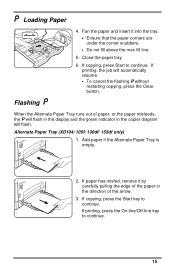
... it by carefully pulling the edge of the paper in the direction of paper, or the paper misfeeds, the P will flash in the display and the green indicator in the copier diagram will automatically resume. • To cancel the flashing P without restarting copying, press the Clear button. Add paper if the Alternate Paper Tray is empty. 2. If printing, press the On-line/Off-line key to continue. 15
... it by carefully pulling the edge of the paper in the direction of paper, or the paper misfeeds, the P will flash in the display and the green indicator in the copier diagram will automatically resume. • To cancel the flashing P without restarting copying, press the Clear button. Add paper if the Alternate Paper Tray is empty. 2. If printing, press the On-line/Off-line key to continue. 15
User Guide
Page 25
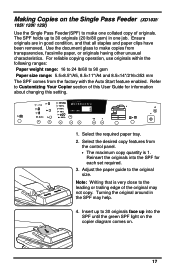
... information about changing this User Guide for each set required. 3. Note: Writing that all staples and paper clips have been removed. Use the document glass to 90 gsm Paper size range: 5.5×8.5"/A5, 8.5×11"/A4 and 8.5×14"/216×353 mm The SPF comes from the factory with the Auto Start feature enabled. Select the required paper tray. 2. Select the desired copy features...
... information about changing this User Guide for each set required. 3. Note: Writing that all staples and paper clips have been removed. Use the document glass to 90 gsm Paper size range: 5.5×8.5"/A5, 8.5×11"/A4 and 8.5×14"/216×353 mm The SPF comes from the factory with the Auto Start feature enabled. Select the required paper tray. 2. Select the desired copy features...

User Guide
Page 30
.../Enlargement Reference Table Original Size 5.5 × 8.5 5.5 × 8.5 8.5 × 14 8.5 × 11 A4 B4 A4/ A3 Copy Size 8.5 × 14 8.5 × 11 8.5 × 11 5.5 × 8.5 A3 A4 A5/ A4 % To Use 154% 129% 78% 64% 141% 81% 71% 22 Display Window Preset or variable reduction/enlargement percentages appear in the Display Window at the factory for information about changing the default percentage.
.../Enlargement Reference Table Original Size 5.5 × 8.5 5.5 × 8.5 8.5 × 14 8.5 × 11 A4 B4 A4/ A3 Copy Size 8.5 × 14 8.5 × 11 8.5 × 11 5.5 × 8.5 A3 A4 A5/ A4 % To Use 154% 129% 78% 64% 141% 81% 71% 22 Display Window Preset or variable reduction/enlargement percentages appear in the Display Window at the factory for information about changing the default percentage.
User Guide
Page 48
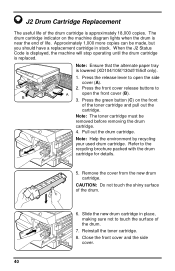
... used drum cartridge. Refer to A open the side cover (A). 2. Slide the new drum cartridge in stock. When the J2 Status Code is displayed, the machine will stop operating until the drum cartridge is lowered (XD104/105f/130df/155df only). Note: Ensure that the alternate paper tray is replaced. Remove the cover from the new drum cartridge. CAUTION: Do not touch the shiny surface of the drum. 7. Reinstall the toner cartridge. 8. C B 1. Press the green button (C) on the machine diagram lights...
... used drum cartridge. Refer to A open the side cover (A). 2. Slide the new drum cartridge in stock. When the J2 Status Code is displayed, the machine will stop operating until the drum cartridge is lowered (XD104/105f/130df/155df only). Note: Ensure that the alternate paper tray is replaced. Remove the cover from the new drum cartridge. CAUTION: Do not touch the shiny surface of the drum. 7. Reinstall the toner cartridge. 8. C B 1. Press the green button (C) on the machine diagram lights...
User Guide
Page 50
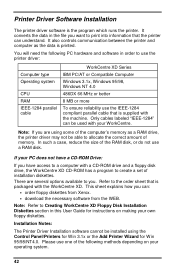
... that the printer can : • order floppy diskettes from Xerox. • download the necessary software from the WEB. This sheet explains how you have access to a computer with your operating system. 42 It converts the data in this User Guide for Win 95/98/NT4.0. Please use one of the RAM disk, or do not use the IEEE-1284 compliant parallel cable that is printed.
... that the printer can : • order floppy diskettes from Xerox. • download the necessary software from the WEB. This sheet explains how you have access to a computer with your operating system. 42 It converts the data in this User Guide for Win 95/98/NT4.0. Please use one of the RAM disk, or do not use the IEEE-1284 compliant parallel cable that is printed.
User Guide
Page 51
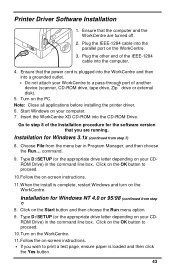
... line box. Plug the other end of the IEEE-1284 cable into the CD-ROM Drive. Start Windows on the Start button and then choose the Run menu option. 9. ROM Drive) in Program Manager, and then choose the Run... Type D:\SETUP (or the appropriate drive letter depending on -screen instructions. • If you are turned off. 2. Note: Close all applications before installing the printer driver. 6. Installation for the software...
... line box. Plug the other end of the IEEE-1284 cable into the CD-ROM Drive. Start Windows on the Start button and then choose the Run menu option. 9. ROM Drive) in Program Manager, and then choose the Run... Type D:\SETUP (or the appropriate drive letter depending on -screen instructions. • If you are turned off. 2. Note: Close all applications before installing the printer driver. 6. Installation for the software...
User Guide
Page 52
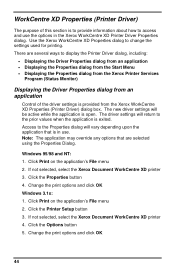
... in the Xerox WorkCentre XD Printer Driver Properties dialog. If not selected, select the Xerox Document WorkCentre XD printer 4. Click the Options button 5. The driver settings will be active while the application is exited. Click Print on the application's File menu 2. Windows 95/98 and NT: 1. Change the print options and click OK 44 Click Print on the application's File menu 2. The new driver settings will return to access and use the options in use. Access to change the settings used for printing.
... in the Xerox WorkCentre XD Printer Driver Properties dialog. If not selected, select the Xerox Document WorkCentre XD printer 4. Click the Options button 5. The driver settings will be active while the application is exited. Click Print on the application's File menu 2. Windows 95/98 and NT: 1. Change the print options and click OK 44 Click Print on the application's File menu 2. The new driver settings will return to access and use the options in use. Access to change the settings used for printing.
User Guide
Page 54
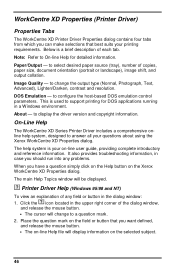
... output type (Normal, Photograph, Text, Advanced), Lighten/Darken, contrast and resolution. icon located in a Windows environment. to change to answer all your on-line user guide, providing complete introductory and reference information. to configure the host-based DOS emulation control parameters. The help system, designed to a question mark. 2. Click the ? Note: Refer to support printing for detailed information. Image Quality - On-Line Help The WorkCentre XD Series Printer Driver...
... output type (Normal, Photograph, Text, Advanced), Lighten/Darken, contrast and resolution. icon located in a Windows environment. to change to answer all your on-line user guide, providing complete introductory and reference information. to configure the host-based DOS emulation control parameters. The help system, designed to a question mark. 2. Click the ? Note: Refer to support printing for detailed information. Image Quality - On-Line Help The WorkCentre XD Series Printer Driver...
User Guide
Page 56
... Your Xerox WorkCentre XD Digital Copier/Printer has been designed to operate in this mode. 48 How do not enable ECP mode? Each device should be on your personal computer, the install software will automatically check your computer? Be prepared with the model number and serial number. 3) Contact a computer sales or service near you, and inquire about an ECP board option for BIOS and/or CMOS settings...
... Your Xerox WorkCentre XD Digital Copier/Printer has been designed to operate in this mode. 48 How do not enable ECP mode? Each device should be on your personal computer, the install software will automatically check your computer? Be prepared with the model number and serial number. 3) Contact a computer sales or service near you, and inquire about an ECP board option for BIOS and/or CMOS settings...
User Guide
Page 58
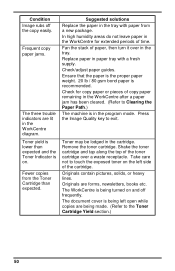
... of time. Check for extended periods of paper, then turn it over a waste receptacle. Originals are being made. (Refer to Clearing the Paper Path.) The machine is being left side of the cartridge. Fewer copies from a new package. Remove the toner cartridge. Frequent copy paper jams. The three trouble indicators are lit in the cartridge. Toner may be lodged in the WorkCentre diagram. Check/adjust paper guides. Take care not to exit. Replace paper in paper tray with paper from the Toner Cartridge...
... of time. Check for extended periods of paper, then turn it over a waste receptacle. Originals are being made. (Refer to Clearing the Paper Path.) The machine is being left side of the cartridge. Fewer copies from a new package. Remove the toner cartridge. Frequent copy paper jams. The three trouble indicators are lit in the cartridge. Toner may be lodged in the WorkCentre diagram. Check/adjust paper guides. Take care not to exit. Replace paper in paper tray with paper from the Toner Cartridge...

User Guide
Page 59
... J1 status code is displayed, the machine will light when the toner supply is closed properly. The front or side cover is paper in stock. Switch OFF the Main Power. U5 The toner indicator on the machine diagram lights when the drum is replaced. The drum cartridge indicator on the copier diagram will stop operating until the toner cartridge is near the end of life. A2 L1 E7 H2 - Close the cover. Problem Solving Status Code Chart Status Code...
... J1 status code is displayed, the machine will light when the toner supply is closed properly. The front or side cover is paper in stock. Switch OFF the Main Power. U5 The toner indicator on the machine diagram lights when the drum is replaced. The drum cartridge indicator on the copier diagram will stop operating until the toner cartridge is near the end of life. A2 L1 E7 H2 - Close the cover. Problem Solving Status Code Chart Status Code...

User Guide
Page 60
... dpi. Check the cable connection. Use the IEEE-1284 parallel port cable supplied with the machine or replace it with a computer and printer that work. Install more RAM in the Windows Control Panel to make sure that the print job is not connected does not print properly. The port setting is still not possible, replace the cable. printing software. Half of the page is blank The page layout is defective. There may be too many applications open. Change the page orientation...
... dpi. Check the cable connection. Use the IEEE-1284 parallel port cable supplied with the machine or replace it with a computer and printer that work. Install more RAM in the Windows Control Panel to make sure that the print job is not connected does not print properly. The port setting is still not possible, replace the cable. printing software. Half of the page is blank The page layout is defective. There may be too many applications open. Change the page orientation...

User Guide
Page 61
... the right mouse button. Select the desired setting from 600 dpi to evenly distribute the toner. Computer may not have Install more RAM in the options menu of operation. Toner may be incorrect. Use only paper that meets the specifications required by the WorkCentre. 53 Click the Xerox Document WorkCentre XD with an ECP parallel port, enable this mode of print manager may be set incorrectly. Print Job to large...
... the right mouse button. Select the desired setting from 600 dpi to evenly distribute the toner. Computer may not have Install more RAM in the options menu of operation. Toner may be incorrect. Use only paper that meets the specifications required by the WorkCentre. 53 Click the Xerox Document WorkCentre XD with an ECP parallel port, enable this mode of print manager may be set incorrectly. Print Job to large...
User Guide
Page 62
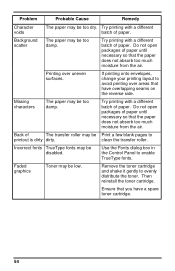
... paper. Missing characters The paper may be Print a few blank pages to avoid printing over uneven surfaces. Back of paper until necessary so that have a spare toner cartridge. 54 Remove the toner cartridge and shake it gently to enable TrueType fonts. Do not open packages of The transfer roller may be too damp. Incorrect fonts TrueType fonts may be too dry. If printing onto envelopes, change your printing layout to printout is dirty dirty. Use...
... paper. Missing characters The paper may be Print a few blank pages to avoid printing over uneven surfaces. Back of paper until necessary so that have a spare toner cartridge. 54 Remove the toner cartridge and shake it gently to enable TrueType fonts. Do not open packages of The transfer roller may be too damp. Incorrect fonts TrueType fonts may be too dry. If printing onto envelopes, change your printing layout to printout is dirty dirty. Use...


