
User Guide
Page 2
... FCC regulations. Shielded cables must be used in accordance with the instructions, may be determined by turning the equipment off and on the screen such as icons, screen display looks, etc. is a U.S. FCC Compliance in the USA WARNING: This equipment has been tested and found to comply with the limits for a Class B digital device pursuant to provide reasonable...
... FCC regulations. Shielded cables must be used in accordance with the instructions, may be determined by turning the equipment off and on the screen such as icons, screen display looks, etc. is a U.S. FCC Compliance in the USA WARNING: This equipment has been tested and found to comply with the limits for a Class B digital device pursuant to provide reasonable...
User Guide
Page 6
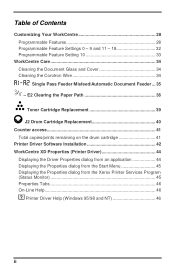
E2 Clearing the Paper Path 36 Toner Cartridge Replacement 39 J2 Drum Cartridge Replacement 40 Counter access 41 Total copies/prints remaining on the drum cartridge 41 Printer Driver Software Installation 42 WorkCentre XD Properties (Printer Driver 44 Displaying the Driver Properties dialog from an application 44 Displaying the Properties dialog from the Start Menu 45 Displaying the Properties dialog from the Xerox Printer Services Program (Status Monitor 45 Properties Tabs 46 On-Line Help 46 ? Printer Driver Help (Windows 95/98 and NT 46...
E2 Clearing the Paper Path 36 Toner Cartridge Replacement 39 J2 Drum Cartridge Replacement 40 Counter access 41 Total copies/prints remaining on the drum cartridge 41 Printer Driver Software Installation 42 WorkCentre XD Properties (Printer Driver 44 Displaying the Driver Properties dialog from an application 44 Displaying the Properties dialog from the Start Menu 45 Displaying the Properties dialog from the Xerox Printer Services Program (Status Monitor 45 Properties Tabs 46 On-Line Help 46 ? Printer Driver Help (Windows 95/98 and NT 46...
User Guide
Page 9
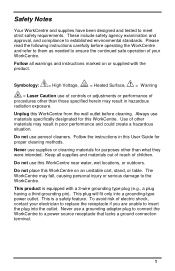
... cleaners. Do not place this WorkCentre. Follow the instructions in hazardous radiation exposure. To avoid risk of your electrician to replace the receptacle if you are unable to insert the plug into a grounding-type power outlet. Safety Notes Your WorkCentre and supplies have been designed and tested to established environmental standards. Do not use materials specifically designated for purposes other materials...
... cleaners. Do not place this WorkCentre. Follow the instructions in hazardous radiation exposure. To avoid risk of your electrician to replace the receptacle if you are unable to insert the plug into a grounding-type power outlet. Safety Notes Your WorkCentre and supplies have been designed and tested to established environmental standards. Do not use materials specifically designated for purposes other materials...
User Guide
Page 17
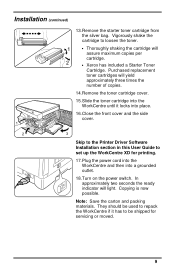
... light. Purchased replacement toner cartridges will yield approximately three times the number of copies. 14.Remove the toner cartridge cover. 15.Slide the toner cartridge into the WorkCentre until it has to be used to set up the WorkCentre XD for servicing or moved. 9 They should be shipped for printing. 17.Plug the power cord into the WorkCentre and then into place. 16.Close the front cover and the side cover. 1 2 3 Skip to the Printer Driver Software Installation...
... light. Purchased replacement toner cartridges will yield approximately three times the number of copies. 14.Remove the toner cartridge cover. 15.Slide the toner cartridge into the WorkCentre until it has to be used to set up the WorkCentre XD for servicing or moved. 9 They should be shipped for printing. 17.Plug the power cord into the WorkCentre and then into place. 16.Close the front cover and the side cover. 1 2 3 Skip to the Printer Driver Software Installation...
User Guide
Page 18
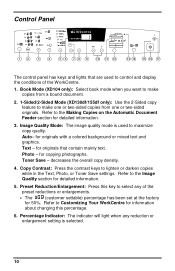
..., Photo, or Toner Save settings. Book Mode (XD104 only): Select book mode when you want to make one or two-sided copies from a bound document. 2. 1-Sided/2-Sided Mode (XD130df/155df only): Use the 2-Sided copy feature to maximize copy quality. for information about changing this key to control and display the conditions of the preset reductions or enlargements. • The (customer settable) percentage has been set at the factory for detailed...
..., Photo, or Toner Save settings. Book Mode (XD104 only): Select book mode when you want to make one or two-sided copies from a bound document. 2. 1-Sided/2-Sided Mode (XD130df/155df only): Use the 2-Sided copy feature to maximize copy quality. for information about changing this key to control and display the conditions of the preset reductions or enlargements. • The (customer settable) percentage has been set at the factory for detailed...

User Guide
Page 20
..., Power Save, and Auto Clear modes can be modified to meet your specific copying needs. Power Shut-Off Mode - Auto Copy Function This function provides the ability to program a copy job while the copier is completed, press the On-line/Off-line button to immediately return to the print job. 12 Power Save Mode - This WorkCentre is enabled at the factory to return to Customizing Your WorkCentre section of this User Guide for information about changing these settings. Tray...
..., Power Save, and Auto Clear modes can be modified to meet your specific copying needs. Power Shut-Off Mode - Auto Copy Function This function provides the ability to program a copy job while the copier is completed, press the On-line/Off-line button to immediately return to the print job. 12 Power Save Mode - This WorkCentre is enabled at the factory to return to Customizing Your WorkCentre section of this User Guide for information about changing these settings. Tray...
User Guide
Page 23
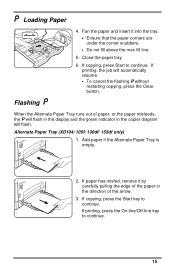
... job will flash. Add paper if the Alternate Paper Tray is empty. 2. Close the paper tray. 6. Fan the paper and insert it by carefully pulling the edge of the arrow. 3. If copying, press the Start key to continue. If printing, press the On-line/Off-line key to continue. 15 Loading Paper 4. Flashing When the Alternate Paper Tray runs out of paper, or the paper misfeeds, the P will flash in the display...
... job will flash. Add paper if the Alternate Paper Tray is empty. 2. Close the paper tray. 6. Fan the paper and insert it by carefully pulling the edge of the arrow. 3. If copying, press the Start key to continue. If printing, press the On-line/Off-line key to continue. 15 Loading Paper 4. Flashing When the Alternate Paper Tray runs out of paper, or the paper misfeeds, the P will flash in the display...
User Guide
Page 25
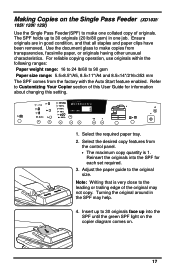
... been removed. The SPF holds up into the SPF for information about changing this setting. 200%Max DOCUMENT Wo r k C e n t r e 129% C 86% 78% 50% 200% Auto 100% 10 1 1. Select the required paper tray. 2. Insert up to 30 originals face up to make copies from the factory with the Auto Start feature enabled. Refer to make one job. Making Copies on . 17 Use the document glass to Customizing Your...
... been removed. The SPF holds up into the SPF for information about changing this setting. 200%Max DOCUMENT Wo r k C e n t r e 129% C 86% 78% 50% 200% Auto 100% 10 1 1. Select the required paper tray. 2. Insert up to 30 originals face up to make copies from the factory with the Auto Start feature enabled. Refer to make one job. Making Copies on . 17 Use the document glass to Customizing Your...

User Guide
Page 30
... variable reduction/enlargement percentages appear in the Display Window at the factory for information about changing the default percentage. Reduction/Enlargement Reference Table Original Size 5.5 × 8.5 5.5 × 8.5 8.5 × 14 8.5 × 11 A4 B4 A4/ A3 Copy Size 8.5 × 14 8.5 × 11 8.5 × 11 5.5 × 8.5 A3 A4 A5/ A4 % To Use 154% 129% 78% 64% 141% 81% 71% 22 Variable...
... variable reduction/enlargement percentages appear in the Display Window at the factory for information about changing the default percentage. Reduction/Enlargement Reference Table Original Size 5.5 × 8.5 5.5 × 8.5 8.5 × 14 8.5 × 11 A4 B4 A4/ A3 Copy Size 8.5 × 14 8.5 × 11 8.5 × 11 5.5 × 8.5 A3 A4 A5/ A4 % To Use 154% 129% 78% 64% 141% 81% 71% 22 Variable...
User Guide
Page 48
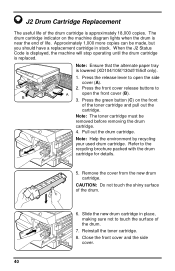
... paper tray is approximately 18,000 copies. Remove the cover from the new drum cartridge. Note: The toner cartridge must be made, but you should have a replacement cartridge in place, making sure not to open the front cover (B). 3. Press the green button (C) on the machine diagram lights when the drum is replaced. Slide the new drum cartridge in stock. Close the front cover and the side cover. 40 Approximately 1,000 more copies can be removed before removing the drum cartridge. 4. C B 1. J2 Drum Cartridge Replacement...
... paper tray is approximately 18,000 copies. Remove the cover from the new drum cartridge. Note: The toner cartridge must be made, but you should have a replacement cartridge in place, making sure not to open the front cover (B). 3. Press the green button (C) on the machine diagram lights when the drum is replaced. Slide the new drum cartridge in stock. Close the front cover and the side cover. 40 Approximately 1,000 more copies can be removed before removing the drum cartridge. 4. C B 1. J2 Drum Cartridge Replacement...
User Guide
Page 50
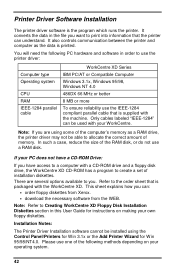
... Xerox. • download the necessary software from the WEB. Refer to Creating WorkCentre XD Floppy Disk Installation Diskettes section in this User Guide for Win 95/98/NT4.0. Installation Notes: The Printer Driver Installation software cannot be used with a CD-ROM drive and a floppy disk drive, the WorkCentre XD CD-ROM has a program to create a set of the following PC hardware and software in the file you . It also controls communication between the printer...
... Xerox. • download the necessary software from the WEB. Refer to Creating WorkCentre XD Floppy Disk Installation Diskettes section in this User Guide for Win 95/98/NT4.0. Installation Notes: The Printer Driver Installation software cannot be used with a CD-ROM drive and a floppy disk drive, the WorkCentre XD CD-ROM has a program to create a set of the following PC hardware and software in the file you . It also controls communication between the printer...
User Guide
Page 51
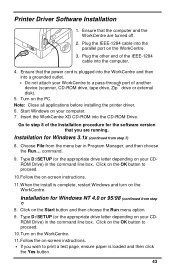
...-screen instructions. 11.When the install is complete, restart Windows and turn on the Start button and then choose the Run menu option. 9. Installation for the software version that the power cord is loaded and then click the Yes button. 43 Note: Close all applications before installing the printer driver. 6. Go to a pass-through port of the IEEE-1284 cable into the CD-ROM Drive. Printer Driver Software Installation 1. Turn on your WorkCentre to...
...-screen instructions. 11.When the install is complete, restart Windows and turn on the Start button and then choose the Run menu option. 9. Installation for the software version that the power cord is loaded and then click the Yes button. 43 Note: Close all applications before installing the printer driver. 6. Go to a pass-through port of the IEEE-1284 cable into the CD-ROM Drive. Printer Driver Software Installation 1. Turn on your WorkCentre to...
User Guide
Page 52
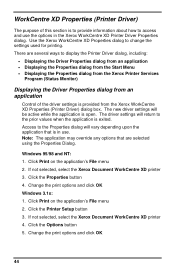
... dialog from the Start Menu • Displaying the Properties dialog from the Xerox Printer Services Program (Status Monitor) Displaying the Driver Properties dialog from the Xerox WorkCentre XD Properties (Printer Driver) dialog box. Click Print on the application's File menu 2. Windows 95/98 and NT: 1. Change the print options and click OK Windows 3.1x: 1. Click the Properties button 4. Click the Printer Setup button 3. There are selected using the Properties Dialog. The driver settings will vary depending upon...
... dialog from the Start Menu • Displaying the Properties dialog from the Xerox Printer Services Program (Status Monitor) Displaying the Driver Properties dialog from the Xerox WorkCentre XD Properties (Printer Driver) dialog box. Click Print on the application's File menu 2. Windows 95/98 and NT: 1. Change the print options and click OK Windows 3.1x: 1. Click the Properties button 4. Click the Printer Setup button 3. There are selected using the Properties Dialog. The driver settings will vary depending upon...
User Guide
Page 54
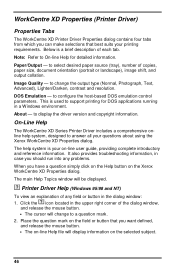
... field or button that you can make selections that best suits your printing requirements. Image Quality - This is a brief description of any problems. When you have a question simply click on the Help button on the Xerox WorkCentre XD Properties dialog. On-Line Help The WorkCentre XD Series Printer Driver includes a comprehensive online help system is your questions about using the Xerox WorkCentre XD Properties dialog. Printer Driver Help (Windows 95/98...
... field or button that you can make selections that best suits your printing requirements. Image Quality - This is a brief description of any problems. When you have a question simply click on the Help button on the Xerox WorkCentre XD Properties dialog. On-Line Help The WorkCentre XD Series Printer Driver includes a comprehensive online help system is your questions about using the Xerox WorkCentre XD Properties dialog. Printer Driver Help (Windows 95/98...
User Guide
Page 56
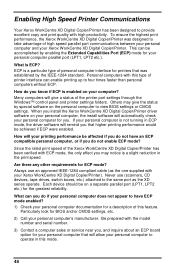
... copy and print quality with your Xerox WorkCentre XD Digital Copier/Printer). This can enable printing up to four times faster than personal computers without ECP. Many computers will give the status by special software on your personal computer, the install software will your printing performance be on your personal computer's manufacturer. Always use (scanners, CD devices, tape drives, switch boxes, etc.) attached to view BIOS settings or CMOS settings...
... copy and print quality with your Xerox WorkCentre XD Digital Copier/Printer). This can enable printing up to four times faster than personal computers without ECP. Many computers will give the status by special software on your personal computer, the install software will your printing performance be on your personal computer's manufacturer. Always use (scanners, CD devices, tape drives, switch boxes, etc.) attached to view BIOS settings or CMOS settings...
User Guide
Page 58
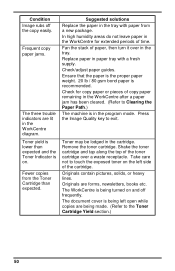
... cartridge. Fan the stack of time. Press the Image Quality key to the Toner Cartridge Yield section.) 50 Remove the toner cartridge. Originals contain pictures, solids, or heavy lines. Check/adjust paper guides. Take care not to Clearing the Paper Path.) The machine is on the left open while copies are being turned on and off the copy easily. The WorkCentre is recommended. Check for extended periods of paper, then turn it over a waste receptacle. Toner...
... cartridge. Fan the stack of time. Press the Image Quality key to the Toner Cartridge Yield section.) 50 Remove the toner cartridge. Originals contain pictures, solids, or heavy lines. Check/adjust paper guides. Take care not to Clearing the Paper Path.) The machine is on the left open while copies are being turned on and off the copy easily. The WorkCentre is recommended. Check for extended periods of paper, then turn it over a waste receptacle. Toner...

User Guide
Page 59
... status code is displayed, the machine will light when the toner supply is low. Paper may not have fed all the way into the WorkCentre. (Refer to Loading Paper and Flashing P.) Copy paper has misfed. (Refer to A1 - U5 The toner indicator on the machine diagram lights when the drum is near the end of life. The drum cartridge indicator on the copier diagram will stop operating until the drum cartridge is replaced. Switch ON the Main Power...
... status code is displayed, the machine will light when the toner supply is low. Paper may not have fed all the way into the WorkCentre. (Refer to Loading Paper and Flashing P.) Copy paper has misfed. (Refer to A1 - U5 The toner indicator on the machine diagram lights when the drum is near the end of life. The drum cartridge indicator on the copier diagram will stop operating until the drum cartridge is replaced. Switch ON the Main Power...

User Guide
Page 60
.... The printer driver may be installed properly. There may not Reinstall the WorkCentre be too many applications open. Reduce resolution from 600 dpi to 300 dpi. Install more RAM in the Windows Control Panel to make sure that the print job is not connected does not print properly. printing software. The page orientation may not be incorrect. Change the page orientation in the computer. 52 properly. The parallel port cable specifications may...
.... The printer driver may be installed properly. There may not Reinstall the WorkCentre be too many applications open. Reduce resolution from 600 dpi to 300 dpi. Install more RAM in the Windows Control Panel to make sure that the print job is not connected does not print properly. printing software. The page orientation may not be incorrect. Change the page orientation in the computer. 52 properly. The parallel port cable specifications may...

User Guide
Page 61
... computer parallel port may not have Install more RAM in the options menu of print manger. If using Windows 3.1x, the background printing item in your computers user guide. Click Properties and then spool settings on the details tab. Print Job to large Reduce resolution from the available choices. Black staining There is a paper quality patches of operation. Check that meets the specifications required by the printer. Printing is equipped...
... computer parallel port may not have Install more RAM in the options menu of print manger. If using Windows 3.1x, the background printing item in your computers user guide. Click Properties and then spool settings on the details tab. Print Job to large Reduce resolution from the available choices. Black staining There is a paper quality patches of operation. Check that meets the specifications required by the printer. Printing is equipped...
User Guide
Page 62
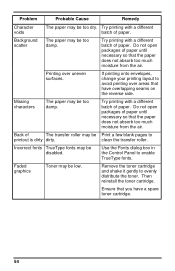
.... Remove the toner cartridge and shake it gently to printout is dirty dirty. If printing onto envelopes, change your printing layout to enable TrueType fonts. Back of paper. Try printing with a different batch of The transfer roller may be low. Do not open packages of paper. Use the Fonts dialog box in the Control Panel to avoid printing over uneven surfaces. Faded graphics Toner may be Print a few blank pages to evenly distribute the toner. Try printing...
.... Remove the toner cartridge and shake it gently to printout is dirty dirty. If printing onto envelopes, change your printing layout to enable TrueType fonts. Back of paper. Try printing with a different batch of The transfer roller may be low. Do not open packages of paper. Use the Fonts dialog box in the Control Panel to avoid printing over uneven surfaces. Faded graphics Toner may be Print a few blank pages to evenly distribute the toner. Try printing...


