User Guide
Page 5
... Ordering Supplies iv Safety Notes 1 Helpful Hints 4 Getting to Know Your WorkCentre 5 Installation 6 Control Panel 10 Power Reduction / Auto Clear 12 Auto Copy Function 12 Paper Specifications 13 Loading Paper 14 Flashing 15 Making Copies on the Document Glass 16 Making Copies on the Single Pass Feeder (XD103f/ 105f/ 120f...(XD130df/155df). 18 Manual Two-Sided Copying (XD130df/155df only 20 Image Quality 21 Reduction/Enlargement 22 Copying Oversized Documents 23 Book Mode (XD104 only 23 Paper Tray Bypass (XD100/102/103f/120f/125/125f only 24 Alternate Paper Tray (XD104/105f/...
... Ordering Supplies iv Safety Notes 1 Helpful Hints 4 Getting to Know Your WorkCentre 5 Installation 6 Control Panel 10 Power Reduction / Auto Clear 12 Auto Copy Function 12 Paper Specifications 13 Loading Paper 14 Flashing 15 Making Copies on the Document Glass 16 Making Copies on the Single Pass Feeder (XD103f/ 105f/ 120f...(XD130df/155df). 18 Manual Two-Sided Copying (XD130df/155df only 20 Image Quality 21 Reduction/Enlargement 22 Copying Oversized Documents 23 Book Mode (XD104 only 23 Paper Tray Bypass (XD100/102/103f/120f/125/125f only 24 Alternate Paper Tray (XD104/105f/...
User Guide
Page 6
.../Automatic Document Feeder ... 35 - E2 Clearing the Paper Path 36 Toner Cartridge Replacement 39 J2 Drum Cartridge Replacement 40 Counter access 41 Total copies/prints remaining on the drum cartridge 41 Printer Driver Software Installation 42 WorkCentre XD Properties (Printer Driver ...44 Displaying the Driver Properties dialog from an application 44 Displaying the Properties dialog from the Start Menu 45 Displaying the Properties dialog from the Xerox Printer Services Program (Status...
.../Automatic Document Feeder ... 35 - E2 Clearing the Paper Path 36 Toner Cartridge Replacement 39 J2 Drum Cartridge Replacement 40 Counter access 41 Total copies/prints remaining on the drum cartridge 41 Printer Driver Software Installation 42 WorkCentre XD Properties (Printer Driver ...44 Displaying the Driver Properties dialog from an application 44 Displaying the Properties dialog from the Start Menu 45 Displaying the Properties dialog from the Xerox Printer Services Program (Status...

User Guide
Page 10
... exposing the drum cartridge to protect it from the type of the WorkCentre are not sure of the type of the document lights. Machines are bright and, while not harmful, they may be blocked or covered. This WorkCentre should never be placed in a built-in the back and sides of... power source indicated on the marking label. Always keep the document cover closed during operation and storage. The lamps are designed to restrict operator access to rest on the WorkCentre. The machine may touch dangerous voltage points or short out parts which could result ...
... exposing the drum cartridge to protect it from the type of the WorkCentre are not sure of the type of the document lights. Machines are bright and, while not harmful, they may be blocked or covered. This WorkCentre should never be placed in a built-in the back and sides of... power source indicated on the marking label. Always keep the document cover closed during operation and storage. The lamps are designed to restrict operator access to rest on the WorkCentre. The machine may touch dangerous voltage points or short out parts which could result ...
User Guide
Page 12
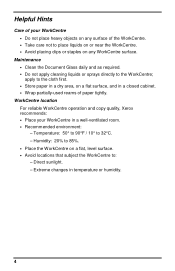
... WorkCentre operation and copy quality, Xerox recommends: • Place your WorkCentre • Do not place heavy objects on any WorkCentre surface. Humidity: 20% to 85%. • Place the WorkCentre on a flat, level surface. • Avoid locations that subject the WorkCentre to 32°C. - Helpful Hints Care of your WorkCentre in temperature or humidity. 4 Maintenance • Clean the Document...
... WorkCentre operation and copy quality, Xerox recommends: • Place your WorkCentre • Do not place heavy objects on any WorkCentre surface. Humidity: 20% to 85%. • Place the WorkCentre on a flat, level surface. • Avoid locations that subject the WorkCentre to 32°C. - Helpful Hints Care of your WorkCentre in temperature or humidity. 4 Maintenance • Clean the Document...

User Guide
Page 13
Getting to Know Your WorkCentre Original exit Original guides area Original feeder tray SPF XD103f/ 105f/ 120f/125f ADF XD130df/ 155df only Control panel Exit tray Paper tray 1 Paper tray 2 XD120f/130df/ 155df only Front cover Release latch Document cover Document glass Paper tray bypass paper guides Paper guides Side cover Alternate paper tray XD104/ 105f/ 130df/ 155df only Exit tray Serial number Power connection Parallel port Power switch Lift area 5
Getting to Know Your WorkCentre Original exit Original guides area Original feeder tray SPF XD103f/ 105f/ 120f/125f ADF XD130df/ 155df only Control panel Exit tray Paper tray 1 Paper tray 2 XD120f/130df/ 155df only Front cover Release latch Document cover Document glass Paper tray bypass paper guides Paper guides Side cover Alternate paper tray XD104/ 105f/ 130df/ 155df only Exit tray Serial number Power connection Parallel port Power switch Lift area 5
User Guide
Page 14
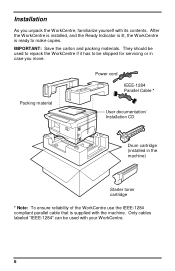
Packing material Power cord IEEE-1284 Parallel Cable * User documentation/ Installation CD Drum cartridge (installed in case you unpack the WorkCentre, familiarize yourself with its contents. Installation As you move. After the WorkCentre is installed, and the Ready Indicator is lit, the WorkCentre is supplied with your WorkCentre. 6 They should be shipped for servicing or in...
Packing material Power cord IEEE-1284 Parallel Cable * User documentation/ Installation CD Drum cartridge (installed in case you unpack the WorkCentre, familiarize yourself with its contents. Installation As you move. After the WorkCentre is installed, and the Ready Indicator is lit, the WorkCentre is supplied with your WorkCentre. 6 They should be shipped for servicing or in...

User Guide
Page 15
.../ 155df copier only Note: Be sure to properly set up your Xerox WorkCentre. Remove the pieces of the WorkCentre. XD130df/155df copier only To ensure the 2-sided tray is not removed. 5. CAUTION: The WorkCentre will misfeed if the paper tray button is not removed. CAUTION: ... the direction shown by the arrow. 3. A E B D C 1. Open the document cover and remove the packing materials shown. 4. Installation (continued) Follow the steps below to remove the pressure plate lock from the WorkCentre. 2. Remove the bag from both paper trays. 7 Turn and remove the paper tray...
.../ 155df copier only Note: Be sure to properly set up your Xerox WorkCentre. Remove the pieces of the WorkCentre. XD130df/155df copier only To ensure the 2-sided tray is not removed. 5. CAUTION: The WorkCentre will misfeed if the paper tray button is not removed. CAUTION: ... the direction shown by the arrow. 3. A E B D C 1. Open the document cover and remove the packing materials shown. 4. Installation (continued) Follow the steps below to remove the pressure plate lock from the WorkCentre. 2. Remove the bag from both paper trays. 7 Turn and remove the paper tray...
User Guide
Page 18
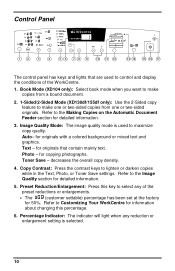
... or darken copies while in the Text, Photo, or Toner Save settings. Percentage Indicator: The indicator will light when any of the WorkCentre. 1. for originals with a colored background or mixed text and graphics. Copy Contrast: Press the contrast keys to the Image Quality section...maximize copy quality. Auto- for copying photographs. Photo - for 50%. decreases the overall copy density. 4. Preset Reduction/Enlargement: Press this percentage. 6. Control Panel 200%Max DOCUMENT Wo r k C e n t r e 129% C 86% 78% 50% 200% Auto 100% 10 1 12 3 4 56 78 9 10 11 12 13...
... or darken copies while in the Text, Photo, or Toner Save settings. Percentage Indicator: The indicator will light when any of the WorkCentre. 1. for originals with a colored background or mixed text and graphics. Copy Contrast: Press the contrast keys to the Image Quality section...maximize copy quality. Auto- for copying photographs. Photo - for 50%. decreases the overall copy density. 4. Preset Reduction/Enlargement: Press this percentage. 6. Control Panel 200%Max DOCUMENT Wo r k C e n t r e 129% C 86% 78% 50% 200% Auto 100% 10 1 12 3 4 56 78 9 10 11 12 13...
User Guide
Page 24
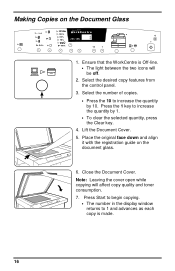
... 200%Max DOCUMENT Wo r k C e n t r e 129% C 86% 78% 50% 200% Auto 100% 10 1 1. Select the number of copies. • Press the 10 to increase the quantity by 1. • To clear the selected quantity, press the Clear key. 4. Ensure that the WorkCentre is made. 16 Note: Leaving the cover open while copying ...will be off. 2. Making Copies on the document glass. 6. Lift the...
... 200%Max DOCUMENT Wo r k C e n t r e 129% C 86% 78% 50% 200% Auto 100% 10 1 1. Select the number of copies. • Press the 10 to increase the quantity by 1. • To clear the selected quantity, press the Clear key. 4. Ensure that the WorkCentre is made. 16 Note: Leaving the cover open while copying ...will be off. 2. Making Copies on the document glass. 6. Lift the...
User Guide
Page 26
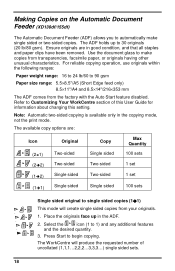
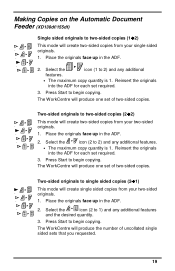
...1 set 100 sets Single sided original to Customizing Your WorkCentre section of uncollated (1,1,1...2,2,2...3,3,3...) single sided sets. 18 The WorkCentre will create single sided copies from the factory with the ...Auto Start feature disabled. Place the originals face up to automatically make copies from transparencies, facsimile paper, or originals having other unusual characteristics. The ADF holds up in the ADF. 2. Making Copies on the Automatic Document Feeder (XD130df/155df) The Automatic Document...
...1 set 100 sets Single sided original to Customizing Your WorkCentre section of uncollated (1,1,1...2,2,2...3,3,3...) single sided sets. 18 The WorkCentre will create single sided copies from the factory with the ...Auto Start feature disabled. Place the originals face up to automatically make copies from transparencies, facsimile paper, or originals having other unusual characteristics. The ADF holds up in the ADF. 2. Making Copies on the Automatic Document Feeder (XD130df/155df) The Automatic Document...
User Guide
Page 27
... (2!2) This mode will produce one set required. 3. Reinsert the originals into the ADF for each set of two-sided copies. The WorkCentre will create two-sided copies from your two-sided originals. 1. Two-sided originals to single sided copies (2!1) This mode will produce one... your two-sided originals. 1. Place the originals face up in the ADF. 2. The WorkCentre will create two-sided copies from your single sided originals. 1. Making Copies on the Automatic Document Feeder (XD130df/155df) Single sided originals to two-sided copies (1!2) This mode will produce...
... (2!2) This mode will produce one set required. 3. Reinsert the originals into the ADF for each set of two-sided copies. The WorkCentre will create two-sided copies from your two-sided originals. 1. Two-sided originals to single sided copies (2!1) This mode will produce one... your two-sided originals. 1. Place the originals face up in the ADF. 2. The WorkCentre will create two-sided copies from your single sided originals. 1. Making Copies on the Automatic Document Feeder (XD130df/155df) Single sided originals to two-sided copies (1!2) This mode will produce...
User Guide
Page 28
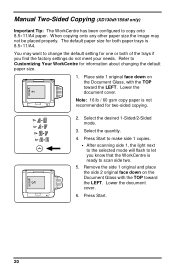
... side 1 original face down on the Document Glass, with the TOP toward the LEFT. Select the desired 1-Sided/2-Sided mode. 3. Press Start. 20 2 Xerox When copying onto any other paper size the image may want to Customizing Your WorkCentre for both of the trays if you ...original face down on the Document Glass with the TOP toward the LEFT. Refer to change the default setting for two-sided copying. 2. 1 Xerox Manual Two-Sided Copying (XD130df/155df only) Important Tip: The WorkCentre has been configured to scan side two. 5. Lower the document cover. 6. The default ...
... side 1 original face down on the Document Glass, with the TOP toward the LEFT. Select the desired 1-Sided/2-Sided mode. 3. Press Start. 20 2 Xerox When copying onto any other paper size the image may want to Customizing Your WorkCentre for both of the trays if you ...original face down on the Document Glass with the TOP toward the LEFT. Refer to change the default setting for two-sided copying. 2. 1 Xerox Manual Two-Sided Copying (XD130df/155df only) Important Tip: The WorkCentre has been configured to scan side two. 5. Lower the document cover. 6. The default ...

User Guide
Page 30
... the time selections are made. Refer to quickly select one of copies selected. Reduction/Enlargement DOCUMENT WorkCentre 88 50% 200% 10 DOCUMENT WorkCentre 50% 200% 10 1 Preset Reduction/Enlargement Press the Preset Reduction/Enlargement key to Customizing Your WorkCentre for 50%. Variable Percentage Press the Variable Percentage key to increase or decrease the reduction or...
... the time selections are made. Refer to quickly select one of copies selected. Reduction/Enlargement DOCUMENT WorkCentre 88 50% 200% 10 DOCUMENT WorkCentre 50% 200% 10 1 Preset Reduction/Enlargement Press the Preset Reduction/Enlargement key to Customizing Your WorkCentre for 50%. Variable Percentage Press the Variable Percentage key to increase or decrease the reduction or...
User Guide
Page 41
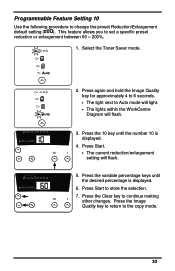
...The light next to store the selection. 7. DOCUMENT WorkCentre 50% 200% 10 5. Press the variable percentage keys until the number 10 is displayed. 6. Press Start to Auto mode will light. • The lights within the WorkCentre Diagram will flash. Programmable Feature Setting 10 Use ... specific preset reduction or enlargement between 50 - 200%. 1. This feature allows you to change the preset Reduction/Enlargement default setting ( ). WorkCentre 50% 200% 10 3. Press Start. 1 • The current reduction/enlargement setting will flash. Select the Toner Saver mode. 2. ...
...The light next to store the selection. 7. DOCUMENT WorkCentre 50% 200% 10 5. Press the variable percentage keys until the number 10 is displayed. 6. Press Start to Auto mode will light. • The lights within the WorkCentre Diagram will flash. Programmable Feature Setting 10 Use ... specific preset reduction or enlargement between 50 - 200%. 1. This feature allows you to change the preset Reduction/Enlargement default setting ( ). WorkCentre 50% 200% 10 3. Press Start. 1 • The current reduction/enlargement setting will flash. Select the Toner Saver mode. 2. ...

User Guide
Page 42
...green corotron wire cleaner from inside the copier (near the front corner of the copier. 1. Xerox suggests that the alternate paper tray is clean and dry. 4. Note: Ensure that you clean the document glass at the start getting streaks or blotches, the corotron wire may be dirty. Insert the ... into the corotron wire unit. 4. Slightly dampen a soft lint-free cloth or paper towel with the corotron cleaning tool as needed. WorkCentre Care Cleaning the Document Glass and Cover Keeping the document glass clean helps ensure the best possible copies. Wipe the corotron wire with water. 2.
...green corotron wire cleaner from inside the copier (near the front corner of the copier. 1. Xerox suggests that the alternate paper tray is clean and dry. 4. Note: Ensure that you clean the document glass at the start getting streaks or blotches, the corotron wire may be dirty. Insert the ... into the corotron wire unit. 4. Slightly dampen a soft lint-free cloth or paper towel with the corotron cleaning tool as needed. WorkCentre Care Cleaning the Document Glass and Cover Keeping the document glass clean helps ensure the best possible copies. Wipe the corotron wire with water. 2.
User Guide
Page 52
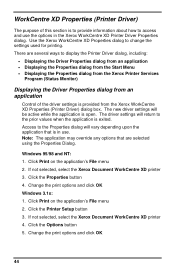
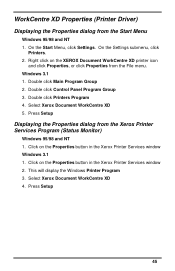
... Print on the application's File menu 2. Note: The application may override any options that is exited. If not selected, select the Xerox Document WorkCentre XD printer 4. Use the Xerox WorkCentre XD Properties dialog to display the Printer Driver dialog, including: • Displaying the Driver Properties dialog from an application • Displaying the Properties dialog from the Start...
... Print on the application's File menu 2. Note: The application may override any options that is exited. If not selected, select the Xerox Document WorkCentre XD printer 4. Use the Xerox WorkCentre XD Properties dialog to display the Printer Driver dialog, including: • Displaying the Driver Properties dialog from an application • Displaying the Properties dialog from the Start...
User Guide
Page 53
... on the Properties button in the Xerox Printer Services window 2. Click on the XEROX Document WorkCentre XD printer icon and click Properties, or click Properties from the Xerox Printer Services Program (Status Monitor) Windows 95/98 and NT 1. Double click Control Panel Program Group 3. Select Xerox Document WorkCentre XD 4. On the Settings submenu, click Printers. 2. Select Xerox Document WorkCentre XD 5. Double click Main Program Group...
... on the Properties button in the Xerox Printer Services window 2. Click on the XEROX Document WorkCentre XD printer icon and click Properties, or click Properties from the Xerox Printer Services Program (Status Monitor) Windows 95/98 and NT 1. Double click Control Panel Program Group 3. Select Xerox Document WorkCentre XD 4. On the Settings submenu, click Printers. 2. Select Xerox Document WorkCentre XD 5. Double click Main Program Group...
User Guide
Page 54
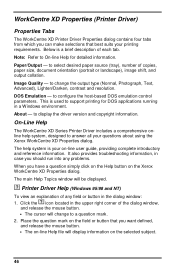
...? About - This is a brief description of any problems. When you have a question simply click on the Help button on the Xerox WorkCentre XD Properties dialog. icon located in the dialog window: 1. Image Quality - The main Help Topics window will display information on -line... or button in the upper right corner of copies, paper size, document orientation (portrait or landscape), image shift, and output collation. WorkCentre XD Properties (Printer Driver) Properties Tabs The WorkCentre XD Printer Driver Properties dialog contains four tabs from which you can make selections ...
...? About - This is a brief description of any problems. When you have a question simply click on the Help button on the Xerox WorkCentre XD Properties dialog. icon located in the dialog window: 1. Image Quality - The main Help Topics window will display information on -line... or button in the upper right corner of copies, paper size, document orientation (portrait or landscape), image shift, and output collation. WorkCentre XD Properties (Printer Driver) Properties Tabs The WorkCentre XD Printer Driver Properties dialog contains four tabs from which you can make selections ...
User Guide
Page 56
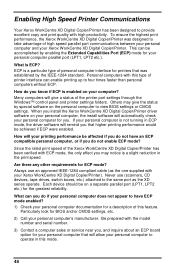
... not running in ECP mode, the driver software will automatically check your personal computer for your personal computer documentation for the greatest reliability. To ensure the highest print performance, the Xerox WorkCentre XD Digital Copier/Printer was established by enabling the Extended Capabilities Port (ECP) mode for you may give a status of high speed...
... not running in ECP mode, the driver software will automatically check your personal computer for your personal computer documentation for the greatest reliability. To ensure the highest print performance, the Xerox WorkCentre XD Digital Copier/Printer was established by enabling the Extended Capabilities Port (ECP) mode for you may give a status of high speed...

User Guide
Page 61
...to the Start Task bar and then click Settings then Printers. Use only paper that meets the specifications required by the WorkCentre. 53 If using Windows 95, the spool setting may be incorrect. Click the Xerox Document WorkCentre XD with an ECP parallel port, enable this mode ...of print manager may be set incorrectly. Print Job to the Enabling High Speed Printer Communications section and your computer is a paper quality problem. ...
...to the Start Task bar and then click Settings then Printers. Use only paper that meets the specifications required by the WorkCentre. 53 If using Windows 95, the spool setting may be incorrect. Click the Xerox Document WorkCentre XD with an ECP parallel port, enable this mode ...of print manager may be set incorrectly. Print Job to the Enabling High Speed Printer Communications section and your computer is a paper quality problem. ...


