
User Guide
Page 2
... protection against harmful interference in a residential installation. registered mark. Product names used in accordance with the instructions, may be determined by turning the equipment off and on a different circuit than the receiver. • Consult the dealer or an experienced radio/TV technician for help. Changes or modifications to this guide may cause harmful communications. FCC Compliance...
... protection against harmful interference in a residential installation. registered mark. Product names used in accordance with the instructions, may be determined by turning the equipment off and on a different circuit than the receiver. • Consult the dealer or an experienced radio/TV technician for help. Changes or modifications to this guide may cause harmful communications. FCC Compliance...
User Guide
Page 6
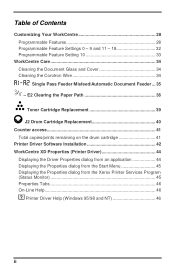
E2 Clearing the Paper Path 36 Toner Cartridge Replacement 39 J2 Drum Cartridge Replacement 40 Counter access 41 Total copies/prints remaining on the drum cartridge 41 Printer Driver Software Installation 42 WorkCentre XD Properties (Printer Driver 44 Displaying the Driver Properties dialog from an application 44 Displaying the Properties dialog from the Start Menu 45 Displaying the Properties dialog from the Xerox Printer Services Program (Status Monitor 45 Properties Tabs 46 On-Line Help 46 ? Table of Contents Customizing Your WorkCentre 28 Programmable...
E2 Clearing the Paper Path 36 Toner Cartridge Replacement 39 J2 Drum Cartridge Replacement 40 Counter access 41 Total copies/prints remaining on the drum cartridge 41 Printer Driver Software Installation 42 WorkCentre XD Properties (Printer Driver 44 Displaying the Driver Properties dialog from an application 44 Displaying the Properties dialog from the Start Menu 45 Displaying the Properties dialog from the Xerox Printer Services Program (Status Monitor 45 Properties Tabs 46 On-Line Help 46 ? Table of Contents Customizing Your WorkCentre 28 Programmable...
User Guide
Page 8
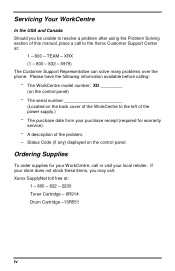
... WorkCentre model number: XD _________ (on the control panel. XRX (1 - 800 - 832 - 6979) The Customer Support Representative can solve many problems over the phone. The serial number Located on the back cover of the problem. - Status Code (if any) displayed on the control panel) - Servicing Your WorkCentre In the USA and Canada Should you may call: Xerox SupplyNet toll free at : 1 - 800 - A description of the WorkCentre to the Xerox Customer Support Center at : 1 - 800 - 822 - 2200 Toner Cartridge...
... WorkCentre model number: XD _________ (on the control panel. XRX (1 - 800 - 832 - 6979) The Customer Support Representative can solve many problems over the phone. The serial number Located on the back cover of the problem. - Status Code (if any) displayed on the control panel) - Servicing Your WorkCentre In the USA and Canada Should you may call: Xerox SupplyNet toll free at : 1 - 800 - A description of the WorkCentre to the Xerox Customer Support Center at : 1 - 800 - 822 - 2200 Toner Cartridge...
User Guide
Page 9
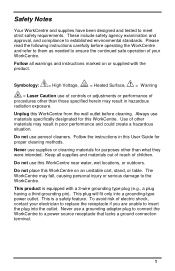
... what they were intended. Never use of controls or adjustments or performance of other than those specified herein may fall, causing personal injury or serious damage to a power source receptacle that lacks a ground connection terminal. 1 Symbology: = High Voltage, = Heated Surface, ! = Warning = Laser Caution use a grounding adapter plug to connect the WorkCentre to the WorkCentre. Keep all warnings and instructions marked on an unstable cart...
... what they were intended. Never use of controls or adjustments or performance of other than those specified herein may fall, causing personal injury or serious damage to a power source receptacle that lacks a ground connection terminal. 1 Symbology: = High Voltage, = Heated Surface, ! = Warning = Laser Caution use a grounding adapter plug to connect the WorkCentre to the WorkCentre. Keep all warnings and instructions marked on an unstable cart...
User Guide
Page 17
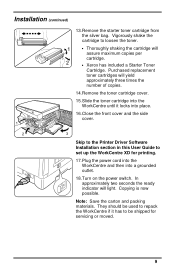
... cartridge. • Xerox has included a Starter Toner Cartridge. They should be used to repack the WorkCentre if it locks into place. 16.Close the front cover and the side cover. 1 2 3 Skip to the Printer Driver Software Installation section in this User Guide to set up the WorkCentre XD for servicing or moved. 9 Copying is now possible. Note: Save the carton and packing materials. Purchased replacement toner cartridges will yield approximately three times the number...
... cartridge. • Xerox has included a Starter Toner Cartridge. They should be used to repack the WorkCentre if it locks into place. 16.Close the front cover and the side cover. 1 2 3 Skip to the Printer Driver Software Installation section in this User Guide to set up the WorkCentre XD for servicing or moved. 9 Copying is now possible. Note: Save the carton and packing materials. Purchased replacement toner cartridges will yield approximately three times the number...
User Guide
Page 18
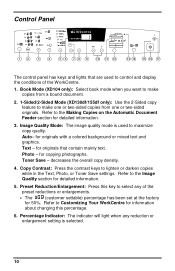
.... 2. 1-Sided/2-Sided Mode (XD130df/155df only): Use the 2-Sided copy feature to lighten or darken copies while in the Text, Photo, or Toner Save settings. Refer to the Making Copies on the Automatic Document Feeder section for originals that are used to maximize copy quality. Refer to control and display the conditions of the preset reductions or enlargements. • The (customer settable) percentage has been set at the factory for...
.... 2. 1-Sided/2-Sided Mode (XD130df/155df only): Use the 2-Sided copy feature to lighten or darken copies while in the Text, Photo, or Toner Save settings. Refer to the Making Copies on the Automatic Document Feeder section for originals that are used to maximize copy quality. Refer to control and display the conditions of the preset reductions or enlargements. • The (customer settable) percentage has been set at the factory for...

User Guide
Page 20
...-line button to immediately return to program a copy job while the copier is completed. Program the copy job. 2. Auto Clear - There are as follows: • Copy Quality - Power Save, and Power Shut-off mode the Ready Indicator will flash and the other indicators will be modified to Customizing Your WorkCentre section of this User Guide for a set period of power reduction; This WorkCentre is enabled at the factory to return to the Normal Copy Mode...
...-line button to immediately return to program a copy job while the copier is completed. Program the copy job. 2. Auto Clear - There are as follows: • Copy Quality - Power Save, and Power Shut-off mode the Ready Indicator will flash and the other indicators will be modified to Customizing Your WorkCentre section of this User Guide for a set period of power reduction; This WorkCentre is enabled at the factory to return to the Normal Copy Mode...
User Guide
Page 23
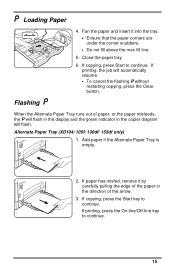
... job will flash. If copying, press the Start key to continue. Alternate Paper Tray (XD104/ 105f/ 130df/ 155df only) 1. If printing, press the On-line/Off-line key to continue. 15 If paper has misfed, remove it into the tray. • Ensure that the paper corners are under the corner snubbers. • Do not fill above the max fill line. 5. Add paper if the Alternate Paper Tray...
... job will flash. If copying, press the Start key to continue. Alternate Paper Tray (XD104/ 105f/ 130df/ 155df only) 1. If printing, press the On-line/Off-line key to continue. 15 If paper has misfed, remove it into the tray. • Ensure that the paper corners are under the corner snubbers. • Do not fill above the max fill line. 5. Add paper if the Alternate Paper Tray...
User Guide
Page 25
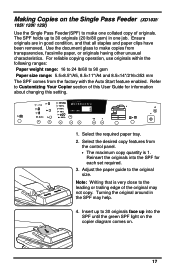
... until the green SPF light on the copier diagram comes on the Single Pass Feeder (XD103f/ 105f/ 120f/ 125f) Use the Single Pass Feeder(SPF) to the original size. Adjust the paper guide to make copies from the control panel. • The maximum copy quantity is very close to Customizing Your Copier section of the original may help. 4. Select the required paper tray. 2. Turning the original around in...
... until the green SPF light on the copier diagram comes on the Single Pass Feeder (XD103f/ 105f/ 120f/ 125f) Use the Single Pass Feeder(SPF) to the original size. Adjust the paper guide to make copies from the control panel. • The maximum copy quantity is very close to Customizing Your Copier section of the original may help. 4. Select the required paper tray. 2. Turning the original around in...

User Guide
Page 30
.../Enlargement Press the Preset Reduction/Enlargement key to display the current percentage. Display Window Preset or variable reduction/enlargement percentages appear in the Display Window at the factory for information about changing the default percentage. You may select any reduction or enlargement is replaced with the number of the 6 preset percentages. Press the % key to quickly select one of copies selected.
.../Enlargement Press the Preset Reduction/Enlargement key to display the current percentage. Display Window Preset or variable reduction/enlargement percentages appear in the Display Window at the factory for information about changing the default percentage. You may select any reduction or enlargement is replaced with the number of the 6 preset percentages. Press the % key to quickly select one of copies selected.
User Guide
Page 48
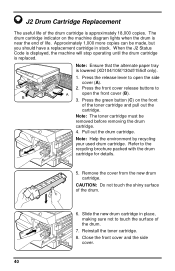
... front cover and the side cover. 40 When the J2 Status Code is displayed, the machine will stop operating until the drum cartridge is lowered (XD104/105f/130df/155df only). Press the green button (C) on the machine diagram lights when the drum is approximately 18,000 copies. J2 Drum Cartridge Replacement The useful life of the drum cartridge is near the end of life. Slide the new drum cartridge in stock. Remove the cover from the new drum cartridge. CAUTION...
... front cover and the side cover. 40 When the J2 Status Code is displayed, the machine will stop operating until the drum cartridge is lowered (XD104/105f/130df/155df only). Press the green button (C) on the machine diagram lights when the drum is approximately 18,000 copies. J2 Drum Cartridge Replacement The useful life of the drum cartridge is near the end of life. Slide the new drum cartridge in stock. Remove the cover from the new drum cartridge. CAUTION...
User Guide
Page 50
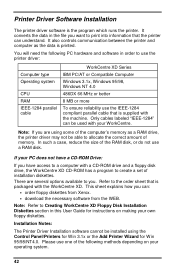
... to Creating WorkCentre XD Floppy Disk Installation Diskettes section in this User Guide for Win 95/98/NT4.0. Refer to create a set of memory. Printer Driver Software Installation The printer driver software is printed. There are using the Control Panel/Printers for Win 3.1x or the Add Printer Wizard for instructions on your own floppy diskettes. Only cables labeled "IEEE-1284" can : • order floppy diskettes from Xerox. • download the necessary software from the WEB. Please use one...
... to Creating WorkCentre XD Floppy Disk Installation Diskettes section in this User Guide for Win 95/98/NT4.0. Refer to create a set of memory. Printer Driver Software Installation The printer driver software is printed. There are using the Control Panel/Printers for Win 3.1x or the Add Printer Wizard for instructions on your own floppy diskettes. Only cables labeled "IEEE-1284" can : • order floppy diskettes from Xerox. • download the necessary software from the WEB. Please use one...
User Guide
Page 51
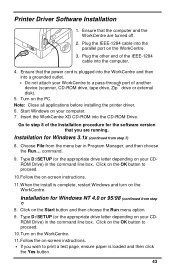
... applications before installing the printer driver. 6. Type D:\SETUP (or the appropriate drive letter depending on your CDROM Drive) in the command line box. Type D:\SETUP (or the appropriate drive letter depending on the Start button and then choose the Run menu option. 9. Installation for Windows NT 4.0 or 95/98 (continued from the menu bar in the command line box. Click on your WorkCentre to step 8 of the Installation procedure for the software version...
... applications before installing the printer driver. 6. Type D:\SETUP (or the appropriate drive letter depending on your CDROM Drive) in the command line box. Type D:\SETUP (or the appropriate drive letter depending on the Start button and then choose the Run menu option. 9. Installation for Windows NT 4.0 or 95/98 (continued from the menu bar in the command line box. Click on your WorkCentre to step 8 of the Installation procedure for the software version...
User Guide
Page 52
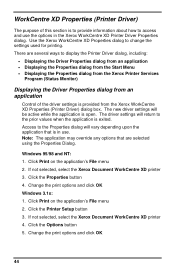
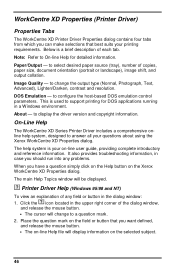
... to change the settings used for printing. WorkCentre XD Properties (Printer Driver) The purpose of the driver settings is provided from the Xerox WorkCentre XD Properties (Printer Driver) dialog box. The driver settings will be active while the application is exited. Click Print on the application's File menu 2. If not selected, select the Xerox Document WorkCentre XD printer 4. Click Print on the application's File menu 2. Change the print options and click OK Windows 3.1x: 1. Click the Options button 5. Change the print options and...
... to change the settings used for printing. WorkCentre XD Properties (Printer Driver) The purpose of the driver settings is provided from the Xerox WorkCentre XD Properties (Printer Driver) dialog box. The driver settings will be active while the application is exited. Click Print on the application's File menu 2. If not selected, select the Xerox Document WorkCentre XD printer 4. Click Print on the application's File menu 2. Change the print options and click OK Windows 3.1x: 1. Click the Options button 5. Change the print options and...
User Guide
Page 54
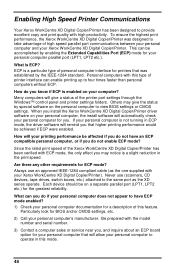
... the field or button that best suits your printing requirements. Printer Driver Help (Windows 95/98 and NT) To view an explanation of copies, paper size, document orientation (portrait or landscape), image shift, and output collation. Paper/Output - to select desired paper source (tray), number of any problems. When you have a question simply click on the Help button on the Xerox WorkCentre XD Properties dialog. to On-line Help for...
... the field or button that best suits your printing requirements. Printer Driver Help (Windows 95/98 and NT) To view an explanation of copies, paper size, document orientation (portrait or landscape), image shift, and output collation. Paper/Output - to select desired paper source (tray), number of any problems. When you have a question simply click on the Help button on the Xerox WorkCentre XD Properties dialog. to On-line Help for...
User Guide
Page 56
... of the printer port settings through the Windows™ control panel and printer settings folders. ECP is enabled on a separate parallel port (LPT1, LPT2 etc.) for printers that higher printing performance would be achieved if ECP were enabled. Since the rated print speed of printer interface can be on your Xerox WorkCentre XD Digital Copier/Printer. Always use (scanners, CD devices, tape drives, switch boxes, etc.) attached to provide excellent copy and print quality with your...
... of the printer port settings through the Windows™ control panel and printer settings folders. ECP is enabled on a separate parallel port (LPT1, LPT2 etc.) for printers that higher printing performance would be achieved if ECP were enabled. Since the rated print speed of printer interface can be on your Xerox WorkCentre XD Digital Copier/Printer. Always use (scanners, CD devices, tape drives, switch boxes, etc.) attached to provide excellent copy and print quality with your...

User Guide
Page 59
... to Loading Paper and Flashing P.) Copy paper has misfed. (Refer to A1 - Wait approximately 5 seconds. Ensure that the shipping screw is replaced. The front or side cover is paper in stock. Close the cover. Refer to Clearing the Paper Path.) J1 J2 C1 CH A1 - When the J1 status code is displayed, the machine will stop operating until the drum cartridge is removed. Install the toner cartridge. Switch OFF the Main Power. Problem Solving Status Code Chart Status Code...
... to Loading Paper and Flashing P.) Copy paper has misfed. (Refer to A1 - Wait approximately 5 seconds. Ensure that the shipping screw is replaced. The front or side cover is paper in stock. Close the cover. Refer to Clearing the Paper Path.) J1 J2 C1 CH A1 - When the J1 status code is displayed, the machine will stop operating until the drum cartridge is removed. Install the toner cartridge. Switch OFF the Main Power. Problem Solving Status Code Chart Status Code...

User Guide
Page 60
..., replace the cable. Try closing other applications before printing. Check the printer settings in the printer setup dialog. printing software. Reduce resolution from 600 dpi to 300 dpi. If printing is too complex. The printer driver may be installed properly. The page orientation may not Reinstall the WorkCentre be incorrect. Reduce the resolution setting from 600 dpi to the correct port. (For Example: LPT1.) The toner and drum Check that work. Check the cable connection. Problem...
..., replace the cable. Try closing other applications before printing. Check the printer settings in the printer setup dialog. printing software. Reduce resolution from 600 dpi to 300 dpi. If printing is too complex. The printer driver may be installed properly. The page orientation may not Reinstall the WorkCentre be incorrect. Reduce the resolution setting from 600 dpi to the correct port. (For Example: LPT1.) The toner and drum Check that work. Check the cable connection. Problem...

User Guide
Page 61
... equipped with the right mouse button. If your computers user guide. Refer to 300 dpi. Click the Xerox Document WorkCentre XD with an ECP parallel port, enable this mode of print manger. Computer may be incorrect. computer. print Use only paper that meets the specifications required by the WorkCentre. 53 Toner may not have Install more RAM in the options menu of problem. Use only paper that the computer meets the...
... equipped with the right mouse button. If your computers user guide. Refer to 300 dpi. Click the Xerox Document WorkCentre XD with an ECP parallel port, enable this mode of print manger. Computer may be incorrect. computer. print Use only paper that meets the specifications required by the WorkCentre. 53 Toner may not have Install more RAM in the options menu of problem. Use only paper that the computer meets the...
User Guide
Page 62
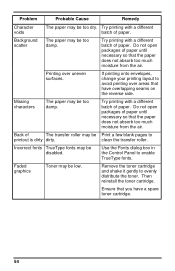
... printing onto envelopes, change your printing layout to printout is dirty dirty. Do not open packages of The transfer roller may be too damp. Use the Fonts dialog box in the Control Panel to evenly distribute the toner. Remove the toner cartridge and shake it gently to enable TrueType fonts. Then reinstall the toner cartridge. Printing over areas that the paper does not absorb too much moisture from the air. clean the transfer roller. Problem...
... printing onto envelopes, change your printing layout to printout is dirty dirty. Do not open packages of The transfer roller may be too damp. Use the Fonts dialog box in the Control Panel to evenly distribute the toner. Remove the toner cartridge and shake it gently to enable TrueType fonts. Then reinstall the toner cartridge. Printing over areas that the paper does not absorb too much moisture from the air. clean the transfer roller. Problem...


