
User Guide
Page 1
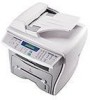
LASER MULTIFUNCTION (4 IN 1) MFP User's Guide WorkCentre PE16
LASER MULTIFUNCTION (4 IN 1) MFP User's Guide WorkCentre PE16

User Guide
Page 2
About the User's Guides Your machine comes with the three user's guides: This Laser MFP User's Guide provides information you need for information purposes only. All information included herein is provided for setting up your machine as... how to change without notice. This manual is subject to set fax-related options. All rights reserved. • WorkCentre PE16 and Xerox logo are trademarks of this manual. © 2003 Xerox Corporation. Xerox Corporation is a trademark of Centronics Data Computer Corporation. • IBM and IBM PC are trademarks of International Business Machines...
About the User's Guides Your machine comes with the three user's guides: This Laser MFP User's Guide provides information you need for information purposes only. All information included herein is provided for setting up your machine as... how to change without notice. This manual is subject to set fax-related options. All rights reserved. • WorkCentre PE16 and Xerox logo are trademarks of this manual. © 2003 Xerox Corporation. Xerox Corporation is a trademark of Centronics Data Computer Corporation. • IBM and IBM PC are trademarks of International Business Machines...
User Guide
Page 24
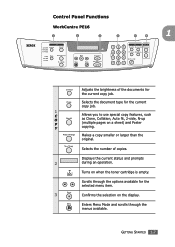
Control Panel Functions WorkCentre PE16 1 2 3 4 5 6 1 Adjusts the brightness of copies. Enters Menu Mode and scrolls through the options available for the selected menu item. 3 Confirms the selection on a sheet) and ...
Control Panel Functions WorkCentre PE16 1 2 3 4 5 6 1 Adjusts the brightness of copies. Enters Menu Mode and scrolls through the options available for the selected menu item. 3 Confirms the selection on a sheet) and ...

User Guide
Page 41
... not support USB connection. 1 Switch on the PC and start Windows. Installing Software Installing the drivers and other software will enable PC printing. Ensure the WorkCentre PE16 is plugged in and connected to step 7. 4 From the Start menu, select [Run]. 5 Type D:\XINSTALL.EXE ("D" is the letter of the PC. 3 If the...
... not support USB connection. 1 Switch on the PC and start Windows. Installing Software Installing the drivers and other software will enable PC printing. Ensure the WorkCentre PE16 is plugged in and connected to step 7. 4 From the Start menu, select [Run]. 5 Type D:\XINSTALL.EXE ("D" is the letter of the PC. 3 If the...

User Guide
Page 69
.... œ¤Windows 98 3 To take advantage of the printer features provided by your application. These settings include the number of information you see the Xerox WorkCentre PE16 Properties window, which allows you are selected within the Print window. Make sure that button instead.
.... œ¤Windows 98 3 To take advantage of the printer features provided by your application. These settings include the number of information you see the Xerox WorkCentre PE16 Properties window, which allows you are selected within the Print window. Make sure that button instead.
User Guide
Page 71
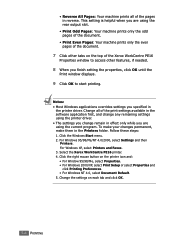
... 4.0, select Document Default. 5. Click the right mouse button on each tab and click OK. 5.4 PRINTING • Reverse All Pages: Your machine prints all of the Xerox WorkCentre PE16 Properties window to access other features, if needed. 8 When you finish setting the properties, click OK until the Print window displays. 9 Click OK to start...
... 4.0, select Document Default. 5. Click the right mouse button on each tab and click OK. 5.4 PRINTING • Reverse All Pages: Your machine prints all of the Xerox WorkCentre PE16 Properties window to access other features, if needed. 8 When you finish setting the properties, click OK until the Print window displays. 9 Click OK to start...
User Guide
Page 72
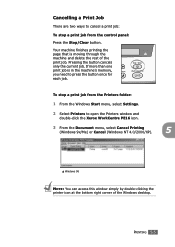
... stop a print job from the Printers folder: 1 From the Windows Start menu, select Settings. 2 Select Printers to open the Printers window and double-click the Xerox WorkCentre PE16 icon. 3 From the Document menu, select Cancel Printing (Windows 9x/Me) or Cancel (Windows NT 4.0/2000/XP). 5 œ¤Windows 98 NOTE: You can access...
... stop a print job from the Printers folder: 1 From the Windows Start menu, select Settings. 2 Select Printers to open the Printers window and double-click the Xerox WorkCentre PE16 icon. 3 From the Document menu, select Cancel Printing (Windows 9x/Me) or Cancel (Windows NT 4.0/2000/XP). 5 œ¤Windows 98 NOTE: You can access...

User Guide
Page 93
... described in the TWAIN Driver Help program. PaperPort is an advanced software program that is provided on the software CD provided with the WorkCentre PE16. For installation instructions, please refer to scan images, graphics, photographs, and printed text. Documents can be fed from a PC, both... method for scanning images from the Automatic Document Feeder(ADF) or placed on page 2.4.. TWAIN Scanner Program The WorkCentre PE16 TWAIN Scanner program is used to "Installing Software" on the Document Glass. A simple TWAIN Scanner program is provided with themachine.
... described in the TWAIN Driver Help program. PaperPort is an advanced software program that is provided on the software CD provided with the WorkCentre PE16. For installation instructions, please refer to scan images, graphics, photographs, and printed text. Documents can be fed from a PC, both... method for scanning images from the Automatic Document Feeder(ADF) or placed on page 2.4.. TWAIN Scanner Program The WorkCentre PE16 TWAIN Scanner program is used to "Installing Software" on the Document Glass. A simple TWAIN Scanner program is provided with themachine.
User Guide
Page 116
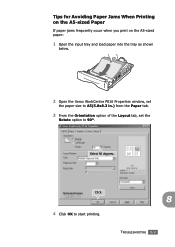
Click. 4 Click OK to 90º. Tips for Avoiding Paper Jams When Printing on the A5-sized Paper If paper jams frequently occur when you print on the A5-sized paper: 1 Open the input tray and load paper into the tray as shown below. 2 Open the Xerox WorkCentre PE16 Properties window, set the paper size to A5(5.8x8.3 in.) from the Paper tab. 3 From the Orientation option of the Layout tab, set the Rotate option to start printing. 8 TROUBLESHOOTING 8.9 Select 90 degrees.
Click. 4 Click OK to 90º. Tips for Avoiding Paper Jams When Printing on the A5-sized Paper If paper jams frequently occur when you print on the A5-sized paper: 1 Open the input tray and load paper into the tray as shown below. 2 Open the Xerox WorkCentre PE16 Properties window, set the paper size to A5(5.8x8.3 in.) from the Paper tab. 3 From the Orientation option of the Layout tab, set the Rotate option to start printing. 8 TROUBLESHOOTING 8.9 Select 90 degrees.
User Guide
Page 122
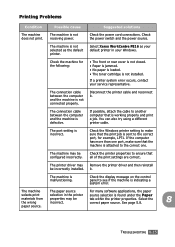
Check the power cord connections. Select Xerox WorkCentre PE16 as the default printer. The connection cable between the computer and the machine is incorrect. The printer driver may Remove the printer driver and then ...
Check the power cord connections. Select Xerox WorkCentre PE16 as the default printer. The connection cable between the computer and the machine is incorrect. The printer driver may Remove the printer driver and then ...
User Guide
Page 123
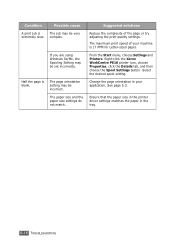
... application. The page orientation setting may be very complex. See page 5.3. Select the desired spool setting. Condition A print job is extremely slow. Right-click the Xerox WorkCentre PE16 printer icon, choose Properties, click the Details tab, and then choose the Spool Settings button. Ensure that the paper size in the printer driver settings...
... application. The page orientation setting may be very complex. See page 5.3. Select the desired spool setting. Condition A print job is extremely slow. Right-click the Xerox WorkCentre PE16 printer icon, choose Properties, click the Details tab, and then choose the Spool Settings button. Ensure that the paper size in the printer driver settings...

User Guide
Page 146
LASER MULTIFUNCTION (4 IN 1) FAX User's Guide WorkCentre PE16
LASER MULTIFUNCTION (4 IN 1) FAX User's Guide WorkCentre PE16

User Guide
Page 196
... window provides five tabs; For further details, click the Help button at the bottom of each tab. 3 From Programs, select Xerox WorkCentre PE16 and then ControlCentre. The Settings Tab Click the Settings tab to your machine and refreshes the ControlCentre with them. 5.8 ADDITIONAL FEATURES Downloads the settings made ...
... window provides five tabs; For further details, click the Help button at the bottom of each tab. 3 From Programs, select Xerox WorkCentre PE16 and then ControlCentre. The Settings Tab Click the Settings tab to your machine and refreshes the ControlCentre with them. 5.8 ADDITIONAL FEATURES Downloads the settings made ...


