
Use & Care Guide
Page 1
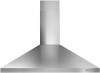
...-MOUNT CANOPY RANGE HOOD Installation Instructions and Use & Care Guide For questions about features, operation/performance, parts, accessories or service, call: 1-800-253-1301 or visit our website at www.whirlpool.com In Canada, call 1-800-807-6777 or visit our website at www.whirlpool.ca HOTTE ...utilisation et d'entretien Au Canada, pour assistance, installation ou service, composer le 1-800-807-6777 ou visiter notre site Web à www.whirlpool.ca Table of Contents/Table des matières 2 IMPORTANT: READ AND SAVE THESE INSTRUCTIONS. IMPORTANT : LIRE ET CONSERVER CES INSTRUCTIONS. ...
...-MOUNT CANOPY RANGE HOOD Installation Instructions and Use & Care Guide For questions about features, operation/performance, parts, accessories or service, call: 1-800-253-1301 or visit our website at www.whirlpool.com In Canada, call 1-800-807-6777 or visit our website at www.whirlpool.ca HOTTE ...utilisation et d'entretien Au Canada, pour assistance, installation ou service, composer le 1-800-807-6777 ou visiter notre site Web à www.whirlpool.ca Table of Contents/Table des matières 2 IMPORTANT: READ AND SAVE THESE INSTRUCTIONS. IMPORTANT : LIRE ET CONSERVER CES INSTRUCTIONS. ...
Use & Care Guide
Page 2
...and Parts 4 Location Requirements 4 Venting Requirements 5 Electrical Requirements 6 INSTALLATION INSTRUCTIONS 7 Prepare Location 7 Install Range Hood 8 Connect Vent System 8 Make Electrical Connection 9 Install Vent Covers 10 Complete Installation 10 RANGE HOOD USE 11 Range Hood Controls 11 RANGE HOOD CARE 12 Cleaning 12 WIRING DIAGRAM 13 ASSISTANCE OR SERVICE 14 In the U.S.A 14 In Canada 14... 27 SCHÉMA DE CÂBLAGE 28 ASSISTANCE OU SERVICE 29 Au Canada 29 Accessoires 29 GARANTIE 30 RANGE HOOD SAFETY Your safety and the safety of California to cause cancer.
...and Parts 4 Location Requirements 4 Venting Requirements 5 Electrical Requirements 6 INSTALLATION INSTRUCTIONS 7 Prepare Location 7 Install Range Hood 8 Connect Vent System 8 Make Electrical Connection 9 Install Vent Covers 10 Complete Installation 10 RANGE HOOD USE 11 Range Hood Controls 11 RANGE HOOD CARE 12 Cleaning 12 WIRING DIAGRAM 13 ASSISTANCE OR SERVICE 14 In the U.S.A 14 In Canada 14... 27 SCHÉMA DE CÂBLAGE 28 ASSISTANCE OU SERVICE 29 Au Canada 29 Accessoires 29 GARANTIE 30 RANGE HOOD SAFETY Your safety and the safety of California to cause cancer.
Use & Care Guide
Page 4
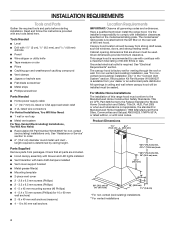
...9632;■ 6 - 5 x 45 mm mounting screws (#2 Phillips) ■■ 4 - 5.4 x 75 mm screws (Phillips) (for use with cooktops with local codes. This range hood is recommended for 10 x 60 mm wall anchors) ■■ 2 - 8 x 40 mm wall anchors (masonry) ■■ 4 - 10 x 60 mm wall anchors Location... or latest edition, or with a maximum total rating of 60,000 BTUs or less. Have a qualified technician install the range hood. Cabinet opening dimensions that all governing codes and ordinances. For non-vented (recirculating) installation, see "For nonvented (recirculating) ...
...9632;■ 6 - 5 x 45 mm mounting screws (#2 Phillips) ■■ 4 - 5.4 x 75 mm screws (Phillips) (for use with cooktops with local codes. This range hood is recommended for 10 x 60 mm wall anchors) ■■ 2 - 8 x 40 mm wall anchors (masonry) ■■ 4 - 10 x 60 mm wall anchors Location... or latest edition, or with a maximum total rating of 60,000 BTUs or less. Have a qualified technician install the range hood. Cabinet opening dimensions that all governing codes and ordinances. For non-vented (recirculating) installation, see "For nonvented (recirculating) ...

Use & Care Guide
Page 5
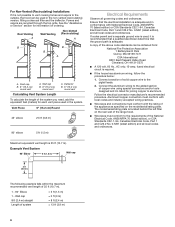
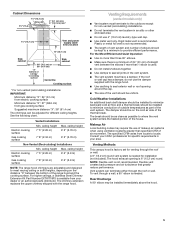
...Min. ceiling height Max. ceiling height Electric cooking surface Gas cooking surface 7' 5" (2.26 m) 7' 8" (2.34 m) 9' 6" (2.9 m) 9' 6" (2.9 m) NOTE: The range hood chimneys are adjustable and designed to locale. The damper should be on the distance "X" between the elbows if more than specified CFM of air movement...the cold air side of the vent system. ceiling height Max. The chimney extension replaces the upper chimney shipped with the range hood. ■■ Use caulking to seal all joints in your dealer or an authorized parts distributor. See the following chart...
...Min. ceiling height Max. ceiling height Electric cooking surface Gas cooking surface 7' 5" (2.26 m) 7' 8" (2.34 m) 9' 6" (2.9 m) 9' 6" (2.9 m) NOTE: The range hood chimneys are adjustable and designed to locale. The damper should be on the distance "X" between the elbows if more than specified CFM of air movement...the cold air side of the vent system. ceiling height Max. The chimney extension replaces the upper chimney shipped with the range hood. ■■ Use caulking to seal all joints in your dealer or an authorized parts distributor. See the following chart...
Use & Care Guide
Page 6
... and industry accepted wiring practices. ■■ Wire sizes and connections must conform to the outside, the hood can be used in the system. Roof Venting A Wall Venting Non-Vented (Recirculating) A B B B A A. Connect a section of the range hood. ■■ Wire sizes must conform with National Electrical Code, ANSI/NFPA 70 (latest edition) or...
... and industry accepted wiring practices. ■■ Wire sizes and connections must conform to the outside, the hood can be used in the system. Roof Venting A Wall Venting Non-Vented (Recirculating) A B B B A A. Connect a section of the range hood. ■■ Wire sizes must conform with National Electrical Code, ANSI/NFPA 70 (latest edition) or...
Use & Care Guide
Page 7
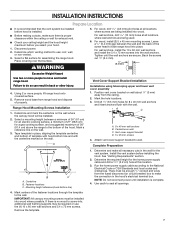
...Back the screws out 1/4" (6.4 mm). ¹⁄₄" (6.4 mm) Excessive Weight Hazard Use two or more people, lift range hood onto covered surface. 5. Range Hood Mounting Screws Installation 1. A DRILL 2 (TWO) 3/16" PILOT HOLES THROUGH STUDS OR REAR WALL SUPPORT Vertical Centerline Horizontal Line... and wires from the fused disconnect (or circuit breaker) box to slide range hood into the wall anchors. Failure to move and install range hood. Mounting height reference (hood bottom line) Vent Cover Support Bracket Installation Installations using telescoping upper and lower...
...Back the screws out 1/4" (6.4 mm). ¹⁄₄" (6.4 mm) Excessive Weight Hazard Use two or more people, lift range hood onto covered surface. 5. Range Hood Mounting Screws Installation 1. A DRILL 2 (TWO) 3/16" PILOT HOLES THROUGH STUDS OR REAR WALL SUPPORT Vertical Centerline Horizontal Line... and wires from the fused disconnect (or circuit breaker) box to slide range hood into the wall anchors. Failure to move and install range hood. Mounting height reference (hood bottom line) Vent Cover Support Bracket Installation Installations using telescoping upper and lower...

Use & Care Guide
Page 8
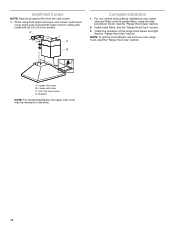
...on back of the air deflector. 6. Fit vent system over the exhaust outlet from the hood. 7. Check that back draft dampers work properly. Measure from range hood and metal filters. 1. Place the assembled air deflector and duct over transition piece. 2. ... clamp C. X = length to the measured size "X." 4. B A B B C C A. A For non-vented (recirculating) installation only: 1. Mounting slots C. See "Range Hood Care" section. 3. Vent transition B. 3.5 x 9.5 mm screw For vented installations only: 1. Use the optional wall anchors if needed. Using 2 or more people, hang...
...on back of the air deflector. 6. Fit vent system over the exhaust outlet from the hood. 7. Check that back draft dampers work properly. Measure from range hood and metal filters. 1. Place the assembled air deflector and duct over transition piece. 2. ... clamp C. X = length to the measured size "X." 4. B A B B C C A. A For non-vented (recirculating) installation only: 1. Mounting slots C. See "Range Hood Care" section. 3. Vent transition B. 3.5 x 9.5 mm screw For vented installations only: 1. Use the optional wall anchors if needed. Using 2 or more people, hang...

Use & Care Guide
Page 10
...the vent covers. 1. A. When using the clips provided in the kit. Lower vent cover C. 2.9 x 6.5 mm screws D. See the "Range Hood Use" section. Bracket NOTE: For vented installations, the upper vent cover may be reversed to ceiling and install with (2) 2.9 x 6.5 mm screws. See the... "Range Hood Care" section. 3. Upper vent cover B. For non-vented (recirculating) installations only, install charcoal filters over the grease filters, using both upper...
...the vent covers. 1. A. When using the clips provided in the kit. Lower vent cover C. 2.9 x 6.5 mm screws D. See the "Range Hood Use" section. Bracket NOTE: For vented installations, the upper vent cover may be reversed to ceiling and install with (2) 2.9 x 6.5 mm screws. See the... "Range Hood Care" section. 3. Upper vent cover B. For non-vented (recirculating) installations only, install charcoal filters over the grease filters, using both upper...

Use & Care Guide
Page 11
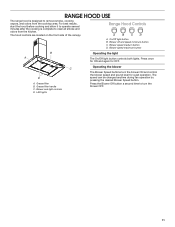
The hood controls are located on the front side of the canopy. Grease filter B. Grease filter handle C. Blower speed medium button D. Press the Blower Off button a second ... odors from the kitchen. C D A. LED lights Operating the blower The Blower Speed buttons turn the blower OFF. 11 RANGE HOOD USE The range hood is complete to clear all smoke and odors from the cooktop area. Range Hood Controls A B C D A. Blower and light controls D. The speed can be changed anytime during fan operation by pressing the desired...
The hood controls are located on the front side of the canopy. Grease filter B. Grease filter handle C. Blower speed medium button D. Press the Blower Off button a second ... odors from the kitchen. C D A. LED lights Operating the blower The Blower Speed buttons turn the blower OFF. 11 RANGE HOOD USE The range hood is complete to clear all smoke and odors from the cooktop area. Range Hood Controls A B C D A. Blower and light controls D. The speed can be changed anytime during fan operation by pressing the desired...
Use & Care Guide
Page 12
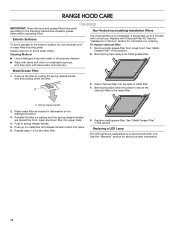
...charcoal filter is not washable. To replace charcoal filter: 1. Bend spring clips away from range hood. Wash metal filter as needed in this section. Replace grease filters before operating hood. Place charcoal filter into place to secure the charcoal filter to the exterior surface, do... to 6 months with normal use steel wool or soap-filled scouring pads. Insert aluminum filter into place. 6. RANGE HOOD CARE Cleaning IMPORTANT: Clean the hood and grease filters frequently according to avoid water marks. Replace metal grease filter. See the "Warranty" section for ...
...charcoal filter is not washable. To replace charcoal filter: 1. Bend spring clips away from range hood. Wash metal filter as needed in this section. Replace grease filters before operating hood. Place charcoal filter into place to secure the charcoal filter to the exterior surface, do... to 6 months with normal use steel wool or soap-filled scouring pads. Insert aluminum filter into place. 6. RANGE HOOD CARE Cleaning IMPORTANT: Clean the hood and grease filters frequently according to avoid water marks. Replace metal grease filter. See the "Warranty" section for ...
Installation Guide
Page 1
... AND 36" (76.2 AND 91.4 CM) WALL-MOUNT CANOPY RANGE HOOD Installation Instructions and Use & Care Guide For questions about features, operation/performance, parts, accessories or service, call: 1-800-253-1301 or visit our website at www.whirlpool.com In Canada, call 1-800-807-6777 or visit our website ... et d'entretien Au Canada, pour assistance, installation ou service, composer le 1-800-807-6777 ou visiter notre site Web à www.whirlpool.ca Table of Contents/Table des matières 2 IMPORTANT: READ AND SAVE THESE INSTRUCTIONS. IMPORTANT : LIRE ET CONSERVER CES INSTRUCTIONS.
... AND 36" (76.2 AND 91.4 CM) WALL-MOUNT CANOPY RANGE HOOD Installation Instructions and Use & Care Guide For questions about features, operation/performance, parts, accessories or service, call: 1-800-253-1301 or visit our website at www.whirlpool.com In Canada, call 1-800-807-6777 or visit our website ... et d'entretien Au Canada, pour assistance, installation ou service, composer le 1-800-807-6777 ou visiter notre site Web à www.whirlpool.ca Table of Contents/Table des matières 2 IMPORTANT: READ AND SAVE THESE INSTRUCTIONS. IMPORTANT : LIRE ET CONSERVER CES INSTRUCTIONS.

Installation Guide
Page 2
... Tools and Parts 4 Location Requirements 4 Venting Requirements 5 Electrical Requirements 6 INSTALLATION INSTRUCTIONS 7 Prepare Location 7 Install Range Hood 8 Connect Vent System 8 Make Electrical Connection 9 Install Vent Covers 10 Complete Installation 10 RANGE HOOD USE 11 Range Hood Controls 11 RANGE HOOD CARE 12 Cleaning 12 WIRING DIAGRAM 13 ASSISTANCE OR SERVICE 14 In the U.S.A 14 In Canada 14...27 Nettoyage 27 SCHÉMA DE CÂBLAGE 28 ASSISTANCE OU SERVICE 29 Au Canada 29 Accessoires 29 GARANTIE 30 RANGE HOOD SAFETY Your safety and the safety of others .
... Tools and Parts 4 Location Requirements 4 Venting Requirements 5 Electrical Requirements 6 INSTALLATION INSTRUCTIONS 7 Prepare Location 7 Install Range Hood 8 Connect Vent System 8 Make Electrical Connection 9 Install Vent Covers 10 Complete Installation 10 RANGE HOOD USE 11 Range Hood Controls 11 RANGE HOOD CARE 12 Cleaning 12 WIRING DIAGRAM 13 ASSISTANCE OR SERVICE 14 In the U.S.A 14 In Canada 14...27 Nettoyage 27 SCHÉMA DE CÂBLAGE 28 ASSISTANCE OU SERVICE 29 Au Canada 29 Accessoires 29 GARANTIE 30 RANGE HOOD SAFETY Your safety and the safety of others .

Installation Guide
Page 4
INSTALLATION REQUIREMENTS Tools and Parts Gather the required tools and parts before starting installation. This range hood is the installer's responsibility to comply with a maximum total rating of the vent hood. Grounded electrical outlet is determined by ceiling height. For non-vented (recirculating) installation, see "For nonvented (recirculating) installation only" in ceiling and wall...
INSTALLATION REQUIREMENTS Tools and Parts Gather the required tools and parts before starting installation. This range hood is the installer's responsibility to comply with a maximum total rating of the vent hood. Grounded electrical outlet is determined by ceiling height. For non-vented (recirculating) installation, see "For nonvented (recirculating) installation only" in ceiling and wall...
Installation Guide
Page 5
...■■ The size of the vent should be uniform. The chimney extension replaces the upper chimney shipped with the range hood. ■■ Use caulking to meet varying ceiling or soffit heights, depending on the cold air side of the thermal... reduce performance. ceiling height Electric cooking surface Gas cooking surface 7' 5" (2.26 m) 7' 8" (2.34 m) 9' 6" (2.9 m) 9' 6" (2.9 m) NOTE: The range hood chimneys are adjustable and designed to seal exterior wall or roof opening is needed for non-vented (recirculating) installations. ■■ Do not terminate the...
...■■ The size of the vent should be uniform. The chimney extension replaces the upper chimney shipped with the range hood. ■■ Use caulking to meet varying ceiling or soffit heights, depending on the cold air side of the thermal... reduce performance. ceiling height Electric cooking surface Gas cooking surface 7' 5" (2.26 m) 7' 8" (2.34 m) 9' 6" (2.9 m) 9' 6" (2.9 m) NOTE: The range hood chimneys are adjustable and designed to seal exterior wall or roof opening is needed for non-vented (recirculating) installations. ■■ Do not terminate the...

Installation Guide
Page 6
...the equivalent feet (meters) for each vent piece used , it is not possible to vent cooking fumes and vapors to the outside, the hood can be used in the non-vented (recirculating) version, fitting a charcoal filter and the deflector. A copy of the appliance as specified ...connection must conform with local codes and industry accepted wiring practices. ■■ Wire sizes and connections must conform to the requirements of the range hood. ■■ Wire sizes must conform with National Electrical Code, ANSI/NFPA 70 (latest edition) or CSA Standards C22.1-94, Canadian Electrical...
...the equivalent feet (meters) for each vent piece used , it is not possible to vent cooking fumes and vapors to the outside, the hood can be used in the non-vented (recirculating) version, fitting a charcoal filter and the deflector. A copy of the appliance as specified ...connection must conform with local codes and industry accepted wiring practices. ■■ Wire sizes and connections must conform to the requirements of the range hood. ■■ Wire sizes must conform with National Electrical Code, ANSI/NFPA 70 (latest edition) or CSA Standards C22.1-94, Canadian Electrical...

Installation Guide
Page 7
...being used. 6. Remove wood base from the ceiling. 2. Mark a reference line on wall about 1/8" (3 mm) away from range hood and dispose of the hood. Mark the hole locations. 3. See "Venting Requirements" section. 2. Disconnect power. 2. Select a mounting height between the wall ... be installed. 2. For wood, drill 3/16" (4.8 mm) pilot holes at this location. 3. For wood, install (2) 5 x 45 mm mounting screws. Range Hood Mounting Screws Installation 1. Determine and mark the centerline on wall C. Centerline B. A C B D A. 8 x 40 mm wall anchors B. If there is ...
...being used. 6. Remove wood base from the ceiling. 2. Mark a reference line on wall about 1/8" (3 mm) away from range hood and dispose of the hood. Mark the hole locations. 3. See "Venting Requirements" section. 2. Disconnect power. 2. Select a mounting height between the wall ... be installed. 2. For wood, drill 3/16" (4.8 mm) pilot holes at this location. 3. For wood, install (2) 5 x 45 mm mounting screws. Range Hood Mounting Screws Installation 1. Determine and mark the centerline on wall C. Centerline B. A C B D A. 8 x 40 mm wall anchors B. If there is ...

Installation Guide
Page 8
...back draft dampers work properly. X = length to the measured size "X." 4. Using 2 or more people, hang range hood on 2 mounting screws through the mounting slots on top of hood. Lower mounting screws 2. Vent clamp C. Cut the duct to cut vent duct D. Slide the duct onto the ...bottom of the hood outlet. Mounting screws B. Fit vent system over the exhaust outlet from the hood. 7. Air deflector B. Vent duct E. Level the range hood and tighten upper mounting screws. 4. Measure from range hood and metal filters. 1. Reassemble the air deflector to...
...back draft dampers work properly. X = length to the measured size "X." 4. Using 2 or more people, hang range hood on 2 mounting screws through the mounting slots on top of hood. Lower mounting screws 2. Vent clamp C. Cut the duct to cut vent duct D. Slide the duct onto the ...bottom of the hood outlet. Mounting screws B. Fit vent system over the exhaust outlet from the hood. 7. Air deflector B. Vent duct E. Level the range hood and tighten upper mounting screws. 4. Measure from range hood and metal filters. 1. Reassemble the air deflector to...
Installation Guide
Page 10
... over the grease filters, using both upper and lower vent covers, push lower cover down onto hood and lift upper cover to hide slots. 10 Check the operation of the range hood blower and light. When using the clips provided in the kit. Upper vent cover B. Lower vent... cover C. 2.9 x 6.5 mm screws D. See the "Range Hood Care" section. 3. See the "Range Hood Use" section. Install Vent Covers NOTE: Remove protective film from your new range hood, read the "Range Hood Use" section. Install metal filters. NOTE: To get the most efficient use from the...
... over the grease filters, using both upper and lower vent covers, push lower cover down onto hood and lift upper cover to hide slots. 10 Check the operation of the range hood blower and light. When using the clips provided in the kit. Upper vent cover B. Lower vent... cover C. 2.9 x 6.5 mm screws D. See the "Range Hood Care" section. 3. See the "Range Hood Use" section. Install Vent Covers NOTE: Remove protective film from your new range hood, read the "Range Hood Use" section. Install metal filters. NOTE: To get the most efficient use from the...
Installation Guide
Page 11
...Off light button B. Grease filter handle C. Blower speed maximum button B A Operating the light The On/Off light button controls both lights. Range Hood Controls A B C D A. LED lights Operating the blower The Blower Speed buttons turn the blower OFF. 11 Press the Blower Off button a second time ... smoke, cooking vapors, and odors from the kitchen. Grease filter B. RANGE HOOD USE The range hood is complete to turn the blower ON and control the blower speed and sound level for OFF. The hood controls are located on the front side of the canopy. Blower speed ...
...Off light button B. Grease filter handle C. Blower speed maximum button B A Operating the light The On/Off light button controls both lights. Range Hood Controls A B C D A. LED lights Operating the blower The Blower Speed buttons turn the blower OFF. 11 Press the Blower Off button a second time ... smoke, cooking vapors, and odors from the kitchen. Grease filter B. RANGE HOOD USE The range hood is complete to turn the blower ON and control the blower speed and sound level for OFF. The hood controls are located on the front side of the canopy. Blower speed ...

Installation Guide
Page 12
...damp soft cloth or nonabrasive sponge, and then rinse with normal use steel wool or soap-filled scouring pads. Bend spring clips away from range hood. A 4. Wash metal filter as needed in this section. 2. Replacing a LED Lamp The LED lights are toward the front. Cleaning ...charcoal filter to 6 months with clean water and wipe dry. See the "Warranty" section for the other filter. 5. RANGE HOOD CARE Cleaning IMPORTANT: Clean the hood and grease filters frequently according to avoid water marks. Replace with Charcoal Filter Kit. Place charcoal filter into place. 6....
...damp soft cloth or nonabrasive sponge, and then rinse with normal use steel wool or soap-filled scouring pads. Bend spring clips away from range hood. A 4. Wash metal filter as needed in this section. 2. Replacing a LED Lamp The LED lights are toward the front. Cleaning ...charcoal filter to 6 months with clean water and wipe dry. See the "Warranty" section for the other filter. 5. RANGE HOOD CARE Cleaning IMPORTANT: Clean the hood and grease filters frequently according to avoid water marks. Replace with Charcoal Filter Kit. Place charcoal filter into place. 6....


