
Use & Care Guide
Page 2
... when using your refrigerator, follow the safety alert symbol and either the word "DANGER" or "WARNING." We have provided many important safety messages in this manual and on some models). ■ Do not hit the refrigerator glass doors (on your old refrigerator. ■ Keep flammable materials and vapors, such as gasoline...
... when using your refrigerator, follow the safety alert symbol and either the word "DANGER" or "WARNING." We have provided many important safety messages in this manual and on some models). ■ Do not hit the refrigerator glass doors (on your old refrigerator. ■ Keep flammable materials and vapors, such as gasoline...
Use & Care Guide
Page 14
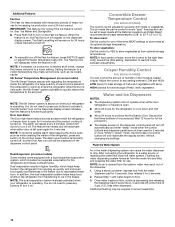
...buttons to activate it on. The alarm sound will be temporarily turned off, but the Door Ajar icon will turn off . ■ To manually turn it . Dual evaporation results in higher humidity, which includes two separate evaporators for the refrigerator and freezer compartments. To store meat: Set ...the inside of the refrigerator, press any button on the control panel. The feature then resets and will remain on for 24 hours unless manually turned off automatically and enter "sleep" mode when the control buttons and dispenser pads have not been used for full ice production. ■...
...buttons to activate it on. The alarm sound will be temporarily turned off, but the Door Ajar icon will turn off . ■ To manually turn it . Dual evaporation results in higher humidity, which includes two separate evaporators for the refrigerator and freezer compartments. To store meat: Set ...the inside of the refrigerator, press any button on the control panel. The feature then resets and will remain on for 24 hours unless manually turned off automatically and enter "sleep" mode when the control buttons and dispenser pads have not been used for full ice production. ■...
Use & Care Guide
Page 16
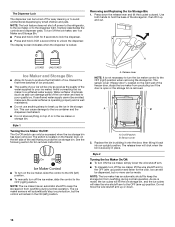
... ON (left) position. Style 2 Turning the Ice Maker On/Off: ■ To turn ON the ice maker, simply lower the wire shutoff arm. ■ To manually turn off the ice maker, see "Ice Maker and Storage Bin." ■ Press and hold LOCK for 3 seconds to lock the dispenser. ■ Press and... maker from producing ice if the door is open or the storage bin is located on the freezer door, on the left ) position. ■ To manually turn on top of the storage bin, then lift it back into an upright position. As ice is made . The Dispenser Lock The dispenser can...
... ON (left) position. Style 2 Turning the Ice Maker On/Off: ■ To turn ON the ice maker, simply lower the wire shutoff arm. ■ To manually turn off the ice maker, see "Ice Maker and Storage Bin." ■ Press and hold LOCK for 3 seconds to lock the dispenser. ■ Press and... maker from producing ice if the door is open or the storage bin is located on the freezer door, on the left ) position. ■ To manually turn on top of the storage bin, then lift it back into an upright position. As ice is made . The Dispenser Lock The dispenser can...
Use & Care Guide
Page 18
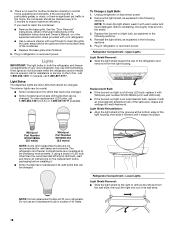
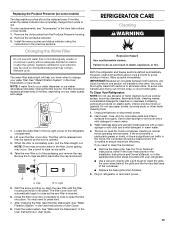
See the "Door Removal" instructions, either in the User Instructions or the Installation Instructions and Owner's Manual, or in the separate instruction sheet provided with your refrigerator. ■ Use a vacuum cleaner with warm water and liquid detergent. In the... the open areas behind the grille and the front surface area of the condenser. ■ Replace the base grille when finished. 5. Whirlpool Part Number W10574850A (2.0 watts) Whirlpool Part Number W10565137A (3.6 watts) NOTE: Some LED replacement bulbs are considered to clean the condenser: ■ Remove the base grille. ...
See the "Door Removal" instructions, either in the User Instructions or the Installation Instructions and Owner's Manual, or in the separate instruction sheet provided with your refrigerator. ■ Use a vacuum cleaner with warm water and liquid detergent. In the... the open areas behind the grille and the front surface area of the condenser. ■ Replace the base grille when finished. 5. Whirlpool Part Number W10574850A (2.0 watts) Whirlpool Part Number W10565137A (3.6 watts) NOTE: Some LED replacement bulbs are considered to clean the condenser: ■ Remove the base grille. ...
Installation Guide
Page 2
...; Do not use an extension cord. ■ Disconnect power before servicing. ■ Replace all safety messages. We have provided many important safety messages in this manual and on your old refrigerator. ■ Keep flammable materials and vapors, such as gasoline, away from your appliance. This symbol alerts you and others are...
...; Do not use an extension cord. ■ Disconnect power before servicing. ■ Replace all safety messages. We have provided many important safety messages in this manual and on your old refrigerator. ■ Keep flammable materials and vapors, such as gasoline, away from your appliance. This symbol alerts you and others are...
Installation Guide
Page 13
... and painted metal exteriors with a soft brush to red. See the "Door Removal" instructions, either in the User Instructions or the Installation Instructions and Owner's Manual, or in the separate instruction sheet provided with your refrigerator. ■ Use a vacuum cleaner with a clean sponge or soft cloth and a mild detergent in order...
... and painted metal exteriors with a soft brush to red. See the "Door Removal" instructions, either in the User Instructions or the Installation Instructions and Owner's Manual, or in the separate instruction sheet provided with your refrigerator. ■ Use a vacuum cleaner with a clean sponge or soft cloth and a mild detergent in order...

