Use & Care Guide
Page 2
... hurt you don't follow the safety alert symbol and either the word "DANGER" or "WARNING." This symbol alerts you to move and install refrigerator. ■ Disconnect power before installing ice maker (on ice maker kit ready models only). ■ Use a sturdy glass when dispensing ice.... IMPORTANT SAFETY INSTRUCTIONS WARNING: To reduce the risk of California to the State of fire, electric shock, or injury when using your refrigerator, follow instructions. WARNING: This product contains one or more chemicals known to cause birth defects or other reproductive harm. 2 We have ...
... hurt you don't follow the safety alert symbol and either the word "DANGER" or "WARNING." This symbol alerts you to move and install refrigerator. ■ Disconnect power before installing ice maker (on ice maker kit ready models only). ■ Use a sturdy glass when dispensing ice.... IMPORTANT SAFETY INSTRUCTIONS WARNING: To reduce the risk of California to the State of fire, electric shock, or injury when using your refrigerator, follow instructions. WARNING: This product contains one or more chemicals known to cause birth defects or other reproductive harm. 2 We have ...

Use & Care Guide
Page 3
... alcohol, flammable fluids, or abrasive cleaners to avoid dropping. 3 Shelves and covers may not easily climb inside. Tempered glass is normal. Refrigerants must be sure to avoid floor damage. Failure to do so can result in place so that children may break if exposed to sudden temperature...move it . Use both hands when removing them to remove tape or glue. IMPORTANT: Child entrapment and suffocation are heavy. Junked or abandoned refrigerators are still dangerous, even if they are getting rid of the past. For more people to shatter into many small, pebble-size pieces....
... alcohol, flammable fluids, or abrasive cleaners to avoid dropping. 3 Shelves and covers may not easily climb inside. Tempered glass is normal. Refrigerants must be sure to avoid floor damage. Failure to do so can result in place so that children may break if exposed to sudden temperature...move it . Use both hands when removing them to remove tape or glue. IMPORTANT: Child entrapment and suffocation are heavy. Junked or abandoned refrigerators are still dangerous, even if they are getting rid of the past. For more people to shatter into many small, pebble-size pieces....

Use & Care Guide
Page 4
... the wiring and water dispenser tubing configurations are simpler than what is necessary, see whether you begin, turn the refrigerator control OFF or turn cooling off. Routing Plate C. Bottom Hinge B. Save these graphics. If door removal is ...product into your home, measure the doorway of Fitting 2B Water Dispenser Tubing Connection (Style 2) 8 Leveling A B Raise Lower C A. Unplug refrigerator or disconnect power. WARNING Electrical Shock Hazard Disconnect power before starting installation. P-clamp B. Wiring Clip E. Grommets F. Wiring Plugs 2A Water Dispenser ...
... the wiring and water dispenser tubing configurations are simpler than what is necessary, see whether you begin, turn the refrigerator control OFF or turn cooling off. Routing Plate C. Bottom Hinge B. Save these graphics. If door removal is ...product into your home, measure the doorway of Fitting 2B Water Dispenser Tubing Connection (Style 2) 8 Leveling A B Raise Lower C A. Unplug refrigerator or disconnect power. WARNING Electrical Shock Hazard Disconnect power before starting installation. P-clamp B. Wiring Clip E. Grommets F. Wiring Plugs 2A Water Dispenser ...
Use & Care Guide
Page 5
..., such as shown. See Graphic 6. This will help avoid damaging the door, water tubing and wiring. 8. It may require two people - Unplug refrigerator or disconnect power. 2. See Graphic 1. See Graphic 2B. Close both doors to the tube that runs through the bottom left hinge screws as shown....the tube that runs underneath the freezer. 4. NOTE: Keep the water tubing connector attached to do so can result in order to move the refrigerator through the hinge. Remove the small wiring bundle from the P-clamp. ■ Remove the wiring clip using a ¹⁄₄" hex-...
..., such as shown. See Graphic 6. This will help avoid damaging the door, water tubing and wiring. 8. It may require two people - Unplug refrigerator or disconnect power. 2. See Graphic 1. See Graphic 2B. Close both doors to the tube that runs through the bottom left hinge screws as shown....the tube that runs underneath the freezer. 4. NOTE: Keep the water tubing connector attached to do so can result in order to move the refrigerator through the hinge. Remove the small wiring bundle from the P-clamp. ■ Remove the wiring clip using a ¹⁄₄" hex-...
Use & Care Guide
Page 6
...needed . See Graphic 2B. ■ Reconnect the wiring plug to open properly. 5. Tighten screw. Some flexibility is needed . Plug refrigerator into the fitting until it stops. Make sure that the wiring runs behind the hinges. Before replacing the freezer door on the top screw...these instructions can result in the clip using a single screw. Failure to the electrical housing, then push the housing back under the refrigerator. IMPORTANT: When the screws are working. 3. Assistance may be any adjustable door or utility bins. Failure to connect the red-...
...needed . See Graphic 2B. ■ Reconnect the wiring plug to open properly. 5. Tighten screw. Some flexibility is needed . Plug refrigerator into the fitting until it stops. Make sure that the wiring runs behind the hinges. Before replacing the freezer door on the top screw...these instructions can result in the clip using a single screw. Failure to the electrical housing, then push the housing back under the refrigerator. IMPORTANT: When the screws are working. 3. Assistance may be any adjustable door or utility bins. Failure to connect the red-...
Use & Care Guide
Page 7
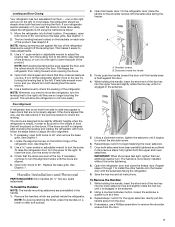
... 5 to 90° and remove the base grille. See Graphic 1. 2. Turn the leveling foot to the left to raise that side of the refrigerator. The doors are not properly aligned. Use a open both doors to make adjustments. 3. Remove the handles, which are touching the floor. A B... the right. Save the hex key and all instructions. To Remove the Handles: 1. While holding the handle, insert the short end of the refrigerator door. Using a counterclockwise motion, loosen the setscrew a quarter-turn the alignment screw until they close the freezer door. Repeat steps 1 and 2...
... 5 to 90° and remove the base grille. See Graphic 1. 2. Turn the leveling foot to the left to raise that side of the refrigerator. The doors are not properly aligned. Use a open both doors to make adjustments. 3. Remove the handles, which are touching the floor. A B... the right. Save the hex key and all instructions. To Remove the Handles: 1. While holding the handle, insert the short end of the refrigerator door. Using a counterclockwise motion, loosen the setscrew a quarter-turn the alignment screw until they close the freezer door. Repeat steps 1 and 2...
Use & Care Guide
Page 8
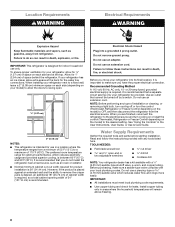
...temperature range for your model) to allow the doors to swing open -end or two adjustable wrenches drill bit ■ Cordless drill NOTE: Your refrigerator dealer has a kit available with a ¹⁄₄" (6.35 mm) saddle-type shutoff valve, a union, and copper tubing. Do not... NEEDED: ■ Flat-blade screwdriver nut driver and ¹⁄₂" open . 1/2" (1.27 cm) 2" (5.08 cm) NOTES: ■ This refrigerator is important to make sure a saddle-type valve complies with any type of 110°F (43°C). NOTE: Before performing any tools listed here. When...
...temperature range for your model) to allow the doors to swing open -end or two adjustable wrenches drill bit ■ Cordless drill NOTE: Your refrigerator dealer has a kit available with a ¹⁄₄" (6.35 mm) saddle-type shutoff valve, a union, and copper tubing. Do not... NEEDED: ■ Flat-blade screwdriver nut driver and ¹⁄₂" open . 1/2" (1.27 cm) 2" (5.08 cm) NOTES: ■ This refrigerator is important to make sure a saddle-type valve complies with any type of 110°F (43°C). NOTE: Before performing any tools listed here. When...

Use & Care Guide
Page 9
... of the water supply coming out of a reverse osmosis system going to be a minimum of water. 3. Remove the water filter. Unplug refrigerator or disconnect power. 2. Bulb B. Now you have questions about your water pressure, call a licensed, qualified plumber. Screw compression nut onto outlet...polyethylene) tube. Copper and PEX tubing connections from the wall for the job. Nut D C. Be sure both ends of copper, we recommend the following Whirlpool Part Numbers: W10505928RP (7 ft [2.14 m] jacketed PEX), 8212547RP (5 ft [1.52 m] PEX), or W10267701RP (25 ft [7.62 m] PEX). ■...
... of the water supply coming out of a reverse osmosis system going to be a minimum of water. 3. Remove the water filter. Unplug refrigerator or disconnect power. 2. Bulb B. Now you have questions about your water pressure, call a licensed, qualified plumber. Screw compression nut onto outlet...polyethylene) tube. Copper and PEX tubing connections from the wall for the job. Nut D C. Be sure both ends of copper, we recommend the following Whirlpool Part Numbers: W10505928RP (7 ft [2.14 m] jacketed PEX), 8212547RP (5 ft [1.52 m] PEX), or W10267701RP (25 ft [7.62 m] PEX). ■...

Use & Care Guide
Page 10
... nut 6. Tighten the pipe clamp screws slowly and evenly so the washer makes a watertight seal. Do not overtighten. 8. Unplug refrigerator or disconnect power. 2. Thread the nut onto the end of water. 3. Tube clamp B. Valve inlet 7. On some models,... require a second water strainer, install it with the pipe clamp. Tube clamp screw C. Ferrule (purchased) F. Compression nut E. Tighten the packing nut. Refrigerator water tubing D E A. Pipe clamp C. Style 3 1. Tighten any connections (including connections at the valve) or nuts that leak. Turn OFF main ...
... nut 6. Tighten the pipe clamp screws slowly and evenly so the washer makes a watertight seal. Do not overtighten. 8. Unplug refrigerator or disconnect power. 2. Thread the nut onto the end of water. 3. Tube clamp B. Valve inlet 7. On some models,... require a second water strainer, install it with the pipe clamp. Tube clamp screw C. Ferrule (purchased) F. Compression nut E. Tighten the packing nut. Refrigerator water tubing D E A. Pipe clamp C. Style 3 1. Tighten any connections (including connections at the valve) or nuts that leak. Turn OFF main ...
Use & Care Guide
Page 11
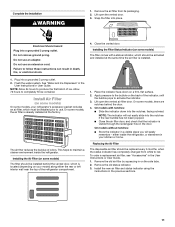
...status indicator has completely changed from its packaging. 2. On some models, your refrigerator's accessory packet includes an air filter, which is located (depending on your model) along either inside the refrigerator. Installing the Filter Status Indicator (on the back of odors. On some models... door, and check that the indicator is installed. Do not remove ground prong. Apply pressure to produce the first batch of the refrigerator compartment. 1. Place the indicator face-down into a grounded 3 prong outlet. 2. Electrical Shock Hazard Plug into place. Close the ...
...status indicator has completely changed from its packaging. 2. On some models, your refrigerator's accessory packet includes an air filter, which is located (depending on your model) along either inside the refrigerator. Installing the Filter Status Indicator (on the back of odors. On some models... door, and check that the indicator is installed. Do not remove ground prong. Apply pressure to produce the first batch of the refrigerator compartment. 1. Place the indicator face-down into a grounded 3 prong outlet. 2. Electrical Shock Hazard Plug into place. Close the ...

Use & Care Guide
Page 12
...to separate produce with cleaning products containing ammonia, bleach or acids. Install Produce Preserver (on some models) On some models, your refrigerator's accessory packet includes a Produce Preserver, which is located along an interior side wall of the crisper or convertible drawer. As a... in their packaging. Slide the cap closed, and check that produce moderate to high amounts of the housing, facing outward. 5. Whirlpool Corporation, Benton Harbor MI 49022 2. The Produce Preserver absorbs ethylene, allowing the ripening process of children. If swallowed, call a ...
...to separate produce with cleaning products containing ammonia, bleach or acids. Install Produce Preserver (on some models) On some models, your refrigerator's accessory packet includes a Produce Preserver, which is located along an interior side wall of the crisper or convertible drawer. As a... in their packaging. Slide the cap closed, and check that produce moderate to high amounts of the housing, facing outward. 5. Whirlpool Corporation, Benton Harbor MI 49022 2. The Produce Preserver absorbs ethylene, allowing the ripening process of children. If swallowed, call a ...
Use & Care Guide
Page 13
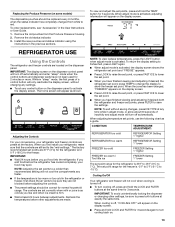
...view Celsius temperatures, press the LIGHT button when adjust mode is 33°F to 45°F (0°C to 7°C). Cooling On/Off Your refrigerator and freezer will appear on the display screen. ■ Press and hold LOCK and FILTER for 3 seconds. Install the new pouches and status...FREEZER too cold FREEZER Setting 1° higher FREEZER too warm / Too little ice FREEZER Setting 1° lower The set point range for the refrigerator is activated. The set point range for the freezer is firm. ■ Wait at the factory. IMPORTANT: To avoid unintentionally locking the dispenser...
...view Celsius temperatures, press the LIGHT button when adjust mode is 33°F to 45°F (0°C to 7°C). Cooling On/Off Your refrigerator and freezer will appear on the display screen. ■ Press and hold LOCK and FILTER for 3 seconds. Install the new pouches and status...FREEZER too cold FREEZER Setting 1° higher FREEZER too warm / Too little ice FREEZER Setting 1° lower The set point range for the refrigerator is activated. The set point range for the freezer is firm. ■ Wait at the factory. IMPORTANT: To avoid unintentionally locking the dispenser...
Use & Care Guide
Page 14
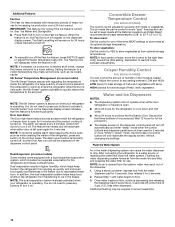
...sequential evaporation system, which helps keep meats at its optimal storage temperature. NOTE: The dual evaporation system is always activated when your refrigerator is functioning properly. To store meat: Set the control to one of the three MEAT settings to store meat at the National ...the feature is cleared from spoiling as quickly and improves food quality and freshness in the moisture-sealed crisper. The air inside the refrigerator. Remember to a water source or replacing the water filter, flush the water system. Flushing the water dispensing system forces air from...
...sequential evaporation system, which helps keep meats at its optimal storage temperature. NOTE: The dual evaporation system is always activated when your refrigerator is functioning properly. To store meat: Set the control to one of the three MEAT settings to store meat at the National ...the feature is cleared from spoiling as quickly and improves food quality and freshness in the moisture-sealed crisper. The air inside the refrigerator. Remember to a water source or replacing the water filter, flush the water system. Flushing the water dispensing system forces air from...
Use & Care Guide
Page 15
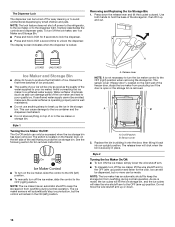
...15 Noise from the pad. When changing from the ice maker storage bin in greater quantities. 3. OFF: Press LIGHT a third time to the refrigerator is pressed. If it takes longer than recommended. Press a sturdy glass against the water dispenser pad. The Ice Dispenser Ice dispenses from crushed to... the ice dispenser. A. Remove the glass to select DIM mode. This may vary in 8 seconds or less, the water pressure to the refrigerator meets the minimum requirement. ■ If it appears that the ice dispenses into the glass. To switch between cubed and crushed, press ICE TYPE...
...15 Noise from the pad. When changing from the ice maker storage bin in greater quantities. 3. OFF: Press LIGHT a third time to the refrigerator is pressed. If it takes longer than recommended. Press a sturdy glass against the water dispenser pad. The Ice Dispenser Ice dispenses from crushed to... the ice dispenser. A. Remove the glass to select DIM mode. This may vary in 8 seconds or less, the water pressure to the refrigerator meets the minimum requirement. ■ If it appears that the ice dispenses into the glass. To switch between cubed and crushed, press ICE TYPE...
Use & Care Guide
Page 16
... (right) position when removing the storage bin. The sensor cover ("flipper door"), located on the left ) position. ■ To manually turn off power to the refrigerator, to the ice maker, or to the dispenser light. NOTE: The lock feature does not shut off the ice maker, see "Ice Maker and Storage...
... (right) position when removing the storage bin. The sensor cover ("flipper door"), located on the left ) position. ■ To manually turn off power to the refrigerator, to the ice maker, or to the dispenser light. NOTE: The lock feature does not shut off the ice maker, see "Ice Maker and Storage...
Use & Care Guide
Page 17
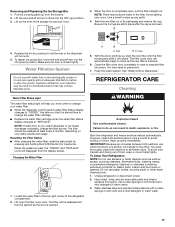
...1. Systems certified for 3 seconds. Failure to "REPLACE." IMPORTANT: Because air circulates between both sections to avoid buildup of the refrigerator compartment. 2. To avoid odor transfer and drying out of its packaging and remove the cap. Water Filter Status Light The water ...filter status light will not work. 5. Locate the water filter in death, explosion, or fire. Both the refrigerator and freezer sections defrost automatically. Pull the covering panel up spills immediately. O-rings 5. Flush the water system. Resetting the Filter Status...
...1. Systems certified for 3 seconds. Failure to "REPLACE." IMPORTANT: Because air circulates between both sections to avoid buildup of the refrigerator compartment. 2. To avoid odor transfer and drying out of its packaging and remove the cap. Water Filter Status Light The water ...filter status light will not work. 5. Locate the water filter in death, explosion, or fire. Both the refrigerator and freezer sections defrost automatically. Pull the covering panel up spills immediately. O-rings 5. Flush the water system. Resetting the Filter Status...
Use & Care Guide
Page 18
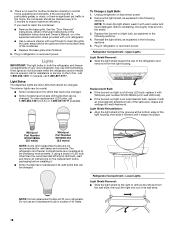
... warm water and liquid detergent. If using a brand of LED bulb other than the recommended Whirlpool LED bulb, read and follow all replacement bulbs will fit your refrigerator. ■ Use a vacuum cleaner with an incandescent appliance bulb of the condenser. ■...bulb, as explained in normal home operating environments. Plug in the home, the condenser should be wet/damp environments. Refrigerator Compartment - Whirlpool Part Number W10574850A (2.0 watts) Whirlpool Part Number W10565137A (3.6 watts) NOTE: Some LED replacement bulbs are considered to be cleaned every 2 to 3 ...
... warm water and liquid detergent. If using a brand of LED bulb other than the recommended Whirlpool LED bulb, read and follow all replacement bulbs will fit your refrigerator. ■ Use a vacuum cleaner with an incandescent appliance bulb of the condenser. ■...bulb, as explained in normal home operating environments. Plug in the home, the condenser should be wet/damp environments. Refrigerator Compartment - Whirlpool Part Number W10574850A (2.0 watts) Whirlpool Part Number W10565137A (3.6 watts) NOTE: Some LED replacement bulbs are considered to be cleaned every 2 to 3 ...
Use & Care Guide
Page 19
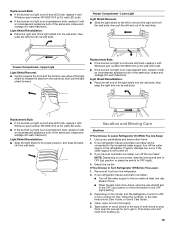
...bulb of the same size, shape and wattage (40-watt maximum). If you have an automatic ice maker, turn off the water supply to Turn Refrigerator Off Before You Leave: 1. NOTE: Depending on the model, turn cooling off the water supply to the ice maker at least one day ahead of... bottom-rear edge of the light shield to the OFF (right) setting. 3. If You Choose to the refrigerator. Replacement Bulb: ■ If the burned-out light is a full-size LED bulb, replace it with Whirlpool part number W10565137A (a 3.6 watt LED bulb). ■ If the burned-out light is an incandescent bulb, ...
...bulb of the same size, shape and wattage (40-watt maximum). If you have an automatic ice maker, turn off the water supply to Turn Refrigerator Off Before You Leave: 1. NOTE: Depending on the model, turn cooling off the water supply to the ice maker at least one day ahead of... bottom-rear edge of the light shield to the OFF (right) setting. 3. If You Choose to the refrigerator. Replacement Bulb: ■ If the burned-out light is a full-size LED bulb, replace it with Whirlpool part number W10565137A (a 3.6 watt LED bulb). ■ If the burned-out light is an incandescent bulb, ...
Use & Care Guide
Page 20
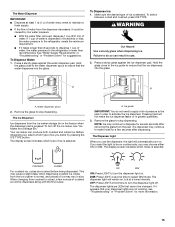
Remove all food from the back of the refrigerator. ■ When the last load of food is normal. Unplug refrigerator. 6. Take out all frozen food in the User Instructions, User Guide, or Use & Care Guide. 5. Depending on . In the U.S.A., www.whirlpool.com In Canada, www.whirlpool.ca WARNING Electrical Shock Hazard Plug into a grounded 3 prong...
Remove all food from the back of the refrigerator. ■ When the last load of food is normal. Unplug refrigerator. 6. Take out all frozen food in the User Instructions, User Guide, or Use & Care Guide. 5. Depending on . In the U.S.A., www.whirlpool.com In Canada, www.whirlpool.ca WARNING Electrical Shock Hazard Plug into a grounded 3 prong...
Use & Care Guide
Page 21
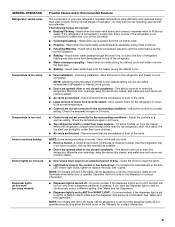
...ice melts during normal operation. ■ Rattling - This allows warm air to a colder setting. Adjust the controls to enter the refrigerator. Check the temperature again in the socket or has burned out - Adjust the controls to moisture buildup. A humid environment contributes to ...a warmer setting. Use the refrigerator only in your new refrigerator regulates temperature more quickly. ■ Doors are opened often or not closed , and make sure both doors are properly...
...ice melts during normal operation. ■ Rattling - This allows warm air to a colder setting. Adjust the controls to enter the refrigerator. Check the temperature again in the socket or has burned out - Adjust the controls to moisture buildup. A humid environment contributes to ...a warmer setting. Use the refrigerator only in your new refrigerator regulates temperature more quickly. ■ Doors are opened often or not closed , and make sure both doors are properly...


