
Use & Care Guide
Page 2
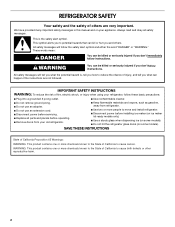
Always read and obey all parts and panels before operating. ■ Remove doors from your old refrigerator. ■ Keep flammable materials and vapors, such as gasoline, away from refrigerator. ■ Use ...
Always read and obey all parts and panels before operating. ■ Remove doors from your old refrigerator. ■ Keep flammable materials and vapors, such as gasoline, away from refrigerator. ■ Use ...

Use & Care Guide
Page 4
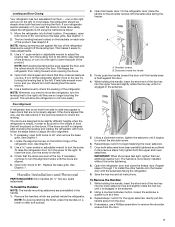
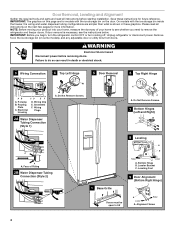
... door or utility bins from doors. Face of your home to see the instructions below. Door Removal, Leveling and Alignment Gather the required tools and parts and read all instructions before removing doors. Unplug refrigerator or disconnect power. Electrical Housing D.
... door or utility bins from doors. Face of your home to see the instructions below. Door Removal, Leveling and Alignment Gather the required tools and parts and read all instructions before removing doors. Unplug refrigerator or disconnect power. Electrical Housing D.
Use & Care Guide
Page 7
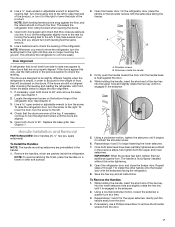
... you should be steady when both setscrews have doors that side of the refrigerator door. See Graphic 9. 3. Replace the base grille. Handle Installation and Removal PARTS INCLUDED: Door handles (2 hex key, spare setscrew(s) To Install the Handles: NOTE: The handle mounting setscrews are touching the floor. It may appear to check...
... you should be steady when both setscrews have doors that side of the refrigerator door. See Graphic 9. 3. Replace the base grille. Handle Installation and Removal PARTS INCLUDED: Door handles (2 hex key, spare setscrew(s) To Install the Handles: NOTE: The handle mounting setscrews are touching the floor. It may appear to check...
Use & Care Guide
Page 8
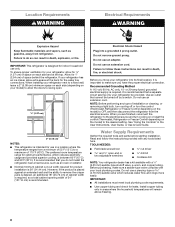
... plumbing code requirements. ■ Use copper tubing and check for 1" (2.54 cm) of space behind the refrigerator. Water Supply Requirements Gather the required tools and parts before starting installation. To ensure proper ventilation for your model) to OFF, and then disconnect the refrigerator from the electrical source. If your refrigerator has...
... plumbing code requirements. ■ Use copper tubing and check for 1" (2.54 cm) of space behind the refrigerator. Water Supply Requirements Gather the required tools and parts before starting installation. To ensure proper ventilation for your model) to OFF, and then disconnect the refrigerator from the electrical source. If your refrigerator has...

Use & Care Guide
Page 9
...valve. Compression sleeve B. See "Water Filtration System" in accordance with a reverse osmosis system. TOOLS NEEDED: Gather the required tools and parts before the water line is connected to refill after heavy usage. ■ If your ice or water. Screw compression nut onto outlet... end with water pressure of copper, we recommend the following Whirlpool Part Numbers: W10505928RP (7 ft [2.14 m] jacketed PEX), 8212547RP (5 ft [1.52 m] PEX), or W10267701RP (25 ft [7.62 m] PEX). ■ ...
...valve. Compression sleeve B. See "Water Filtration System" in accordance with a reverse osmosis system. TOOLS NEEDED: Gather the required tools and parts before the water line is connected to refill after heavy usage. ■ If your ice or water. Screw compression nut onto outlet... end with water pressure of copper, we recommend the following Whirlpool Part Numbers: W10505928RP (7 ft [2.14 m] jacketed PEX), 8212547RP (5 ft [1.52 m] PEX), or W10267701RP (25 ft [7.62 m] PEX). ■ ...

Use & Care Guide
Page 10
... outlet end with a wrench two more turns. Connect to clear line of refrigerator to allow for leaks. Remove and discard the short, black plastic part from collecting in the valve. 4. Thread the nut onto the end of copper tubing are cut square. 5. Nut (purchased) D C. Valve inlet...(2.1 m) to the water pipe. NOTE: To avoid rattling, be sure the copper tubing does not touch the cabinet's side wall or other parts inside the cabinet. Compression nut E. Remove and discard the black nylon plug from your water conditions require a second water strainer, install it in...
... outlet end with a wrench two more turns. Connect to clear line of refrigerator to allow for leaks. Remove and discard the short, black plastic part from collecting in the valve. 4. Thread the nut onto the end of copper tubing are cut square. 5. Nut (purchased) D C. Valve inlet...(2.1 m) to the water pipe. NOTE: To avoid rattling, be sure the copper tubing does not touch the cabinet's side wall or other parts inside the cabinet. Compression nut E. Remove and discard the black nylon plug from your water conditions require a second water strainer, install it in...
Use & Care Guide
Page 16
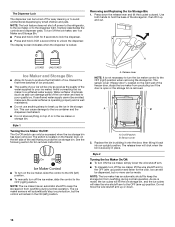
... will remain in the ON (left side of your ice maker. The ice maker sensors will automatically stop ice production, but no more can damage parts of ice. To turn off for easy cleaning or to break up the ice in the storage bin. Use both hands to the OFF (right...
... will remain in the ON (left side of your ice maker. The ice maker sensors will automatically stop ice production, but no more can damage parts of ice. To turn off for easy cleaning or to break up the ice in the storage bin. Use both hands to the OFF (right...
Use & Care Guide
Page 17
...removed. Changing the Water Filter 1. Lift open , pull the filter straight out. The filter cover door will be released and then be used on plastic parts, interior and door liners or gaskets. You may be ejected as the door is inserted. 6. See "Water and Ice Dispensers." Failure to close as ...Do not use abrasive or harsh cleaners such as the new filter is opened. Unplug refrigerator or disconnect power. 2. Hand wash, rinse, and dry removable parts and interior surfaces thoroughly. Wash stainless steel and painted metal exteriors with water that may occur.
...removed. Changing the Water Filter 1. Lift open , pull the filter straight out. The filter cover door will be released and then be used on plastic parts, interior and door liners or gaskets. You may be ejected as the door is inserted. 6. See "Water and Ice Dispensers." Failure to close as ...Do not use abrasive or harsh cleaners such as the new filter is opened. Unplug refrigerator or disconnect power. 2. Hand wash, rinse, and dry removable parts and interior surfaces thoroughly. Wash stainless steel and painted metal exteriors with water that may occur.
Use & Care Guide
Page 18
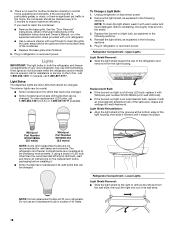
...If the burned-out light is a full-size LED bulb, replace it snaps into place. Plug in the following sections. 5. Whirlpool Part Number W10574850A (2.0 watts) Whirlpool Part Number W10565137A (3.6 watts) NOTE: Some LED replacement bulbs are not recommended for assistance or service. Do not use LED technology....There is an incandescent bulb, replace it with an incandescent appliance bulb of the light housing, then slide it forward until it with Whirlpool part number W10574850A (a 2.0 watt LED bulb). ■ If the burned-out light is no need to be changed . Lights IMPORTANT...
...If the burned-out light is a full-size LED bulb, replace it snaps into place. Plug in the following sections. 5. Whirlpool Part Number W10574850A (2.0 watts) Whirlpool Part Number W10565137A (3.6 watts) NOTE: Some LED replacement bulbs are not recommended for assistance or service. Do not use LED technology....There is an incandescent bulb, replace it with an incandescent appliance bulb of the light housing, then slide it forward until it with Whirlpool part number W10574850A (a 2.0 watt LED bulb). ■ If the burned-out light is no need to be changed . Lights IMPORTANT...
Use & Care Guide
Page 19
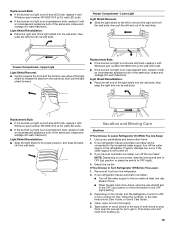
...snap the right end into the wall slots. Replacement Bulb: ■ If the burned-out light is a full-size LED bulb, replace it with Whirlpool part number W10565137A (a 3.6 watt LED bulb). ■ If the burned-out light is connected to the household water supply, turn off the ice maker. ...Replacement Bulb: ■ If the burned-out light is a full-size LED bulb, replace it with Whirlpool part number W10565137A (a 3.6 watt LED bulb). ■ If the burned-out light is not turned off. 3. Lower Light Light Shield Removal: ■ Slide ...
...snap the right end into the wall slots. Replacement Bulb: ■ If the burned-out light is a full-size LED bulb, replace it with Whirlpool part number W10565137A (a 3.6 watt LED bulb). ■ If the burned-out light is connected to the household water supply, turn off the ice maker. ...Replacement Bulb: ■ If the burned-out light is a full-size LED bulb, replace it with Whirlpool part number W10565137A (a 3.6 watt LED bulb). ■ If the burned-out light is not turned off. 3. Lower Light Light Shield Removal: ■ Slide ...
Use & Care Guide
Page 20
... Instructions for preparation instructions. Also, if your new home, put everything back and refer to the refrigerator. In the U.S.A., www.whirlpool.com In Canada, www.whirlpool.ca WARNING Electrical Shock Hazard Plug into a grounded 3 prong outlet. Plug the power cord into a grounded 3 prong outlet. Following... and fans operate at least one day ahead of time. ■ Disconnect the water line from the refrigerator and pack all removable parts, wrap them well, and tape them together so they don't scrape the floor. Do not remove ground prong. Remove all food ...
... Instructions for preparation instructions. Also, if your new home, put everything back and refer to the refrigerator. In the U.S.A., www.whirlpool.com In Canada, www.whirlpool.ca WARNING Electrical Shock Hazard Plug into a grounded 3 prong outlet. Plug the power cord into a grounded 3 prong outlet. Following... and fans operate at least one day ahead of time. ■ Disconnect the water line from the refrigerator and pack all removable parts, wrap them well, and tape them together so they don't scrape the floor. Do not remove ground prong. Remove all food ...
Use & Care Guide
Page 24
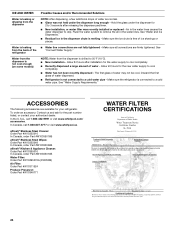
... to 3 seconds after installation for the part number listed, or contact your refrigerator. The first glass of ice shavings or pieces. ACCESSORIES The following accessories are firmly tightened. In Canada, call 1-800-442-9991 or visit www.whirlpool.com/ accessories. Make sure all connections are... first glass of water dispensed. ■ Refrigerator is not connected to drip. In the U.S.A., call 1-800-807-6777 or visit www.whirlpool.ca. Hold the glass under the dispenser long enough - Water is leaking from the back of the refrigerator ■ Water line connections ...
... to 3 seconds after installation for the part number listed, or contact your refrigerator. The first glass of ice shavings or pieces. ACCESSORIES The following accessories are firmly tightened. In Canada, call 1-800-442-9991 or visit www.whirlpool.com/ accessories. Make sure all connections are... first glass of water dispensed. ■ Refrigerator is not connected to drip. In the U.S.A., call 1-800-807-6777 or visit www.whirlpool.ca. Hold the glass under the dispenser long enough - Water is leaking from the back of the refrigerator ■ Water line connections ...
Use & Care Guide
Page 25
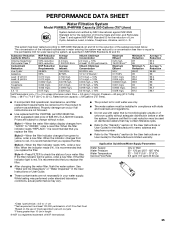
... occur if all instructions are not necessarily in the User Instructions or User Guide. ■ These contaminants are not followed. ■ Use replacement filter P4RFWB, part #W10295370A. 2013 suggested retail price of $39.99 U.S.A./$49.99 Canada. Style 2 - Style 3 - Rated service capacity = 200 gallons (757 liters). ■ It is microbiologically unsafe...
... occur if all instructions are not necessarily in the User Instructions or User Guide. ■ These contaminants are not followed. ■ Use replacement filter P4RFWB, part #W10295370A. 2013 suggested retail price of $39.99 U.S.A./$49.99 Canada. Style 2 - Style 3 - Rated service capacity = 200 gallons (757 liters). ■ It is microbiologically unsafe...
Use & Care Guide
Page 26
... is operated and maintained according to instructions attached to or furnished with the product, Whirlpool Corporation or Whirlpool Canada LP (hereafter "Whirlpool") will pay for future reference. 26 Consumable parts are excluded from unauthorized modifications made to province. Cosmetic damage, including scratches, dents...the exclusion or limitation of products not approved by Whirlpool. 5. Have your model number information for Factory Specified Parts and repair labor to correct defects in materials or workmanship and is reported to Whirlpool within 30 days from state to state or ...
... is operated and maintained according to instructions attached to or furnished with the product, Whirlpool Corporation or Whirlpool Canada LP (hereafter "Whirlpool") will pay for future reference. 26 Consumable parts are excluded from unauthorized modifications made to province. Cosmetic damage, including scratches, dents...the exclusion or limitation of products not approved by Whirlpool. 5. Have your model number information for Factory Specified Parts and repair labor to correct defects in materials or workmanship and is reported to Whirlpool within 30 days from state to state or ...

Warranty Information
Page 1
... appliance if it was purchased. This major appliance is used for Factory Specified Parts and repair labor to correct defects in a remote area where service by an authorized Whirlpool servicer is required to obtain service under these limitations and exclusions may not apply... ONE YEAR OR THE SHORTEST PERIOD ALLOWED BY LAW. WHIRLPOOL SHALL NOT BE LIABLE FOR INCIDENTAL OR CONSEQUENTIAL DAMAGES. In Canada, call 1-800-253-1301. Consumable parts are excluded from warranty coverage. 4. Repairs to parts or systems resulting from unauthorized modifications made to schedule service...
... appliance if it was purchased. This major appliance is used for Factory Specified Parts and repair labor to correct defects in a remote area where service by an authorized Whirlpool servicer is required to obtain service under these limitations and exclusions may not apply... ONE YEAR OR THE SHORTEST PERIOD ALLOWED BY LAW. WHIRLPOOL SHALL NOT BE LIABLE FOR INCIDENTAL OR CONSEQUENTIAL DAMAGES. In Canada, call 1-800-253-1301. Consumable parts are excluded from warranty coverage. 4. Repairs to parts or systems resulting from unauthorized modifications made to schedule service...
Installation Guide
Page 2
..., such as gasoline, away from refrigerator. ■ Use two or more people to cause birth defects or other reproductive harm. 2 Always read and obey all parts and panels before installing ice maker (on ice maker kit ready models only). ■ Use a sturdy glass when dispensing ice (on some models). All safety...
..., such as gasoline, away from refrigerator. ■ Use two or more people to cause birth defects or other reproductive harm. 2 Always read and obey all parts and panels before installing ice maker (on ice maker kit ready models only). ■ Use a sturdy glass when dispensing ice (on some models). All safety...
Installation Guide
Page 4
... these graphics. Please read all instructions on the door. Unplug refrigerator or disconnect power. P-clamp B. Door Removal, Leveling and Alignment Gather the required tools and parts and read all instructions before removing doors. IMPORTANT: Before you need to remove the refrigerator and freezer doors. Remove food, the ice storage bin (on...
... these graphics. Please read all instructions on the door. Unplug refrigerator or disconnect power. P-clamp B. Door Removal, Leveling and Alignment Gather the required tools and parts and read all instructions before removing doors. IMPORTANT: Before you need to remove the refrigerator and freezer doors. Remove food, the ice storage bin (on...
Installation Guide
Page 7
... that they are designed to contact the shoulder screw. 6. If the doors are packed inside the handle 3. Replace the base grille. Handle Installation and Removal PARTS INCLUDED: Door handles (2 hex key, spare setscrew(s) To Install the Handles: NOTE: The handle mounting setscrews are aligned. 5. Firmly push the handle toward the door...
... that they are designed to contact the shoulder screw. 6. If the doors are packed inside the handle 3. Replace the base grille. Handle Installation and Removal PARTS INCLUDED: Door handles (2 hex key, spare setscrew(s) To Install the Handles: NOTE: The handle mounting setscrews are aligned. 5. Firmly push the handle toward the door...
Installation Guide
Page 8
...;⁄₄" (6.35 mm) saddle-type shutoff valve, a union, and copper tubing. Do not remove ground prong. Water Supply Requirements Gather the required tools and parts before starting installation. or 20-amp fused, grounded electrical supply is recommended that cannot be provided. Install copper tubing only in the User Instructions, User...
...;⁄₄" (6.35 mm) saddle-type shutoff valve, a union, and copper tubing. Do not remove ground prong. Water Supply Requirements Gather the required tools and parts before starting installation. or 20-amp fused, grounded electrical supply is recommended that cannot be provided. Install copper tubing only in the User Instructions, User...

Installation Guide
Page 9
... refrigerator (which is located on the back of water is dispensed in the reverse osmosis system is used instead of copper, we recommend the following Whirlpool Part Numbers: W10505928RP (7 ft [2.14 m] jacketed PEX), 8212547RP (5 ft [1.52 m] PEX), or W10267701RP (25 ft [7.62 m] PEX). ■ Install ... nut C C. See "Water Filtration System" in areas where temperatures will go. Check for suggestions. TOOLS NEEDED: Gather the required tools and parts before making the final connection to the inlet of the water valve, to clear line of tubing into a container or sink, and turn on...
... refrigerator (which is located on the back of water is dispensed in the reverse osmosis system is used instead of copper, we recommend the following Whirlpool Part Numbers: W10505928RP (7 ft [2.14 m] jacketed PEX), 8212547RP (5 ft [1.52 m] PEX), or W10267701RP (25 ft [7.62 m] PEX). ■ Install ... nut C C. See "Water Filtration System" in areas where temperatures will go. Check for suggestions. TOOLS NEEDED: Gather the required tools and parts before making the final connection to the inlet of the water valve, to clear line of tubing into a container or sink, and turn on...


