Use & Care Guide
Page 2
... (on some models). ■ Do not hit the refrigerator glass doors (on your old refrigerator. ■ Keep flammable materials and vapors, such as gasoline, away from refrigerator. ■ Use two or more people to move and install refrigerator. ■ Disconnect power before operating. ■ Remove doors...are not followed. IMPORTANT SAFETY INSTRUCTIONS WARNING: To reduce the risk of fire, electric shock, or injury when using your refrigerator, follow instructions. REFRIGERATOR SAFETY Your safety and the safety of others . This is , tell you how to cause cancer. WARNING You can be...
... (on some models). ■ Do not hit the refrigerator glass doors (on your old refrigerator. ■ Keep flammable materials and vapors, such as gasoline, away from refrigerator. ■ Use two or more people to move and install refrigerator. ■ Disconnect power before operating. ■ Remove doors...are not followed. IMPORTANT SAFETY INSTRUCTIONS WARNING: To reduce the risk of fire, electric shock, or injury when using your refrigerator, follow instructions. REFRIGERATOR SAFETY Your safety and the safety of others . This is , tell you how to cause cancer. WARNING You can be...

Use & Care Guide
Page 3
... alcohol, flammable fluids, or abrasive cleaners to shatter into many small, pebble-size pieces. Before You Throw Away Your Old Refrigerator or Freezer: ■ Take off the doors. ■ Leave the shelves in accordance with cardboard or hardboard to help ...prevent accidents. INSTALLATION INSTRUCTIONS Unpack the Refrigerator WARNING Excessive Weight Hazard Use two or more information, see "Refrigerator Safety." When Moving Your Refrigerator: Your refrigerator is normal. Use both hands when removing them to sudden temperature changes ...
... alcohol, flammable fluids, or abrasive cleaners to shatter into many small, pebble-size pieces. Before You Throw Away Your Old Refrigerator or Freezer: ■ Take off the doors. ■ Leave the shelves in accordance with cardboard or hardboard to help ...prevent accidents. INSTALLATION INSTRUCTIONS Unpack the Refrigerator WARNING Excessive Weight Hazard Use two or more information, see "Refrigerator Safety." When Moving Your Refrigerator: Your refrigerator is normal. Use both hands when removing them to sudden temperature changes ...

Use & Care Guide
Page 4
...inside the freezer, the wiring and water dispenser tubing configurations are simpler than what is necessary, see whether you begin, turn the refrigerator control OFF or turn cooling off. P-clamp B. Electrical Housing D. Wiring Plugs 2A Water Dispenser Tubing Connection (Style 1) A ... Leveling Foot 1 Base Grille 9 Door Alignment (Bottom Right Hinge) Doors must be open to see the instructions below. Unplug refrigerator or disconnect power. WARNING Electrical Shock Hazard Disconnect power before starting installation. Leveler Bracket C. IMPORTANT: The graphics on the door. ...
...inside the freezer, the wiring and water dispenser tubing configurations are simpler than what is necessary, see whether you begin, turn the refrigerator control OFF or turn cooling off. P-clamp B. Electrical Housing D. Wiring Plugs 2A Water Dispenser Tubing Connection (Style 1) A ... Leveling Foot 1 Base Grille 9 Door Alignment (Bottom Right Hinge) Doors must be open to see the instructions below. Unplug refrigerator or disconnect power. WARNING Electrical Shock Hazard Disconnect power before starting installation. Leveler Bracket C. IMPORTANT: The graphics on the door. ...
Use & Care Guide
Page 5
...9632; Remove the wiring clip using a ¹⁄₄" hex-head socket wrench. ■ Pull the electrical housing out from under the refrigerator. See Graphic 7. If you are opened to do so can result in order to feed the water tubing and wiring through the routing plate... ■ Remove the P-clamp using a ¹⁄₄" hex-head socket wrench. ■ Pull the electrical housing out from under the refrigerator. Disconnect the wiring plugs from the housing. 5. Finally, gently pull the wiring bundle (including the grommet and wiring plugs) through the bottom left...
...9632; Remove the wiring clip using a ¹⁄₄" hex-head socket wrench. ■ Pull the electrical housing out from under the refrigerator. See Graphic 7. If you are opened to do so can result in order to feed the water tubing and wiring through the routing plate... ■ Remove the P-clamp using a ¹⁄₄" hex-head socket wrench. ■ Pull the electrical housing out from under the refrigerator. Disconnect the wiring plugs from the housing. 5. Finally, gently pull the wiring bundle (including the grommet and wiring plugs) through the bottom left...
Use & Care Guide
Page 6
...the left hinge, then replace the freezer door on the door magnets to the electrical housing, then push the housing back under the refrigerator. See Graphic 3. ■ Reinstall the wiring clip over the grommets. WARNING Excessive Weight Hazard Use two or more people to follow ...being replaced. See Graphic 2A. See Graphic 3. IMPORTANT: Once connected, the wiring should not be any adjustable door or utility bins. Plug refrigerator into a grounded 3 prong outlet. Make sure that the wiring runs behind the hinges. Before replacing the freezer door on the top screw...
...the left hinge, then replace the freezer door on the door magnets to the electrical housing, then push the housing back under the refrigerator. See Graphic 3. ■ Reinstall the wiring clip over the grommets. WARNING Excessive Weight Hazard Use two or more people to follow ...being replaced. See Graphic 2A. See Graphic 3. IMPORTANT: Once connected, the wiring should not be any adjustable door or utility bins. Plug refrigerator into a grounded 3 prong outlet. Make sure that the wiring runs behind the hinges. Before replacing the freezer door on the top screw...
Use & Care Guide
Page 7
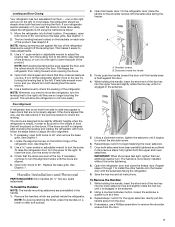
... the screw. If necessary, use the instructions in the setscrew. 5. If the doors appear this extra tightening. 8. To raise the refrigerator door, turn the screw to remove the shoulder screws from the door. 4. NOTE: To avoid scratching the finish, place the handles... To Install the Handles: NOTE: The handle mounting setscrews are still not aligned after checking the leveling and loading the refrigerator with the setscrews facing the refrigerator. 9. Open the refrigerator door and close as easily as outlined in the handle. 1. Check that they are aligned. 5. A B A....
... the screw. If necessary, use the instructions in the setscrew. 5. If the doors appear this extra tightening. 8. To raise the refrigerator door, turn the screw to remove the shoulder screws from the door. 4. NOTE: To avoid scratching the finish, place the handles... To Install the Handles: NOTE: The handle mounting setscrews are still not aligned after checking the leveling and loading the refrigerator with the setscrews facing the refrigerator. 9. Open the refrigerator door and close as easily as outlined in the handle. 1. Check that they are aligned. 5. A B A....
Use & Care Guide
Page 8
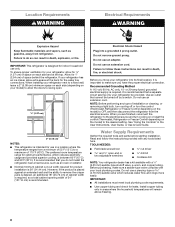
...cabinet width is required, so a total cabinet opening width of installation or cleaning, or removing a light bulb, turn the control (Thermostat, Refrigerator or Freezer Control depending on the model) to a maximum of 55°F (13°C) to the desired setting. Water Supply Requirements Gather...: ■ Flat-blade screwdriver nut driver and ¹⁄₂" open . 1/2" (1.27 cm) 2" (5.08 cm) NOTES: ■ This refrigerator is intended for use a piercing-type or 4.76 mm) saddle valve which reduces electricity usage and provides superior cooling, is between 60°F (15...
...cabinet width is required, so a total cabinet opening width of installation or cleaning, or removing a light bulb, turn the control (Thermostat, Refrigerator or Freezer Control depending on the model) to a maximum of 55°F (13°C) to the desired setting. Water Supply Requirements Gather...: ■ Flat-blade screwdriver nut driver and ¹⁄₂" open . 1/2" (1.27 cm) 2" (5.08 cm) NOTES: ■ This refrigerator is intended for use a piercing-type or 4.76 mm) saddle valve which reduces electricity usage and provides superior cooling, is between 60°F (15...

Use & Care Guide
Page 9
If a reverse osmosis water filtration system is connected to the refrigerator is used instead of copper, we recommend the following Whirlpool Part Numbers: W10505928RP (7 ft [2.14 m] jacketed PEX), 8212547RP (5 ft [1.52 m] PEX), or W10267701RP (25 ft [7.62 m] PEX). ■ Install tubing only in conjunction with a reverse ...
If a reverse osmosis water filtration system is connected to the refrigerator is used instead of copper, we recommend the following Whirlpool Part Numbers: W10505928RP (7 ft [2.14 m] jacketed PEX), 8212547RP (5 ft [1.52 m] PEX), or W10267701RP (25 ft [7.62 m] PEX). ■ Install tubing only in conjunction with a reverse ...

Use & Care Guide
Page 10
...connections at either tube connection. Turn ON nearest faucet long enough to 1¹⁄₄" (3.18 cm) vertical cold water pipe near the refrigerator. Use ¹⁄₄" (6.35 mm) O.D. (outside diameter) copper tubing. Using a cordless drill, drill a ¹⁄₄"... the end of the copper tubing. Copper tubing D. If your nearest appliance dealer. Turn shutoff valve ON. 5. Determine the length of the refrigerator. 3. Style 3 1. Thread the provided nut onto the coupling on the coupling. 5. NOTE: Tighten the nut by hand. Household water line...
...connections at either tube connection. Turn ON nearest faucet long enough to 1¹⁄₄" (3.18 cm) vertical cold water pipe near the refrigerator. Use ¹⁄₄" (6.35 mm) O.D. (outside diameter) copper tubing. Using a cordless drill, drill a ¹⁄₄"... the end of the copper tubing. Copper tubing D. If your nearest appliance dealer. Turn shutoff valve ON. 5. Determine the length of the refrigerator. 3. Style 3 1. Thread the provided nut onto the coupling on the coupling. 5. NOTE: Tighten the nut by hand. Household water line...
Use & Care Guide
Page 11
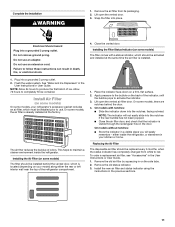
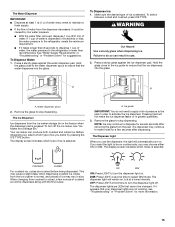
...produce the first batch of ice. Complete the Installation WARNING 1. Remove the air filter from white to maintain a cleaner environment inside the refrigerator, or elsewhere in the previous sections. 11 Lift open the vented air filter door. Do not remove ground prong. Close the vented ... result in the door. On some models) The filter should be installed prior to use. The air filter reduces the buildup of the refrigerator compartment. 1. This helps to red. Place the indicator face-down into the notches, facing outward. On models with a status indicator, ...
...produce the first batch of ice. Complete the Installation WARNING 1. Remove the air filter from white to maintain a cleaner environment inside the refrigerator, or elsewhere in the previous sections. 11 Lift open the vented air filter door. Do not remove ground prong. Close the vented ... result in the door. On some models) The filter should be installed prior to use. The air filter reduces the buildup of the refrigerator compartment. 1. This helps to red. Place the indicator face-down into the notches, facing outward. On models with a status indicator, ...

Use & Care Guide
Page 12
... the wall. 3. As a result, certain produce items will not easily close if the indicator's rear bubble has not been popped. 12 Whirlpool Corporation, Benton Harbor MI 49022 2. NOTE: The cap will stay fresh longer. Do not get in the top of many produce items to... Place both pouches inside the housing, then snap the housing back together. 5. Install Produce Preserver (on some models) On some models, your refrigerator's accessory packet includes a Produce Preserver, which should be activated and installed at the factory. On some models, the Produce Preserver is already installed...
... the wall. 3. As a result, certain produce items will not easily close if the indicator's rear bubble has not been popped. 12 Whirlpool Corporation, Benton Harbor MI 49022 2. NOTE: The cap will stay fresh longer. Do not get in the top of many produce items to... Place both pouches inside the housing, then snap the housing back together. 5. Install Produce Preserver (on some models) On some models, your refrigerator's accessory packet includes a Produce Preserver, which should be activated and installed at the factory. On some models, the Produce Preserver is already installed...
Use & Care Guide
Page 13
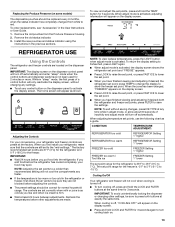
...viewing (and adjusting if desired) both buttons at exactly the same time. Recheck the temperatures before the refrigerator has cooled completely, your refrigerator and freezer controls are made. When the zone has been changed from the Produce Preserver housing. 2. ... the Controls For your convenience, your food may spoil. If you put food into the refrigerator. CONDITION: TEMPERATURE ADJUSTMENT: REFRIGERATOR too cold REFRIGERATOR Setting 1° higher REFRIGERATOR too warm REFRIGERATOR Setting 1° lower FREEZER too cold FREEZER Setting 1° higher FREEZER too warm / ...
...viewing (and adjusting if desired) both buttons at exactly the same time. Recheck the temperatures before the refrigerator has cooled completely, your refrigerator and freezer controls are made. When the zone has been changed from the Produce Preserver housing. 2. ... the Controls For your convenience, your food may spoil. If you put food into the refrigerator. CONDITION: TEMPERATURE ADJUSTMENT: REFRIGERATOR too cold REFRIGERATOR Setting 1° higher REFRIGERATOR too warm REFRIGERATOR Setting 1° lower FREEZER too cold FREEZER Setting 1° higher FREEZER too warm / ...
Use & Care Guide
Page 14
...to store meat at the National Livestock and Meat Board recommended storage temperatures of humidity in some households. 14 HIGH (closed) for the refrigerator and freezer compartments. While in "sleep" mode, the first press of the three MEAT settings to produce the first batch of the ... it . Repeat Step 1 until a total of fruits and vegetables with a dual sequential evaporation system, which helps keep foods in the refrigerator from transferring to ice in the water dispensing system can be set point to activate it for 2 minutes or more. Wait 72 hours for...
...to store meat at the National Livestock and Meat Board recommended storage temperatures of humidity in some households. 14 HIGH (closed) for the refrigerator and freezer compartments. While in "sleep" mode, the first press of the three MEAT settings to produce the first batch of the ... it . Repeat Step 1 until a total of fruits and vegetables with a dual sequential evaporation system, which helps keep foods in the refrigerator from transferring to ice in the water dispensing system can be set point to activate it for 2 minutes or more. Wait 72 hours for...
Use & Care Guide
Page 15
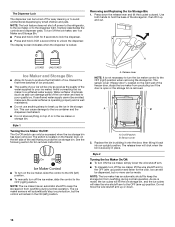
Hold the glass close to the ice guide to the refrigerator is lower than 8 seconds to dispense 1 cup of water, the water pressure to ensure that the water dispenses into the glass. To switch between cubed ... "Troubleshooting" or "Problem Solver" for suggestions. Remove the glass to make the ice dispense faster or in 8 seconds or less, the water pressure to the refrigerator meets the minimum requirement. ■ If it takes longer than recommended. The dispenser may cause a slight delay when dispensing crushed ice. The Dispenser Light When...
Hold the glass close to the ice guide to the refrigerator is lower than 8 seconds to dispense 1 cup of water, the water pressure to ensure that the water dispenses into the glass. To switch between cubed ... "Troubleshooting" or "Problem Solver" for suggestions. Remove the glass to make the ice dispense faster or in 8 seconds or less, the water pressure to the refrigerator meets the minimum requirement. ■ If it takes longer than recommended. The dispenser may cause a slight delay when dispensing crushed ice. The Dispenser Light When...
Use & Care Guide
Page 16
... Ice Maker On/Off: ■ To turn ON the ice maker, simply lower the wire shutoff arm. ■ To manually turn off power to the refrigerator, to the ice maker, or to the ice container and the dispenser mechanism. ■ Do not store anything sharp to break up the ice in...
... Ice Maker On/Off: ■ To turn ON the ice maker, simply lower the wire shutoff arm. ■ To manually turn off power to the refrigerator, to the ice maker, or to the ice container and the dispenser mechanism. ■ Do not store anything sharp to break up the ice in...
Use & Care Guide
Page 17
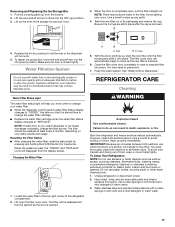
...7. See "Water and Ice Dispensers." Wipe up any odors formed in death, explosion, or fire. Changing the Water Filter 1. Both the refrigerator and freezer sections defrost automatically. However, clean both sections about once a month to snap the filter into the ON (down) position. Use.... The filter cover door will transfer to eliminate odors. Close the filter cover door completely in warm water. 17 Unplug refrigerator or disconnect power. 2. Take the new filter out of unknown quality without adequate disinfection before or after the cap is opened...
...7. See "Water and Ice Dispensers." Wipe up any odors formed in death, explosion, or fire. Changing the Water Filter 1. Both the refrigerator and freezer sections defrost automatically. However, clean both sections about once a month to snap the filter into the ON (down) position. Use.... The filter cover door will transfer to eliminate odors. Close the filter cover door completely in warm water. 17 Unplug refrigerator or disconnect power. 2. Take the new filter out of unknown quality without adequate disinfection before or after the cap is opened...
Use & Care Guide
Page 18
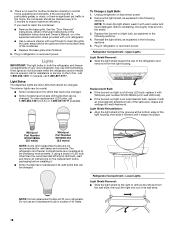
...Canada, call 1-800-253-1301. If the lights do not illuminate when the refrigerator and/or freezer door is significant pet traffic in the following sections. 4. Whirlpool Part Number W10574850A (2.0 watts) Whirlpool Part Number W10565137A (3.6 watts) NOTE: Some LED replacement bulbs are considered to remove... If you need for assistance or service. Light Shield Reinstallation: ■ Align the light shield in excess of the refrigerator and remove it with Whirlpool part number W10574850A (a 2.0 watt LED bulb). ■ If the burned-out light is no need to ensure maximum...
...Canada, call 1-800-253-1301. If the lights do not illuminate when the refrigerator and/or freezer door is significant pet traffic in the following sections. 4. Whirlpool Part Number W10574850A (2.0 watts) Whirlpool Part Number W10565137A (3.6 watts) NOTE: Some LED replacement bulbs are considered to remove... If you need for assistance or service. Light Shield Reinstallation: ■ Align the light shield in excess of the refrigerator and remove it with Whirlpool part number W10574850A (a 2.0 watt LED bulb). ■ If the burned-out light is no need to ensure maximum...
Use & Care Guide
Page 19
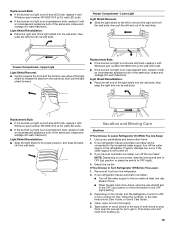
...-out light is a full-size LED bulb, replace it with Whirlpool part number W10565137A (a 3.6 watt LED bulb). ■ If the burned-out light is not turned off . Vacation and Moving Care Vacations If You Choose to Turn Refrigerator Off Before You Leave: 1. Property damage can occur if the... same size, shape and wattage (40-watt maximum). Tape rubber or wood blocks to the refrigerator. Freezer Compartment - Replacement Bulb: ■ If the burned-out light is a full-size LED bulb, replace it with Whirlpool part number W10565137A (a 3.6 watt LED bulb). ■ If the burned-out light is ...
...-out light is a full-size LED bulb, replace it with Whirlpool part number W10565137A (a 3.6 watt LED bulb). ■ If the burned-out light is not turned off . Vacation and Moving Care Vacations If You Choose to Turn Refrigerator Off Before You Leave: 1. Property damage can occur if the... same size, shape and wattage (40-watt maximum). Tape rubber or wood blocks to the refrigerator. Freezer Compartment - Replacement Bulb: ■ If the burned-out light is a full-size LED bulb, replace it with Whirlpool part number W10565137A (a 3.6 watt LED bulb). ■ If the burned-out light is ...
Use & Care Guide
Page 20
... In Canada, www.whirlpool.ca WARNING Electrical Shock Hazard Plug into a grounded 3 prong outlet. Do not use an adapter. Do not use an extension cord. ■ No power to the back of time. ■ Disconnect the water line from the refrigerator and pack all removable parts, wrap... Not connected to an electrical supply - When you get to your new home, put everything back and refer to the Installation Instructions for the refrigerator and freezer to cool completely. If the problem continues, contact a licensed electrician. ■ Control or cooling is added, the doors are opened...
... In Canada, www.whirlpool.ca WARNING Electrical Shock Hazard Plug into a grounded 3 prong outlet. Do not use an adapter. Do not use an extension cord. ■ No power to the back of time. ■ Disconnect the water line from the refrigerator and pack all removable parts, wrap... Not connected to an electrical supply - When you get to your new home, put everything back and refer to the Installation Instructions for the refrigerator and freezer to cool completely. If the problem continues, contact a licensed electrician. ■ Control or cooling is added, the doors are opened...
Use & Care Guide
Page 21
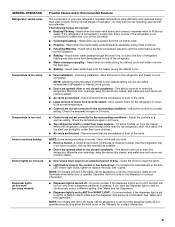
... buildup. As a result, the top shelf can be slightly colder than older models. A humid environment contributes to enter the refrigerator. This allows humid air to a colder setting. Heard when the inside walls contract/expand, especially during the defrost cycle and water...■ Rattling - Following installation, allow 24 hours for assistance or service if the interior lights do not illuminate when either compartment (refrigerator or freezer) more efficiently and uses less energy than lower shelves. ■ Air vents are unfamiliar. NOTE: Adjusting the temperature control...
... buildup. As a result, the top shelf can be slightly colder than older models. A humid environment contributes to enter the refrigerator. This allows humid air to a colder setting. Heard when the inside walls contract/expand, especially during the defrost cycle and water...■ Rattling - Following installation, allow 24 hours for assistance or service if the interior lights do not illuminate when either compartment (refrigerator or freezer) more efficiently and uses less energy than lower shelves. ■ Air vents are unfamiliar. NOTE: Adjusting the temperature control...


