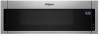

Installation Instructions
Page 1
...hazard is, tell you how to Wall 9 Install the Microwave Oven 9 Complete Installation 10 VENTING DESIGN SPECIFICATIONS 11 ASSISTANCE 12 Replacement Parts 12 MICROWAVE HOOD COMBINATION SAFETY Your safety and the safety of Contents MICROWAVE HOOD COMBINATION SAFETY 1 INSTALLATION REQUIREMENTS 2 Tools and Parts ...DANGER" or "WARNING." W11359126A WARNING You can be killed or seriously injured if you don't immediately follow instructions. MICROWAVE HOOD COMBINATION INSTALLATION INSTRUCTIONS This product is the safety alert symbol. Always read and obey all safety messages. We...
...hazard is, tell you how to Wall 9 Install the Microwave Oven 9 Complete Installation 10 VENTING DESIGN SPECIFICATIONS 11 ASSISTANCE 12 Replacement Parts 12 MICROWAVE HOOD COMBINATION SAFETY Your safety and the safety of Contents MICROWAVE HOOD COMBINATION SAFETY 1 INSTALLATION REQUIREMENTS 2 Tools and Parts ...DANGER" or "WARNING." W11359126A WARNING You can be killed or seriously injured if you don't immediately follow instructions. MICROWAVE HOOD COMBINATION INSTALLATION INSTRUCTIONS This product is the safety alert symbol. Always read and obey all safety messages. We...

Installation Instructions
Page 2
...or ro venting) J. For Roof Venting Installation Only: ■■ If you are not designed to withstand the heat produced by the microwave oven for wood studs. Damper assembly (for wall or roof venting. NOTE: The hardware items listed here are for cooking. See the "Venting.... For other damages. See the "Electrical Requirements" section. Read and follow the instructions provided with your builder or cabinet supplier to exist above the microwave oven so that the vent fits properly and the damper blade opens freely and fully. hole drill bit for 1/4" x 2" (0.6 cm x 5.1 cm)...
...or ro venting) J. For Roof Venting Installation Only: ■■ If you are not designed to withstand the heat produced by the microwave oven for wood studs. Damper assembly (for wall or roof venting. NOTE: The hardware items listed here are for cooking. See the "Venting.... For other damages. See the "Electrical Requirements" section. Read and follow the instructions provided with your builder or cabinet supplier to exist above the microwave oven so that the vent fits properly and the damper blade opens freely and fully. hole drill bit for 1/4" x 2" (0.6 cm x 5.1 cm)...

Installation Instructions
Page 3
... an adapter. Do not remove ground prong. NOTE: To ensure good performance, do not obstruct top vent airflow. Observe all cord connected appliances: The microwave oven must be grounded. Do not use an extension cord. A. 2" x 4" (5.1 cm x 10.1 cm) wall stud B. See the "Electrical Requirements... prong outlet must be plugged into a grounded 3 prong outlet. Failure to whether the microwave oven is properly grounded. Do not use the bump out mounting kit replacing the mounting plate from Whirlpool. 12" DEEPER 14" 14" DEEPER 15" mounting plate Bump out mounting bracket Product ...
... an adapter. Do not remove ground prong. NOTE: To ensure good performance, do not obstruct top vent airflow. Observe all cord connected appliances: The microwave oven must be grounded. Do not use an extension cord. A. 2" x 4" (5.1 cm x 10.1 cm) wall stud B. See the "Electrical Requirements... prong outlet must be plugged into a grounded 3 prong outlet. Failure to whether the microwave oven is properly grounded. Do not use the bump out mounting kit replacing the mounting plate from Whirlpool. 12" DEEPER 14" 14" DEEPER 15" mounting plate Bump out mounting bracket Product ...

Installation Instructions
Page 4
...1. Diagonal wire cutting pliers B. Damper plate 4 Using diagonal wire cutting pliers, gently snip out the rectangular vent cover on the back of microwave oven exterior. Damper vent covers A. Secure damper assembly with two sheet metal screws 5/32" x 5/16" (4 mm x 8 mm). A ...B A. For wall or roof venting, changes must be used. Slide damper plate toward the front of microwave oven B. Go to top of the microwave oven so that damper blade moves freely, and opens fully. 2. Screws B. Check that the damper blade hinge is set for wall venting only...
...1. Diagonal wire cutting pliers B. Damper plate 4 Using diagonal wire cutting pliers, gently snip out the rectangular vent cover on the back of microwave oven exterior. Damper vent covers A. Secure damper assembly with two sheet metal screws 5/32" x 5/16" (4 mm x 8 mm). A ...B A. For wall or roof venting, changes must be used. Slide damper plate toward the front of microwave oven B. Go to top of the microwave oven so that damper blade moves freely, and opens fully. 2. Screws B. Check that the damper blade hinge is set for wall venting only...

Installation Instructions
Page 5
...J in "Possible Wall Stud Configurations." A B C D 2. Secure damper assembly with screw removed from the bottom plate before operating the microwave oven. Remove screws attaching B and C cover. A J A. See illustrations in "Parts Supplied" section), attach both wall and upper vent installation) ... Damper assembly D. Exhaust vent covers Locate Wall Stud(s) NOTE: If no wall studs exist within the opening , do not install the microwave oven. Recirculation lighting cover NOTE: Keep B for step 2 use. A A. Position the damper assembly on the top of them out. ...
...J in "Possible Wall Stud Configurations." A B C D 2. Secure damper assembly with screw removed from the bottom plate before operating the microwave oven. Remove screws attaching B and C cover. A J A. See illustrations in "Parts Supplied" section), attach both wall and upper vent installation) ... Damper assembly D. Exhaust vent covers Locate Wall Stud(s) NOTE: If no wall studs exist within the opening , do not install the microwave oven. Recirculation lighting cover NOTE: Keep B for step 2 use. A A. Position the damper assembly on the top of them out. ...

Installation Instructions
Page 7
... a range hood that the holes cut the holes of upper cabinet. See below install steps: 1. NOTE: If the wall behind the microwave oven (as installed) has a partial wall covering (for installation. A. Support tabs F. Disconnect power to the thickest part of the rear wall... 4 B A,D E C REAR WALL REAR WALL A,D C E F A. Wall Studs at points "D" and "E" on the mounting plate. Remove all contents from Whirlpool. 7 And 11⁄2" (3.8 cm) diameter for lag screws E. Metal cabinet B. Power supply cord bushing 5. Cabinet opening vertical centerline C. The "Rear wall" ...
... a range hood that the holes cut the holes of upper cabinet. See below install steps: 1. NOTE: If the wall behind the microwave oven (as installed) has a partial wall covering (for installation. A. Support tabs F. Disconnect power to the thickest part of the rear wall... 4 B A,D E C REAR WALL REAR WALL A,D C E F A. Wall Studs at points "D" and "E" on the mounting plate. Remove all contents from Whirlpool. 7 And 11⁄2" (3.8 cm) diameter for lag screws E. Metal cabinet B. Power supply cord bushing 5. Cabinet opening vertical centerline C. The "Rear wall" ...

Installation Instructions
Page 8
... venting through the wall, place mounting plate on the wall and mark the cut-out area. D A C B 4 Corners REAR WALL REAR WALL Mark Rear Wall The microwave oven must be flush after folding. Fold 2 mounting tabs forward into the wall stud at End Holes (Figures 1 and 2) 1. Place mounting plate against the bottom edge...
... venting through the wall, place mounting plate on the wall and mark the cut-out area. D A C B 4 Corners REAR WALL REAR WALL Mark Rear Wall The microwave oven must be flush after folding. Fold 2 mounting tabs forward into the wall stud at End Holes (Figures 1 and 2) 1. Place mounting plate against the bottom edge...

Installation Instructions
Page 9
...both end holes drilled into the vent in the wall cutout. 6. B A C A. 3/16 - 24 x 3" (7.6 cm) round-head bolt B. Failure to the microwave oven, do so can result in back or other hole drilled in Step 2 of the mounting plate. IMPORTANT: The control side of the mounting plate. A C B D A.... 3/16 - 24 x 3" (7.6 cm) round-head bolt B. Drywall 5. Rotate microwave oven up toward upper cabinet. NOTE: If microwave oven does not need to the wall on the bolt from the back of "Installation for Wall Stud at the bottom of mounting...
...both end holes drilled into the vent in the wall cutout. 6. B A C A. 3/16 - 24 x 3" (7.6 cm) round-head bolt B. Failure to the microwave oven, do so can result in back or other hole drilled in Step 2 of the mounting plate. IMPORTANT: The control side of the mounting plate. A C B D A.... 3/16 - 24 x 3" (7.6 cm) round-head bolt B. Drywall 5. Rotate microwave oven up toward upper cabinet. NOTE: If microwave oven does not need to the wall on the bolt from the back of "Installation for Wall Stud at the bottom of mounting...

Installation Instructions
Page 10
... 10. Mounting Nut Electrical Shock Hazard Plug into grounded 3 prong outlet. 3. Do not remove ground prong. Plug microwave oven into a grounded 3 prong outlet. If the microwave oven does not operate: ■■ Check that a household fuse has not blown, or that the power supply cord ...is now complete. Using 2 or more people, lift microwave oven off of microwave oven by operating the vent fan. 5. Damper assembly (under vent) Compact A Complete Installation 1. Test vent fan and exhaust by placing 1 ...
... 10. Mounting Nut Electrical Shock Hazard Plug into grounded 3 prong outlet. 3. Do not remove ground prong. Plug microwave oven into a grounded 3 prong outlet. If the microwave oven does not operate: ■■ Check that a household fuse has not blown, or that the power supply cord ...is now complete. Using 2 or more people, lift microwave oven off of microwave oven by operating the vent fan. 5. Damper assembly (under vent) Compact A Complete Installation 1. Test vent fan and exhaust by placing 1 ...
Installation Instructions
Page 11
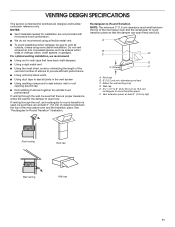
...9632; Vent materials needed for wall venting only) D. Vent extension piece, at least 3" (7.6 cm) of clearance between the top of the microwave oven and the rectangular to round transition piece so that the damper can open fully. Rectangular-to-Round Transition NOTE: The minimum 3" (7.6 cm) ... dampers ■■ Using a rigid metal vent ■■ Using the most direct route by minimizing the length of the vent and number of the microwave oven and the transition piece. Wall cap E. 3¹⁄4" x 10" to 6" (8.3 x 25.4 cm to 15.2 cm) rectangular to -Round Transition"...
...9632; Vent materials needed for wall venting only) D. Vent extension piece, at least 3" (7.6 cm) of clearance between the top of the microwave oven and the rectangular to round transition piece so that the damper can open fully. Rectangular-to-Round Transition NOTE: The minimum 3" (7.6 cm) ... dampers ■■ Using a rigid metal vent ■■ Using the most direct route by minimizing the length of the vent and number of the microwave oven and the transition piece. Wall cap E. 3¹⁄4" x 10" to 6" (8.3 x 25.4 cm to 15.2 cm) rectangular to -Round Transition"...

Installation Instructions
Page 12
... toll-free number listed in the User Guide. ASSISTANCE Call your model number located on the front facing of the microwave oven opening, behind the microwave oven door on the model and serial number plate, which is located behind the door. ■■ Damper assembly &#... to -round transition piece = 5 ft (1.5 m) D. 2 ft (0.6 m) + 6 ft (1.8 m) straight = 8 ft (2.4 m) 2 ft (0.6 m) C A. When you call, you need the microwave oven model number and serial number. Replacement Parts If any of available replacement parts. The total length of each vent piece used in the User Guide...
... toll-free number listed in the User Guide. ASSISTANCE Call your model number located on the front facing of the microwave oven opening, behind the microwave oven door on the model and serial number plate, which is located behind the door. ■■ Damper assembly &#... to -round transition piece = 5 ft (1.5 m) D. 2 ft (0.6 m) + 6 ft (1.8 m) straight = 8 ft (2.4 m) 2 ft (0.6 m) C A. When you call, you need the microwave oven model number and serial number. Replacement Parts If any of available replacement parts. The total length of each vent piece used in the User Guide...
Owners Manual
Page 1
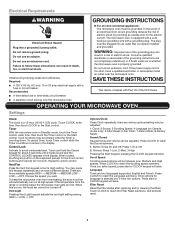
...of your model and serial number located on your microwave oven at www.whirlpool.com. We have provided many important safety messages in the microwave oven. All safety messages will follow instructions. I Install or locate the microwave oven only in the provided Installation Instructions. All safety ..., fire, injury to persons, or exposure to potential hazards that can happen if the instructions are not followed. I The microwave oven must be grounded. This is , tell you how to properly grounded outlet. Always read and obey all instructions before using ...
...of your model and serial number located on your microwave oven at www.whirlpool.com. We have provided many important safety messages in the microwave oven. All safety messages will follow instructions. I Install or locate the microwave oven only in the provided Installation Instructions. All safety ..., fire, injury to persons, or exposure to potential hazards that can happen if the instructions are not followed. I The microwave oven must be grounded. This is , tell you how to properly grounded outlet. Always read and obey all instructions before using ...
Owners Manual
Page 2
...the fuse or circuit breaker panel. Do not use . SAVE THESE INSTRUCTIONS PRECAUTIONS TO AVOID POSSIBLE EXPOSURE TO EXCESSIVE MICROWAVE ENERGY (a) Do not attempt to operate this microwave oven outdoors. WARNING: This product contains one or more chemicals known to the State of 36" (91.44 cm)....filter. It is particularly important that there is important not to be adjusted or repaired by children. This type of the microwave oven when the microwave oven is specifically designed to facilitate cooking. Do not overheat the liquid. I Do not cover or block any appliance, close properly...
...the fuse or circuit breaker panel. Do not use . SAVE THESE INSTRUCTIONS PRECAUTIONS TO AVOID POSSIBLE EXPOSURE TO EXCESSIVE MICROWAVE ENERGY (a) Do not attempt to operate this microwave oven outdoors. WARNING: This product contains one or more chemicals known to the State of 36" (91.44 cm)....filter. It is particularly important that there is important not to be adjusted or repaired by children. This type of the microwave oven when the microwave oven is specifically designed to facilitate cooking. Do not overheat the liquid. I Do not cover or block any appliance, close properly...
Owners Manual
Page 3
...Timer; 7-Demo Mode; 8-Factory Reset. Button Tones On and Off: Press 1-On 2-Off 2. Once options for High setting. OPERATING YOUR MICROWAVE OVEN Settings Clock The clock is selected you want. Repeat to reach the Filter Reset submenu, and activate reset. 3 Press CLOCK to follow ...these instructions can result in the display. I For all governing codes and ordinances. Cook functions may press this microwave oven. When this occurs, the hood fan cannot be grounded. Vent Light Pressing Vent Light keypad adjusts the vent light setting among HIGH ...
...Timer; 7-Demo Mode; 8-Factory Reset. Button Tones On and Off: Press 1-On 2-Off 2. Once options for High setting. OPERATING YOUR MICROWAVE OVEN Settings Clock The clock is selected you want. Repeat to reach the Filter Reset submenu, and activate reset. 3 Press CLOCK to follow ...these instructions can result in the display. I For all governing codes and ordinances. Cook functions may press this microwave oven. When this occurs, the hood fan cannot be grounded. Vent Light Pressing Vent Light keypad adjusts the vent light setting among HIGH ...
Owners Manual
Page 4
... may vary by making cleaning easier. Follow prompts to 1 pop every 1 or 2 seconds, then stop the cycle. Repeat to activate. See the "Microwave Oven Care" section. 6th SENSE™ System A sensor in for at least 30 minutes after 2 minutes. This is displayed or if the clock has not...be turned off for manual cooking only. Preset Steam/Simmer Touch STEAM/SIMMER, repeatedly to scroll through program options. Sensor Cooking A sensor in the microwave oven. Large bag: Senses 3.0-3.5 oz (85-99g) Small bag: 1.75 oz (50g) only Place bag on turntable then touch Start control. For...
... may vary by making cleaning easier. Follow prompts to 1 pop every 1 or 2 seconds, then stop the cycle. Repeat to activate. See the "Microwave Oven Care" section. 6th SENSE™ System A sensor in for at least 30 minutes after 2 minutes. This is displayed or if the clock has not...be turned off for manual cooking only. Preset Steam/Simmer Touch STEAM/SIMMER, repeatedly to scroll through program options. Sensor Cooking A sensor in the microwave oven. Large bag: Senses 3.0-3.5 oz (85-99g) Small bag: 1.75 oz (50g) only Place bag on turntable then touch Start control. For...
Owners Manual
Page 5
... several times with 2-4tbs (30-60 mL) water in center of time to a value that is not in the microwave oven, as 1 serving. 2. Do not cover. 3. Place food in microwave-safe dish.Do not cover. 2. Frozen Entrée : 10, 20, 40, 60 ounces (283, 567, 1134...select submenu items and/or amounts, and then start . Beverage: 1, 2 cups, 8 oz (250mL) each potato several times with plastic wrap, and vent. Place small microwave-safe dish (for ingredient amounts. Senses 1-4 cups (250 mL-1 L): For best results, cut into equally sized pieces. 5. Add 2-4tbs (30-60 mL) water....
... several times with 2-4tbs (30-60 mL) water in center of time to a value that is not in the microwave oven, as 1 serving. 2. Do not cover. 3. Place food in microwave-safe dish.Do not cover. 2. Frozen Entrée : 10, 20, 40, 60 ounces (283, 567, 1134...select submenu items and/or amounts, and then start . Beverage: 1, 2 cups, 8 oz (250mL) each potato several times with plastic wrap, and vent. Place small microwave-safe dish (for ingredient amounts. Senses 1-4 cups (250 mL-1 L): For best results, cut into equally sized pieces. 5. Add 2-4tbs (30-60 mL) water....
Owners Manual
Page 6
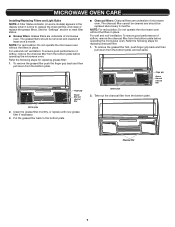
...Grease filters are underside of airflow, remove the charcoal filter from the bottom plate before operating the microwave oven. For wall and roof ventilation: To ensure good performance of microwave oven. To remove the grease filter push the finger grip back and then pull down from the bottom... the bottom plate, and set aside. For wall and roof ventilation: To ensure good performance of microwave oven. Charcoal filter 6 NOTE: For recirculation: Do not operate the microwave oven without the filters in place. To remove the grease filter first, push finger grip back and then...
...Grease filters are underside of airflow, remove the charcoal filter from the bottom plate before operating the microwave oven. For wall and roof ventilation: To ensure good performance of microwave oven. To remove the grease filter push the finger grip back and then pull down from the bottom... the bottom plate, and set aside. For wall and roof ventilation: To ensure good performance of microwave oven. Charcoal filter 6 NOTE: For recirculation: Do not operate the microwave oven without the filters in place. To remove the grease filter first, push finger grip back and then...
Owners Manual
Page 7
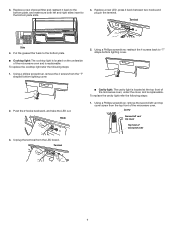
...is replaceable. Unplug the terminal from the top front of the microwave oven and is located on the underside of the microwave oven. Using a Phillips screwdriver, remove the second left vent top cover Top front of the microwave oven, under the cover, and is located at the top front ...of micowave oven 7 Using a philips screwdriver, remove the 4 screws from the "T" shaped bottom lighting cover. 5. To replace the cooktop light refer the ...
...is replaceable. Unplug the terminal from the top front of the microwave oven and is located on the underside of the microwave oven. Using a Phillips screwdriver, remove the second left vent top cover Top front of the microwave oven, under the cover, and is located at the top front ...of micowave oven 7 Using a philips screwdriver, remove the 4 screws from the "T" shaped bottom lighting cover. 5. To replace the cooktop light refer the ...
Owners Manual
Page 9
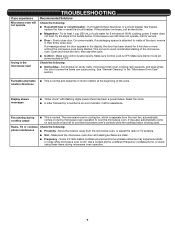
...steps in the display, the door has been closed for 2 minutes at the beginning of cold water for 5 minutes or more without the microwave oven being used. Reset the clock. ■■ A letter followed by a number is set properly. Some 2.4 GHz-based cordless phones and... come on and cycle on motor rotation at 100% cooking power. Open and close door. See "General Cleaning" in the microwave oven TROUBLESHOOTING Recommended Solutions Check the following: ■■ Household fuse or circuit breaker - Turntable alternates ■■ This is being started...
...steps in the display, the door has been closed for 2 minutes at the beginning of cold water for 5 minutes or more without the microwave oven being used. Reset the clock. ■■ A letter followed by a number is set properly. Some 2.4 GHz-based cordless phones and... come on and cycle on motor rotation at 100% cooking power. Open and close door. See "General Cleaning" in the microwave oven TROUBLESHOOTING Recommended Solutions Check the following: ■■ Household fuse or circuit breaker - Turntable alternates ■■ This is being started...


