Whirlpool YWMH31017HB Support and Manuals
Get Help and Manuals for this Whirlpool item
View All Support Options Below
Free Whirlpool YWMH31017HB manuals!
Problems with Whirlpool YWMH31017HB?
Ask a Question
Free Whirlpool YWMH31017HB manuals!
Problems with Whirlpool YWMH31017HB?
Ask a Question
Whirlpool YWMH31017HB Videos

Whirlpool YWMH31017HB Micro-ondes à hotte intégrée
Duration: :30
Total Views: 11
Duration: :30
Total Views: 11
YWMH31017HB_review Whirlpool YWMH31017HB Over the Range Microwave Review
Duration: :57
Total Views: 7
Duration: :57
Total Views: 7
Whirlpool YWMH31017HB Over the Range Microwave
Duration: :33
Total Views: 15
Duration: :33
Total Views: 15
Popular Whirlpool YWMH31017HB Manual Pages
Owners Manual - Page 1

... locate the microwave oven only in accordance with the provided Installation Instructions.
These words mean:
DANGER
You can kill or hurt you what can be killed or seriously injured if you don't immediately follow instructions.
I Some products such as whole eggs in this manual and on the front facing of injury, and tell you...
Owners Manual - Page 2
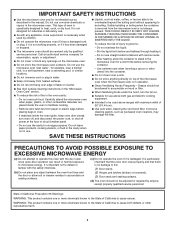
... service personnel.
I Do not let cord hang over a sink.
I To reduce the risk of California to the State of fire in the manual. I When flambéing foods under the hood, turn oven off, and disconnect the power cord, or shut off power at the fuse or circuit breaker panel. SAVE THESE INSTRUCTIONS...
Owners Manual - Page 3

...) may be turned off or all governing codes and ordinances. or 20-amp electrical supply
with Part 18 of the vent grille, remove them before using the microwave oven.
Do not use an extension cord. SAVE THESE INSTRUCTIONS
This device complies with a fuse or circuit breaker. Settings
Clock
The clock is active in the...
Owners Manual - Page 4

... code of the microwave oven and is located behind the door.
Preset Defrosting
Pizza (reheat)
Unwrap food.
Manual ...Replace bulb, close bulb cover. Program 1 minute of each , then touch Start control. If programming additional stages, enter the cook time and cook power of cook time at least 1" (2.5 cm) apart. Popcorn
Touch POPCORN. Always follow label instructions on some models...
Owners Manual - Page 5
...; Cooktop light bulb
■■ Cavity light bulb
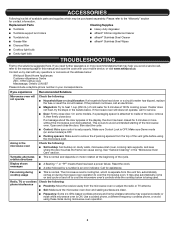
TROUBLESHOOTING
First try the steps in this manual and scan the code with any questions or concerns at the address below:...problem continues, call for service.
■■ Door: Firmly close the door, then start the cycle.
■■ Control: Make sure control is set properly. ACCESSORIES
Following is a list of available parts...
Owners Manual - Page 6
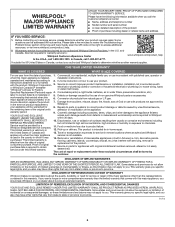
.... Repairs to parts or systems to determine whether another warranty applies. Service must be warranted for in remote locations where an authorized Whirlpool
applies only when the major appliance
servicer is installed,
installation instructions. This product is effective from caustic or corrosive environments including
REPAIR AS PROVIDED HEREIN. This warranty gives you specific legal...
Feature Sheet - Page 1
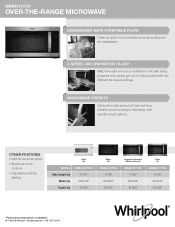
... just the right amount of cooking odors with specific preset options.
WC170107A OTHER FEATURES
• Add 30 seconds option • Electronic touch
controls • Adjustable cooktop
lighting
White (W)
MODEL WMH31017HW
Max height (in)
17-1/8"
Width (...
29-15/16" 15-9/16"
*Performance varies based on installation. ®/™ ©2018 Whirlpool.
All rights reserved. 1/18.
Installation Instructions - Page 3

...models have a pocket handle. See "Rectangular to separate the template from the
rest of the cardboard packaging. 2.
Location Requirements
Check the opening .
■ Support...Specifications" section.
NOTE: To ensure good performance, do not obstruct top vent airflow. Set...during
the "Mark Rear Wall" and "Prepare Upper Cabinet" part of installation. A
B
30" (76.2 cm) minimum
30" (76...
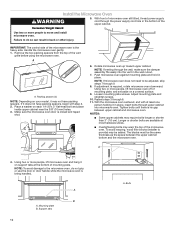
Installation Instructions - Page 5
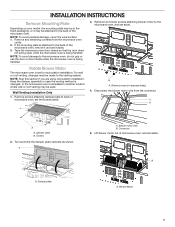
... location where wall or roof venting may be attached to the back of microwave oven, set for recirculation installation. A
A. Tape the microwave oven door closed so that the door does
not swing ... the venting system. Blower screws (in recessed holes) 4. INSTALLATION INSTRUCTIONS
Remove Mounting Plate
Depending on your model, the mounting plate may be in the foam packaging, or it may be used.
Installation Instructions - Page 8
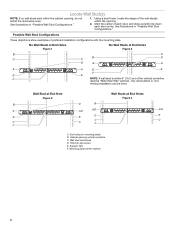
... show examples of the vertical centerline
(see the "Mark Rear Wall" section), only recirculation or roof
venting installation can be done. No Wall Studs at End Holes Figure 1
No Wall Studs at End Holes Figure 4...NOTE: If no wall studs exist within 6" (15.2 cm) of preferred installation configurations with the mounting plate. See illustrations in "Possible Wall Stud Configurations."
...
Installation Instructions - Page 9
... sides of the centerline, and mark.
10.
A
6. Set the mounting plate aside. Remove the cardboard template and check... the marks made in steps 8 and 10.
12. Wall Venting Installation Only
Upper cabinet bottom
3/8" (1 cm)
A. Align the center markers...(1.9 cm) hole in one corner of the opening. With the support tabs facing forward (see illustrations in the "Locate Wall Stud(s)" section...
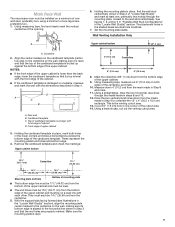
Installation Instructions - Page 10

...plate, making sure it is level. 4. Installation for the toggle nuts to go through the wall at Both End Holes (Figure 4)
1.
With the support tabs of the mounting plate facing forward,...5. Securely tighten all Stud(s)" section.
3. Wall Stud at One End Hole (Figure 3)
1. With the support tabs of the mounting plate facing forward, insert a 3/16-24 x 3" round-head bolt through the ...
Installation Instructions - Page 12
...with at least one person holding it on support tabs at most hardware stores.
■...is being handled. Place a washer on your model, it does not have packing spacers.
Loosen ...it may warp the top of mounting plate, and set aside on a covered surface. 9. Using two or ...) holes. 3. To avoid warping, wood filler blocks (installer to be added. Adjust mounting plate and retighten screws. ...
Installation Instructions - Page 13
... outlet.
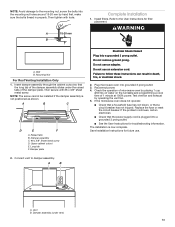
■ See the User Instructions for troubleshooting information. Do not use an adapter. Connect vent to follow these instructions can result in properly. Then tighten ...Installation Only
1.
Do not use an extension cord. A
15-20 mm
B
Complete Installation
1. Install filters. Raised tabs B. NOTE: Avoid damage to the User Instructions for future use.
2. If the problem...
Installation Instructions - Page 15

... a list of available replacement parts. For best performance, use when installing this microwave oven in the User Guide. In addition, a rectangular 3" (7.6 cm) extension vent between the damper assembly and rectangular to round transition piece must be installed to be used. Replacement Parts
If any of the installation hardware needs to keep the damper from your model and serial numbers...
Whirlpool YWMH31017HB Reviews
We have not received any reviews for Whirlpool yet.