
Use & Care Guide
Page 1
... important safety messages in the provided Installation Instructions. IMPORTANT SAFETY INSTRUCTIONS When using the microwave oven. ■ Read and follow instructions. Para obtener acceso a "Instrucciones para el usuario de la combinación microondas campana" en español, o para obtener información adicional acerca de su producto, visite: www.whirlpool.com Tenga listo su nú...
... important safety messages in the provided Installation Instructions. IMPORTANT SAFETY INSTRUCTIONS When using the microwave oven. ■ Read and follow instructions. Para obtener acceso a "Instrucciones para el usuario de la combinación microondas campana" en español, o para obtener información adicional acerca de su producto, visite: www.whirlpool.com Tenga listo su nú...
Use & Care Guide
Page 3
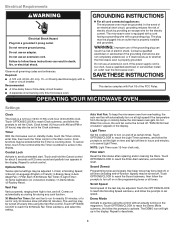
...Activate to unlock control. Repeat to avoid unintended start. Touch OPTIONS/CLOCK to reach the Light Timer submenu, and follow these instructions can result in standby mode, touch the Timer control, enter time, then touch the Timer control or the Start control. .../settings may be grounded. Repeat to follow the prompts to set in the display. Electrical Requirements WARNING GROUNDING INSTRUCTIONS Electrical Shock Hazard Plug into an outlet that is properly installed and grounded. Failure to deactivate. 3 Observe all tones. Required: ■ A 120 volt, 60 Hz...
...Activate to unlock control. Repeat to avoid unintended start. Touch OPTIONS/CLOCK to reach the Light Timer submenu, and follow these instructions can result in standby mode, touch the Timer control, enter time, then touch the Timer control or the Start control. .../settings may be grounded. Repeat to follow the prompts to set in the display. Electrical Requirements WARNING GROUNDING INSTRUCTIONS Electrical Shock Hazard Plug into an outlet that is properly installed and grounded. Failure to deactivate. 3 Observe all tones. Required: ■ A 120 volt, 60 Hz...

Use & Care Guide
Page 5
...as prompted by filter status indicator. The Warm Hold function uses 10% cook power. Always follow a cooking cycle. Dishwasher cleaning is cool. Installing/Replacing Filters and Light Bulbs NOTE: A filter status indicator (on some models): To avoid damage to soil buildup, keep cavity, microwave inlet...oven more than 100% cook power, "PRESS 0 TO ADD MORE TIME" scrolls in the microwave oven. See "Settings" section to follow label instructions on the vent grille, tilt the grille forward, lift it out, and remove filter. Replace bulb, close bulb cover, and secure with screws....
...as prompted by filter status indicator. The Warm Hold function uses 10% cook power. Always follow a cooking cycle. Dishwasher cleaning is cool. Installing/Replacing Filters and Light Bulbs NOTE: A filter status indicator (on some models): To avoid damage to soil buildup, keep cavity, microwave inlet...oven more than 100% cook power, "PRESS 0 TO ADD MORE TIME" scrolls in the microwave oven. See "Settings" section to follow label instructions on the vent grille, tilt the grille forward, lift it out, and remove filter. Replace bulb, close bulb cover, and secure with screws....

Use & Care Guide
Page 7
..., removal or replacement of the product. The removal and reinstallation of your major appliance, to replace or repair house fuses, or to Whirlpool within 30 days from defects in accordance with published installation instructions. 11. Some states and provinces do not allow limitations on how to use your major appliance if it is...
..., removal or replacement of the product. The removal and reinstallation of your major appliance, to replace or repair house fuses, or to Whirlpool within 30 days from defects in accordance with published installation instructions. 11. Some states and provinces do not allow limitations on how to use your major appliance if it is...
Dimension Guide
Page 1
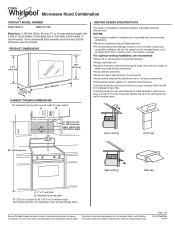
...MODEL NUMBER WMH73521C WMH76719C Electrical: A 120-Volt, 60-Hz, AC-only, 15- A time-delay fuse or time-delay circuit breaker is typical for installation are for ...sized vents q using duct tape to round transition is used, be provided. Instructions packed with microwave hood combination. W10652354A 1/16/14 or 20-amp electrical ...q We do not recommend using recirculation installation. Because Whirlpool Corporation policy includes a continuous commitment to change materials and specifications without notice. For complete details, see Installation our products, we recommend: q using...
...MODEL NUMBER WMH73521C WMH76719C Electrical: A 120-Volt, 60-Hz, AC-only, 15- A time-delay fuse or time-delay circuit breaker is typical for installation are for ...sized vents q using duct tape to round transition is used, be provided. Instructions packed with microwave hood combination. W10652354A 1/16/14 or 20-amp electrical ...q We do not recommend using recirculation installation. Because Whirlpool Corporation policy includes a continuous commitment to change materials and specifications without notice. For complete details, see Installation our products, we recommend: q using...
Dimension Guide
Page 2
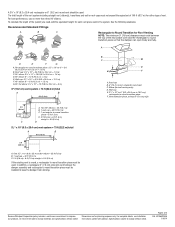
...= 20 ft (6.1 m) B. 1 wall cap = 40 ft (12.2 m) C. 1 rectangular to F. Because Whirlpool Corporation policy includes a continuous commitment to round transition piece F. Page 2 of the system you need, add the ...C A. A 3¹⁄₄" x 10" (8.3 x 25.4 cm) rectangular or 6" (15.2 cm) round vent should be installed to change materials and specifications without notice. Roof cap: 3 " x 10" = 24 ft (8.3 x 25.4 cm = 7.3 ...cm) rectangular to improve Dimensions are for each vent piece used . Instructions packed with product. Rectangular to round transition piece: 3 " x...
...= 20 ft (6.1 m) B. 1 wall cap = 40 ft (12.2 m) C. 1 rectangular to F. Because Whirlpool Corporation policy includes a continuous commitment to round transition piece F. Page 2 of the system you need, add the ...C A. A 3¹⁄₄" x 10" (8.3 x 25.4 cm) rectangular or 6" (15.2 cm) round vent should be installed to change materials and specifications without notice. Roof cap: 3 " x 10" = 24 ft (8.3 x 25.4 cm = 7.3 ...cm) rectangular to improve Dimensions are for each vent piece used . Instructions packed with product. Rectangular to round transition piece: 3 " x...

Installation Guide
Page 1
... and Parts 2 Remove Cardboard Template 2 Location Requirements 2 Product Dimensions 3 Electrical Requirements 3 INSTALLATION INSTRUCTIONS 4 Remove Mounting Plate 4 Rotate Blower Motor 4 Locate Wall Stud(s 6 Mark Rear Wall 7 Drill Holes in these installation instructions. W10652354A MICROWAVE HOOD COMBINATION INSTALLATION INSTRUCTIONS This product is suitable for further notes. These installation instructions cover different models. This is , tell you how to Wall 8 Prepare...
... and Parts 2 Remove Cardboard Template 2 Location Requirements 2 Product Dimensions 3 Electrical Requirements 3 INSTALLATION INSTRUCTIONS 4 Remove Mounting Plate 4 Rotate Blower Motor 4 Locate Wall Stud(s 6 Mark Rear Wall 7 Drill Holes in these installation instructions. W10652354A MICROWAVE HOOD COMBINATION INSTALLATION INSTRUCTIONS This product is suitable for further notes. These installation instructions cover different models. This is , tell you how to Wall 8 Prepare...

Installation Guide
Page 2
... for weight of wall structures, be sure to use as a rear wall template. 1. Damper assembly (for wood studs. See User Instructions.) NOTE: Depending on model, aluminum grease filter and charcoal filter may not be combined. Materials needed ■ Standard fittings for cabinet ... gun and weatherproof caulking compound ■ Duct tape Parts Supplied For information on model, charcoal filters may be included. The location must be installed. See "Installation Dimensions" illustration. ■ Minimum one 2" x 4" (50.8 x 101.6 mm) wood wall stud and minimum 3/8" (10 mm)...
... for weight of wall structures, be sure to use as a rear wall template. 1. Damper assembly (for wood studs. See User Instructions.) NOTE: Depending on model, aluminum grease filter and charcoal filter may not be combined. Materials needed ■ Standard fittings for cabinet ... gun and weatherproof caulking compound ■ Duct tape Parts Supplied For information on model, charcoal filters may be included. The location must be installed. See "Installation Dimensions" illustration. ■ Minimum one 2" x 4" (50.8 x 101.6 mm) wood wall stud and minimum 3/8" (10 mm)...
Installation Guide
Page 3
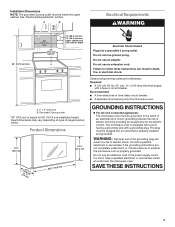
...;₈⁵c"⁄)₁m₆") 29⁷⁄₈" (76.0 cm) Electrical Shock Hazard Plug into an outlet that is properly installed and grounded. Do not remove ground prong. Observe all cord connected appliances: The microwave oven must be plugged into a grounded 3 ...section. Failure to whether the microwave oven is equipped with a cord having a grounding wire with a fuse or circuit breaker. GROUNDING INSTRUCTIONS ■ For all governing codes and ordinances. WARNING: Improper use an extension cord. Product Dimensions 17¹⁄₈" (43.5...
...;₈⁵c"⁄)₁m₆") 29⁷⁄₈" (76.0 cm) Electrical Shock Hazard Plug into an outlet that is properly installed and grounded. Do not remove ground prong. Observe all cord connected appliances: The microwave oven must be plugged into a grounded 3 ...section. Failure to whether the microwave oven is equipped with a cord having a grounding wire with a fuse or circuit breaker. GROUNDING INSTRUCTIONS ■ For all governing codes and ordinances. WARNING: Improper use an extension cord. Product Dimensions 17¹⁄₈" (43.5...

Installation Guide
Page 4
... 1. Louvered damper vent covers 4 INSTALLATION INSTRUCTIONS Remove Mounting Plate Depending on your model, the mounting plate may be in the foam packaging, or it may be used. Tape the microwave oven ... to top of microwave oven. A A. Screws (in case the venting method is changed, or the microwave oven is set for recirculation installation. NOTE: Skip this section if you are using recirculation installation. If the mounting plate is attached to the work surface, cover the work surface. 1. Blower motor 5. Slide damper plate toward...
... 1. Louvered damper vent covers 4 INSTALLATION INSTRUCTIONS Remove Mounting Plate Depending on your model, the mounting plate may be in the foam packaging, or it may be used. Tape the microwave oven ... to top of microwave oven. A A. Screws (in case the venting method is changed, or the microwave oven is set for recirculation installation. NOTE: Skip this section if you are using recirculation installation. If the mounting plate is attached to the work surface, cover the work surface. 1. Blower motor 5. Slide damper plate toward...

Installation Guide
Page 10
... microwave oven centered, and with sheet metal screw. Vent B. Damper assembly (under the raised tabs of water on a covered surface. 8. Install filters. Refer to follow these instructions can result in place, insert bolts through the cabinet cutout so that the long tab of the damper assembly slides under vent) Complete...space between upper cabinet and microwave oven. If the problem continues, call an electrician. ■ Check that a circuit breaker has not tripped. Installation is required, rotate microwave oven downward. Save Installation Instructions for future use. 10
... microwave oven centered, and with sheet metal screw. Vent B. Damper assembly (under the raised tabs of water on a covered surface. 8. Install filters. Refer to follow these instructions can result in place, insert bolts through the cabinet cutout so that the long tab of the damper assembly slides under vent) Complete...space between upper cabinet and microwave oven. If the problem continues, call an electrician. ■ Check that a circuit breaker has not tripped. Installation is required, rotate microwave oven downward. Save Installation Instructions for future use. 10

Installation Guide
Page 12
... use no more than three 90° elbows. W10652354A SP PN W10652356A © 2013. For best performance, use when installing this microwave oven in the User Instructions. See the following examples: 3¹⁄₄" x 10" (8.3 x 25.4 cm) vent system = 73 ft (22.2 m) total A B 6 ft (1.8 m) 2 ft ... the damper assembly and rectangular to round transition piece must not exceed the equivalent of 140 ft (42.7 m) for either type of the installation hardware needs to round transition piece must be used. Recommended Vent Length A 3¹⁄₄" x 10" (8.3 x 25.4 cm) ...
... use no more than three 90° elbows. W10652354A SP PN W10652356A © 2013. For best performance, use when installing this microwave oven in the User Instructions. See the following examples: 3¹⁄₄" x 10" (8.3 x 25.4 cm) vent system = 73 ft (22.2 m) total A B 6 ft (1.8 m) 2 ft ... the damper assembly and rectangular to round transition piece must not exceed the equivalent of 140 ft (42.7 m) for either type of the installation hardware needs to round transition piece must be used. Recommended Vent Length A 3¹⁄₄" x 10" (8.3 x 25.4 cm) ...
Warranty Information
Page 1
... finish of your authorized Whirlpool dealer to use of original consumer purchase. This warranty gives you specific legal rights, and you on the duration of implied warranties of purchase, when this limitation may not apply to the appliance. 9. Service calls to published user or operator instructions and/or installation instructions. 4. This major appliance is...
... finish of your authorized Whirlpool dealer to use of original consumer purchase. This warranty gives you specific legal rights, and you on the duration of implied warranties of purchase, when this limitation may not apply to the appliance. 9. Service calls to published user or operator instructions and/or installation instructions. 4. This major appliance is...


