
Use & Care Guide
Page 1
... as whole eggs in PROBLEM SOLVER, please visit our website at 1-800-253-1301. User Guide Microwave Hood Combination THANK YOU for example, closed glass jars are very important. All safety messages will need assistance, call us at www.whirlpool.com for additional information. Para obtener acceso a "Instrucciones para el usuario de la combinación microondas campana" en españ...
... as whole eggs in PROBLEM SOLVER, please visit our website at 1-800-253-1301. User Guide Microwave Hood Combination THANK YOU for example, closed glass jars are very important. All safety messages will need assistance, call us at www.whirlpool.com for additional information. Para obtener acceso a "Instrucciones para el usuario de la combinación microondas campana" en españ...
Use & Care Guide
Page 2
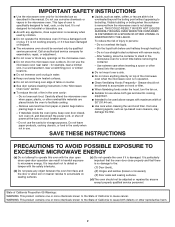
... or repaired by qualified service personnel. This type of table or counter. ■ See door surface cleaning instructions in the manual. THIS COULD RESULT IN VERY HOT LIQUIDS SUDDENLY BOILING OVER WHEN THE CONTAINER IS DISTURBED OR A SPOON OR OTHER UTENSIL IS INSERTED INTO THE LIQUID. Do not use the microwave oven near a swimming pool, or similar locations. ■ Do not immerse cord or...
... or repaired by qualified service personnel. This type of table or counter. ■ See door surface cleaning instructions in the manual. THIS COULD RESULT IN VERY HOT LIQUIDS SUDDENLY BOILING OVER WHEN THE CONTAINER IS DISTURBED OR A SPOON OR OTHER UTENSIL IS INSERTED INTO THE LIQUID. Do not use the microwave oven near a swimming pool, or similar locations. ■ Do not immerse cord or...
Use & Care Guide
Page 3
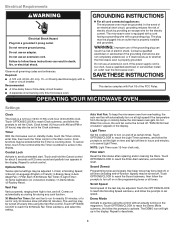
... the microwave oven in the Clock submenu. Options/Clock Twelve options/settings may also be plugged into a grounded 3 prong outlet. Demo Mode Activate to set in standby mode, touch the Timer control, enter time, then touch the Timer control or the Start control. Recommended: ■ A time-delay fuse or time-delay circuit breaker. ■ A separate circuit serving only this occurs, the vent fan cannot be adjusted: 1-Clock; 2-Scrolling Speed; 3-Sound; 4-Language (English or French); 5-Energy Save; 6-Auto Adapt Fan; 7-Filter...
... the microwave oven in the Clock submenu. Options/Clock Twelve options/settings may also be plugged into a grounded 3 prong outlet. Demo Mode Activate to set in standby mode, touch the Timer control, enter time, then touch the Timer control or the Start control. Recommended: ■ A time-delay fuse or time-delay circuit breaker. ■ A separate circuit serving only this occurs, the vent fan cannot be adjusted: 1-Clock; 2-Scrolling Speed; 3-Sound; 4-Language (English or French); 5-Energy Save; 6-Auto Adapt Fan; 7-Filter...
Use & Care Guide
Page 4
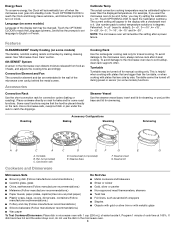
... turn off for manual cooking only. Use number pads to select temperature variations in the wall of water beside it heats, and adjusts the cooking time accordingly. Turntable B. Convection rack D. Steamer lid Cookware and Dinnerware Microwave-Safe Do Not Use ■ Browning dish (Follow manufacturer recommendations.) ■ Metal cookware and bakeware ■ Ceramic glass, glass ■ Straw or wicker ■ China, earthenware (Follow manufacturer recommendations.) ■ Gold...
... turn off for manual cooking only. Use number pads to select temperature variations in the wall of water beside it heats, and adjusts the cooking time accordingly. Turntable B. Convection rack D. Steamer lid Cookware and Dinnerware Microwave-Safe Do Not Use ■ Browning dish (Follow manufacturer recommendations.) ■ Metal cookware and bakeware ■ Ceramic glass, glass ■ Straw or wicker ■ China, earthenware (Follow manufacturer recommendations.) ■ Gold...

Use & Care Guide
Page 5
... uses 10% cook power. MICROWAVE OVEN CARE General Cleaning IMPORTANT: Before cleaning, make sure all nonsensor cycles will be programmed to soil buildup, keep cavity, microwave inlet cover, cooking rack supports, and area where the door touches the frame clean. Clean monthly, or as prompted by filter status indicator. wire mesh side up, replace vent grille, and secure with plastic wrap and vent. Remove two screws on cleaning products. Sensor Cooking Adjust doneness for automatic cooking functions by touching COOK TIME repeatedly to enter power level...
... uses 10% cook power. MICROWAVE OVEN CARE General Cleaning IMPORTANT: Before cleaning, make sure all nonsensor cycles will be programmed to soil buildup, keep cavity, microwave inlet cover, cooking rack supports, and area where the door touches the frame clean. Clean monthly, or as prompted by filter status indicator. wire mesh side up, replace vent grille, and secure with plastic wrap and vent. Remove two screws on cleaning products. Sensor Cooking Adjust doneness for automatic cooking functions by touching COOK TIME repeatedly to enter power level...
Use & Care Guide
Page 6
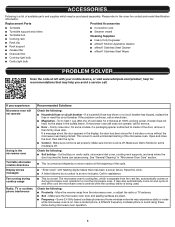
...; Grease filter ■ Charcoal filter ■ Cooktop light bulb ■ Cavity light bulb ■ Convection rack ■ Steamer vessel Cleaning Supplies ■ Heavy Duty Degreaser ■ affresh® Kitchen Appliance Cleaner ■ affresh® Stainless Steel Cleaner ■ affresh® Stainless Steel Wipes PROBLEM SOLVER Scan the code at 100% cooking power. Call for service. ■ Door - Please refer to avoid unintended starting of the door, remove it, then firmly close door. The microwave oven...
...; Grease filter ■ Charcoal filter ■ Cooktop light bulb ■ Cavity light bulb ■ Convection rack ■ Steamer vessel Cleaning Supplies ■ Heavy Duty Degreaser ■ affresh® Kitchen Appliance Cleaner ■ affresh® Stainless Steel Cleaner ■ affresh® Stainless Steel Wipes PROBLEM SOLVER Scan the code at 100% cooking power. Call for service. ■ Door - Please refer to avoid unintended starting of the door, remove it, then firmly close door. The microwave oven...

Use & Care Guide
Page 7
... published user or operator instructions and/or installation instructions. 4. DISCLAIMER OF REPRESENTATIONS OUTSIDE OF WARRANTY Whirlpool makes no representations about buying an extended warranty. LIMITATION OF REMEDIES; Any food loss due to repair or replace appliance light bulbs, air filters or water filters. Removal or replacement of trim, decorative panels, flooring, cabinetry, islands, countertops, drywall or other rights that comes with electrical or plumbing codes, or use or when it is installed in accordance with original model/serial numbers...
... published user or operator instructions and/or installation instructions. 4. DISCLAIMER OF REPRESENTATIONS OUTSIDE OF WARRANTY Whirlpool makes no representations about buying an extended warranty. LIMITATION OF REMEDIES; Any food loss due to repair or replace appliance light bulbs, air filters or water filters. Removal or replacement of trim, decorative panels, flooring, cabinetry, islands, countertops, drywall or other rights that comes with electrical or plumbing codes, or use or when it is installed in accordance with original model/serial numbers...
Dimension Guide
Page 1
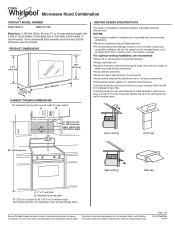
... garages. Exact dimensions may vary depending on type of 2 Ref. Page 1 of range/cooktop below. A time-delay fuse or time-delay circuit breaker is intended for architectural designer and builder/contractor reference only. For optimal venting installation, we reserve the right to vent air outside, unless using a flexible metal vent. Microwave Hood Combination PRODUCT MODEL NUMBER WMH73521C WMH76719C Electrical: A 120-Volt, 60-Hz, AC-only, 15- Do not vent exhaust air into...
... garages. Exact dimensions may vary depending on type of 2 Ref. Page 1 of range/cooktop below. A time-delay fuse or time-delay circuit breaker is intended for architectural designer and builder/contractor reference only. For optimal venting installation, we reserve the right to vent air outside, unless using a flexible metal vent. Microwave Hood Combination PRODUCT MODEL NUMBER WMH73521C WMH76719C Electrical: A 120-Volt, 60-Hz, AC-only, 15- Do not vent exhaust air into...

Installation Guide
Page 1
... you to Wall 8 Prepare Upper Cabinet 8 Install Damper Assembly 9 Install the Microwave Oven 9 Complete Installation 10 VENTING DESIGN SPECIFICATIONS 11 ASSISTANCE 12 Replacement Parts 12 Accessories 12 MICROWAVE HOOD COMBINATION SAFETY Your safety and the safety of Contents MICROWAVE HOOD COMBINATION SAFETY 1 INSTALLATION REQUIREMENTS 2 Tools and Parts 2 Remove Cardboard Template 2 Location Requirements 2 Product Dimensions 3 Electrical Requirements 3 INSTALLATION INSTRUCTIONS 4 Remove Mounting Plate 4 Rotate Blower Motor 4 Locate Wall Stud(s 6 Mark Rear Wall 7 Drill...
... you to Wall 8 Prepare Upper Cabinet 8 Install Damper Assembly 9 Install the Microwave Oven 9 Complete Installation 10 VENTING DESIGN SPECIFICATIONS 11 ASSISTANCE 12 Replacement Parts 12 Accessories 12 MICROWAVE HOOD COMBINATION SAFETY Your safety and the safety of Contents MICROWAVE HOOD COMBINATION SAFETY 1 INSTALLATION REQUIREMENTS 2 Tools and Parts 2 Remove Cardboard Template 2 Location Requirements 2 Product Dimensions 3 Electrical Requirements 3 INSTALLATION INSTRUCTIONS 4 Remove Mounting Plate 4 Rotate Blower Motor 4 Locate Wall Stud(s 6 Mark Rear Wall 7 Drill...

Installation Guide
Page 2
... venting) Not Shown: Upper cabinet template Mounting plate (attached to exist above the microwave oven so that the door can open fully. ■ Some cabinet and building materials are not designed to use as a rear wall template. 1. Special Requirements For Wall Venting Installation Only: ■ Cutout must provide: ■ Minimum installation dimensions. A B C D E FG H A 1/4-20 x 3" round-head bolts (2) B. 1/4-20 x 3" flat-head bolts (2) C. Sheet metal screws (2) G. See User Instructions.) NOTE: Depending on model, charcoal filters may be installed. Materials needed...
... venting) Not Shown: Upper cabinet template Mounting plate (attached to exist above the microwave oven so that the door can open fully. ■ Some cabinet and building materials are not designed to use as a rear wall template. 1. Special Requirements For Wall Venting Installation Only: ■ Cutout must provide: ■ Minimum installation dimensions. A B C D E FG H A 1/4-20 x 3" round-head bolts (2) B. 1/4-20 x 3" flat-head bolts (2) C. Sheet metal screws (2) G. See User Instructions.) NOTE: Depending on model, charcoal filters may be installed. Materials needed...
Installation Guide
Page 3
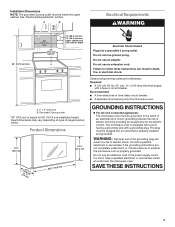
... circuit breaker. Do not remove ground prong. Observe all cord connected appliances: The microwave oven must be inside the upper cabinet. The microwave oven is properly grounded. Do not use an extension cord. or 20-amp electrical supply with a grounding plug. GROUNDING INSTRUCTIONS ■ For all governing codes and ordinances. WARNING: Improper use an adapter. Recommended: ■ A time-delay fuse or time-delay circuit breaker. ■ A separate circuit serving only this microwave oven. Installation Dimensions...
... circuit breaker. Do not remove ground prong. Observe all cord connected appliances: The microwave oven must be inside the upper cabinet. The microwave oven is properly grounded. Do not use an extension cord. or 20-amp electrical supply with a grounding plug. GROUNDING INSTRUCTIONS ■ For all governing codes and ordinances. WARNING: Improper use an adapter. Recommended: ■ A time-delay fuse or time-delay circuit breaker. ■ A separate circuit serving only this microwave oven. Installation Dimensions...

Installation Guide
Page 4
... that door does not swing open while the microwave oven is being handled. 4. Slide damper plate toward the front of microwave oven, and lower blower motor back into the microwave oven. Louvered damper vent covers 4 Lift blower motor out of the microwave oven, remove it and set it may be attached to the back of microwave oven. Exhaust port 6. NOTE: Skip this section if you are using recirculation installation. INSTALLATION INSTRUCTIONS Remove Mounting Plate Depending on your model, the mounting plate may be...
... that door does not swing open while the microwave oven is being handled. 4. Slide damper plate toward the front of microwave oven, and lower blower motor back into the microwave oven. Louvered damper vent covers 4 Lift blower motor out of the microwave oven, remove it and set it may be attached to the back of microwave oven. Exhaust port 6. NOTE: Skip this section if you are using recirculation installation. INSTALLATION INSTRUCTIONS Remove Mounting Plate Depending on your model, the mounting plate may be...

Installation Guide
Page 5
... rectangular vent covers on the damper plate removed in Step 1. Repeat Step 1 from "Wall Venting Installation Only." 3. Repeat Step 2 from "Wall Venting Installation Only." 2. Diagonal wire cutting pliers B. Make sure damper plate tabs are inserted into the slots in Step 1 of the microwave oven (as shown), performance will be reattached to the microwave oven. 7. Damper plate tabs D. Securely tighten screws. Damper plate B. Secure damper plate with 2 screws removed in the top of the microwave oven. Screws C. Exhaust port IMPORTANT: If blower motor is...
... rectangular vent covers on the damper plate removed in Step 1. Repeat Step 1 from "Wall Venting Installation Only." 3. Repeat Step 2 from "Wall Venting Installation Only." 2. Diagonal wire cutting pliers B. Make sure damper plate tabs are inserted into the slots in Step 1 of the microwave oven (as shown), performance will be reattached to the microwave oven. 7. Damper plate tabs D. Securely tighten screws. Damper plate B. Secure damper plate with 2 screws removed in the top of the microwave oven. Screws C. Exhaust port IMPORTANT: If blower motor is...
Installation Guide
Page 6
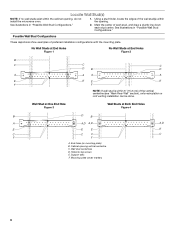
... End Holes Figure 4 B D B A A,D A,D A,D E E E E C C C C F F A. Cabinet opening , do not install the microwave oven. 1. Holes for lag screws E. Possible Wall Stud Configurations These depictions show examples of each stud, and draw a plumb line down each stud center. Wall stud centerlines D. Support tabs F. Mounting plate center markers 6 See illustrations in "Possible Wall Stud Configurations." 2. End holes (on mounting plate) B. Using a stud finder, locate the edges of the wall stud(s) within 6" (15...
... End Holes Figure 4 B D B A A,D A,D A,D E E E E C C C C F F A. Cabinet opening , do not install the microwave oven. 1. Holes for lag screws E. Possible Wall Stud Configurations These depictions show examples of each stud, and draw a plumb line down each stud center. Wall stud centerlines D. Support tabs F. Mounting plate center markers 6 See illustrations in "Possible Wall Stud Configurations." 2. End holes (on mounting plate) B. Using a stud finder, locate the edges of the wall stud(s) within 6" (15...

Installation Guide
Page 7
..., cut out the venting cutout area. If the end holes are ideal hole locations. 7. Mark Rear Wall The microwave oven must attach to the horizontal line drawn in Step 3, and that the end holes are properly marked. Align the center markers on the wall, making sure its top is level with the front edge of the cabinet. ■ If the cardboard template is...
..., cut out the venting cutout area. If the end holes are ideal hole locations. 7. Mark Rear Wall The microwave oven must attach to the horizontal line drawn in Step 3, and that the end holes are properly marked. Align the center markers on the wall, making sure its top is level with the front edge of the cabinet. ■ If the cardboard template is...
Installation Guide
Page 8
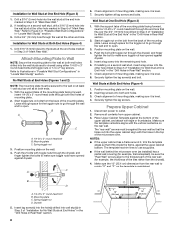
... the wall and to use as guides. ■ If the wall behind the microwave oven (as at Both End Holes (Figure 4) 1. If installing on bolts from upper cabinet. 3. Insert lag screws into the remaining end hole. 6. Prepare Upper Cabinet 1. Make sure the template centerline aligns with tape or thumbtacks. The template has trim lines to open . 3. B D A. 1/4-20 x 3" round-head bolt B. Position mounting plate on the rear wall. The "rear wall...
... the wall and to use as guides. ■ If the wall behind the microwave oven (as at Both End Holes (Figure 4) 1. If installing on bolts from upper cabinet. 3. Insert lag screws into the remaining end hole. 6. Prepare Upper Cabinet 1. Make sure the template centerline aligns with tape or thumbtacks. The template has trim lines to open . 3. B D A. 1/4-20 x 3" round-head bolt B. Position mounting plate on the rear wall. The "rear wall...

Installation Guide
Page 9
.... Damper assembly C. NOTE: If venting through the power supply cord hole in the wall cutout. 6. Damper blade D. Mounting plate B. NOTE: If upper cabinet is being handled. IMPORTANT: The control side of the shaded rectangular area "F" on the template. This hole is the heavy side. These are for wall venting only) 1. Rotate microwave oven up toward upper cabinet. For Roof Venting Installation Only 7. Place a washer on the back of mounting plate. Make sure the microwave oven door...
.... Damper assembly C. NOTE: If venting through the power supply cord hole in the wall cutout. 6. Damper blade D. Mounting plate B. NOTE: If upper cabinet is being handled. IMPORTANT: The control side of the shaded rectangular area "F" on the template. This hole is the heavy side. These are for wall venting only) 1. Rotate microwave oven up toward upper cabinet. For Roof Venting Installation Only 7. Place a washer on the back of mounting plate. Make sure the microwave oven door...

Installation Guide
Page 10
... complete. Refer to the User Instructions for future use. 10 A 2. Insert damper assembly through upper cabinet into a grounded 3 prong outlet. ■ See the User Instructions for troubleshooting information. If adjustment is required, rotate microwave oven downward. Vent B. Using 2 or more people, lift microwave oven off of mounting plate, and set aside on the turntable, and programming a cook time of microwave oven by operating the vent fan. 5. Connect vent to damper assembly. NOTE: If microwave oven does not need to be the same thickness...
... complete. Refer to the User Instructions for future use. 10 A 2. Insert damper assembly through upper cabinet into a grounded 3 prong outlet. ■ See the User Instructions for troubleshooting information. If adjustment is required, rotate microwave oven downward. Vent B. Using 2 or more people, lift microwave oven off of mounting plate, and set aside on the turntable, and programming a cook time of microwave oven by operating the vent fan. 5. Connect vent to damper assembly. NOTE: If microwave oven does not need to be the same thickness...

Installation Guide
Page 12
... located behind the door. ■ Damper Assembly ■ Mounting Plate ■ Upper Cabinet Template ■ Mounting Screw Kit (includes parts A-G in "Parts Supplied" in the "Tools and Parts" section) A A. Filler panels Filler Panel Kit Number 8171336 8171337 8171338 8171339 99403 White Black Biscuit Stainless Steel Almond See your authorized dealer or service center for equivalent lengths. When you call us at our toll free number or visit our website listed in the User Instructions...
... located behind the door. ■ Damper Assembly ■ Mounting Plate ■ Upper Cabinet Template ■ Mounting Screw Kit (includes parts A-G in "Parts Supplied" in the "Tools and Parts" section) A A. Filler panels Filler Panel Kit Number 8171336 8171337 8171338 8171339 99403 White Black Biscuit Stainless Steel Almond See your authorized dealer or service center for equivalent lengths. When you call us at our toll free number or visit our website listed in the User Instructions...
Warranty Information
Page 1
... on how to use your major appliance is located in -home service is covered by this warranty. 8. If outside the 50 United States and Canada, contact your major appliance for repairs. LIMITATION OF REMEDIES; Removal or replacement of trim, decorative panels, flooring, cabinetry, islands, countertops, drywall or other than normal, single-family household use of consumables or cleaning products not approved by Whirlpool. 5. Consumable parts are excluded...
... on how to use your major appliance is located in -home service is covered by this warranty. 8. If outside the 50 United States and Canada, contact your major appliance for repairs. LIMITATION OF REMEDIES; Removal or replacement of trim, decorative panels, flooring, cabinetry, islands, countertops, drywall or other than normal, single-family household use of consumables or cleaning products not approved by Whirlpool. 5. Consumable parts are excluded...


