Installation Instructions
Page 4
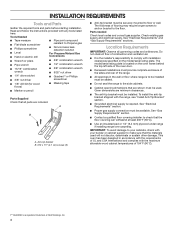
...8224; or Phillips screwdriver ■■ 1/8" drill bit (for wood floors) ■■ Masking tape ■■ Marker or pencil Parts Supplied Check that the floor covering can withstand at least 200°F (93°C). ■■ Use an insulated pad or 1/4" ... with any tools listed here. INSTALLATION REQUIREMENTS Tools and Parts Gather the required tools and parts before starting installation. A B A. Parts needed Check local codes and consult gas supplier. Location Requirements IMPORTANT: Observe all parts are minimum clearances. ■■ The anti-tip ...
...8224; or Phillips screwdriver ■■ 1/8" drill bit (for wood floors) ■■ Masking tape ■■ Marker or pencil Parts Supplied Check that the floor covering can withstand at least 200°F (93°C). ■■ Use an insulated pad or 1/4" ... with any tools listed here. INSTALLATION REQUIREMENTS Tools and Parts Gather the required tools and parts before starting installation. A B A. Parts needed Check local codes and consult gas supplier. Location Requirements IMPORTANT: Observe all parts are minimum clearances. ■■ The anti-tip ...

Installation Instructions
Page 5
...;⁄8" (76.5 cm) min. Back of cooktop** F. opening width F. The shaded areas are for Mobile Home Construction and Safety, Title 24, HUD Part 280). Additional Installation Requirements The installation of this range must be secured according to countertop B. 13" (33 cm) max. IMPORTANT: If installing a range... to the instructions in a mobile home, it must conform to front of range to the Manufactured Home Construction and Safety Standard, Title 24 CFR, Part 3280 (formerly the Federal Standard for 25" (64.0 cm) countertop depth, 24" (61.0 cm) base cabinet depth and 36" (91.4 ...
...;⁄8" (76.5 cm) min. Back of cooktop** F. opening width F. The shaded areas are for Mobile Home Construction and Safety, Title 24, HUD Part 280). Additional Installation Requirements The installation of this range must be secured according to countertop B. 13" (33 cm) max. IMPORTANT: If installing a range... to the instructions in a mobile home, it must conform to front of range to the Manufactured Home Construction and Safety Standard, Title 24 CFR, Part 3280 (formerly the Federal Standard for 25" (64.0 cm) countertop depth, 24" (61.0 cm) base cabinet depth and 36" (91.4 ...
Installation Instructions
Page 8
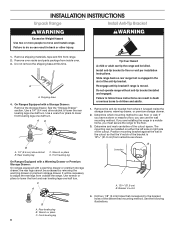
... can result in the cutout so that correspond to the floor. 3. Failure to adjust the rear legs from outside the range. Remove oven racks and parts package from range. 2. See the "Storage Drawer" section. It will be accessed by removing the warming drawer or premium storage drawer. C A B A. B Centerline A A. 129⁄36...
... can result in the cutout so that correspond to the floor. 3. Failure to adjust the rear legs from outside the range. Remove oven racks and parts package from range. 2. See the "Storage Drawer" section. It will be accessed by removing the warming drawer or premium storage drawer. C A B A. B Centerline A A. 129⁄36...
Installation Instructions
Page 10
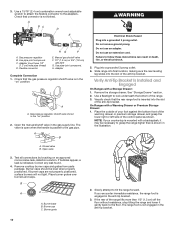
...-tip bracket. Failure to the adapters. See "Storage Drawer" section. 2. Burner base B. Remove the storage drawer. Closed valve B. Remove cooktop burner caps and grates from parts package. Place burner grates over burners and caps. Gas pressure regulator B. Flexible connector HG F E. Correct any leak found. 4. If you encounter immediate resistance, the range...
...-tip bracket. Failure to the adapters. See "Storage Drawer" section. 2. Burner base B. Remove the storage drawer. Closed valve B. Remove cooktop burner caps and grates from parts package. Place burner grates over burners and caps. Gas pressure regulator B. Flexible connector HG F E. Correct any leak found. 4. If you encounter immediate resistance, the range...

Installation Instructions
Page 14
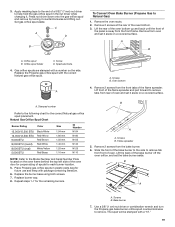
Slowly push the drawer into a grounded 3 prong outlet. ■■ Electrical supply is an extra part, go back through the steps to remove the oven door. A. The oven door is not suggested to see the "Range Care" section of the drawer ...inside the range so that the drawer stop notch is level. To Remove: 1. Open oven door all parts are placed in the Use and Care Guide or User Instructions. 8. Open the oven door. Check that you have all packaging materials. 4. Dispose of liquid...
Slowly push the drawer into a grounded 3 prong outlet. ■■ Electrical supply is an extra part, go back through the steps to remove the oven door. A. The oven door is not suggested to see the "Range Care" section of the drawer ...inside the range so that the drawer stop notch is level. To Remove: 1. Open oven door all parts are placed in the Use and Care Guide or User Instructions. 8. Open the oven door. Check that you have all packaging materials. 4. Dispose of liquid...
Installation Instructions
Page 19
... up and back until the front of the flame spreader. Orifice spud B. Screws B. Apply masking tape to help hold the gas orifice spud in plastic parts bag for each burner location. 5. Gas orifice spuds are stamped with a "57." 19 Remove 2 screws from the front frame. Orifice spud holder C. Lift the back...
... up and back until the front of the flame spreader. Orifice spud B. Screws B. Apply masking tape to help hold the gas orifice spud in plastic parts bag for each burner location. 5. Gas orifice spuds are stamped with a "57." 19 Remove 2 screws from the front frame. Orifice spud holder C. Lift the back...

Owners Manual
Page 8
... be canceled (if active) and only the following pads will function: ■ "up " or "down " arrow pads. The oven temperature will remain on for only part of foil or liner. The display will not change 25°F (14°C) each time the keypad is pressed. The oven is now in Sabbath...
... be canceled (if active) and only the following pads will function: ■ "up " or "down " arrow pads. The oven temperature will remain on for only part of foil or liner. The display will not change 25°F (14°C) each time the keypad is pressed. The oven is now in Sabbath...
Owners Manual
Page 11
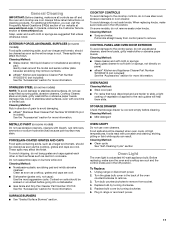
... away from socket. 4. Unplug range or disconnect power. 2. Damage may remove numbers. ■ affresh® Kitchen and Appliance Cleaner Part Number W10355010 (not included): See the "Accessories" section for more information. PORCELAIN-COATED GRATES AND CAPS Food spills containing acids, such ...■ Dishwasher (grates only, not caps): Use the most aggressive cycle. In Canada, reference the Customer Service section at www.whirlpool.com. Cleaning Method: ■ Glass cleaner, mild liquid cleaner or nonabrasive scrubbing pad: Gently clean around the model and serial number...
... away from socket. 4. Unplug range or disconnect power. 2. Damage may remove numbers. ■ affresh® Kitchen and Appliance Cleaner Part Number W10355010 (not included): See the "Accessories" section for more information. PORCELAIN-COATED GRATES AND CAPS Food spills containing acids, such ...■ Dishwasher (grates only, not caps): Use the most aggressive cycle. In Canada, reference the Customer Service section at www.whirlpool.com. Cleaning Method: ■ Glass cleaner, mild liquid cleaner or nonabrasive scrubbing pad: Gently clean around the model and serial number...
Owners Manual
Page 15
... visit our website at www.whirlpool.com or call us at 1-800-807-6777. In Canada, you can visit our website at www.whirlpool.ca or call us at 1-800-253-1301. affresh® Stainless Steel Cleaner (stainless steel models) Order Part Number W10355016 affresh® Stainless... Steel Cleaning Wipes (stainless steel models) Order Part Number W10355049 affresh® Kitchen and Appliance ...
... visit our website at www.whirlpool.com or call us at 1-800-807-6777. In Canada, you can visit our website at www.whirlpool.ca or call us at 1-800-253-1301. affresh® Stainless Steel Cleaner (stainless steel models) Order Part Number W10355016 affresh® Stainless... Steel Cleaning Wipes (stainless steel models) Order Part Number W10355049 affresh® Kitchen and Appliance ...

Owners Manual
Page 16
... major appliance was purchased. Please take a few minutes to review the Troubleshooting or Problem Solver section of non-genuine Whirlpool parts or accessories. 6. Commercial, non-residential, multiple-family use, or use of the Use and Care Guide, scan ... workmanship that interfere with the product, Whirlpool Corporation or Whirlpool Canada LP (hereafter "Whirlpool") will be addressed without service. Service or parts for Factory Specified Replacement Parts and repair labor to access additional resources, or visit www.whirlpool.com/product_help. 2. Cosmetic damage including ...
... major appliance was purchased. Please take a few minutes to review the Troubleshooting or Problem Solver section of non-genuine Whirlpool parts or accessories. 6. Commercial, non-residential, multiple-family use, or use of the Use and Care Guide, scan ... workmanship that interfere with the product, Whirlpool Corporation or Whirlpool Canada LP (hereafter "Whirlpool") will be addressed without service. Service or parts for Factory Specified Replacement Parts and repair labor to access additional resources, or visit www.whirlpool.com/product_help. 2. Cosmetic damage including ...


