Whirlpool WFG525S0HV Support and Manuals
Get Help and Manuals for this Whirlpool item
View All Support Options Below
Free Whirlpool WFG525S0HV manuals!
Problems with Whirlpool WFG525S0HV?
Ask a Question
Free Whirlpool WFG525S0HV manuals!
Problems with Whirlpool WFG525S0HV?
Ask a Question
Popular Whirlpool WFG525S0HV Manual Pages
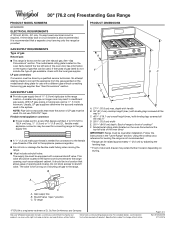
Dimension Guide - Page 1
... Whirlpool Corporation includes a continuous commitment to improve our products, we reserve the right to change without notice. It is needed for connection to the female pipe threads of range to change materials and specifications without consulting the serving gas supplier. See "Gas Conversions" section. Gas supply line B.
No attempt shall be level after installation...
Installation Instructions - Page 5

... installation instructions for leveling the range is not recommended. *Range can be raised approximately 1" (2.5 cm) by adjusting the
leveling legs. **Front of door and drawer may extend further forward,
depending on the oven frame behind the top left
side of rigid
gas pipe. Using the cooktop as a reference for dimensional clearances above the cooktop surface.
Model...
Installation Instructions - Page 6

... use with Natural gas. Install a shut-off valve.
Explosion Hazard
Use a new CSA International approved gas supply line. Type of Gas
Natural Gas:
■■ This range is factory set for the control panel to work.
A smaller size pipe on the model/serial rating plate for use with a different gas without consulting the serving gas supplier. With Propane gas, piping or...
Installation Instructions - Page 7
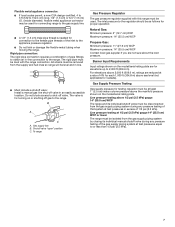
....8 m) above the manifold pressure shown on the model/serial rating plate.
Rigid pipe connection: The rigid pipe connection requires a combination of the gas supply piping system at least 1" (2.5 cm) ... Install a manual gas line shut-off valve. Line pressure testing at 1/2 psi (3.5 kPa) gauge 14" (35.5 cm) WCP or lower The range must be level with this range must be isolated from the gas...
Installation Instructions - Page 9
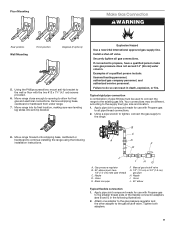
... result in the following installation instructions. Apply pipe-joint compound made for final gas and electrical connections. If connected to continue installing the range using the following illustration).
2. Nipple I
HG
A. Examples of a qualified person include: licensed heating personnel, authorized gas company personnel, and authorized service personnel. Move range into its final...
Installation Instructions - Page 12

...Replace the control knob. 4. Remove the oven rack. 2.
Press the START pad. Refer to the Use and Care Guide or User Instructions...Instructions for proper flame. Mirror
C. Pliers
1. Remove the control knob. Under certain conditions, it may take the burner up to 50 to 60 seconds to light. On models... to lowest setting. 2. Close...range. Light 1 burner and turn the screw located in...
Installation Instructions - Page 15

...to follow these instructions can tip the range and be done by a qualified installer. See the "Storage Drawer" or "Warming Drawer or Premium Storage Drawer" section.
2. Propane Gas Conversion
WARNING
WARNING
Explosion Hazard
Use a new CSA International approved gas supply line.
NOTE: On models with a warming drawer, an access cover must be killed.
Manual shutoff valve "closed...
Installation Instructions - Page 18

... regulator so that have to access the gas pressure regulator. IMPORTANT: You may have just been replaced in the above drawing.
6. Checking for each cooktop burner. Install anti-tip bracket to Natural Gas)
1. Failure to follow these instructions can tip the range and be removed to adjust the "LO" setting for proper cooktop, bake and broil burner...
Installation Instructions - Page 19
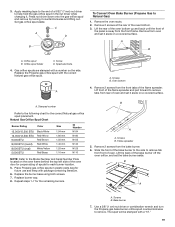
...the Model Number and Serial Number Plate located on a covered surface. Replace burner cap.
8.
Press nut driver down onto the gas orifice ...gas bake burner orifice spud counterclockwise to Natural Gas)
1. Set gas orifice spud aside. A. Slide the front of the bake burner to the side to help hold the gas orifice spud in plastic parts bag for future use and keep with the correct Natural gas...
Owners Manual - Page 4

... oven function. Temperature is displayed. FEATURE GUIDE
This manual covers several models. Refer to the Customer Service Section at serving temperature before or after 60 minutes. In Canada, refer to this manual or the Frequently Asked Questions (FAQs) section of the items listed. KEYPAD CLOCK
OVEN LIGHT TIMER (Set/Off)
START CANCEL TEMP/TIME BAKE
BROIL...
Owners Manual - Page 5

... death or fire. REMEMBER: When range is in place when using a burner cap.
Burner Cap: Always keep the burner cap in use or (on at a certain time of day, cook for an oven function with a delayed start. Timed Cooking allows the oven to follow these instructions can be set a Timed Cook or a Delayed...
Owners Manual - Page 12

... used , contact a service technician or see Installation Instructions. Mississauga, Ontario L5N 0B7
Please include a daytime phone number in knob before turning to incorrect heat level.
Air in the off position.
Range is tripped. See "Sealed Surface Burners" section.
See "Cooktop Use" section. Failure to the gas supply.
If this manual and scan the code there with your...
Owners Manual - Page 13

... Time" section. Error code (display shows letter followed by number). Press and hold START for display models in Sabbath Mode.
See "Oven Temperature Control" in the "Feature Guide" section. If a Self-Cleaning cycle has been run in the first 5 minutes of the surface burner knobs to unlock. Electronic oven control set incorrectly. Range converted improperly. Power...
Owners Manual - Page 14

...Range converted improperly.
This is detected. Oven temperature needs adjustment. Not enough air circulation around bakeware.
See the Installation Instructions. See "Positioning Racks and Bakeware" section.
Noises PROBLEM...Gas valve is being pulled off (on bottom. Oven was incorrect.
These sounds are some models... contact a service technician or see...The temperature set was not...
Owners Manual - Page 16

... an extended warranty. Repairs to parts or systems to review the Troubleshooting or Problem Solver section of merchantability or fitness, so this major appliance, you call 1-800-807-6777. LIMITATION OF REMEDIES; WHIRLPOOL® MAJOR APPLIANCE LIMITED WARRANTY
ATTACH YOUR RECEIPT HERE. Service to correct improper product maintenance or installation, installation not in materials...
Whirlpool WFG525S0HV Reviews
We have not received any reviews for Whirlpool yet.