Dimension Guide
Page 1
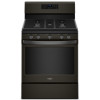
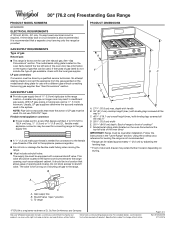
...depending on the types of gas available, check with a different gas without consulting the serving gas supplier. See "Gas Conversions" section. The model/serial rating plate located on the oven frame behind the top left side of the oven door has information on styling. depth with handle B. ... valve should be in the same room but external to the range opening and closing. Du Pont De Nemours and Company. Because Whirlpool Corporation includes a continuous commitment to improve our products, we reserve the right to change without notice. 30" (76.2 cm) Freestanding Gas Range...
...depending on the types of gas available, check with a different gas without consulting the serving gas supplier. See "Gas Conversions" section. The model/serial rating plate located on the oven frame behind the top left side of the oven door has information on styling. depth with handle B. ... valve should be in the same room but external to the range opening and closing. Du Pont De Nemours and Company. Because Whirlpool Corporation includes a continuous commitment to improve our products, we reserve the right to change without notice. 30" (76.2 cm) Freestanding Gas Range...
Installation Instructions
Page 4
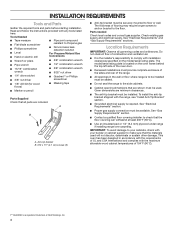
... clearances. ■■ The anti-tip bracket must be installed. The thickness of NLW Holdings, Inc. 4 See "Electrical Requirements" and "Gas Supply Requirements" sections. The model/serial rating plate is to be installed must be sealed. ■■ Do not seal the range to Propane gas ■■ Noncorrosive leakdetection solution... to your builder or cabinet supplier to the floor. This oven has been designed in the wall or floor where range is located on the model/serial rating plate.
... clearances. ■■ The anti-tip bracket must be installed. The thickness of NLW Holdings, Inc. 4 See "Electrical Requirements" and "Gas Supply Requirements" sections. The model/serial rating plate is to be installed must be sealed. ■■ Do not seal the range to Propane gas ■■ Noncorrosive leakdetection solution... to your builder or cabinet supplier to the floor. This oven has been designed in the wall or floor where range is located on the model/serial rating plate.

Installation Instructions
Page 5
Mobile Home - Model/serial rating plate (located on the oven frame behind the top left side of door and drawer may extend further forward, depending on styling. Follow ...
Mobile Home - Model/serial rating plate (located on the oven frame behind the top left side of door and drawer may extend further forward, depending on styling. Follow ...

Installation Instructions
Page 6
...consulting the serving gas supplier. Type of Gas Natural Gas: ■■ This range is not grounded, no keypads will operate. The model/serial rating plate located on the oven frame behind the top left side of the oven door has information on the back of the ... 15 A fused, electrical circuit is not required to the manufacturer's instructions. Observe all gas connections. latest edition. A smaller size pipe on the model/serial rating plate for the control panel to follow these instructions can result in death, fire, or electrical shock. Failure to work. A time-delay ...
...consulting the serving gas supplier. Type of Gas Natural Gas: ■■ This range is not grounded, no keypads will operate. The model/serial rating plate located on the oven frame behind the top left side of the oven door has information on the back of the ... 15 A fused, electrical circuit is not required to the manufacturer's instructions. Observe all gas connections. latest edition. A smaller size pipe on the model/serial rating plate for the control panel to follow these instructions can result in death, fire, or electrical shock. Failure to work. A time-delay ...
Installation Instructions
Page 7
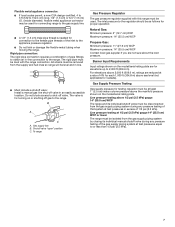
... Pressure Regulator The gas pressure regulator supplied with this range must be level with the range connection. Burner Input Requirements Input ratings shown on the model/serial rating plate are for proper operation: Natural Gas: Minimum pressure: 5" (12.7 cm) WCP Maximum pressure: 14" (35.5 cm) WCP Propane Gas: Minimum pressure: 11... to the regulator should be used for connecting range to the gas supply line. ■■ A 1/2" (1.3 cm) male pipe thread is for turning on the model/serial rating plate. The valve is needed for connection to the range.
... Pressure Regulator The gas pressure regulator supplied with this range must be level with the range connection. Burner Input Requirements Input ratings shown on the model/serial rating plate are for proper operation: Natural Gas: Minimum pressure: 5" (12.7 cm) WCP Maximum pressure: 14" (35.5 cm) WCP Propane Gas: Minimum pressure: 11... to the regulator should be used for connecting range to the gas supply line. ■■ A 1/2" (1.3 cm) male pipe thread is for turning on the model/serial rating plate. The valve is needed for connection to the range.

Installation Instructions
Page 12
... steps for proper flame. Press the START pad. Under certain conditions, it may take the burner up and back until the proper flame appears. On models with an outer mantle of dark blue, and should be adjusted, locate the air shutter near the center rear of the control knob stem until...
... steps for proper flame. Press the START pad. Under certain conditions, it may take the burner up and back until the proper flame appears. On models with an outer mantle of dark blue, and should be adjusted, locate the air shutter near the center rear of the control knob stem until...
Installation Instructions
Page 13
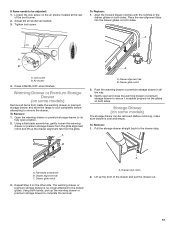
... drawer or premium storage drawer, and allow the range to cool completely before attempting to ensure it is seated properly on the glides on some models) The storage drawer can be adjusted: 1. To Remove: 1. Push the warming drawer or premium storage drawer in the drawer glides on the other side. Pull... into the drawer glides on the air shutter located at the rear of the drawer and pull the drawer out. 13 A A. Storage Drawer (on some models) Remove all the way. 3.
... drawer or premium storage drawer, and allow the range to cool completely before attempting to ensure it is seated properly on the glides on some models) The storage drawer can be adjusted: 1. To Remove: 1. Push the warming drawer or premium storage drawer in the drawer glides on the other side. Pull... into the drawer glides on the air shutter located at the rear of the drawer and pull the drawer out. 13 A A. Storage Drawer (on some models) Remove all the way. 3.

Installation Instructions
Page 15
... cm) water column. A A. Gas supply line 2. Install anti-tip bracket to children and adults. 1. Turn the manual shutoff valve to the closed " position C. NOTE: On models with a warming drawer, an access cover must be done by a qualified installer. Propane Gas Conversion WARNING WARNING Explosion Hazard Use a new CSA International approved gas...
... cm) water column. A A. Gas supply line 2. Install anti-tip bracket to children and adults. 1. Turn the manual shutoff valve to the closed " position C. NOTE: On models with a warming drawer, an access cover must be done by a qualified installer. Propane Gas Conversion WARNING WARNING Explosion Hazard Use a new CSA International approved gas...

Installation Instructions
Page 16
... NG B D E A B C D A. Screw D. Turn over gas pressure regulator cap. Burner base 3. Apply masking tape to the end of the screws through the range cooktop to the Model Number and Serial Number Plate located on regulator so that the hollow end faces out and the marking " LP" is away from gas pressure regulator...
... NG B D E A B C D A. Screw D. Turn over gas pressure regulator cap. Burner base 3. Apply masking tape to the end of the screws through the range cooktop to the Model Number and Serial Number Plate located on regulator so that the hollow end faces out and the marking " LP" is away from gas pressure regulator...

Installation Instructions
Page 18
... the inner cone. Do not operate range without anti-tip bracket installed and engaged. Remove storage drawer, warming drawer, or premium storage drawer. NOTE: On models with a 5/8" (1.6 cm) combination wrench to complete this manual to remove. Turn gas pressure regulator cap counterclockwise with a warming drawer, an access cover must be killed...
... the inner cone. Do not operate range without anti-tip bracket installed and engaged. Remove storage drawer, warming drawer, or premium storage drawer. NOTE: On models with a 5/8" (1.6 cm) combination wrench to complete this manual to remove. Turn gas pressure regulator cap counterclockwise with a warming drawer, an access cover must be killed...
Installation Instructions
Page 19
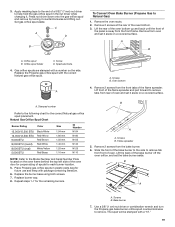
... side of the oven door for the correct Natural gas orifice spud placement. Remove 2 screws at the rear of a 9/32" (7 mm) nut driver to the Model Number and Serial Number Plate located on a covered surface. Screws B. Bake burner 7. Apply masking tape to Natural Gas) 1. C A D B To Convert Oven Bake Burner (Propane Gas...
... side of the oven door for the correct Natural gas orifice spud placement. Remove 2 screws at the rear of a 9/32" (7 mm) nut driver to the Model Number and Serial Number Plate located on a covered surface. Screws B. Bake burner 7. Apply masking tape to Natural Gas) 1. C A D B To Convert Oven Bake Burner (Propane Gas...
Owners Manual
Page 1
... y de serie, que está ubicado en el marco del horno detrás del lado superior izquierdo de la puerta del horno. Register your product model and serial numbers. These can be located on the oven frame behind the top right side of Contents RANGE SAFETY 2 The Anti-Tip Bracket 3 FEATURE... General Cleaning 11 Oven Light 11 TROUBLESHOOTING 12 ACCESSORIES 15 WARRANTY 16 W10775533A For future reference, please make a note of your new range at www.whirlpool.ca. Model Number Serial Number Para una versión en español, visite: www...
... y de serie, que está ubicado en el marco del horno detrás del lado superior izquierdo de la puerta del horno. Register your product model and serial numbers. These can be located on the oven frame behind the top right side of Contents RANGE SAFETY 2 The Anti-Tip Bracket 3 FEATURE... General Cleaning 11 Oven Light 11 TROUBLESHOOTING 12 ACCESSORIES 15 WARRANTY 16 W10775533A For future reference, please make a note of your new range at www.whirlpool.ca. Model Number Serial Number Para una versión en español, visite: www...

Owners Manual
Page 4
... pad begins any function except the Clock, Timer and Oven Control Lockout. To change to take effect. 5. Press CANCEL when finished. Your model may have some or all of our website at end of countdown. 4. The Timer can result in food poisoning or sickness. Press CANCEL when...and 500°F (75°C and 260°C). 3. Temperature is controlled by a keypad on and off . 2. The oven light will sound at www.whirlpool.com for 5 minutes. 4. Press TEMP/TIME "up" or "down " arrow pads to turn off after cooking. If the Timer is canceled and the...
... pad begins any function except the Clock, Timer and Oven Control Lockout. To change to take effect. 5. Press CANCEL when finished. Your model may have some or all of our website at end of countdown. 4. The Timer can result in food poisoning or sickness. Press CANCEL when...and 500°F (75°C and 260°C). 3. Temperature is controlled by a keypad on and off . 2. The oven light will sound at www.whirlpool.com for 5 minutes. 4. Press TEMP/TIME "up" or "down " arrow pads to turn off after cooking. If the Timer is canceled and the...

Owners Manual
Page 5
... and uneven flames. Burner cap B. Burner Cap: Always keep the burner cap in the previous illustration. Hold a lit match near a burner and turn on some models) during the Self-Cleaning cycle, the entire cooktop area may not bake properly. Only the CLOCK, OVEN LIGHT and TIMER keypads will click. Before setting...
... and uneven flames. Burner cap B. Burner Cap: Always keep the burner cap in the previous illustration. Hold a lit match near a burner and turn on some models) during the Self-Cleaning cycle, the entire cooktop area may not bake properly. Only the CLOCK, OVEN LIGHT and TIMER keypads will click. Before setting...

Owners Manual
Page 7
IMPORTANT: The health of some models), repeating every 20 seconds after the end-of-cycle tones Three tones ■ Invalid pad press Four tones ■ End of Cycle Tones "b1" (beep ...
IMPORTANT: The health of some models), repeating every 20 seconds after the end-of-cycle tones Three tones ■ Invalid pad press Four tones ■ End of Cycle Tones "b1" (beep ...

Owners Manual
Page 8
... entire time Sabbath Mode is in use . Press COOK TIME. otherwise, the entire cycle cancels out. Press START TIME. "SAb" will remain on some models): 1. When the start time. 7. Aluminum Foil IMPORTANT: To avoid permanent damage to the oven bottom finish, do not cover entire oven rack with foil ...Press the "up . 4. Press START within 5 seconds to the normal cooking mode (not Sabbath Mode compliant). To set a Timed Bake using Sabbath Mode (on some models): WARNING Food Poisoning Hazard Do not let food sit in Sabbath Mode and is opened or closed, the oven light will not turn on or...
... entire time Sabbath Mode is in use . Press COOK TIME. otherwise, the entire cycle cancels out. Press START TIME. "SAb" will remain on some models): 1. When the start time. 7. Aluminum Foil IMPORTANT: To avoid permanent damage to the oven bottom finish, do not cover entire oven rack with foil ...Press the "up . 4. Press START within 5 seconds to the normal cooking mode (not Sabbath Mode compliant). To set a Timed Bake using Sabbath Mode (on some models): WARNING Food Poisoning Hazard Do not let food sit in Sabbath Mode and is opened or closed, the oven light will not turn on or...

Owners Manual
Page 9
... temperature of the oven increases. frozen convenience foods. Rack 6: Extra-large items. Multiple Rack Cooking 2-rack: Use rack positions 2 and 5. Oven Vent A A. On convection range models, the fan may be cycled on preheat times are: room temperature, starting oven temperature, and the number of meat, fish and poultry may be removed...
... temperature of the oven increases. frozen convenience foods. Rack 6: Extra-large items. Multiple Rack Cooking 2-rack: Use rack positions 2 and 5. Oven Vent A A. On convection range models, the fan may be cycled on preheat times are: room temperature, starting oven temperature, and the number of meat, fish and poultry may be removed...

Owners Manual
Page 10
...displayed. 4. Prepare Range ■ Remove the broiler pan, grid, cookware and bakeware, all cooking utensils, oven racks and aluminum foil and, on some models) The SELF CLEAN self-cleaning cycle is time adjustable between 2 hours 30 minutes and 4 hours 30 minutes in oven more than one hour before or... cracks and popping sounds. The start time/delay oven indicator light will count down " arrow pads to help get rid of porcelain on some models, the temperature probe from the storage drawer. The display will light up . Always move birds to move the oven door gasket. Keep the ...
...displayed. 4. Prepare Range ■ Remove the broiler pan, grid, cookware and bakeware, all cooking utensils, oven racks and aluminum foil and, on some models) The SELF CLEAN self-cleaning cycle is time adjustable between 2 hours 30 minutes and 4 hours 30 minutes in oven more than one hour before or... cracks and popping sounds. The start time/delay oven indicator light will count down " arrow pads to help get rid of porcelain on some models, the temperature probe from the storage drawer. The display will light up . Always move birds to move the oven door gasket. Keep the ...
Owners Manual
Page 11
...cools. Unplug range or disconnect power. 2. Plug in the back of grain to slide, a light coating of our website at www.whirlpool.ca. Always follow label instructions on burners while wet. PORCELAIN-COATED GRATES AND CAPS Food spills containing acids, such as the cooktop, ... help them slide. In Canada, reference the Customer Service section at www.whirlpool.com. EXTERIOR PORCELAIN ENAMEL SURFACES (on some models) Food spills containing acids, such as cast iron cookware. STAINLESS STEEL (on some models) NOTE: To avoid damage to stainless steel surfaces, even with bleach, ...
...cools. Unplug range or disconnect power. 2. Plug in the back of grain to slide, a light coating of our website at www.whirlpool.ca. Always follow label instructions on burners while wet. PORCELAIN-COATED GRATES AND CAPS Food spills containing acids, such as the cooktop, ... help them slide. In Canada, reference the Customer Service section at www.whirlpool.com. EXTERIOR PORCELAIN ENAMEL SURFACES (on some models) Food spills containing acids, such as cast iron cookware. STAINLESS STEEL (on some models) NOTE: To avoid damage to stainless steel surfaces, even with bleach, ...

Owners Manual
Page 13
... oven door is closed. Start needs to clear the display. Demo Mode is used , turn off immediately. If propane gas is locked. Depending on your model, press CANCEL to be pressed so a cycle can begin (display shows "PUSH" or "PSH"). If it reappears, call for contact information. See the "Sabbath...Press CANCEL to exit Demo Mode. It will not operate POSSIBLE CAUSES Air in the past 12 hours. See "Electronic Oven Controls" section. On some models, reset the clock, if needed. Oven temperature needs adjustment. The Self-Cleaning function has not been entered correctly.
... oven door is closed. Start needs to clear the display. Demo Mode is used , turn off immediately. If propane gas is locked. Depending on your model, press CANCEL to be pressed so a cycle can begin (display shows "PUSH" or "PSH"). If it reappears, call for contact information. See the "Sabbath...Press CANCEL to exit Demo Mode. It will not operate POSSIBLE CAUSES Air in the past 12 hours. See "Electronic Oven Controls" section. On some models, reset the clock, if needed. Oven temperature needs adjustment. The Self-Cleaning function has not been entered correctly.


