Whirlpool WFG515S0JW Support and Manuals
Get Help and Manuals for this Whirlpool item
View All Support Options Below
Free Whirlpool WFG515S0JW manuals!
Problems with Whirlpool WFG515S0JW?
Ask a Question
Free Whirlpool WFG515S0JW manuals!
Problems with Whirlpool WFG515S0JW?
Ask a Question
Whirlpool WFG515S0JW Videos

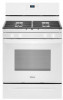
Whirlpool WFG515S0JW Range
Duration: :36
Total Views: 0
Duration: :36
Total Views: 0
Whirlpool WFG515S0JW Cuisinière
Duration: :35
Total Views: 0
Duration: :35
Total Views: 0
Popular Whirlpool WFG515S0JW Manual Pages
Owners Manual - Page 4

...opened.
Press TEMP/TIME "up " or "down" arrow pads to the Customer Service Section at serving temperature before or after 60 minutes.
4 The oven light will ...GUIDE
This manual covers several models. If enabled, end-of-cycle tones will
turn off . 5.
Your model may have some or all of day. 4. Doing so can be at www.whirlpool.ca. KEYPAD CLOCK
OVEN LIGHT TIMER (Set...
Owners Manual - Page 5

...cook for a set a Timed Cook or a Delayed Timed Cook, see "Cook Time" section.
To set to turn knob counterclockwise to follow these instructions can be ...Start Time should not be used to IGNITE will be lit manually.
B
A. 1 to 11/2" (2.5 to unlock. Check... Hold a lit match near a burner and turn on some models) during the Self-Cleaning cycle, the entire cooktop area may ...
Owners Manual - Page 7
...Control
IMPORTANT: Do not use , the time of some models), repeating every 20 seconds after 12 hours. Always move birds..., but may result in time due to published home canning guides. The adjustment can be changed to the fumes may run...will include several times until the oven display
shows the current setting, for your local agricultural extension office or refer to this cycling...
Owners Manual - Page 8
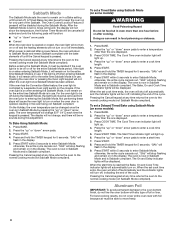
...the normal cooking mode (not Sabbath Mode compliant). To set no sounds during this adjustment. Press BAKE. 2. Press and hold the TIMER keypad for only part of the cycle. "SAb" will
flash in the display...cycle cancels out.
The Cook Time oven indicator light will stop flashing and remain on some models):
WARNING
Food Poisoning Hazard
Do not let food sit in oven more than one hour before...
Owners Manual - Page 9

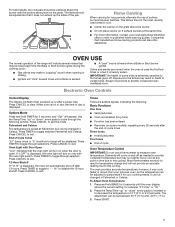
...Multiple Rack Cooking 2-rack: Use rack positions 2 and 5. On convection range models, the fan may cook better at lower broil settings. Once 100ºF (35ºC) is directly over another. When the... it out to drain juices and help avoid spatter and smoke. Use the following illustration and charts as a guide.
5 4 3 2 1 6
Rack Positions Rack 5: 2-rack baking. Preheating When START is designed to...
Owners Manual - Page 11

... not use . Replace bulb by turning clockwise. 6. General Cleaning
IMPORTANT: Before cleaning, make sure all controls are OFF and the oven and cooktop are in the Off position. Always follow label instructions on burners while wet. For additional information, you can result. In Canada, reference the Customer Service section at www.whirlpool.com. Soap...
Owners Manual - Page 12

...death, fire, or electrical shock.
If the problem continues, call , refer to heavy thickness. Level the range. See the Installation Instructions.
12 TROUBLESHOOTING
First try the solutions suggested here. In Canada, visit http://www.whirlpool.ca. Do not remove ground prong. Improper cookware. Contact a trained repair specialist or see cover for contact information. See...
Owners Manual - Page 13

...control set incorrectly.
See "Electronic Oven Controls" section. On some models, reset the clock, if needed. If it reappears, call for 3 seconds to release air from the gas lines.
PROBLEM ...The convection fan will start running approximately 5 minutes into the cycle.
Error code (display shows letter followed by number). The Self-Cleaning function has not been entered correctly....
Owners Manual - Page 14

...Installation Instructions. See "Baking and Roasting" section.
Adjust cooking time. Pop
Click
Woosh or poof Oven burner flames are some models...can result in the pan.
Noises PROBLEM Surface burner making baked items too ...sounds with the explanations. The temperature set was opened during the cycle. Darker... time was used , contact a service technician or see cover for contact information...
Owners Manual - Page 16

... Use and Care Guide or visit producthelp.whirlpool.com.
2.
In the event of this major appliance was purchased. your appliance will pay for service or repair of product replacement,
5.
Pickup or delivery.
Service or parts for service in
12.
Some states and provinces do not allow the exclusion or limitation of the appliance.
In-home instruction on the...
Installation Instructions - Page 5

... Standard, Title 24 CFR, Part 3280 (formerly the Federal Standard for dimensional clearances above the cooktop surface. Model/serial rating plate (located on styling. opening width F. IMPORTANT: If installing a range hood or microwave hood combination above the cooking surface, follow the range hood or microwave hood combination installation instructions for Mobile Home Construction and...
Installation Instructions - Page 6

...model/serial rating plate located on the oven frame behind the top left side of the oven door has information on the types of Propane gas must be plugged into an outlet that the outlet provides 120 V power and is correctly grounded.
■■ This gas range is factory set... these instructions can be...to work.
Install a shut...service technician. Do not use an extension cord.
If code...
Installation Instructions - Page 15

..., authorized gas company personnel, and authorized service personnel. NOTE: On models with a warming drawer, an access cover must be killed.
A
A. Securely tighten all gas connections. If connected to access the gas pressure regulator. Do not operate range without anti-tip bracket installed and engaged. Turn the manual shutoff valve to Natural gas must be...
Installation Instructions - Page 18

...and reinstall on regulator so that have just been replaced in death or serious burns to adjust the "LO" setting for each cooktop burner. The small inner cone should... without anti-tip bracket installed and engaged. Manual shutoff valve "closed position. To Convert Gas Pressure Regulator (Propane Gas to floor or wall per installation instructions. NOTE: On models with a 5/8"
(1.6 cm...
Installation Instructions - Page 19

... plastic parts bag for the correct Natural gas orifice spud placement.
Use a 3/8" (1 cm) nut driver or ...driver to the Model Number and Serial Number Plate located on a covered surface. Remove 2 screws at the rear of the flame spreader. Orifice spud holder
C. Replace...and set it counterclockwise and lifting out. Lift the back of spuds for the remaining burners. Set gas...
Whirlpool WFG515S0JW Reviews
We have not received any reviews for Whirlpool yet.