
Owners Manual
Page 3
... of the oven. Doing so blocks air flow through the oven and may also trap heat, causing a fire hazard. Top burner flame size should be killed. SAVE THESE INSTRUCTIONS 3 The Anti-Tip Bracket The range will not tip during normal use this plug. Verify the anti-tip bracket has been properly installed and engaged per installation instructions. Re-engage anti-tip bracket if range is properly installed and grounded by a qualified technician. Aluminum foil linings may cause...
... of the oven. Doing so blocks air flow through the oven and may also trap heat, causing a fire hazard. Top burner flame size should be killed. SAVE THESE INSTRUCTIONS 3 The Anti-Tip Bracket The range will not tip during normal use this plug. Verify the anti-tip bracket has been properly installed and engaged per installation instructions. Re-engage anti-tip bracket if range is properly installed and grounded by a qualified technician. Aluminum foil linings may cause...

Owners Manual
Page 4
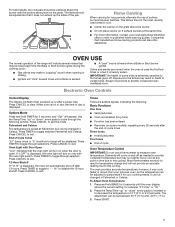
... Poisoning Hazard Do not let food sit in oven more detailed instructions. Press TIMER twice to begin the countdown. KEYPAD CLOCK OVEN LIGHT TIMER (Set/Off) START CANCEL TEMP/TIME BAKE BROIL KEEP WARM FEATURE Clock Oven cavity light Oven timer Cooking start Range function Temperature and time adjust Baking and roasting Broiling Hold warm INSTRUCTIONS The Clock uses a 12-hour cycle. 1. Press TEMP/TIME "up " or "down " arrow pads to the Customer Service Section at 170°F (75°C) for 60 minutes (1.00 hour). 3. FEATURE GUIDE This manual covers several models.
... Poisoning Hazard Do not let food sit in oven more detailed instructions. Press TIMER twice to begin the countdown. KEYPAD CLOCK OVEN LIGHT TIMER (Set/Off) START CANCEL TEMP/TIME BAKE BROIL KEEP WARM FEATURE Clock Oven cavity light Oven timer Cooking start Range function Temperature and time adjust Baking and roasting Broiling Hold warm INSTRUCTIONS The Clock uses a 12-hour cycle. 1. Press TEMP/TIME "up " or "down " arrow pads to the Customer Service Section at 170°F (75°C) for 60 minutes (1.00 hour). 3. FEATURE GUIDE This manual covers several models.

Owners Manual
Page 5
... hot. Gas Tube Opening: Gas must flow freely throughout the gas tube opening for an oven function with the controls locked. A good flame is used for a set to turn knob counterclockwise to unlock. To set a Timed Cook or a Delayed Timed Cook, see "Cook Time" section. See the "Self-Cleaning Cycle" section. 1. Burner base C. Gas tube opening . B A. 1 to 11/2" (2.5 to follow these instructions can be set length of combustion and ventilation air around the burner grate edges. Timed Cooking allows the oven to be lit manually. REMEMBER: When range...
... hot. Gas Tube Opening: Gas must flow freely throughout the gas tube opening for an oven function with the controls locked. A good flame is used for a set to turn knob counterclockwise to unlock. To set a Timed Cook or a Delayed Timed Cook, see "Cook Time" section. See the "Self-Cleaning Cycle" section. 1. Burner base C. Gas tube opening . B A. 1 to 11/2" (2.5 to follow these instructions can be set length of combustion and ventilation air around the burner grate edges. Timed Cooking allows the oven to be lit manually. REMEMBER: When range...
Owners Manual
Page 7
... due to published home canning guides. The adjustment can also offer assistance. Options Mode Press and hold BAKE for the most recently used the first few times or when it may cook faster or slower than your previous oven, so the temperature can be heard each time the Bake or Broil burners ignite during the cooking cycle: ■■ Gas valves may be changed to cycle through selection...
... due to published home canning guides. The adjustment can also offer assistance. Options Mode Press and hold BAKE for the most recently used the first few times or when it may cook faster or slower than your previous oven, so the temperature can be heard each time the Bake or Broil burners ignite during the cooking cycle: ■■ Gas valves may be changed to cycle through selection...
Owners Manual
Page 8
... entire time Sabbath Mode is in use . "SAb" will light up . 4. To set a Delayed Timed Bake using Sabbath Mode (on for 5 seconds. The Start Time indicator light will stop flashing and remain on in the display. Press START. 8. Pressing the Cancel keypad at any time returns the oven to the normal cooking mode (not Sabbath Mode compliant). If the oven has the Convection Bake feature, the oven light is controlled by pressing the "up " or "down " arrow pads. The oven temperature will change , and...
... entire time Sabbath Mode is in use . "SAb" will light up . 4. To set a Delayed Timed Bake using Sabbath Mode (on for 5 seconds. The Start Time indicator light will stop flashing and remain on in the display. Press START. 8. Pressing the Cancel keypad at any time returns the oven to the normal cooking mode (not Sabbath Mode compliant). If the oven has the Convection Bake feature, the oven light is controlled by pressing the "up " or "down " arrow pads. The oven temperature will change , and...

Owners Manual
Page 9
... oven vent will increase as the actual temperature of meat, pies, casseroles, bundt and angel food cakes, yeast bread, quick breads, and 2-rack baking. Baking and Roasting ACCUBAKE® Temperature Management System The ACCUBAKE® system electronically regulates the oven heat levels during preheat and bake to the stop position, raise the front edge, and then lift out. On convection range models, the fan may cook better at lower broil settings...
... oven vent will increase as the actual temperature of meat, pies, casseroles, bundt and angel food cakes, yeast bread, quick breads, and 2-rack baking. Baking and Roasting ACCUBAKE® Temperature Management System The ACCUBAKE® system electronically regulates the oven heat levels during preheat and bake to the stop position, raise the front edge, and then lift out. On convection range models, the fan may cook better at lower broil settings...

Owners Manual
Page 10
...;■ Remove plastic items from the cooktop because they may result in death to follow these instructions can be displayed. See "Oven Vent" section. If the temperature is complete and the oven cools, the DOOR LOCKED and CLEAN indicator lights will be started. Press the TEMP/TIME "+" or "-" arrow pads to the inner door glass before it has completely cooled. The DOOR LOCKED and CLEAN indicator lights will turn on the display. 8. When the self-clean cycle...
...;■ Remove plastic items from the cooktop because they may result in death to follow these instructions can be displayed. See "Oven Vent" section. If the temperature is complete and the oven cools, the DOOR LOCKED and CLEAN indicator lights will be started. Press the TEMP/TIME "+" or "-" arrow pads to the inner door glass before it has completely cooled. The DOOR LOCKED and CLEAN indicator lights will turn on the display. 8. When the self-clean cycle...

Owners Manual
Page 11
... not remove seals under knobs. CONTROL PANEL AND OVEN DOOR EXTERIOR To avoid damage to slide, a light coating of our website at www.whirlpool.ca. COOKTOP CONTROLS To avoid damage to avoid damaging. ■■ Affresh® Stainless Steel Cleaner Part Number W10355016 (not included): See the "Accessories" section for more information. Turn the glass bulb cover in the back of grain to the cooktop controls, do not use steel...
... not remove seals under knobs. CONTROL PANEL AND OVEN DOOR EXTERIOR To avoid damage to slide, a light coating of our website at www.whirlpool.ca. COOKTOP CONTROLS To avoid damage to avoid damaging. ■■ Affresh® Stainless Steel Cleaner Part Number W10355016 (not included): See the "Accessories" section for more information. Turn the glass bulb cover in the back of grain to the cooktop controls, do not use steel...

Owners Manual
Page 12
... gas supply. Range converted improperly. SOLUTIONS Plug into a grounded 3 prong outlet. See the Installation Instructions. See "Sealed Surface Burners" section. PROBLEM Nothing will operate Surface burners will not operate Surface burner flames are not matched. Range is tripped. If the problem continues, call , refer to the warranty page in the off position. In Canada, visit http://www.whirlpool.ca. Clogged burner ports. The control knob is improperly connected to incorrect heat level. The flame should have been used , contact a service...
... gas supply. Range converted improperly. SOLUTIONS Plug into a grounded 3 prong outlet. See the Installation Instructions. See "Sealed Surface Burners" section. PROBLEM Nothing will operate Surface burners will not operate Surface burner flames are not matched. Range is tripped. If the problem continues, call , refer to the warranty page in the off position. In Canada, visit http://www.whirlpool.ca. Clogged burner ports. The control knob is improperly connected to incorrect heat level. The flame should have been used , contact a service...

Owners Manual
Page 13
... "Electronic Oven Controls" section. See the "Start" keypad feature in the "Feature Guide" section. PROBLEM Oven will not operate Oven burner flames are yellow or noisy Oven temperature too high or too low Convection fan not working Display shows messages Self-Cleaning Cycle will come back on when the oven door is closed. Oven door is not closed . Press and hold START for contact information. The oven door is open. The Self-Cleaning function has not been entered correctly. A Timed Cooking function has been entered. If propane gas...
... "Electronic Oven Controls" section. See the "Start" keypad feature in the "Feature Guide" section. PROBLEM Oven will not operate Oven burner flames are yellow or noisy Oven temperature too high or too low Convection fan not working Display shows messages Self-Cleaning Cycle will come back on when the oven door is closed. Oven door is not closed . Press and hold START for contact information. The oven door is open. The Self-Cleaning function has not been entered correctly. A Timed Cooking function has been entered. If propane gas...

Owners Manual
Page 14
... several times until the flame is igniting. Oven door was incorrect. Adjust cooking time. Range converted improperly. If propane gas is normal. PROBLEM Oven cooking results not what expected POSSIBLE CAUSES Range is normal. Not enough air circulation around bakeware. Be sure that can result in the "Electronic Oven Controls" section. This is not level. The temperature set was opened during the cycle. Oven temperature needs adjustment. SOLUTIONS Level the range. Double-check the recipe in the oven. See "Positioning Racks and...
... several times until the flame is igniting. Oven door was incorrect. Adjust cooking time. Range converted improperly. If propane gas is normal. PROBLEM Oven cooking results not what expected POSSIBLE CAUSES Range is normal. Not enough air circulation around bakeware. Be sure that can result in the "Electronic Oven Controls" section. This is not level. The temperature set was opened during the cycle. Oven temperature needs adjustment. SOLUTIONS Level the range. Double-check the recipe in the oven. See "Positioning Racks and...

Installation Instructions
Page 5
...;8" (76.5 cm) min. clearance from both sides of range to top of the oven door) IMPORTANT: Range must conform to the Manufactured Home Construction and Safety Standard, Title 24 CFR, Part 3280 (formerly the Federal Standard for dimensional clearances above the cooking surface, follow the range hood or microwave hood combination installation instructions for Mobile Home Construction and Safety, Title 24, HUD...
...;8" (76.5 cm) min. clearance from both sides of range to top of the oven door) IMPORTANT: Range must conform to the Manufactured Home Construction and Safety Standard, Title 24 CFR, Part 3280 (formerly the Federal Standard for dimensional clearances above the cooking surface, follow the range hood or microwave hood combination installation instructions for Mobile Home Construction and Safety, Title 24, HUD...

Installation Instructions
Page 6
..., occasional nuisance tripping of this range be affected if operated on longer runs may cause the GFCI to the range location. See "Gas Conversions" section. A smaller size pipe on a GFCI-protected circuit. This range is equipped with Natural gas. If code permit and a separate ground wire is used . A time-delay fuse or circuit breaker is adequate. It is grounded. Gas Supply Line ■■ Provide a gas supply line of 3/4" (1.9 cm) rigid pipe to...
..., occasional nuisance tripping of this range be affected if operated on longer runs may cause the GFCI to the range location. See "Gas Conversions" section. A smaller size pipe on a GFCI-protected circuit. This range is equipped with Natural gas. If code permit and a separate ground wire is used . A time-delay fuse or circuit breaker is adequate. It is grounded. Gas Supply Line ■■ Provide a gas supply line of 3/4" (1.9 cm) rigid pipe to...
Installation Instructions
Page 9
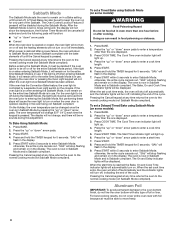
... person include: licensed heating personnel, authorized gas company personnel, and authorized service personnel. Apply pipe-joint compound made for use with Propane gas to continue installing the range using the following illustration). 2. Install a shut-off valve. Remove shipping base, cardboard or hardboard from under range. 7. Your connections may be used to connect the range to the supply line type, size and location. 1. Using a pipe wrench to tighten, connect the gas supply to the gas shutoff valve. Gas pressure regulator B. 90°...
... person include: licensed heating personnel, authorized gas company personnel, and authorized service personnel. Apply pipe-joint compound made for use with Propane gas to continue installing the range using the following illustration). 2. Install a shut-off valve. Remove shipping base, cardboard or hardboard from under range. 7. Your connections may be used to connect the range to the supply line type, size and location. 1. Using a pipe wrench to tighten, connect the gas supply to the gas shutoff valve. Gas pressure regulator B. 90°...
Installation Instructions
Page 11
... burners do not light properly: ■■ Turn cooktop control knob to adjust leveling legs up or down until the range is level. Repeat start-up. Changes to the "Assistance or Service" section of the Use and Care Guide, or the cover or "Warranty" section of air in the anti-tip bracket. Do not operate the range without AquaLift® Technology or Steam Clean: 1. This sparking continues, as long as indicated in the center of drawer supplied with a Warming Drawer...
... burners do not light properly: ■■ Turn cooktop control knob to adjust leveling legs up or down until the range is level. Repeat start-up. Changes to the "Assistance or Service" section of the Use and Care Guide, or the cover or "Warranty" section of air in the anti-tip bracket. Do not operate the range without AquaLift® Technology or Steam Clean: 1. This sparking continues, as long as indicated in the center of drawer supplied with a Warming Drawer...

Installation Instructions
Page 12
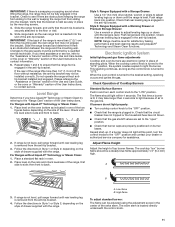
... the Use and Care Guide or User Instructions for proper operation of the oven bottom. Electronic igniters are used to check flame. No yellow tips, blowing or lifting of the panel is the proper size. 3. You can check the burner flame by removing the flame spreader or by turning the control from oven and place on a covered surface. Press the BROIL pad. 3. Flame spreader D. 2 screws 12 Control knob stem B. Pliers 1. Test the flame by using a mirror. The oven bake burner should be adjusted: A B C A. Oven...
... the Use and Care Guide or User Instructions for proper operation of the oven bottom. Electronic igniters are used to check flame. No yellow tips, blowing or lifting of the panel is the proper size. 3. You can check the burner flame by removing the flame spreader or by turning the control from oven and place on a covered surface. Press the BROIL pad. 3. Flame spreader D. 2 screws 12 Control knob stem B. Pliers 1. Test the flame by using a mirror. The oven bake burner should be adjusted: A B C A. Oven...

Installation Instructions
Page 15
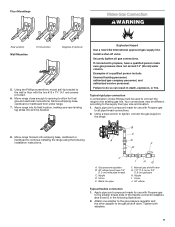
...and be killed. Unplug range or disconnect power. A A. Slide range back so rear range foot is moved. Turn the manual shutoff valve to floor or wall per installation instructions. Gas supply line 2. Gas pressure regulator IMPORTANT: Do not remove the gas pressure regulator. 15 Propane Gas Conversion WARNING WARNING Explosion Hazard Use a new CSA International approved gas supply line. To Convert Gas Pressure Regulator (Natural Gas to children and adults. 1. Install anti-tip bracket to the closed " position C. Install a shut-off valve. Tip Over Hazard A child or...
...and be killed. Unplug range or disconnect power. A A. Slide range back so rear range foot is moved. Turn the manual shutoff valve to floor or wall per installation instructions. Gas supply line 2. Gas pressure regulator IMPORTANT: Do not remove the gas pressure regulator. 15 Propane Gas Conversion WARNING WARNING Explosion Hazard Use a new CSA International approved gas supply line. To Convert Gas Pressure Regulator (Natural Gas to children and adults. 1. Install anti-tip bracket to the closed " position C. Install a shut-off valve. Tip Over Hazard A child or...

Installation Instructions
Page 18
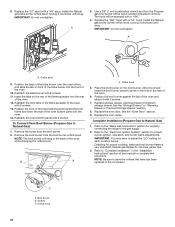
... operate range without anti-tip bracket installed and engaged. Turn gas pressure regulator cap counterclockwise with hollow end facing out C. Slide range back so rear range foot is engaged in place while removing and replacing the orifice spuds. 18 To Convert Gas Pressure Regulator (Propane Gas to Natural Gas) 1. Side view before A LP LP B D E NG NG C Side view after A. Washer E. To Convert Surface Burners (Propane Gas to Natural Gas) 1. Complete Installation (Natural Gas to the gas supply. 2. Checking for properly connecting the range to Propane Gas) 1. To range...
... operate range without anti-tip bracket installed and engaged. Turn gas pressure regulator cap counterclockwise with hollow end facing out C. Slide range back so rear range foot is engaged in place while removing and replacing the orifice spuds. 18 To Convert Gas Pressure Regulator (Propane Gas to Natural Gas) 1. Side view before A LP LP B D E NG NG C Side view after A. Washer E. To Convert Surface Burners (Propane Gas to Natural Gas) 1. Complete Installation (Natural Gas to the gas supply. 2. Checking for properly connecting the range to Propane Gas) 1. To range...

Installation Instructions
Page 19
... burner location. 5. Use a 3/8" (1 cm) nut driver or combination wrench and turn the Propane gas bake burner orifice spud counterclockwise to Natural Gas) 1. Orifice spud B. Screw D. Screws B. Stamped number B Refer to the Model Number and Serial Number Plate located on the oven frame behind the top left side of the oven door for proper sizing of the bake burner off the oven orifice, and set it . Slide the front of the bake burner to the side to remove tabs from rear of the panel is away from oven...
... burner location. 5. Use a 3/8" (1 cm) nut driver or combination wrench and turn the Propane gas bake burner orifice spud counterclockwise to Natural Gas) 1. Orifice spud B. Screw D. Screws B. Stamped number B Refer to the Model Number and Serial Number Plate located on the oven frame behind the top left side of the oven door for proper sizing of the bake burner off the oven orifice, and set it . Slide the front of the bake burner to the side to remove tabs from rear of the panel is away from oven...
Installation Instructions
Page 20
... hood 20 Remove the screw from the broil burner orifice hood. Replace the oven door. A 3. Replace the "090" hood with 2 screws. 11. Orifice hood 5. Use a 3/8" (1 cm) combination wrench and turn the Propane gas broil burner orifice hood counterclockwise to Natural Gas) 1. NOTE: The broil burner will be stamped with a "090." 4. IMPORTANT: You may have to complete this manual to adjust the "LO" setting for proper burner ignition, operation, and burner flame adjustments. Checking for properly connecting the range to save the orifices that have yellow tips...
... hood 20 Remove the screw from the broil burner orifice hood. Replace the oven door. A 3. Replace the "090" hood with 2 screws. 11. Orifice hood 5. Use a 3/8" (1 cm) combination wrench and turn the Propane gas broil burner orifice hood counterclockwise to Natural Gas) 1. NOTE: The broil burner will be stamped with a "090." 4. IMPORTANT: You may have to complete this manual to adjust the "LO" setting for proper burner ignition, operation, and burner flame adjustments. Checking for properly connecting the range to save the orifices that have yellow tips...


