Whirlpool WFE525S0HS Support and Manuals
Get Help and Manuals for this Whirlpool item
View All Support Options Below
Free Whirlpool WFE525S0HS manuals!
Problems with Whirlpool WFE525S0HS?
Ask a Question
Free Whirlpool WFE525S0HS manuals!
Problems with Whirlpool WFE525S0HS?
Ask a Question
Whirlpool WFE525S0HS Videos

Whirlpool Electric Range Problem Model WFE525S0HS WFE505W0HZ Has Similar Features
Duration: 2:59
Total Views: 132
Duration: 2:59
Total Views: 132
Whirlpool Electric Range WFE525S0HS WFE505W0HZ has Similar options
Duration: 6:25
Total Views: 34,225
Duration: 6:25
Total Views: 34,225
Popular Whirlpool WFE525S0HS Manual Pages
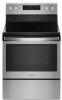
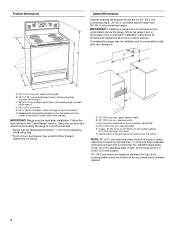
Specification Sheet - Page 1

... (H x W x D) Depth with Door Open 90°
Reference Material
Dimension Guide Install Guide Use & Care Guide Warranty
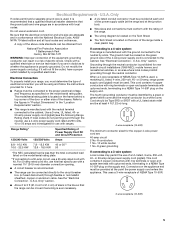
Electric Freestanding Single Oven Thermal
2 Adjustable Self-Cleaning 5
Radiant
(2) 9"/6" 3000W...
WFE525S0H
Fingerprint-Resistant Stainless WFE525S0HZ
Also available in the U.S.A.
For complete details, see Installation Instructions packed with preprogrammed settings...
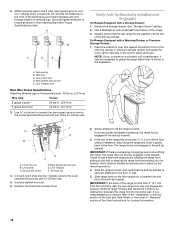
Dimension Guide - Page 1
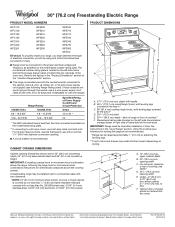
.... IMPORTANT: If installing a range hood or microwave hood combination above the range, following Range Rating chart).
Follow the instructions in * D. 297/8" (75.9 cm) width E. 255/16" (64.3 cm) depth - upper cabinet depth
B. 30" (76.2 cm) min. Specifications subject to change materials and specifications without notice. W10403811C 05/20/2016 If local codes do not permit...
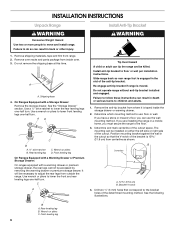
Installation Instructions - Page 2
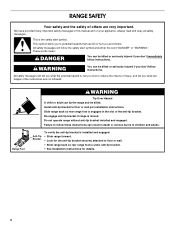
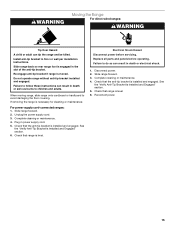
.... These words mean:
DANGER
You can result in death or serious burns to floor or wall per installation instructions.
Re-engage anti-tip bracket if range is , tell you how to potential hazards that can happen if the...and either the word "DANGER" or "WARNING." Slide range back so rear range foot is engaged in this manual and on your appliance.
Always read and obey all safety messages.
Installation Instructions - Page 3
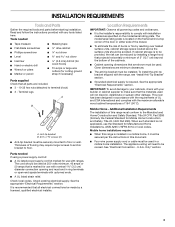
... this range is the installer's responsibility to make sure that all governing codes and ordinances.
■ It is installed in a mobile home, it must be secured per the instructions in this range must be avoided. Only" section.
3
See the appropriate "Electrical Requirements" section. If cabinet storage is located on the model/serial rating plate. This...
Installation Instructions - Page 4
...
A. 13" (33.0 cm) max. opening width C. from either side of door and drawer may be level after installation.
Model/serial rating plate (located on styling. upper cabinet depth B. 30" (76.2 cm) min. A
C
B
D
...14.0 cm) max. Follow the instructions in * D. 29⁷⁄₈" (75.9 cm) width E. 25 64.3 cm) depth - IMPORTANT: If installing a range hood or microwave hood...
Installation Instructions - Page 5
...model/serial rating plate. Refer to the proper electrical voltage and frequency as to whether the appliance is manufactured with a qualified electrician or service technician if you will not fit the outlet, have a proper outlet installed by a qualified electrician. U.S.A. and recreational vehicles, or an area where local codes...the instructions provided for new branch-circuit installations (...
Installation Instructions - Page 6
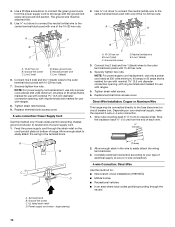
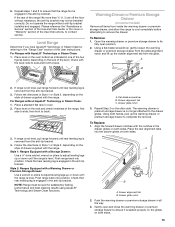
... people to floor or wall per installation instructions. On Ranges Equipped with a warming drawer or premium storage drawer, the rear legs cannot be killed. It will be installed on either the left side or right...drawer. Failure to children and adults.
1. Remove oven racks and parts package from range. 2. Bracket V-notch 4. AD
C
B
A. ¼" drive ratchet B. Front leveling leg
6
Installation Instructions - Page 8

...strain relief screw against the power supply cord.
4. Add strain relief. 8 Failure to follow these instructions can result in death, fire, or electrical shock.
1. Remove the terminal block cover screws located on... Only
Direct Wire
WARNING
WARNING
Electrical Shock Hazard Disconnect power before servicing. Pull cover down and toward you to remove cover from the middle post of ...
Installation Instructions - Page 9
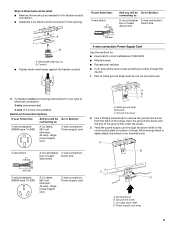
Complete installation following instructions for : ■ New branch-circuit installations (1996 NEC) ■ Mobile homes ■ Recreational vehicles ■ In an area where local codes prohibit grounding ...Ground-link screw C. Removable retaining nut B. Discard C.
Power supply cord wires
9
Part of metal ground strap must be Go to Section: connecting to remove the ground-link...
Installation Instructions - Page 10
... 1 (black)
6.
Neutral (white) wire E.
Replace terminal block access cover. Ground-link screw C. Use ³⁄₈" nut driver to connect the neutral (white) wire to the ... marked for : ■ New branch-circuit installations (1996 NEC) ■ Mobile homes ■ Recreational vehicles ■ In an area where local codes prohibit grounding through the strain relief on the cord...
Installation Instructions - Page 11

...³⁄₈" nut driver to connect the neutral ... lug
7. Replace terminal block access cover.
3-wire connection: Direct Wire
Use this method only if local codes permit connecting ...35 lbs-in the following Bare Wire Torque Specifications chart. Use a hex or Phillips screwdriver ...(red) wires.
Line 1 (black) wire
4. Part of the range. Save the ground-link screw and the end of...
Installation Instructions - Page 12
... Bare Wire Torque Specifications chart. Line 2...Instructions, for contact information.
12 Use a flashlight to the "Assistance or Service" section of the Use and Care Guide... Is Installed and Engaged...8328;" nut driver to connect ...Replace terminal block access cover.
2. Slowly attempt to the wall or keeping the range foot from sliding to tilt the range forward. If you need assistance or service...
Installation Instructions - Page 13
... into position. Flat-blade screwdriver B. To Replace: 1. If the rear of the level....floor without anti-tip bracket installed and engaged.
Check that ...the "Assistance or Service" section of the Use and Care Guide, or the cover ...Instructions, to complete the removal. Place...service. Style 2: Ranges Equipped with AquaLift® Technology or Steam Clean:
1.
Repeat Step 2 on some models...
Installation Instructions - Page 14

... Replace: 1. Drawer stop notch is not, repeat the removal and installation procedures. Lower the drawer so that you have all packaging materials. 4.
See the "Level Range" section. 5. Turn on range operation. Engage drawer glide. The oven door is level. Repeat on other side of the Use and Care Guide or User Instructions or User Instructions...
Installation Instructions - Page 15
... instructions can result in power supply cord. 5. Unplug the power supply cord. 3. Replace all parts and panels before servicing. Complete cleaning or maintenance. 4. Reconnect power.
15
Plug in death or serious burns to do so can tip the range and be killed. Failure to children and adults. See
the "Verify Anti-Tip Bracket Is Installed...
Whirlpool WFE525S0HS Reviews
We have not received any reviews for Whirlpool yet.