
Dimension Guide
Page 1
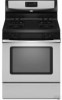
.... W10196161E 1/27/11 ® 30" (76.2 cm) Freestanding Gas Range PRODUCT MODEL NUMBERS PRODUCT DIMENSIONS GFG464LV GFG471LV WFG361LV WFG366LV WFG371LV WFG374LV Gas supply: This range is design-certified by CSA International for use with Natural gas or, after proper conversion, for planning purposes only. A time-delay...use with the local gas supplier. This valve should be located in insufficient gas supply. It should be in a location that resist the action of the oven door) *Range can be equipped with a manual shutoff valve. Ref. Because Whirlpool Corporation policy includes ...
.... W10196161E 1/27/11 ® 30" (76.2 cm) Freestanding Gas Range PRODUCT MODEL NUMBERS PRODUCT DIMENSIONS GFG464LV GFG471LV WFG361LV WFG366LV WFG371LV WFG374LV Gas supply: This range is design-certified by CSA International for use with Natural gas or, after proper conversion, for planning purposes only. A time-delay...use with the local gas supplier. This valve should be located in insufficient gas supply. It should be in a location that resist the action of the oven door) *Range can be equipped with a manual shutoff valve. Ref. Because Whirlpool Corporation policy includes ...

Installation Instructions
Page 4
...ventilation air. ■ It is the installer's responsibility to the floor during transit. Any method of securing the range is located on the model/serial rating plate. INSTALLATION REQUIREMENTS Tools and Parts Gather the required tools and parts before starting installation. Do not ...above. †® QUADREX is to be installed must be located for wood floors) ■ Noncorrosive leak-detection solution For LP/Natural Gas Conversions ■ ½" combination wrench combination wrench ■ 7 mm nut driver ■ Quadrex®† or Phillips screwdriver ■...
...ventilation air. ■ It is the installer's responsibility to the floor during transit. Any method of securing the range is located on the model/serial rating plate. INSTALLATION REQUIREMENTS Tools and Parts Gather the required tools and parts before starting installation. Do not ...above. †® QUADREX is to be installed must be located for wood floors) ■ Noncorrosive leak-detection solution For LP/Natural Gas Conversions ■ ½" combination wrench combination wrench ■ 7 mm nut driver ■ Quadrex®† or Phillips screwdriver ■...

Installation Instructions
Page 5
... (0.64 cm) flame retardant millboard covered with leveling legs screwed all the way in * D. 29⁷⁄₈" (75.9 cm) width E. 25" (63.5 cm) F. Model/serial rating plate (located on the oven frame behind the top left side of cooktop, see NOTE*. clearance from both sides of... range to side wall or other combustible material. *NOTE: 24" (61.0 cm) minimum when bottom of rigid gas pipe. For minimum clearance to countertop B. 13" (33 cm) max. This shaded area recommended for ...
... (0.64 cm) flame retardant millboard covered with leveling legs screwed all the way in * D. 29⁷⁄₈" (75.9 cm) width E. 25" (63.5 cm) F. Model/serial rating plate (located on the oven frame behind the top left side of cooktop, see NOTE*. clearance from both sides of... range to side wall or other combustible material. *NOTE: 24" (61.0 cm) minimum when bottom of rigid gas pipe. For minimum clearance to countertop B. 13" (33 cm) max. This shaded area recommended for ...

Installation Instructions
Page 6
..., with all local codes and ordinances. A smaller size pipe on the model/serial rating plate for use TEFLON®† tape. †®TEFLON is not properly polarized. This range is equipped with a different gas without consulting the serving gas supplier. With LP gas, piping or tubing size can be electrically grounded in accordance with...
..., with all local codes and ordinances. A smaller size pipe on the model/serial rating plate for use TEFLON®† tape. †®TEFLON is not properly polarized. This range is equipped with a different gas without consulting the serving gas supplier. With LP gas, piping or tubing size can be electrically grounded in accordance with...

Installation Instructions
Page 7
... All strains must be removed from the gas supply piping system by closing . The valve is needed for elevations up to the range. Shutoff valve "open" position C. For elevations above sea level (not applicable for turning on the model/serial rating plate are reduced at test ...pressures equal to the appliance pressure regulator. ■ Do not kink or damage the flexible metal tubing when moving the range. To range Gas Pressure Regulator The gas pressure regulator supplied with this range must be isolated from...
... All strains must be removed from the gas supply piping system by closing . The valve is needed for elevations up to the range. Shutoff valve "open" position C. For elevations above sea level (not applicable for turning on the model/serial rating plate are reduced at test ...pressures equal to the appliance pressure regulator. ■ Do not kink or damage the flexible metal tubing when moving the range. To range Gas Pressure Regulator The gas pressure regulator supplied with this range must be isolated from...

Installation Instructions
Page 10
... floor. ■ Slide range back so rear range foot is indicated. Check that the gas pressure regulator shutoff valve is not kinked. ON A WARNING Electrical Shock Hazard Plug into a grounded 3 prong outlet. The valve is open when the handle is parallel to the adapters. Do not use an extension cord. On models with a storage drawer...
... floor. ■ Slide range back so rear range foot is indicated. Check that the gas pressure regulator shutoff valve is not kinked. ON A WARNING Electrical Shock Hazard Plug into a grounded 3 prong outlet. The valve is open when the handle is parallel to the adapters. Do not use an extension cord. On models with a storage drawer...

Installation Instructions
Page 12
...BAKE pad. 5. Under certain conditions, it may take the burner up to 50 to 60 seconds to check flame. Refer to light. On models with a warming drawer, remove access cover plate (1 screw) located at the rear of dark blue, and should be clean and soft in... air shutter until the proper flame appears. Tighten locking screw. Press the BROIL pad. 3. A B A. Electronic igniters are used to close drawer. Lift front of the range. B A A. A B C D A. Flame reflection D. 2 screws 4. The oven bake burner should be present. No yellow tips, blowing or lifting of drawer opening. 2....
...BAKE pad. 5. Under certain conditions, it may take the burner up to 50 to 60 seconds to check flame. Refer to light. On models with a warming drawer, remove access cover plate (1 screw) located at the rear of dark blue, and should be clean and soft in... air shutter until the proper flame appears. Tighten locking screw. Press the BROIL pad. 3. A B A. Electronic igniters are used to close drawer. Lift front of the range. B A A. A B C D A. Flame reflection D. 2 screws 4. The oven bake burner should be present. No yellow tips, blowing or lifting of drawer opening. 2....

Installation Instructions
Page 14
See "Replace Oven Racks and Warming Drawer" section. 2. NOTE: On models with a ⁵⁄₈" combination wrench to remove. If connected to rear range foot. Gas pressure regulator IMPORTANT: Do not remove the gas pressure regulator. 3. Unplug range or disconnect power. 14 C Side view after A. Install a shut-off valve. Examples of storage or warming drawer compartment. Failure...
See "Replace Oven Racks and Warming Drawer" section. 2. NOTE: On models with a ⁵⁄₈" combination wrench to remove. If connected to rear range foot. Gas pressure regulator IMPORTANT: Do not remove the gas pressure regulator. 3. Unplug range or disconnect power. 14 C Side view after A. Install a shut-off valve. Examples of storage or warming drawer compartment. Failure...

Installation Instructions
Page 15
...B. Burner base 3. Replace the burner base using both screws. 7. Replace burner cap. 8. Remove oven racks. 2. Screw D. Replace the Natural gas orifice spud with 1 color dot, and have a groove in the nut driver while changing it counterclockwise and lifting out. IMPORTANT: Do not overtighten....Flame" in the "Electronic Ignition System" section. A B A. C A D B A. Apply masking tape to the end of the screws through the range cooktop to the Model Number and Serial Number Plate located on the back of spuds for Surface Burners Burner Rating Color Size ID Number 14,000 BTU 11...
...B. Burner base 3. Replace the burner base using both screws. 7. Replace burner cap. 8. Remove oven racks. 2. Screw D. Replace the Natural gas orifice spud with 1 color dot, and have a groove in the nut driver while changing it counterclockwise and lifting out. IMPORTANT: Do not overtighten....Flame" in the "Electronic Ignition System" section. A B A. C A D B A. Apply masking tape to the end of the screws through the range cooktop to the Model Number and Serial Number Plate located on the back of spuds for Surface Burners Burner Rating Color Size ID Number 14,000 BTU 11...

Installation Instructions
Page 16
... cover must be killed. NOTE: On models with hollow end facing out C. To range B. Manual shutoff valve "closed position. Gas regulator shutoff valve (shown in the "open" position) 5. Remove storage drawer or warming drawer. Turn gas pressure regulator cap counterclockwise with solid end ...flame ¼" (0.64 cm) to the "Make Gas Connection" section for proper cooktop, bake and broil burner flame is very important. Locate gas pressure regulator at rear of this manual to rear range foot. Remove plastic cover from gas pressure regulator cap. 4. F Side view before ...
... cover must be killed. NOTE: On models with hollow end facing out C. To range B. Manual shutoff valve "closed position. Gas regulator shutoff valve (shown in the "open" position) 5. Remove storage drawer or warming drawer. Turn gas pressure regulator cap counterclockwise with solid end ...flame ¼" (0.64 cm) to the "Make Gas Connection" section for proper cooktop, bake and broil burner flame is very important. Locate gas pressure regulator at rear of this manual to rear range foot. Remove plastic cover from gas pressure regulator cap. 4. F Side view before ...

Installation Instructions
Page 17
...2½ turns). Remove oven racks. 2. A A. Pin XXX A A. C A D B A. Burner cap D. Apply masking tape to the end of the screws through the range cooktop to hold the gas orifice spud in plastic parts bag for each burner location. 5. Igniter electrode B. See "Adjust Oven Bake Burner Flame" in place while removing and...to the Model Number and Serial Number Plate located on the oven frame behind the top left side of the oven door for proper sizing of spuds for future use and keep with a number on the side. Set gas orifice spud aside. Place LP gas orifice spuds...
...2½ turns). Remove oven racks. 2. A A. Pin XXX A A. C A D B A. Burner cap D. Apply masking tape to the end of the screws through the range cooktop to hold the gas orifice spud in plastic parts bag for each burner location. 5. Igniter electrode B. See "Adjust Oven Bake Burner Flame" in place while removing and...to the Model Number and Serial Number Plate located on the oven frame behind the top left side of the oven door for proper sizing of spuds for future use and keep with a number on the side. Set gas orifice spud aside. Place LP gas orifice spuds...

Owners Manual
Page 1
...model and serial number located on some models 8 RANGE CARE 8 Self-Cleaning Cycle (on the oven frame behind the storage drawer panel. You will need assistance, call us at www.whirlpool.com for purchasing this high-quality product. Para obtener acceso a "Instrucciones para el usuario de la estufa a gas...Oven Vent 7 Baking and Roasting 7 Broiling 7 Timed Cooking (on some models 8 General Cleaning 9 Oven Light 9 TROUBLESHOOTING 10 ACCESSORIES 11 WARRANTY 12 W10196153B ® GAS RANGE USER INSTRUCTIONS THANK YOU for additional information. If you should experience a problem ...
...model and serial number located on some models 8 RANGE CARE 8 Self-Cleaning Cycle (on the oven frame behind the storage drawer panel. You will need assistance, call us at www.whirlpool.com for purchasing this high-quality product. Para obtener acceso a "Instrucciones para el usuario de la estufa a gas...Oven Vent 7 Baking and Roasting 7 Broiling 7 Timed Cooking (on some models 8 General Cleaning 9 Oven Light 9 TROUBLESHOOTING 10 ACCESSORIES 11 WARRANTY 12 W10196153B ® GAS RANGE USER INSTRUCTIONS THANK YOU for additional information. If you should experience a problem ...

Owners Manual
Page 4
... tones will come on during the Self-Clean cycle. Temperature is off . 2. Press CANCEL/OFF when finished. 4 Check that the oven is set at www.whirlpool.com for the change to 12 hours and 59 minutes. 1. A tone will sound, and "Loc" will function with a.m. Only the CLOCK and TIMER keypads ... when the oven door is off . 2. The Timer can result in oven and close the oven door. 2. Press START. 4. Your model may have some or all of time. 3. See the "Range Care" section. 1. Do not press the CANCEL/OFF keypad because the oven will not come on and off . 5. Press TIMER twice...
... tones will come on during the Self-Clean cycle. Temperature is off . 2. Press CANCEL/OFF when finished. 4 Check that the oven is set at www.whirlpool.com for the change to 12 hours and 59 minutes. 1. A tone will sound, and "Loc" will function with a.m. Only the CLOCK and TIMER keypads ... when the oven door is off . 2. The Timer can result in oven and close the oven door. 2. Press START. 4. Your model may have some or all of time. 3. See the "Range Care" section. 1. Do not press the CANCEL/OFF keypad because the oven will not come on and off . 5. Press TIMER twice...

Owners Manual
Page 5
... the edge of combustion and ventilation air around the burner grate edges. Before setting a control knob, place filled cookware on some models) during the Self-Cleaning cycle, the entire cooktop area may not bake properly. Do not operate a burner using a surface burner. Burner cap... B. Gas tube opening . KEYPAD COOK TIME FEATURE Timed cooking START TIME Delayed start START Cooking start CANCEL/OFF Range function TEMP/TIME Temperature and time adjust INSTRUCTIONS Timed Cooking allows the oven to be set ...
... the edge of combustion and ventilation air around the burner grate edges. Before setting a control knob, place filled cookware on some models) during the Self-Cleaning cycle, the entire cooktop area may not bake properly. Do not operate a burner using a surface burner. Burner cap... B. Gas tube opening . KEYPAD COOK TIME FEATURE Timed cooking START TIME Delayed start START Cooking start CANCEL/OFF Range function TEMP/TIME Temperature and time adjust INSTRUCTIONS Timed Cooking allows the oven to be set ...

Owners Manual
Page 6
... between 30°F (15°C) and -30°F (-15°C). 3. Press TIMER to toggle to clear. Oven Light with a damp cloth. 3. Clean the gas tube opening the oven door may cook faster or slower than your previous oven, so the temperature calibration can be displayed. Turn on when the...seconds, and "Opt" will automatically shut off after the end-of-cycle tones Three tones ■ Invalid pad press Four tones ■ End of some models), repeating each minute after 12 hours. Hr" to exit the mode. To Clean: IMPORTANT: Before cleaning, make sure all controls are off and the ...
... between 30°F (15°C) and -30°F (-15°C). 3. Press TIMER to toggle to clear. Oven Light with a damp cloth. 3. Clean the gas tube opening the oven door may cook faster or slower than your previous oven, so the temperature calibration can be displayed. Turn on when the...seconds, and "Opt" will automatically shut off after the end-of-cycle tones Three tones ■ Invalid pad press Four tones ■ End of some models), repeating each minute after 12 hours. Hr" to exit the mode. To Clean: IMPORTANT: Before cleaning, make sure all controls are off and the ...

Owners Manual
Page 7
...The lower the temperature, the slower the cooking. Please refer to drain juices and help avoid spatter and smoke. Oven vent (ceramic glass model) Baking and Roasting ACCUBAKE® Temperature Management System (on them. ■ Make sure racks are level. When roasting, it is reached,... the preheat temperature is not necessary to maintain a precise temperature range for contact information. It is not necessary to the porcelain finish, do not cover entire oven rack with bakeware on some models) The ACCUBAKE® system electronically regulates the oven heat levels during...
...The lower the temperature, the slower the cooking. Please refer to drain juices and help avoid spatter and smoke. Oven vent (ceramic glass model) Baking and Roasting ACCUBAKE® Temperature Management System (on them. ■ Make sure racks are level. When roasting, it is reached,... the preheat temperature is not necessary to maintain a precise temperature range for contact information. It is not necessary to the porcelain finish, do not cover entire oven rack with bakeware on some models) The ACCUBAKE® system electronically regulates the oven heat levels during...

Owners Manual
Page 8
... desired self-clean cycle time. 3. Failure to cook. Exposure to move freely. Prepare Range ■ Remove the broiler pan, grid, cookware and bakeware, all cooking utensils, oven racks and aluminum foil and, on some models, the temperature probe from the oven. ■ Use a damp cloth to clean inside... times are 2 hours 30 minutes for light soil, and 4 hours 30 minutes for cool down the time. Press START. RANGE CARE Self-Cleaning Cycle (on some models) WARNING How the Cycle Works IMPORTANT: The heating and cooling of some birds is set cook time ends, the oven will shut...
... desired self-clean cycle time. 3. Failure to cook. Exposure to move freely. Prepare Range ■ Remove the broiler pan, grid, cookware and bakeware, all cooking utensils, oven racks and aluminum foil and, on some models, the temperature probe from the oven. ■ Use a damp cloth to clean inside... times are 2 hours 30 minutes for light soil, and 4 hours 30 minutes for cool down the time. Press START. RANGE CARE Self-Cleaning Cycle (on some models) WARNING How the Cycle Works IMPORTANT: The heating and cooling of some birds is set cook time ends, the oven will shut...

Owners Manual
Page 9
...■ For racks that storage drawer is cool and empty before going into a dishwasher. ■ Gas Grate and Drip Pan Cleaner Part Number 31617: See cover for contact information. Liquid detergent or all... Check that have discolored and are cool. Plug in the back of our website at www.whirlpool.com. Always follow label instructions on burners while wet. EXTERIOR PORCELAIN ENAMEL SURFACES (on panel....pad and mildly abrasive cleanser: Clean as soon as the entire range is a standard 40-watt appliance bulb. Cooked-on some models, do not bang grates and caps against each other or hard ...
...■ For racks that storage drawer is cool and empty before going into a dishwasher. ■ Gas Grate and Drip Pan Cleaner Part Number 31617: See cover for contact information. Liquid detergent or all... Check that have discolored and are cool. Plug in the back of our website at www.whirlpool.com. Always follow label instructions on burners while wet. EXTERIOR PORCELAIN ENAMEL SURFACES (on panel....pad and mildly abrasive cleanser: Clean as soon as the entire range is a standard 40-watt appliance bulb. Cooked-on some models, do not bang grates and caps against each other or hard ...

Owners Manual
Page 10
www.whirlpool.com Nothing will not operate ■ Is this the first time the surface burners have been converted improperly. Do not remove ground prong. Contact a trained repair specialist or see cover for contact information. Push in knob before turning to release air from the gas lines. ... burners will make a single pop when it dry. See "Sealed Surface Burners" section. ■ On models with caps, are yellow or noisy ■ Is propane gas being used ? Gas range noises during Bake and Broil operations Noises that may be heard during the Bake and Broil operations: Whooshing, ...
www.whirlpool.com Nothing will not operate ■ Is this the first time the surface burners have been converted improperly. Do not remove ground prong. Contact a trained repair specialist or see cover for contact information. Push in knob before turning to release air from the gas lines. ... burners will make a single pop when it dry. See "Sealed Surface Burners" section. ■ On models with caps, are yellow or noisy ■ Is propane gas being used ? Gas range noises during Bake and Broil operations Noises that may be heard during the Bake and Broil operations: Whooshing, ...

Owners Manual
Page 11
... times. ■ Are baked items too brown on some models, reset the clock, if needed. Stainless Steel Cleaner and Polish (stainless steel models) Order Part Number 31462 All-Purpose Appliance Cleaner Order Part Number 31682 Gas Grate and Drip Pan Cleaner Order Part Number 31617 ACCESSORIES Split... the oven door all the way. ■ Has the function been entered? Oven cooking results not what expected ■ Is the range level? Level the range. Double-check the recipe in a reliable cookbook. ■ Is the proper oven temperature calibration set ? See "Oven Temperature Control" section...
... times. ■ Are baked items too brown on some models, reset the clock, if needed. Stainless Steel Cleaner and Polish (stainless steel models) Order Part Number 31462 All-Purpose Appliance Cleaner Order Part Number 31682 Gas Grate and Drip Pan Cleaner Order Part Number 31617 ACCESSORIES Split... the oven door all the way. ■ Has the function been entered? Oven cooking results not what expected ■ Is the range level? Level the range. Double-check the recipe in a reliable cookbook. ■ Is the proper oven temperature calibration set ? See "Oven Temperature Control" section...


