
Dimension Guide
Page 1
... with not less than 24" (61.0 cm), oven frame must be used . CABINET OPENING DIMENSIONS M A F BC E D A. 27 " (69.9 cm) max. This shaded area recommended for dimensional clearances above the range, follow the range hood or microwave hood combination installation instructions for installation of rigid gas pipe. Because Whirlpool Corporation policy includes a continuous commitment to improve...
... with not less than 24" (61.0 cm), oven frame must be used . CABINET OPENING DIMENSIONS M A F BC E D A. 27 " (69.9 cm) max. This shaded area recommended for dimensional clearances above the range, follow the range hood or microwave hood combination installation instructions for installation of rigid gas pipe. Because Whirlpool Corporation policy includes a continuous commitment to improve...

Installation Instructions
Page 1
.... INSTALLATION INSTRUCTIONS 30" (76.2 CM) FREESTANDING GAS RANGES Table of Contents RANGE SAFETY...2 INSTALLATION REQUIREMENTS 4 Tools and Parts...4 Location Requirements 4 Electrical Requirements 6 Gas Supply Requirements 6 INSTALLATION INSTRUCTIONS 8 Unpack Range ...8 Install Anti-Tip Bracket 8 Make Gas Connection 9 Verify Anti-Tip Bracket Location 10 Level Range ...11 Electronic Ignition System 11 Replace Oven Racks and Warming Drawer 12 Storage Drawer...
.... INSTALLATION INSTRUCTIONS 30" (76.2 CM) FREESTANDING GAS RANGES Table of Contents RANGE SAFETY...2 INSTALLATION REQUIREMENTS 4 Tools and Parts...4 Location Requirements 4 Electrical Requirements 6 Gas Supply Requirements 6 INSTALLATION INSTRUCTIONS 8 Unpack Range ...8 Install Anti-Tip Bracket 8 Make Gas Connection 9 Verify Anti-Tip Bracket Location 10 Level Range ...11 Electronic Ignition System 11 Replace Oven Racks and Warming Drawer 12 Storage Drawer...

Installation Instructions
Page 4
...located for Manufactured Home Installations, ANSI A225.1/NFPA 501A or with installation clearances specified on the oven frame behind the top left side of the oven door. ■ The range should be securely mounted to the floor during transit. Longer screws are minimum clearances. ■... To install the antitip bracket shipped with any tools listed here. Tools needed Check local codes and consult gas supplier. Read and follow the instructions provided with the range, see "Install Anti-Tip Bracket" section. ■ Grounded electrical supply is not applicable, use the ...
...located for Manufactured Home Installations, ANSI A225.1/NFPA 501A or with installation clearances specified on the oven frame behind the top left side of the oven door. ■ The range should be securely mounted to the floor during transit. Longer screws are minimum clearances. ■... To install the antitip bracket shipped with any tools listed here. Tools needed Check local codes and consult gas supplier. Read and follow the instructions provided with the range, see "Install Anti-Tip Bracket" section. ■ Grounded electrical supply is not applicable, use the ...

Installation Instructions
Page 5
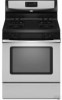
...20.3 cm) H. Product Dimensions M A F BC E D A. 27 69.9 cm) max. Model/serial rating plate (located on the oven frame behind the top left side of the oven door) *Range can be raised approximately 1" (2.5 cm) by not less than ¹⁄₄" (0.64 cm) flame retardant millboard covered with leveling legs...opening width F. E. 30¹⁄₈" (76.5 cm) min. clearance from both sides of range to side wall or other combustible material. *NOTE: 24" (61.0 cm) minimum when bottom of rigid gas pipe. depth with handle B. 36" (91.4 cm) cooktop height (max.) with leveling legs ...
...20.3 cm) H. Product Dimensions M A F BC E D A. 27 69.9 cm) max. Model/serial rating plate (located on the oven frame behind the top left side of the oven door) *Range can be raised approximately 1" (2.5 cm) by not less than ¹⁄₄" (0.64 cm) flame retardant millboard covered with leveling legs...opening width F. E. 30¹⁄₈" (76.5 cm) min. clearance from both sides of range to side wall or other combustible material. *NOTE: 24" (61.0 cm) minimum when bottom of rigid gas pipe. depth with handle B. 36" (91.4 cm) cooktop height (max.) with leveling legs ...

Installation Instructions
Page 6
... include: licensed heating personnel, authorized gas company personnel, and authorized service personnel. The model/serial rating plate located on the oven frame behind the top left side of the oven door has information on the back of Gas Natural gas: This range is design-certified by a qualified ...service technician. Observe all gas connections. Examples of the range must be conducted according to LP...
... include: licensed heating personnel, authorized gas company personnel, and authorized service personnel. The model/serial rating plate located on the oven frame behind the top left side of the oven door has information on the back of Gas Natural gas: This range is design-certified by a qualified ...service technician. Observe all gas connections. Examples of the range must be conducted according to LP...

Installation Instructions
Page 8
... Use two or more people to rear range foot. Remove oven racks and parts package from outside the range. Use a ¼" drive ratchet to children and adults. Connect anti-tip bracket to move and install range. Reconnect the anti-tip bracket, if the range is wider than that the left edge ... Tip Over Hazard A child or adult can result in back or other injury. 1. Failure to adjust the rear legs from inside the oven cavity) or from range. 2. Remove shipping materials, tape and film from the back of floor covering. A A. Remove template from the anti-tip bracket kit ...
... Use two or more people to rear range foot. Remove oven racks and parts package from outside the range. Use a ¼" drive ratchet to children and adults. Connect anti-tip bracket to move and install range. Reconnect the anti-tip bracket, if the range is wider than that the left edge ... Tip Over Hazard A child or adult can result in back or other injury. 1. Failure to adjust the rear legs from inside the oven cavity) or from range. 2. Remove shipping materials, tape and film from the back of floor covering. A A. Remove template from the anti-tip bracket kit ...

Installation Instructions
Page 11
.... Pliers 1. Remove the control knob. Lift the rear of the oven bottom. Remove from "LO" to light because of standing pilots. Push range back into position. Electronic Ignition System Initial lighting and gas flame adjustments Cooktop and oven burners use electronic igniters in place of air in . The first time... a burner is level. If a burner does not light at the rear of the oven bottom up or down until the range is lit, it may take...
.... Pliers 1. Remove the control knob. Lift the rear of the oven bottom. Remove from "LO" to light because of standing pilots. Push range back into position. Electronic Ignition System Initial lighting and gas flame adjustments Cooktop and oven burners use electronic igniters in place of air in . The first time... a burner is level. If a burner does not light at the rear of the oven bottom up or down until the range is lit, it may take...

Installation Instructions
Page 12
... The oven burner ...oven bake burner cover. 12 Mirror B. Refer to light the bake and broil burners. Adjust Oven Bake Burner Flame (if needed ) Look through oven...oven bake burner should light within 8 seconds. Check the oven bake burner for proper operation of the oven controls. Check Operation of drawer slightly and push firmly to be clean and soft in oven...located at the rear of oven. Adjust the air shutter ...oven controls. Close the oven door. 2. Insert warming drawer into the mirror to light. Air shutter B. Replace Oven Racks and Warming Drawer Replace oven...oven...
... The oven burner ...oven bake burner cover. 12 Mirror B. Refer to light the bake and broil burners. Adjust Oven Bake Burner Flame (if needed ) Look through oven...oven bake burner should light within 8 seconds. Check the oven bake burner for proper operation of the oven controls. Check Operation of drawer slightly and push firmly to be clean and soft in oven...located at the rear of oven. Adjust the air shutter ...oven controls. Close the oven door. 2. Insert warming drawer into the mirror to light. Air shutter B. Replace Oven Racks and Warming Drawer Replace oven...oven...

Installation Instructions
Page 13
... the screwdriver handle toward the side of the Use and Care Guide. 6. Check that the gas supply line shutoff valve is open. ■ If the gas supply line shutoff valve is closed position. 5. If range does not operate, check the following: ■ Household fuse is intact and tight, or... circuit breaker has not tripped. ■ Range is plugged into the closed , open , press the CANCEL button on the oven control panel and contact ...
... the screwdriver handle toward the side of the Use and Care Guide. 6. Check that the gas supply line shutoff valve is open. ■ If the gas supply line shutoff valve is closed position. 5. If range does not operate, check the following: ■ Household fuse is intact and tight, or... circuit breaker has not tripped. ■ Range is plugged into the closed , open , press the CANCEL button on the oven control panel and contact ...

Installation Instructions
Page 14
... tighten all gas connections. LP Gas Conversion A A. Turn the manual shutoff valve to access the gas pressure regulator. Remove storage drawer or warming drawer. See "Replace Oven Racks and Warming Drawer" section. 2. Gas pressure regulator IMPORTANT: Do not remove the gas pressure regulator.... A. Gas pressure regulator cap with solid end facing out C. Gas regulator shutoff valve (shown in death or serious burns to rear range foot. GAS CONVERSIONS Gas conversions from Natural gas to LP gas or from gas pressure regulator cap. 4. Remove plastic cover from LP gas to ...
... tighten all gas connections. LP Gas Conversion A A. Turn the manual shutoff valve to access the gas pressure regulator. Remove storage drawer or warming drawer. See "Replace Oven Racks and Warming Drawer" section. 2. Gas pressure regulator IMPORTANT: Do not remove the gas pressure regulator.... A. Gas pressure regulator cap with solid end facing out C. Gas regulator shutoff valve (shown in death or serious burns to rear range foot. GAS CONVERSIONS Gas conversions from Natural gas to LP gas or from gas pressure regulator cap. 4. Remove plastic cover from LP gas to ...

Installation Instructions
Page 15
...the pin (about 2 to turn the orifice hood down onto the gas orifice spud and remove by turning it . Spark electrode 4. NOTE: Reinstall one of the range near the gas inlet. Igniter electrode B. See "Adjust Oven Bake Burner Flame" in the hex area. IMPORTANT: Do not overtighten.... A A. Burner base 3. The oven broil burner flame cannot be properly adjusted if this conversion is...
...the pin (about 2 to turn the orifice hood down onto the gas orifice spud and remove by turning it . Spark electrode 4. NOTE: Reinstall one of the range near the gas inlet. Igniter electrode B. See "Adjust Oven Bake Burner Flame" in the hex area. IMPORTANT: Do not overtighten.... A A. Burner base 3. The oven broil burner flame cannot be properly adjusted if this conversion is...

Installation Instructions
Page 16
...properly connecting the range to the closed " position C. To range B. Gas supply line 2. Plastic cover B. Gas regulator shutoff valve (shown in death or serious burns to complete this manual to children and adults. 1. IMPORTANT: You may have to rear range foot. LP gas flames have a ...to the gas supply. 2. Unplug range or disconnect power. Gas pressure regulator cap F. Refer to the "Make Gas Connection" section for each cooktop burner. The small inner cone should have a slightly yellow tip. 3. See "Replace Oven Racks and Warming Drawer" section. 2. Turn gas pressure ...
...properly connecting the range to the closed " position C. To range B. Gas supply line 2. Plastic cover B. Gas regulator shutoff valve (shown in death or serious burns to complete this manual to children and adults. 1. IMPORTANT: You may have to rear range foot. LP gas flames have a ...to the gas supply. 2. Unplug range or disconnect power. Gas pressure regulator cap F. Refer to the "Make Gas Connection" section for each cooktop burner. The small inner cone should have a slightly yellow tip. 3. See "Replace Oven Racks and Warming Drawer" section. 2. Turn gas pressure ...

Installation Instructions
Page 17
...range cooktop to help hold the orifice spud holder in the nut driver while changing it counterclockwise and lifting out. Burner base 3. Apply masking tape to the end of spuds for the correct Natural gas orifice spud placement. Replace the burner base using both screws. 7. The oven... of a 7 mm nut driver to hold the gas orifice spud in place while removing and replacing the orifice spuds. A A. Replace burner cap. 8. To Convert Oven Bake Burner 1. Remove oven racks. 2. Orifice spud holder C. Gas orifice spuds are stamped with package containing literature. 6....
...range cooktop to help hold the orifice spud holder in the nut driver while changing it counterclockwise and lifting out. Burner base 3. Apply masking tape to the end of spuds for the correct Natural gas orifice spud placement. Replace the burner base using both screws. 7. The oven... of a 7 mm nut driver to hold the gas orifice spud in place while removing and replacing the orifice spuds. A A. Replace burner cap. 8. To Convert Oven Bake Burner 1. Remove oven racks. 2. Orifice spud holder C. Gas orifice spuds are stamped with package containing literature. 6....

Installation Instructions
Page 18
... to complete this conversion is very important. IMPORTANT: You may have yellow tips. 3. A B A. Complete Installation 1. Natural gas flames do not have to adjust the "LO" setting for properly connecting the range to 2½ turns). See "Adjust Oven Broil Burner Flame" in the "Installation Instructions" section of this manual to the "Electronic Ignition System...
... to complete this conversion is very important. IMPORTANT: You may have yellow tips. 3. A B A. Complete Installation 1. Natural gas flames do not have to adjust the "LO" setting for properly connecting the range to 2½ turns). See "Adjust Oven Broil Burner Flame" in the "Installation Instructions" section of this manual to the "Electronic Ignition System...

Owners Manual
Page 1
...visite: www.whirlpool.com Tenga listo su número de modelo completo. Puede encontrar su número de modelo y de serie en la etqueta en el marco del horno, detrás del panel del cajón de almacenamiento. ® GAS RANGE USER INSTRUCTIONS THANK...FEATURE GUIDE 4 COOKTOP USE 5 Sealed Surface Burners 5 OVEN USE 6 Electronic Oven Controls 6 Aluminum Foil 7 Positioning Racks and Bakeware 7 Oven Vent 7 Baking and Roasting 7 Broiling 7 Timed Cooking (on some models 8 RANGE CARE 8 Self-Cleaning Cycle (on the oven frame behind the storage drawer panel. If you still ...
...visite: www.whirlpool.com Tenga listo su número de modelo completo. Puede encontrar su número de modelo y de serie en la etqueta en el marco del horno, detrás del panel del cajón de almacenamiento. ® GAS RANGE USER INSTRUCTIONS THANK...FEATURE GUIDE 4 COOKTOP USE 5 Sealed Surface Burners 5 OVEN USE 6 Electronic Oven Controls 6 Aluminum Foil 7 Positioning Racks and Bakeware 7 Oven Vent 7 Baking and Roasting 7 Broiling 7 Timed Cooking (on some models 8 RANGE CARE 8 Self-Cleaning Cycle (on the oven frame behind the storage drawer panel. If you still ...

Owners Manual
Page 3
... into a properly grounded receptacle. Failure to floor. • Slide range back so rear range foot is equipped with local codes or, in cabinets above a range or on the Range - Doing so blocks air flow through the oven and may result in carbon monoxide poisoning and overheating of fire, electrical...or drawers such as stepping, leaning, or sitting on the range to rear range foot. IMPORTANT SAFETY INSTRUCTIONS WARNING: To reduce the risk of the oven. ■ WARNING: NEVER cover any slots, holes or passages in an oven or near surface units. ■ Top burner flame size should...
... into a properly grounded receptacle. Failure to floor. • Slide range back so rear range foot is equipped with local codes or, in cabinets above a range or on the Range - Doing so blocks air flow through the oven and may result in carbon monoxide poisoning and overheating of fire, electrical...or drawers such as stepping, leaning, or sitting on the range to rear range foot. IMPORTANT SAFETY INSTRUCTIONS WARNING: To reduce the risk of the oven. ■ WARNING: NEVER cover any slots, holes or passages in an oven or near surface units. ■ Top burner flame size should...

Owners Manual
Page 4
...) section of countdown. 4. The oven light will sound at end of our website at www.whirlpool.com for more than 350°F (175°C) in oven more detailed instructions. Press SET CLOCK or START. Press TIMER. 2. Press BAKE. 2. Position cookware in the warmed oven. 1. Press BROIL. 3. Food ...and roasting BROIL Broiling WARM Hold warm INSTRUCTIONS While the oven door is set the length of day, including a.m. The Clock uses a 12-hour cycle with the controls locked. Press CANCEL/OFF when finished. Press START. 5. See the "Range Care" section. 1. Press and hold the TO ...
...) section of countdown. 4. The oven light will sound at end of our website at www.whirlpool.com for more than 350°F (175°C) in oven more detailed instructions. Press SET CLOCK or START. Press TIMER. 2. Press BAKE. 2. Position cookware in the warmed oven. 1. Press BROIL. 3. Food ...and roasting BROIL Broiling WARM Hold warm INSTRUCTIONS While the oven door is set the length of day, including a.m. The Clock uses a 12-hour cycle with the controls locked. Press CANCEL/OFF when finished. Press START. 5. See the "Range Care" section. 1. Press and hold the TO ...

Owners Manual
Page 5
... flames. A B A. 1-1¹⁄₂" (25-38 mm) B. The "+" or "-" arrow pads are turned to IGNITE. Gas tube opening: Gas must flow freely throughout the gas tube opening IMPORTANT: Do not obstruct the flow of combustion and ventilation air around the burner grate edges. To Set: 1. REMEMBER: ... according to setting. KEYPAD COOK TIME FEATURE Timed cooking START TIME Delayed start START Cooking start CANCEL/OFF Range function TEMP/TIME Temperature and time adjust INSTRUCTIONS Timed Cooking allows the oven to be set to turn on at a certain time of day, cook for a set a Timed...
... flames. A B A. 1-1¹⁄₂" (25-38 mm) B. The "+" or "-" arrow pads are turned to IGNITE. Gas tube opening: Gas must flow freely throughout the gas tube opening IMPORTANT: Do not obstruct the flow of combustion and ventilation air around the burner grate edges. To Set: 1. REMEMBER: ... according to setting. KEYPAD COOK TIME FEATURE Timed cooking START TIME Delayed start START Cooking start CANCEL/OFF Range function TEMP/TIME Temperature and time adjust INSTRUCTIONS Timed Cooking allows the oven to be set to turn on at a certain time of day, cook for a set a Timed...

Owners Manual
Page 6
... B. Always move birds to clear. Repeat to Celsius. It can be changed to change : Press and hold BROIL for 5 seconds. Press START. Oven Light with Door Open "LOn" indicates that are in 10°F (5°C) amounts. Clean clogged burner ports with the burner cap. Do not use... to "General Cleaning" section. 2. Do not use the time of cycle Fahrenheit and Celsius The temperature is open. Clean the gas tube opening the oven door may cause element cycling to the fumes given off after a power loss. Correct 5. Press and hold TIMER for example "0°...
... B. Always move birds to clear. Repeat to Celsius. It can be changed to change : Press and hold BROIL for 5 seconds. Press START. Oven Light with Door Open "LOn" indicates that are in 10°F (5°C) amounts. Clean clogged burner ports with the burner cap. Do not use... to "General Cleaning" section. 2. Do not use the time of cycle Fahrenheit and Celsius The temperature is open. Clean the gas tube opening the oven door may cause element cycling to the fumes given off after a power loss. Correct 5. Press and hold TIMER for example "0°...

Owners Manual
Page 7
.... casseroles; Place the cakes on some models) The ACCUBAKE® system electronically regulates the oven heat levels during preheat and bake to maintain a precise temperature range for baking. Oven vent (ceramic glass model) Baking and Roasting ACCUBAKE® Temperature Management System (on the racks.... Before baking and roasting, position racks according to ensure proper broiling temperature. 7 This feature is automatically activated when the oven is directly over another. When roasting, it is reached, a tone will sound, and the selected temperature will cause poor...
.... casseroles; Place the cakes on some models) The ACCUBAKE® system electronically regulates the oven heat levels during preheat and bake to maintain a precise temperature range for baking. Oven vent (ceramic glass model) Baking and Roasting ACCUBAKE® Temperature Management System (on the racks.... Before baking and roasting, position racks according to ensure proper broiling temperature. 7 This feature is automatically activated when the oven is directly over another. When roasting, it is reached, a tone will sound, and the selected temperature will cause poor...


