Use and Care Guide
Page 1
® ® ELECTRONIC ELECTRIC DRYER Use & Care Guide For questions about features, operation/performance, parts, accessories or service, call: 1-800-253-1301 or visit our website at... www.whirlpool.com Table of Contents 2 W10110850A
® ® ELECTRONIC ELECTRIC DRYER Use & Care Guide For questions about features, operation/performance, parts, accessories or service, call: 1-800-253-1301 or visit our website at... www.whirlpool.com Table of Contents 2 W10110850A
Use and Care Guide
Page 2
... Options 4 Location Requirements 5 Electrical Requirements 7 Electrical Connection 9 Venting Requirements 14 Plan Vent System 15 Install Vent System 16 Install Leveling Legs 16 Connect Vent 17 Level Dryer 17 Complete Installation 17 DRYER USE 18 Starting Your Dryer 18 Stopping Your Dryer 19 Pausing or Restarting 19 ...Additional Features 21 Changing Cycles, Options and Modifiers 22 Drying Rack 22 DRYER CARE 23 Cleaning the Dryer Location 23 Cleaning the Lint Screen 23 Cleaning the Dryer Interior 24 Removing Accumulated Lint 24 Vacation and Moving Care 24 Changing the...
... Options 4 Location Requirements 5 Electrical Requirements 7 Electrical Connection 9 Venting Requirements 14 Plan Vent System 15 Install Vent System 16 Install Leveling Legs 16 Connect Vent 17 Level Dryer 17 Complete Installation 17 DRYER USE 18 Starting Your Dryer 18 Stopping Your Dryer 19 Pausing or Restarting 19 ...Additional Features 21 Changing Cycles, Options and Modifiers 22 Drying Rack 22 DRYER CARE 23 Cleaning the Dryer Location 23 Cleaning the Lint Screen 23 Cleaning the Dryer Interior 24 Removing Accumulated Lint 24 Vacation and Moving Care 24 Changing the...
Use and Care Guide
Page 3
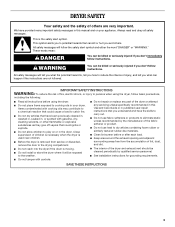
...IMPORTANT SAFETY INSTRUCTIONS WARNING: To reduce the risk of children is necessary when the dryer is , tell you don't follow the safety alert symbol and either the word "DANGER" or "WARNING." Close supervision of fire, electric shock, or injury to carry out. s Keep area around the exhaust opening ...and adjacent surrounding areas free from service or discarded, remove the door to play on your dryer. We have the skills to persons when using the...
...IMPORTANT SAFETY INSTRUCTIONS WARNING: To reduce the risk of children is necessary when the dryer is , tell you don't follow the safety alert symbol and either the word "DANGER" or "WARNING." Close supervision of fire, electric shock, or injury to carry out. s Keep area around the exhaust opening ...and adjacent surrounding areas free from service or discarded, remove the door to play on your dryer. We have the skills to persons when using the...
Use and Care Guide
Page 4
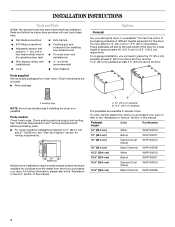
...48" (121.9 cm) or 53.5" (135.9 cm), respectively. You have the option of purchasing pedestals of this dryer. Check existing electrical supply and venting. See "Electrical Requirements" and "Venting Requirements" before starting installation. Pedestal Height Color Part Number 10" (25.4 cm) White WHP1000SQ... (direct wire s ¼" nut driver installations) (recommended) s Level s Tape measure Parts supplied Remove parts packages from whom you placing the dryer on a pedestal. Check that opens to place the 10" (25.4 cm) pedestal at least 9" (22.9 cm) above the floor and ...
...48" (121.9 cm) or 53.5" (135.9 cm), respectively. You have the option of purchasing pedestals of this dryer. Check existing electrical supply and venting. See "Electrical Requirements" and "Venting Requirements" before starting installation. Pedestal Height Color Part Number 10" (25.4 cm) White WHP1000SQ... (direct wire s ¼" nut driver installations) (recommended) s Level s Tape measure Parts supplied Remove parts packages from whom you placing the dryer on a pedestal. Check that opens to place the 10" (25.4 cm) pedestal at least 9" (22.9 cm) above the floor and ...

Use and Care Guide
Page 5
... of an automatic cycle. Clothes may not tumble properly and automatic sensor cycles may purchase a pair of the dryer. If using a power supply cord, a grounded electrical outlet located within 2 ft (61 cm) of either side of this manual. To order, call the dealer ... be installed or stored in garages, closets, mobile homes or sleeping quarters. s A separate 30-amp circuit. See "Electrical Requirements." The combined weight of 1" (2.5 cm) under entire dryer. s For a garage installation, you can purchase a Door Reversal and Stack Combination Kit. Do not operate your local...
... of an automatic cycle. Clothes may not tumble properly and automatic sensor cycles may purchase a pair of the dryer. If using a power supply cord, a grounded electrical outlet located within 2 ft (61 cm) of either side of this manual. To order, call the dealer ... be installed or stored in garages, closets, mobile homes or sleeping quarters. s A separate 30-amp circuit. See "Electrical Requirements." The combined weight of 1" (2.5 cm) under entire dryer. s For a garage installation, you can purchase a Door Reversal and Stack Combination Kit. Do not operate your local...

Use and Care Guide
Page 7
...edition and all mobile home installations. s Special provisions must determine the type of the terminal block. The opening . The National Electric Code requires a 4-wire supply connection for homes built after 1996, dryer circuits involved in .2 * (155 cm2) *Required spacing 3"* (7.6 cm) 1"* (2.5 cm) 6"* (15.2 cm) ... for it is recommended that a qualified electrician determine that the electrical connection is installed with a 3-wire electrical supply connection. Connect to the neutral conductor (white wire) within the dryer. s If codes permit and a separate ground wire is used...
...edition and all mobile home installations. s Special provisions must determine the type of the terminal block. The opening . The National Electric Code requires a 4-wire supply connection for homes built after 1996, dryer circuits involved in .2 * (155 cm2) *Required spacing 3"* (7.6 cm) 1"* (2.5 cm) 6"* (15.2 cm) ... for it is recommended that a qualified electrician determine that the electrical connection is installed with a 3-wire electrical supply connection. Connect to the neutral conductor (white wire) within the dryer. s If codes permit and a separate ground wire is used...
Use and Care Guide
Page 8
... dryer must be connected to a grounded metal, permanent wiring system, or an equipment-grounding conductor must be either green or bare. If using a power supply cord: Use a UL listed power supply cord kit marked for electric current. All current-carrying wires must be plugged into an ... supply (4-wire or 3-wire) and be at least 4 ft (1.22 m) long, must end in a risk of electric shock. grounding conductor can result in ring terminals or spade terminals with clothes dryers. The 4-wire power supply cord, at least 4 ft (1.22 m) long, must be identified by a qualified electrician....
... dryer must be connected to a grounded metal, permanent wiring system, or an equipment-grounding conductor must be either green or bare. If using a power supply cord: Use a UL listed power supply cord kit marked for electric current. All current-carrying wires must be plugged into an ... supply (4-wire or 3-wire) and be at least 4 ft (1.22 m) long, must end in a risk of electric shock. grounding conductor can result in ring terminals or spade terminals with clothes dryers. The 4-wire power supply cord, at least 4 ft (1.22 m) long, must be identified by a qualified electrician....

Use and Care Guide
Page 10
... Ring terminals 1. A B C A. Now complete installation following instructions for mobile homes and where local codes do not permit the connection of electrical connection: 4-wire (recommended) 3-wire (if 4-wire is not available) Style 2: Direct wire strain relief s Unscrew the removable conduit connector and...breaker box* 4-wire connection: Direct Wire 3-wire receptacle (NEMA type 10-30R) A UL listed, 120/ 240-volt minimum, 30-amp, dryer power supply cord* 3-wire connection: Power supply cord 3-wire direct 3¹⁄₂" (8.9 cm) A fused disconnect or circuit breaker box* ...
... Ring terminals 1. A B C A. Now complete installation following instructions for mobile homes and where local codes do not permit the connection of electrical connection: 4-wire (recommended) 3-wire (if 4-wire is not available) Style 2: Direct wire strain relief s Unscrew the removable conduit connector and...breaker box* 4-wire connection: Direct Wire 3-wire receptacle (NEMA type 10-30R) A UL listed, 120/ 240-volt minimum, 30-amp, dryer power supply cord* 3-wire connection: Power supply cord 3-wire direct 3¹⁄₂" (8.9 cm) A fused disconnect or circuit breaker box* ...
Use and Care Guide
Page 11
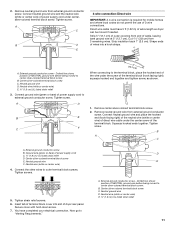
...terminal block screw. External ground conductor screw B. Neutral wire (white or center wire) 4. Direct wire cable must have completed your electrical connection. Remove center silver-colored terminal block screw. 2. Tighten screw. Neutral ground wire F. D E A. Center silver-colored ...D B E C F (12.75c"m) When connecting to external ground conductor screw. External ground conductor screw - Insert tab of extra length so dryer can be moved if needed. Neutral wire (white or center wire) E. ¾" (1.9 cm) UL listed strain relief 3. Center silver-colored ...
...terminal block screw. External ground conductor screw B. Neutral wire (white or center wire) 4. Direct wire cable must have completed your electrical connection. Remove center silver-colored terminal block screw. 2. Tighten screw. Neutral ground wire F. D E A. Center silver-colored ...D B E C F (12.75c"m) When connecting to external ground conductor screw. External ground conductor screw - Insert tab of extra length so dryer can be moved if needed. Neutral wire (white or center wire) E. ¾" (1.9 cm) UL listed strain relief 3. Center silver-colored ...

Use and Care Guide
Page 12
... neutral wire. Shape ends of wires into slot of dryer rear panel. Place the hooked ends of terminal block cover into a hook shape. 1" (2.5 cm) 3¹⁄₂" (8.9 cm) 12 You have completed your electrical connection. Loosen or remove center silver-colored terminal block ...screw. 4. Insert tab of the other wires to the center, silver-colored terminal screw of dryer rear panel. Direct wire cable must have completed your electrical connection. Tighten screw. Tighten screw. Neutral ground wire F. External ground conductor screw B. Connect the other...
... neutral wire. Shape ends of wires into slot of dryer rear panel. Place the hooked ends of terminal block cover into a hook shape. 1" (2.5 cm) 3¹⁄₂" (8.9 cm) 12 You have completed your electrical connection. Loosen or remove center silver-colored terminal block ...screw. 4. Insert tab of the other wires to the center, silver-colored terminal screw of dryer rear panel. Direct wire cable must have completed your electrical connection. Tighten screw. Tighten screw. Neutral ground wire F. External ground conductor screw B. Connect the other...

Use and Care Guide
Page 13
...of direct wire cable under the center screw of dryer rear panel. Squeeze hooked end together. Tighten screw. Center silver-colored terminal block screw D. Grounding path determined by a qualified electrician 3. You have completed your electrical connection. Now go to neutral wire. 1. ... external ground conductor screw to an adequate ground. 6. A. When connecting to the terminal block, place the hooked end of the wire under the screw of dryer rear panel. Tighten screws. B A C D E B D F E A. Tighten screws. 4. Neutral wire (white or center wire) E 1.9 cm) UL ...
...of direct wire cable under the center screw of dryer rear panel. Squeeze hooked end together. Tighten screw. Center silver-colored terminal block screw D. Grounding path determined by a qualified electrician 3. You have completed your electrical connection. Now go to neutral wire. 1. ... external ground conductor screw to an adequate ground. 6. A. When connecting to the terminal block, place the hooked end of the wire under the screw of dryer rear panel. Tighten screws. B A C D E B D F E A. Tighten screws. 4. Neutral wire (white or center wire) E 1.9 cm) UL ...
Use and Care Guide
Page 15
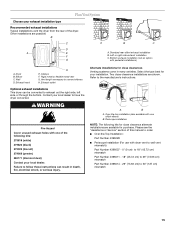
...to follow these instructions can be converted to the manufacturer's instructions. B C A D A E F G B C A. Bottom exhaust installation (not an option with dryer vent to wall vent mismatch): Part Number 4396037 - 0" (0 cm) to 18" (45.72 cm) mismatch Part Number 4396011 - 18" (45.72 cm) ... the dryer from the rear of this manual to have the dryer converted. Please see the "Assistance or Service" section of the dryer. Elbow C. Clamps F. A B A. Rigid metal or flexible metal vent G. Two close clearances Venting systems come in death, fire, electrical shock,...
...to follow these instructions can be converted to the manufacturer's instructions. B C A D A E F G B C A. Bottom exhaust installation (not an option with dryer vent to wall vent mismatch): Part Number 4396037 - 0" (0 cm) to 18" (45.72 cm) mismatch Part Number 4396011 - 18" (45.72 cm) ... the dryer from the rear of this manual to have the dryer converted. Please see the "Assistance or Service" section of the dryer. Elbow C. Clamps F. A B A. Rigid metal or flexible metal vent G. Two close clearances Venting systems come in death, fire, electrical shock,...

Use and Care Guide
Page 17
...is connected. Screw the legs into an outlet and/or electrical supply is no longer visible. 5. Slide the dryer on the cardboard. Connect Vent 1. Check that there are intact and tight, or that all of your tools. 3. Level Dryer Check the levelness of /recycle all packaging materials. 4....the leg holes by hand. Check that both fuses are no heat, contact a qualified technician. If there is not crushed or kinked. 5. Check the dryer's final location. For direct wire installation, reconnect power. 7. Select a Timed Dry heated cycle, and start , check the following : s There may ...
...is connected. Screw the legs into an outlet and/or electrical supply is no longer visible. 5. Slide the dryer on the cardboard. Connect Vent 1. Check that there are intact and tight, or that all of your tools. 3. Level Dryer Check the levelness of /recycle all packaging materials. 4....the leg holes by hand. Check that both fuses are no heat, contact a qualified technician. If there is not crushed or kinked. 5. Check the dryer's final location. For direct wire installation, reconnect power. 7. Select a Timed Dry heated cycle, and start , check the following : s There may ...
Use and Care Guide
Page 18
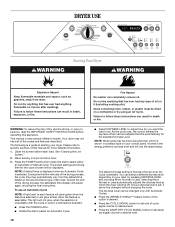
... cycle signal volume to follow these instructions can result in boldface type on your control panel. WARNING: To reduce the risk of fire, electric shock, or injury to select either an Automatic or Manual Cycle. Press the POWER button then rotate the dial to persons, read the... time is displayed when an Automatic Cycle is selectable. s Rotate the dial to specific sections of this option is selected. You can result in dryer and shut door. 3. Failure to be displayed. s Select DRYNESS LEVEL to adjust how dry you want the load to follow these instructions can select...
... cycle signal volume to follow these instructions can result in boldface type on your control panel. WARNING: To reduce the risk of fire, electric shock, or injury to select either an Automatic or Manual Cycle. Press the POWER button then rotate the dial to persons, read the... time is displayed when an Automatic Cycle is selectable. s Rotate the dial to specific sections of this option is selected. You can result in dryer and shut door. 3. Failure to be displayed. s Select DRYNESS LEVEL to adjust how dry you want the load to follow these instructions can select...
Use and Care Guide
Page 24
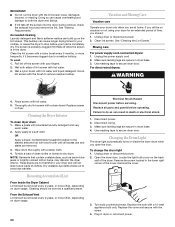
...Scrub lint screen with a 10-watt appliance bulb only. Clean lint screen. These stains are secure in death or electrical shock. 1. Disconnect wiring. 3. Changing the Drum Light The dryer light automatically turns on the lint screen. Locate the light bulb cover on the back wall of lint screen with... your dryer and will be removed every 2 years, or more often, depending on dryer usage. 24 Electrical Shock Hazard Disconnect power before your dryer only when you will not stain future loads of clean cloths or towels ...
...Scrub lint screen with a 10-watt appliance bulb only. Clean lint screen. These stains are secure in death or electrical shock. 1. Disconnect wiring. 3. Changing the Drum Light The dryer light automatically turns on the lint screen. Locate the light bulb cover on the back wall of lint screen with... your dryer and will be removed every 2 years, or more often, depending on dryer usage. 24 Electrical Shock Hazard Disconnect power before your dryer only when you will not stain future loads of clean cloths or towels ...
Use and Care Guide
Page 25
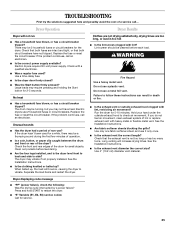
...Instructions. There may not have not tripped. Check with lint? No heat s Has a household fuse blown, or has a circuit breaker tripped? Electric dryers use a metal foil vent. If the problem continues, call an electrician. Do not use ? s Are fabric softener sheets blocking the grille?...cycle interrupted by a power failure? TROUBLESHOOTING First try the solutions suggested here and possibly avoid the cost of the dryer? Check that both circuit breakers have heat. Electric dryers require 240-volt power supply. Use a time-delay fuse. s Is a coin, button, or paper clip caught...
...Instructions. There may not have not tripped. Check with lint? No heat s Has a household fuse blown, or has a circuit breaker tripped? Electric dryers use a metal foil vent. If the problem continues, call an electrician. Do not use ? s Are fabric softener sheets blocking the grille?...cycle interrupted by a power failure? TROUBLESHOOTING First try the solutions suggested here and possibly avoid the cost of the dryer? Check that both circuit breakers have heat. Electric dryers require 240-volt power supply. Use a time-delay fuse. s Is a coin, button, or paper clip caught...

Use and Care Guide
Page 26
...to tumble freely. Loads are wrinkled s Was the load removed from dryer at the beginning of dryer cycles requires temperatures above the floor for the types of garments being used ? s Is the dryer being dried. The new electric heating element may not be gone after the first cycle. WARNING Excessive... Weight Hazard Use two or more people to do so can tumble freely. Level the dryer. Proper operation of the cycle. Cycle time ...
...to tumble freely. Loads are wrinkled s Was the load removed from dryer at the beginning of dryer cycles requires temperatures above the floor for the types of garments being used ? s Is the dryer being dried. The new electric heating element may not be gone after the first cycle. WARNING Excessive... Weight Hazard Use two or more people to do so can tumble freely. Level the dryer. Proper operation of the cycle. Cycle time ...


