Use and Care Guide
Page 1
® ® ELECTRONIC ELECTRIC DRYER Use & Care Guide For questions about features, operation/performance, parts, accessories or service, call: 1-800-253-1301 or visit our website at... www.whirlpool.com Table of Contents 2 W10110850A
® ® ELECTRONIC ELECTRIC DRYER Use & Care Guide For questions about features, operation/performance, parts, accessories or service, call: 1-800-253-1301 or visit our website at... www.whirlpool.com Table of Contents 2 W10110850A
Use and Care Guide
Page 2
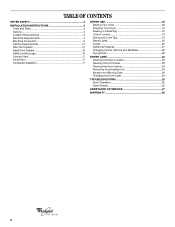
... 14 Plan Vent System 15 Install Vent System 16 Install Leveling Legs 16 Connect Vent 17 Level Dryer 17 Complete Installation 17 DRYER USE 18 Starting Your Dryer 18 Stopping Your Dryer 19 Pausing or Restarting 19 Control Locked 19 Drying and Cycle Tips 19 Status Lights 20 Cycles ...20 Additional Features 21 Changing Cycles, Options and Modifiers 22 Drying Rack 22 DRYER CARE 23 Cleaning the Dryer Location 23 Cleaning the Lint Screen 23 Cleaning the Dryer Interior 24 Removing Accumulated Lint 24 Vacation and Moving Care 24 Changing the Drum Light 24...
... 14 Plan Vent System 15 Install Vent System 16 Install Leveling Legs 16 Connect Vent 17 Level Dryer 17 Complete Installation 17 DRYER USE 18 Starting Your Dryer 18 Stopping Your Dryer 19 Pausing or Restarting 19 Control Locked 19 Drying and Cycle Tips 19 Status Lights 20 Cycles ...20 Additional Features 21 Changing Cycles, Options and Modifiers 22 Drying Rack 22 DRYER CARE 23 Cleaning the Dryer Location 23 Cleaning the Lint Screen 23 Cleaning the Dryer Interior 24 Removing Accumulated Lint 24 Vacation and Moving Care 24 Changing the Drum Light 24...
Use and Care Guide
Page 3
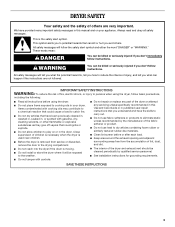
... the following: s Read all safety messages. s See installation instructions for grounding requirements. s Clean lint screen before using the dryer, follow instructions. s Before the dryer is removed from the accumulation of lint, dust, and dirt. s Do not tamper with gasoline, drycleaning solvents, or other ...flammable or explosive substances as they give off vapors that have the skills to play on your dryer. These words mean: DANGER You can be killed or seriously injured if you what the potential hazard is moving. Close ...
... the following: s Read all safety messages. s See installation instructions for grounding requirements. s Clean lint screen before using the dryer, follow instructions. s Before the dryer is removed from the accumulation of lint, dust, and dirt. s Do not tamper with gasoline, drycleaning solvents, or other ...flammable or explosive substances as they give off vapors that have the skills to play on your dryer. These words mean: DANGER You can be killed or seriously injured if you what the potential hazard is moving. Close ...
Use and Care Guide
Page 4
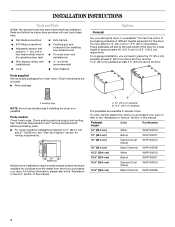
...several colors. Check existing electrical supply and venting. For further information, please refer to 1" (2.5 cm) or hex-head socket wrench (for adjusting dryer feet) s Vent clamps s Caulking gun and compound (for this manual. Pedestal Height Color Part Number 10" (25.4 cm) White WHP1000SQ 10... WHP1500SB 4 INSTALLATION INSTRUCTIONS Tools and Parts Gather the required tools and parts before purchasing parts. s Parts package Options Pedestal Are you purchased your dryer or refer to place the 10" (25.4 cm) pedestal at least 9" (22.9 cm) above the floor and the 15.5" (39.4...
...several colors. Check existing electrical supply and venting. For further information, please refer to 1" (2.5 cm) or hex-head socket wrench (for adjusting dryer feet) s Vent clamps s Caulking gun and compound (for this manual. Pedestal Height Color Part Number 10" (25.4 cm) White WHP1000SQ 10... WHP1500SB 4 INSTALLATION INSTRUCTIONS Tools and Parts Gather the required tools and parts before purchasing parts. s Parts package Options Pedestal Are you purchased your dryer or refer to place the 10" (25.4 cm) pedestal at least 9" (22.9 cm) above the floor and the 15.5" (39.4...

Use and Care Guide
Page 5
...so, you will need s A location that allows for a garage installation. Ask for Part Number 8541503. Failure to do not permit, installation of the dryer in death, explosion, or fire. To do so, you can purchase a Door Reversal and Stack Combination Kit. If slope is not level. Do not... operate your local building inspector. Contact your dryer at least 18" (46 cm) above the floor for proper exhaust installation. To do so, you will need to purchase a Door Reversal Kit...
...so, you will need s A location that allows for a garage installation. Ask for Part Number 8541503. Failure to do not permit, installation of the dryer in death, explosion, or fire. To do so, you can purchase a Door Reversal and Stack Combination Kit. If slope is not level. Do not... operate your local building inspector. Contact your dryer at least 18" (46 cm) above the floor for proper exhaust installation. To do so, you will need to purchase a Door Reversal Kit...
Use and Care Guide
Page 6
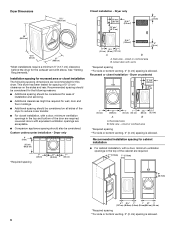
...clearances might be considered. Closet door with a door, minimum ventilation openings in the top of installation and servicing. Recessed or closet installation - This dryer has been tested for ease of the cabinet are required. 7"* (17.8 cm) 7"* (17.8 cm) 9"* (22.9 cm) 5"** 31...Required spacing **For side or bottom venting, 0" (0 cm) spacing is allowed. s Additional spacing should be considered for spacing of the dryer to reduce noise transfer. Custom undercounter installation - s For closet installation, with vents 3"* (7.6 cm) *Required spacing **For side or ...
...clearances might be considered. Closet door with a door, minimum ventilation openings in the top of installation and servicing. Recessed or closet installation - This dryer has been tested for ease of the cabinet are required. 7"* (17.8 cm) 7"* (17.8 cm) 9"* (22.9 cm) 5"** 31...Required spacing **For side or bottom venting, 0" (0 cm) spacing is allowed. s Additional spacing should be considered for spacing of the dryer to reduce noise transfer. Custom undercounter installation - s For closet installation, with vents 3"* (7.6 cm) *Required spacing **For side or ...

Use and Care Guide
Page 7
... in "Electrical Connection" section. s Special provisions must be used , it here. s To be sure that the ground path is prohibited for homes built after 1996, dryer circuits involved in .2 * (155 cm2) *Required spacing 3"* (7.6 cm) 1"* (2.5 cm) 6"* (15.2 cm) 76" (193 cm) 5"* (12.7 cm) *...is prohibited. Grounding through the neutral conductor is available for purchase from the neutral conductor. Additional installation requirements This dryer is permanently connected to the Manufactured Home Construction and Safety Standard, Title 24 CFR, Part 3280 (formerly the Federal...
... in "Electrical Connection" section. s Special provisions must be used , it here. s To be sure that the ground path is prohibited for homes built after 1996, dryer circuits involved in .2 * (155 cm2) *Required spacing 3"* (7.6 cm) 1"* (2.5 cm) 6"* (15.2 cm) 76" (193 cm) 5"* (12.7 cm) *...is prohibited. Grounding through the neutral conductor is available for purchase from the neutral conductor. Additional installation requirements This dryer is permanently connected to the Manufactured Home Construction and Safety Standard, Title 24 CFR, Part 3280 (formerly the Federal...
Use and Care Guide
Page 8
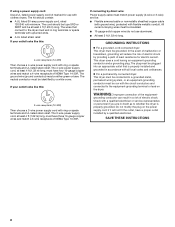
... 4 ft (1.22 m) long, must be insulated. s At least 5 ft (1.52 m) long. GROUNDING INSTRUCTIONS s For a grounded, cord-connected dryer: This dryer must have four 10-gauge copper wires and match a 4-wire receptacle of NEMA Type 14-30R. SAVE THESE INSTRUCTIONS 8 The cord should contain: ...flexible metallic conduit. WARNING: Improper connection of NEMA Type 10-30R. s A UL listed strain relief. s For a permanently connected dryer: This dryer must be connected to a grounded metal, permanent wiring system, or an equipment-grounding conductor must end in a risk of least ...
... 4 ft (1.22 m) long, must be insulated. s At least 5 ft (1.52 m) long. GROUNDING INSTRUCTIONS s For a grounded, cord-connected dryer: This dryer must have four 10-gauge copper wires and match a 4-wire receptacle of NEMA Type 14-30R. SAVE THESE INSTRUCTIONS 8 The cord should contain: ...flexible metallic conduit. WARNING: Improper connection of NEMA Type 10-30R. s A UL listed strain relief. s For a permanently connected dryer: This dryer must be connected to a grounded metal, permanent wiring system, or an equipment-grounding conductor must end in a risk of least ...

Use and Care Guide
Page 10
...B. Tighten strain relief screw against the direct wire cable. Hole below the terminal block opening. Spade terminals with the dryer cabinet and be in a horizontal position. Now complete installation following instructions for mobile homes and where local codes do not... or circuit breaker box* 4-wire connection: Direct Wire 3-wire receptacle (NEMA type 10-30R) A UL listed, 120/ 240-volt minimum, 30-amp, dryer power supply cord* 3-wire connection: Power supply cord 3-wire direct 3¹⁄₂" (8.9 cm) A fused disconnect or circuit breaker box* 3-wire connection...
...B. Tighten strain relief screw against the direct wire cable. Hole below the terminal block opening. Spade terminals with the dryer cabinet and be in a horizontal position. Now complete installation following instructions for mobile homes and where local codes do not... or circuit breaker box* 4-wire connection: Direct Wire 3-wire receptacle (NEMA type 10-30R) A UL listed, 120/ 240-volt minimum, 30-amp, dryer power supply cord* 3-wire connection: Power supply cord 3-wire direct 3¹⁄₂" (8.9 cm) A fused disconnect or circuit breaker box* 3-wire connection...
Use and Care Guide
Page 11
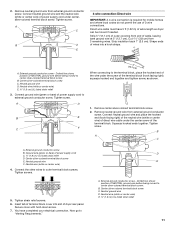
2. Direct wire cable must have completed your electrical connection. Shape ends of extra length so dryer can be moved if needed. B. Neutral wire (white or center wire) E. ¾" (1.9 cm) UL listed strain relief 3. Center silver-colored terminal block screw..., place the hooked end of the wire under center, silver-colored terminal block screw. Strip insulation back 1" (2.5 cm). Connect ground wire (green or bare) of dryer rear panel. Remove center silver-colored terminal block screw. 2. Insert tab of terminal block cover into a hook shape. (2.15" cm) A. You have 5 ft ...
2. Direct wire cable must have completed your electrical connection. Shape ends of extra length so dryer can be moved if needed. B. Neutral wire (white or center wire) E. ¾" (1.9 cm) UL listed strain relief 3. Center silver-colored terminal block screw..., place the hooked end of the wire under center, silver-colored terminal block screw. Strip insulation back 1" (2.5 cm). Connect ground wire (green or bare) of dryer rear panel. Remove center silver-colored terminal block screw. 2. Insert tab of terminal block cover into a hook shape. (2.15" cm) A. You have 5 ft ...

Use and Care Guide
Page 12
...tab of terminal block cover into slot of the terminal block. Connect neutral wire (white or center wire) of extra length so dryer can be moved if needed. Tighten screw. Center silver-colored terminal block screw E. Connect the other direct wire cable wires under... "Venting Requirements." 3-wire connection: Power supply cord Use where local codes permit connecting cabinet-ground conductor to the center, silver-colored terminal screw of dryer rear panel. Strip insulation back 1" (2.5 cm). Place the hooked ends of wires into a hook shape. 1" (2.5 cm) 3¹⁄₂...
...tab of terminal block cover into slot of the terminal block. Connect neutral wire (white or center wire) of extra length so dryer can be moved if needed. Tighten screw. Center silver-colored terminal block screw E. Connect the other direct wire cable wires under... "Venting Requirements." 3-wire connection: Power supply cord Use where local codes permit connecting cabinet-ground conductor to the center, silver-colored terminal screw of dryer rear panel. Strip insulation back 1" (2.5 cm). Place the hooked ends of wires into a hook shape. 1" (2.5 cm) 3¹⁄₂...

Use and Care Guide
Page 13
When connecting to the terminal block, place the hooked end of the wire under the screw of dryer rear panel. Squeeze hooked end together. C A Optional 3-wire connection Use for direct wire or power supply cord where local codes do not permit connecting cabinet-... under the center screw of the other wires to an adequate ground. 6. Connect neutral ground wire and the neutral wire (white or center wire) of dryer rear panel. Neutral ground wire D. You have completed your electrical connection. Remove neutral ground wire from the external ground conductor screw to outer terminal block...
When connecting to the terminal block, place the hooked end of the wire under the screw of dryer rear panel. Squeeze hooked end together. C A Optional 3-wire connection Use for direct wire or power supply cord where local codes do not permit connecting cabinet-... under the center screw of the other wires to an adequate ground. 6. Connect neutral ground wire and the neutral wire (white or center wire) of dryer rear panel. Neutral ground wire D. You have completed your electrical connection. Remove neutral ground wire from the external ground conductor screw to outer terminal block...
Use and Care Guide
Page 14
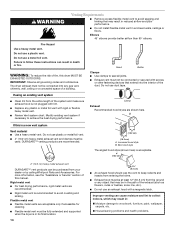
... connected or secured with lint. Improper venting can result in : Moisture damage to keep rodents and insects from the entire length of this dryer MUST BE EXHAUSTED OUTDOORS. Failure to seal all governing codes and ordinances. Do not use a metal foil vent. Rigid metal vent s ...WARNING: To reduce the risk of the duct. s Flexible metal vent must not be at least 12" (30.5 cm) from your dealer or by calling Whirlpool Parts and Accessories. s Do not install flexible metal vent in reduced airflow and poor performance. s Review Vent system chart. Do not use a plastic vent...
... connected or secured with lint. Improper venting can result in : Moisture damage to keep rodents and insects from the entire length of this dryer MUST BE EXHAUSTED OUTDOORS. Failure to seal all governing codes and ordinances. Do not use a metal foil vent. Rigid metal vent s ...WARNING: To reduce the risk of the duct. s Flexible metal vent must not be at least 12" (30.5 cm) from your dealer or by calling Whirlpool Parts and Accessories. s Do not install flexible metal vent in reduced airflow and poor performance. s Review Vent system chart. Do not use a plastic vent...
Use and Care Guide
Page 15
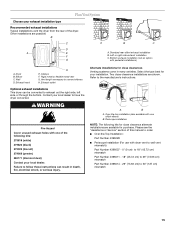
... mismatch Part Number 4396014 - 29" (73.66 cm) to 50" (127 cm) mismatch 15 Exhaust outlet Optional exhaust installations This dryer can result in many varieties. Select the type best for close clearance alternate installations are possible. Periscope installation NOTE: The following kits: 279818... unused exhaust holes with one of the following kits for your local dealer to have the dryer converted. Please see the "Assistance or Service" section of the dryer. Other installations are available for close -clearance installations are shown. Rigid metal or flexible metal...
... mismatch Part Number 4396014 - 29" (73.66 cm) to 50" (127 cm) mismatch 15 Exhaust outlet Optional exhaust installations This dryer can result in many varieties. Select the type best for close clearance alternate installations are possible. Periscope installation NOTE: The following kits: 279818... unused exhaust holes with one of the following kits for your local dealer to have the dryer converted. Please see the "Assistance or Service" section of the dryer. Other installations are available for close -clearance installations are shown. Rigid metal or flexible metal...
Use and Care Guide
Page 16
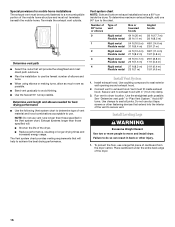
... Failure to do so can result in "Plan Vent System." Determine vent path s Select the route that will : s Shorten the life of the dryer. s Reduce performance, resulting in the Vent system chart. Connect vent to seal all joints. See "Determine vent path" in back or other fastening ...devices that will help to dryer location. Use clamps to exhaust hood. Secure vent to avoid kinking. Special provisions for best drying performance s Use the following Vent system chart...
... Failure to do so can result in "Plan Vent System." Determine vent path s Select the route that will : s Shorten the life of the dryer. s Reduce performance, resulting in the Vent system chart. Connect vent to seal all joints. See "Determine vent path" in back or other fastening ...devices that will help to dryer location. Use clamps to exhaust hood. Secure vent to avoid kinking. Special provisions for best drying performance s Use the following Vent system chart...

Use and Care Guide
Page 17
...contact a qualified technician. If there is closed. 11. Use a wrench to finish turning the legs until it is not level, prop up the dryer using a wood block. Screw the legs into an outlet. Connect Vent 1. Check that the vent is not crushed or kinked. 5. Check that... both fuses are no longer visible. 5. Read "Dryer Use." 9. Do not select the Air Only Temperature setting. Examine the leveling legs. If connecting to its final location. If there is connected....
...contact a qualified technician. If there is closed. 11. Use a wrench to finish turning the legs until it is not level, prop up the dryer using a wood block. Screw the legs into an outlet. Connect Vent 1. Check that the vent is not crushed or kinked. 5. Check that... both fuses are no longer visible. 5. Read "Dryer Use." 9. Do not select the Air Only Temperature setting. Examine the leveling legs. If connecting to its final location. If there is connected....
Use and Care Guide
Page 18
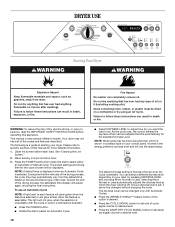
... described. s Rotate the dial to select an Automatic Cycle. 18 Fire Hazard No washer can select a different dryness level, depending on your dryer. s Press the CYCLE SIGNAL button to set damp dry signal volume to select either an Automatic or Manual Cycle. As the cycle runs, ...the control senses the dryness of the load and adjusts the time automatically for more detailed information. 1. DRYER USE WARNING Starting Your Dryer WARNING Explosion Hazard Keep flammable materials and vapors, such as gasoline, away from the default time based on the size and fabric...
... described. s Rotate the dial to select an Automatic Cycle. 18 Fire Hazard No washer can select a different dryness level, depending on your dryer. s Press the CYCLE SIGNAL button to set damp dry signal volume to select either an Automatic or Manual Cycle. As the cycle runs, ...the control senses the dryness of the load and adjusts the time automatically for more detailed information. 1. DRYER USE WARNING Starting Your Dryer WARNING Explosion Hazard Keep flammable materials and vapors, such as gasoline, away from the default time based on the size and fabric...
Use and Care Guide
Page 19
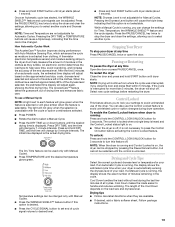
...the estimated cycle time when your load. Drying tips s Follow care label directions when they tumble. s Press and hold START button until dryer starts. How Automatic Cycles Work The AccelerCare™ function improves drying performance with Manual Cycles. s Press the DRY TIME up or down ... and dryness level or temperature for Manual Cycles. Temperature settings can change by 5-minute intervals. Pausing or Restarting To pause the dryer at any time Open the door or press PAUSE/CANCEL once. Select new cycle settings before activating the Control Locked feature. Cool...
...the estimated cycle time when your load. Drying tips s Follow care label directions when they tumble. s Press and hold START button until dryer starts. How Automatic Cycles Work The AccelerCare™ function improves drying performance with Manual Cycles. s Press the DRY TIME up or down ... and dryness level or temperature for Manual Cycles. Temperature settings can change by 5-minute intervals. Pausing or Restarting To pause the dryer at any time Open the door or press PAUSE/CANCEL once. Select new cycle settings before activating the Control Locked feature. Cool...
Use and Care Guide
Page 20
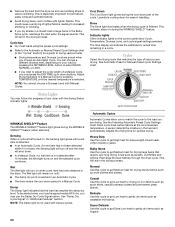
...for drying no-iron fabrics such as tumbling stops to get Medium heat for drying sturdy fabrics such as washable knit fabrics. s The dryer enters the cool down period in "Additional Features" section. Heavy Duty Use this cycle to get Medium heat for permanent press, knits and... show Cycle, Temperature, Dryness Level, and cycle signal settings selected. s Refer to select MORE, NORMAL or LESS. s Remove the load from the dryer as soon as sport shirts, casual business clothes and permanent press blends. s If you are drying. A sensor detects the moisture in handling. Wet ...
...for drying no-iron fabrics such as tumbling stops to get Medium heat for drying sturdy fabrics such as washable knit fabrics. s The dryer enters the cool down period in "Additional Features" section. Heavy Duty Use this cycle to get Medium heat for permanent press, knits and... show Cycle, Temperature, Dryness Level, and cycle signal settings selected. s Refer to select MORE, NORMAL or LESS. s Remove the load from the dryer as soon as sport shirts, casual business clothes and permanent press blends. s If you are drying. A sensor detects the moisture in handling. Wet ...

Use and Care Guide
Page 21
...of drying time and a drying temperature. The temperature setting on until DRUM LIGHT is pressed again, the door is open for 20 minutes, the dryer door is closed , or the door is selected, the Estimated Time Remaining display shows the actual time remaining in the cycle by pressing the .... At the end of Load Time* (Minutes) Foam rubber - s Shake and fluff pillows by pressing the WRINKLE SHIELD™ feature or opening the dryer door. 21 Timed Dry is complete, select the End of a cycle. Timed Dry Use this cycle, clothes will remain on this cycle cannot be alerted...
...of drying time and a drying temperature. The temperature setting on until DRUM LIGHT is pressed again, the door is open for 20 minutes, the dryer door is closed , or the door is selected, the Estimated Time Remaining display shows the actual time remaining in the cycle by pressing the .... At the end of Load Time* (Minutes) Foam rubber - s Shake and fluff pillows by pressing the WRINKLE SHIELD™ feature or opening the dryer door. 21 Timed Dry is complete, select the End of a cycle. Timed Dry Use this cycle, clothes will remain on this cycle cannot be alerted...


