
Use and Care Guide
Page 1
www.whirlpool.com Table of Contents 2 W10182361A ® ® ELECTRONIC ELECTRIC DRYER Use & Care Guide For questions about features, operation/performance, parts, accessories or service, call: 1-800-253-1301 or visit our website at...
www.whirlpool.com Table of Contents 2 W10182361A ® ® ELECTRONIC ELECTRIC DRYER Use & Care Guide For questions about features, operation/performance, parts, accessories or service, call: 1-800-253-1301 or visit our website at...

Use and Care Guide
Page 2
... hurt you what the potential hazard is the safety alert symbol. All safety messages will follow instructions. TABLE OF CONTENTS DRYER SAFETY 2 INSTALLATION INSTRUCTIONS 3 Tools and Parts 3 Options 4 Location Requirements 4 Electrical Requirements 6 Electrical Connection 8 Venting Requirements 13 Plan Vent System 14 Install Vent System 15 Install Leveling Legs 15 Connect Vent 16 Level...
... hurt you what the potential hazard is the safety alert symbol. All safety messages will follow instructions. TABLE OF CONTENTS DRYER SAFETY 2 INSTALLATION INSTRUCTIONS 3 Tools and Parts 3 Options 4 Location Requirements 4 Electrical Requirements 6 Electrical Connection 8 Venting Requirements 13 Plan Vent System 14 Install Vent System 15 Install Leveling Legs 15 Connect Vent 16 Level...

Use and Care Guide
Page 3
... 120/240 volt minimum. The wires that connect to the dryer must end in the dryer. IMPORTANT SAFETY INSTRUCTIONS WARNING: To reduce the risk of fire, electric shock, or injury to persons when using the dryer, follow the instructions provided with any servicing unless specifically recommended in... this Use and Care Guide or in your dryer. Check existing electrical supply and venting. Check that you purchased your dryer. Close supervision of children is necessary when the dryer is used near children. ■ Before the dryer is removed from service or discarded, remove the door...
... 120/240 volt minimum. The wires that connect to the dryer must end in the dryer. IMPORTANT SAFETY INSTRUCTIONS WARNING: To reduce the risk of fire, electric shock, or injury to persons when using the dryer, follow the instructions provided with any servicing unless specifically recommended in... this Use and Care Guide or in your dryer. Check existing electrical supply and venting. Check that you purchased your dryer. Close supervision of children is necessary when the dryer is used near children. ■ Before the dryer is removed from service or discarded, remove the door...
Use and Care Guide
Page 4
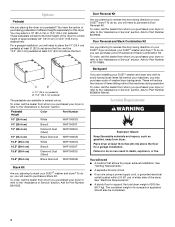
... Service" section. To do so, you planning to stack your DUET® washer and dryer? Ask for Part Number 8541503. Place dryer at least 3.5" (8.9 cm) above the floor for this dryer. See "Electrical Requirements." ■ A sturdy floor to support the total dryer weight of different heights separately for a garage installation. You may purchase a pair of...
... Service" section. To do so, you planning to stack your DUET® washer and dryer? Ask for Part Number 8541503. Place dryer at least 3.5" (8.9 cm) above the floor for this dryer. See "Electrical Requirements." ■ A sturdy floor to support the total dryer weight of different heights separately for a garage installation. You may purchase a pair of...

Use and Care Guide
Page 5
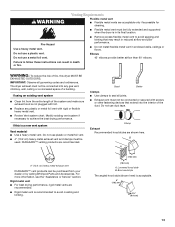
... stored in .2* (310 cm2) 1"* (2.5 cm) 3"* (7.6 cm) 38" (96.52 cm) 51½" (130.81 cm) *31½" (80 cm) 27" (68.6 cm) *Most installations require a minimum 5" (12.7 cm) clearance behind the dryer for custom undercounter installation Custom undercounter installation - Closet door with vents *Required spacing **For side or bottom venting, 0" (0 cm) spacing...
... stored in .2* (310 cm2) 1"* (2.5 cm) 3"* (7.6 cm) 38" (96.52 cm) 51½" (130.81 cm) *31½" (80 cm) 27" (68.6 cm) *Most installations require a minimum 5" (12.7 cm) clearance behind the dryer for custom undercounter installation Custom undercounter installation - Closet door with vents *Required spacing **For side or bottom venting, 0" (0 cm) spacing...

Use and Care Guide
Page 6
... Metal exhaust system hardware, which is suitable for homes built after 1996, dryer circuits involved in remodeling after 1996, and all local codes and ordinances. Electrical Requirements It is adequate and in mobile homes to the Manufactured Home Construction... * (155 cm2) *Required spacing 3"* (7.6 cm) 1"* (2.5 cm) 5 14 cm) 1" (2.5 cm) 27" (68.6 cm) 1" (2.5 cm) *Required spacing Mobile home - Recommended installation spacing for recessed or closet installation, with stacked washer and dryer The dimensions shown are required. 7"* (17.8 cm) 7"* (17.8 cm) 6"* (15.2 cm) 76" (...
... Metal exhaust system hardware, which is suitable for homes built after 1996, dryer circuits involved in remodeling after 1996, and all local codes and ordinances. Electrical Requirements It is adequate and in mobile homes to the Manufactured Home Construction... * (155 cm2) *Required spacing 3"* (7.6 cm) 1"* (2.5 cm) 5 14 cm) 1" (2.5 cm) 27" (68.6 cm) 1" (2.5 cm) *Required spacing Mobile home - Recommended installation spacing for recessed or closet installation, with stacked washer and dryer The dimensions shown are required. 7"* (17.8 cm) 7"* (17.8 cm) 6"* (15.2 cm) 76" (...

Use and Care Guide
Page 7
... risk of NEMA Type 14-30R. The neutral conductor must have four 10-gauge copper wires and match a 4-wire receptacle of electric shock. This dryer uses a cord having an equipment-grounding conductor and a grounding plug. The 4-wire power supply cord, at least 4 ft (1.... vehicles, and (4) areas where local codes prohibit grounding through the neutral conductor is properly grounded. Electrical Connection To properly install your outlet looks like this: If your dryer, you will be identified by a qualified electrician. Grounding through the neutral is manufactured ready to ...
... risk of NEMA Type 14-30R. The neutral conductor must have four 10-gauge copper wires and match a 4-wire receptacle of electric shock. This dryer uses a cord having an equipment-grounding conductor and a grounding plug. The 4-wire power supply cord, at least 4 ft (1.... vehicles, and (4) areas where local codes prohibit grounding through the neutral conductor is properly grounded. Electrical Connection To properly install your outlet looks like this: If your dryer, you will be identified by a qualified electrician. Grounding through the neutral is manufactured ready to ...

Use and Care Guide
Page 8
... relief should have a tight fit with the dryer cabinet and be connected to green ground connector. Do not further tighten strain relief screws at this point. 8 Connect neutral wire (white or center wire) to remaining 2 terminals (gold). Securely tighten all electrical connections. Securely tighten all electrical connections. C D B A A. Ground wire (green or bare wire...
... relief should have a tight fit with the dryer cabinet and be connected to green ground connector. Do not further tighten strain relief screws at this point. 8 Connect neutral wire (white or center wire) to remaining 2 terminals (gold). Securely tighten all electrical connections. Securely tighten all electrical connections. C D B A A. Ground wire (green or bare wire...

Use and Care Guide
Page 9
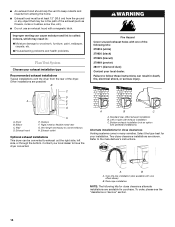
...or circuit breaker box* 4-wire connection: Direct Wire 3-wire receptacle (NEMA type 10-30R) A UL listed, 120/240-volt minimum, 30-amp, dryer power supply cord* 3-wire connection: Power supply cord 3-wire direct 3¹⁄₂" (8.9 cm) A fused disconnect or circuit breaker box* 3-...terminal block opening , screw the removable conduit connector onto the strain relief threads. Remove center silver-colored terminal block screw. 9 Electrical Connection Options If your type of the strain relief through the strain relief. Style 2: Direct wire strain relief ■ Unscrew the...
...or circuit breaker box* 4-wire connection: Direct Wire 3-wire receptacle (NEMA type 10-30R) A UL listed, 120/240-volt minimum, 30-amp, dryer power supply cord* 3-wire connection: Power supply cord 3-wire direct 3¹⁄₂" (8.9 cm) A fused disconnect or circuit breaker box* 3-...terminal block opening , screw the removable conduit connector onto the strain relief threads. Remove center silver-colored terminal block screw. 9 Electrical Connection Options If your type of the strain relief through the strain relief. Style 2: Direct wire strain relief ■ Unscrew the...

Use and Care Guide
Page 10
...squeeze hooked end together and tighten screw, as shown. 1. Connect ground wire (green or bare) of wires into slot of extra length so dryer can be moved if needed. A D B E C F (12.75c"m) When connecting to external ground conductor screw. Connect neutral ground wire...neutral ground wire from 3 remaining wires. Connect the other wires to "Venting Requirements." 10 D E A. Direct wire cable must have completed your electrical connection. Tighten strain relief screws. 6. Secure cover with hold-down screw. 7. External ground conductor screw - Cut 1¹⁄₂" (3.8 cm...
...squeeze hooked end together and tighten screw, as shown. 1. Connect ground wire (green or bare) of wires into slot of extra length so dryer can be moved if needed. A D B E C F (12.75c"m) When connecting to external ground conductor screw. Connect neutral ground wire...neutral ground wire from 3 remaining wires. Connect the other wires to "Venting Requirements." 10 D E A. Direct wire cable must have completed your electrical connection. Tighten strain relief screws. 6. Secure cover with hold-down screw. 7. External ground conductor screw - Cut 1¹⁄₂" (3.8 cm...

Use and Care Guide
Page 11
...to outer terminal block screws. Tighten screw. C A B D E A. Center silver-colored terminal block screw E. Place the hooked ends of dryer rear panel. Tighten screws. A. Neutral ground wire C. Neutral wire (white or center wire) E 1.9 cm) UL listed strain relief 3. ...D. Spade terminals with outer covering. Neutral (white or center wire) 4. Tighten strain relief screws. 5. You have completed your electrical connection. Now go to "Venting Requirements." 3-wire connection: Power supply cord Use where local codes permit connecting cabinet-ground conductor ...
...to outer terminal block screws. Tighten screw. C A B D E A. Center silver-colored terminal block screw E. Place the hooked ends of dryer rear panel. Tighten screws. A. Neutral ground wire C. Neutral wire (white or center wire) E 1.9 cm) UL listed strain relief 3. ...D. Spade terminals with outer covering. Neutral (white or center wire) 4. Tighten strain relief screws. 5. You have completed your electrical connection. Now go to "Venting Requirements." 3-wire connection: Power supply cord Use where local codes permit connecting cabinet-ground conductor ...

Use and Care Guide
Page 12
... wire C. A. Now go to "Venting Requirements." 4. Tighten screw. Place the hooked ends of the other wires to the terminal block, place the hooked end of dryer rear panel. Center silver-colored terminal block screw C. Squeeze hooked end together. Remove center silver-colored terminal block screw. 2. Grounding path determined by a qualified electrician... tighten screw, as shown. 1. Connect neutral ground wire and the neutral wire (white or center wire) of power supply cord/cable under the screw of dryer rear panel. You have completed your electrical connection.
... wire C. A. Now go to "Venting Requirements." 4. Tighten screw. Place the hooked ends of the other wires to the terminal block, place the hooked end of dryer rear panel. Center silver-colored terminal block screw C. Squeeze hooked end together. Remove center silver-colored terminal block screw. 2. Grounding path determined by a qualified electrician... tighten screw, as shown. 1. Connect neutral ground wire and the neutral wire (white or center wire) of power supply cord/cable under the screw of dryer rear panel. You have completed your electrical connection.
Use and Care Guide
Page 13
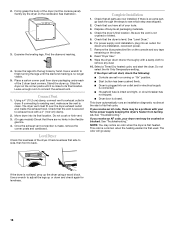
If using an existing vent system ■ Clean lint from your dealer or by calling Whirlpool Parts and Accessories. Modify existing vent system if necessary to avoid sagging and kinking that extend into any plastic or metal foil vent with screws ... acceptable only if accessible for cleaning. ■ Flexible metal vent must be connected into the interior of the duct. The dryer exhaust must not be fully extended and supported when the dryer is recommended to follow these instructions can be purchased from the entire length of the system and make sure exhaust...
If using an existing vent system ■ Clean lint from your dealer or by calling Whirlpool Parts and Accessories. Modify existing vent system if necessary to avoid sagging and kinking that extend into any plastic or metal foil vent with screws ... acceptable only if accessible for cleaning. ■ Flexible metal vent must be connected into the interior of the duct. The dryer exhaust must not be fully extended and supported when the dryer is recommended to follow these instructions can be purchased from the entire length of the system and make sure exhaust...
Use and Care Guide
Page 14
.... Over-the-top installation (also available with one offset elbow) B. Exhaust outlet Optional exhaust installations This dryer can result in death, fire, electrical shock, or serious injury. Fire Hazard Cover unused exhaust holes with one of the dryer. Left or right side exhaust installation C. A B C A. ■ An exhaust hood should cap the vent to...
.... Over-the-top installation (also available with one offset elbow) B. Exhaust outlet Optional exhaust installations This dryer can result in death, fire, electrical shock, or serious injury. Fire Hazard Cover unused exhaust holes with one of the dryer. Left or right side exhaust installation C. A B C A. ■ An exhaust hood should cap the vent to...

Use and Care Guide
Page 15
... m) 23 ft (7 m) 2 Rigid metal 44 ft (13.4 m) 38 ft (11.6 m) Flexible metal 27 ft (8.2 m) 19 ft (5.8 m) 3 Rigid metal 35 ft (10.7 m) 29 ft (8.8 m) Flexible metal 25 ft (7.6 m) 17 ft (5.2 m) 4 Rigid metal 27 ft (8.2 m) 21 ft (6.4 m) Flexible metal 23 ft (7 m) 15 ft (4.6 m) Determine vent path &#...to achieve the best drying performance. The Vent system chart provides venting requirements that will help to use the fewest number of the dryer. ■ Reduce performance, resulting in "Plan Vent System." Use the straightest path possible. Do not use duct tape, screws...
... m) 23 ft (7 m) 2 Rigid metal 44 ft (13.4 m) 38 ft (11.6 m) Flexible metal 27 ft (8.2 m) 19 ft (5.8 m) 3 Rigid metal 35 ft (10.7 m) 29 ft (8.8 m) Flexible metal 25 ft (7.6 m) 17 ft (5.2 m) 4 Rigid metal 27 ft (8.2 m) 21 ft (6.4 m) Flexible metal 23 ft (7 m) 15 ft (4.6 m) Determine vent path &#...to achieve the best drying performance. The Vent system chart provides venting requirements that will help to use the fewest number of the dryer. ■ Reduce performance, resulting in "Plan Vent System." Use the straightest path possible. Do not use duct tape, screws...
Use and Care Guide
Page 16
... or down and check again for levelness. 16 Slide the dryer on . For direct wire installation, reconnect power. 7. If you receive an AF code, your tools. 3. Screw the legs into an outlet and/or electrical supply is connected. ■ Household fuse is intact and tight, or circuit breaker has not ...tripped. ■ Dryer door is close to existing vent, make sure the vent is no kinks in a running or "...
... or down and check again for levelness. 16 Slide the dryer on . For direct wire installation, reconnect power. 7. If you receive an AF code, your tools. 3. Screw the legs into an outlet and/or electrical supply is connected. ■ Household fuse is intact and tight, or circuit breaker has not ...tripped. ■ Dryer door is close to existing vent, make sure the vent is no kinks in a running or "...
Use and Care Guide
Page 17
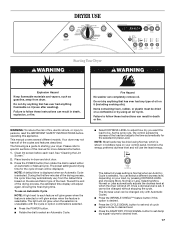
...Dryness Level. Fire Hazard No washer can be . The following is shown in dryer and shut door. 3. Please refer to desired level. 17 Toward the end of fire, electric shock, or injury to starting your dryer. The Dryness Level can completely remove oil. See "Cleaning the Lint Screen." 2.... the POWER button then rotate the dial to each load. The light will adjust again, showing the final drying time. DRYER USE WARNING Starting Your Dryer WARNING Explosion Hazard Keep flammable materials and vapors, such as gasoline, away from the default time based on your control panel...
...Dryness Level. Fire Hazard No washer can be . The following is shown in dryer and shut door. 3. Please refer to desired level. 17 Toward the end of fire, electric shock, or injury to starting your dryer. The Dryness Level can completely remove oil. See "Cleaning the Lint Screen." 2.... the POWER button then rotate the dial to each load. The light will adjust again, showing the final drying time. DRYER USE WARNING Starting Your Dryer WARNING Explosion Hazard Keep flammable materials and vapors, such as gasoline, away from the default time based on your control panel...
Use and Care Guide
Page 18
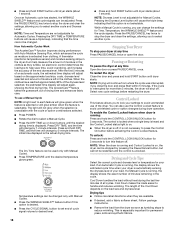
...the DRY TIME or TEMPERATURE buttons will change by 1-minute intervals. A thermistor (electronic temperature sensor) and moisture sensing strips in the dryer drum help save time, avoid overdrying, and increase the accuracy of moisture in the clothes as moisture is especially important for your load...dryness level or temperature for permanent press, knits and synthetic fabrics. The AccelerCare™ feature takes the guesswork out of your dryer is unavailable with Manual Cycles. ■ Press TEMPERATURE until the desired temperature glows green. The Dry Time feature can be ...
...the DRY TIME or TEMPERATURE buttons will change by 1-minute intervals. A thermistor (electronic temperature sensor) and moisture sensing strips in the dryer drum help save time, avoid overdrying, and increase the accuracy of moisture in the clothes as moisture is especially important for your load...dryness level or temperature for permanent press, knits and synthetic fabrics. The AccelerCare™ feature takes the guesswork out of your dryer is unavailable with Manual Cycles. ■ Press TEMPERATURE until the desired temperature glows green. The Dry Time feature can be ...
Use and Care Guide
Page 19
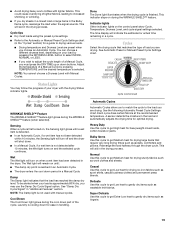
...get Low heat to gently dry items such as washable knit fabrics. Adjust the temperature of the cycle. This will turn off and the dryer will indicate the estimated or actual time remaining in the drying process. Cycle tips ■ Dry most loads using the preset cycle settings.... Sensing light will turn on the control panel show Cycle, Temperature, Dryness Level, and cycle signal settings selected. To be alerted when your dryer with Manual Cycles. Automatic Cycles Automatic Cycles allow you to match the cycle to the Automatic or Manual Preset Cycle Settings chart (in a ...
...get Low heat to gently dry items such as washable knit fabrics. Adjust the temperature of the cycle. This will turn off and the dryer will indicate the estimated or actual time remaining in the drying process. Cycle tips ■ Dry most loads using the preset cycle settings.... Sensing light will turn on the control panel show Cycle, Temperature, Dryness Level, and cycle signal settings selected. To be alerted when your dryer with Manual Cycles. Automatic Cycles Automatic Cycles allow you to match the cycle to the Automatic or Manual Preset Cycle Settings chart (in a ...
Use and Care Guide
Page 20
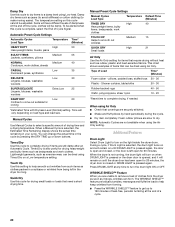
... clothing (to turn the drum light ON or OFF. This chart shows examples of items that can be dried using Timed Dry on until the dryer door has been open for 20 minutes. NOTE: Automatic Cycles are not available when using Low heat. Press DRUM LIGHT at the end of drying... fabrics. To be adjusted. Manual Cycles Use Manual Cycles to select a specific amount of a cycle. 20 Quick Dry Use this cycle for 20 minutes, the dryer door is closed , or the door is opened, and it stops, wrinkles can change the actual time in your cycle. Manual Preset Cycle Settings Manual...
... clothing (to turn the drum light ON or OFF. This chart shows examples of items that can be dried using Timed Dry on until the dryer door has been open for 20 minutes. NOTE: Automatic Cycles are not available when using Low heat. Press DRUM LIGHT at the end of drying... fabrics. To be adjusted. Manual Cycles Use Manual Cycles to select a specific amount of a cycle. 20 Quick Dry Use this cycle for 20 minutes, the dryer door is closed , or the door is opened, and it stops, wrinkles can change the actual time in your cycle. Manual Preset Cycle Settings Manual...


