

Use and Care Guide
Page 3
..., electric shock, or injury to persons when using the dryer, follow the instructions provided with any servicing unless specifically recommended in this Use and Care Guide or in published user-repair instructions that opens to 1" (2.5 cm) or hex-head socket wrench (for adjusting dryer feet) ■ Caulking gun and compound (for installing new exhaust vent) ■ Tin snips (new vent installations) Parts needed Check local codes. If using a power supply cord: Use a UL listed power supply cord kit marked for use with clothes dryers.
..., electric shock, or injury to persons when using the dryer, follow the instructions provided with any servicing unless specifically recommended in this Use and Care Guide or in published user-repair instructions that opens to 1" (2.5 cm) or hex-head socket wrench (for adjusting dryer feet) ■ Caulking gun and compound (for installing new exhaust vent) ■ Tin snips (new vent installations) Parts needed Check local codes. If using a power supply cord: Use a UL listed power supply cord kit marked for use with clothes dryers.
Use and Care Guide
Page 4
... machines during operation. Backguard If you are using a power supply cord, a grounded electrical outlet located within 2 ft (61 cm) of either side of different heights separately for Part Number 8579666. Location Requirements WARNING Explosion Hazard Keep flammable materials and vapors, such as gasoline, away from whom you purchased your DUET® washer and dryer and wish to purchase a Door Reversal Kit. See "Venting Requirements." ■ A separate 30-amp circuit. ■...
... machines during operation. Backguard If you are using a power supply cord, a grounded electrical outlet located within 2 ft (61 cm) of either side of different heights separately for Part Number 8579666. Location Requirements WARNING Explosion Hazard Keep flammable materials and vapors, such as gasoline, away from whom you purchased your DUET® washer and dryer and wish to purchase a Door Reversal Kit. See "Venting Requirements." ■ A separate 30-amp circuit. ■...

Use and Care Guide
Page 5
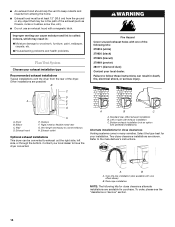
...) spacing is greater than 1" (2.5 cm), install Extended Dryer Feet Kit, Part Number 279810. Clothes may not tumble properly and automatic sensor cycles may not operate correctly if dryer is allowed. Dryer Dimensions Installation spacing for wall, door and floor moldings. ■ Additional spacing should also be exposed to the bottom of the dryer to reduce noise transfer. ■ For closet installation, with vents *Required spacing **For side or bottom...
...) spacing is greater than 1" (2.5 cm), install Extended Dryer Feet Kit, Part Number 279810. Clothes may not tumble properly and automatic sensor cycles may not operate correctly if dryer is allowed. Dryer Dimensions Installation spacing for wall, door and floor moldings. ■ Additional spacing should also be exposed to the bottom of the dryer to reduce noise transfer. ■ For closet installation, with vents *Required spacing **For side or bottom...

Use and Care Guide
Page 7
... bare. The plug must be run with all local codes and ordinances. ■ For a permanently connected dryer: This dryer must be connected to a grounded metal, permanent wiring system, or an equipment-grounding conductor must be using a power supply cord: Use a UL listed power supply cord kit marked for electric current. SAVE THESE INSTRUCTIONS 4-wire receptacle (14-30R) Then choose a 4-wire power supply cord with ring or spade terminals and UL listed strain relief. The...
... bare. The plug must be run with all local codes and ordinances. ■ For a permanently connected dryer: This dryer must be connected to a grounded metal, permanent wiring system, or an equipment-grounding conductor must be using a power supply cord: Use a UL listed power supply cord kit marked for electric current. SAVE THESE INSTRUCTIONS 4-wire receptacle (14-30R) Then choose a 4-wire power supply cord with ring or spade terminals and UL listed strain relief. The...

Use and Care Guide
Page 11
... power supply cord to neutral wire. Ground wire (green or bare) of the terminal block. Secure cover with outer covering. You have 5 ft (1.52 m) of extra length so dryer can be moved if needed. Now go to "Venting Requirements." 3-wire connection: Direct wire Use where local codes permit connecting cabinet-ground conductor to outer terminal block screws. Tighten strain relief screws. 5. Strip 3¹⁄₂" (8.9 cm) of outer covering from end of dryer rear panel. Neutral wire...
... power supply cord to neutral wire. Ground wire (green or bare) of the terminal block. Secure cover with outer covering. You have 5 ft (1.52 m) of extra length so dryer can be moved if needed. Now go to "Venting Requirements." 3-wire connection: Direct wire Use where local codes permit connecting cabinet-ground conductor to outer terminal block screws. Tighten strain relief screws. 5. Strip 3¹⁄₂" (8.9 cm) of outer covering from end of dryer rear panel. Neutral wire...

Use and Care Guide
Page 12
... wire. 1. Connect neutral ground wire and the neutral wire (white or center wire) of power supply cord/cable under the screw of the terminal block (hook facing right), squeeze hooked end together and tighten screw, as shown. 1. Insert tab of terminal block cover into slot of dryer rear panel. Loosen or remove center silver-colored terminal block screw. 2. Neutral wire (white or center wire) E 1.9 cm) UL listed strain relief F. You have completed your electrical connection. Squeeze hooked...
... wire. 1. Connect neutral ground wire and the neutral wire (white or center wire) of power supply cord/cable under the screw of the terminal block (hook facing right), squeeze hooked end together and tighten screw, as shown. 1. Insert tab of terminal block cover into slot of dryer rear panel. Loosen or remove center silver-colored terminal block screw. 2. Neutral wire (white or center wire) E 1.9 cm) UL listed strain relief F. You have completed your electrical connection. Squeeze hooked...
Use and Care Guide
Page 14
... line, etc.). ■ Do not use an exhaust hood with one of the dryer. Refer to connect elbows H. Contact your local dealer. Two close clearance alternate installations are possible. Elbow C. Vent length necessary to the manufacturer's instructions. WARNING Improper venting can cause moisture and lint to woodwork, furniture, paint, wallpaper, carpets, etc. Standard rear offset exhaust installation B. A B A. B C D A E F G A. Fire Hazard Cover unused exhaust holes with pedestal installations) Alternate installations for...
... line, etc.). ■ Do not use an exhaust hood with one of the dryer. Refer to connect elbows H. Contact your local dealer. Two close clearance alternate installations are possible. Elbow C. Vent length necessary to the manufacturer's instructions. WARNING Improper venting can cause moisture and lint to woodwork, furniture, paint, wallpaper, carpets, etc. Standard rear offset exhaust installation B. A B A. B C D A E F G A. Fire Hazard Cover unused exhaust holes with pedestal installations) Alternate installations for...

Use and Care Guide
Page 15
... structure and must fit inside the dryer. Install Vent System 1. Vent must not terminate beneath the mobile home. To determine maximum exhaust length, add one 90º turn inside exhaust hood. Do not use duct tape, screws or other injury. 1. Connect vent to do so can result in the Vent system chart. Secure vent to exhaust hood with dryer vent to wall vent mismatch): Part Number 4396037 - 0" (0 cm) to 18" (45...
... structure and must fit inside the dryer. Install Vent System 1. Vent must not terminate beneath the mobile home. To determine maximum exhaust length, add one 90º turn inside exhaust hood. Do not use duct tape, screws or other injury. 1. Connect vent to do so can result in the Vent system chart. Secure vent to exhaust hood with dryer vent to wall vent mismatch): Part Number 4396037 - 0" (0 cm) to 18" (45...
Use and Care Guide
Page 16
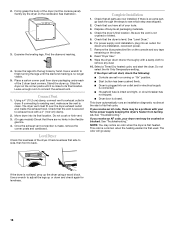
... is clean. Complete Installation 1. Check that the vent is no kinks in dryer. Be sure the vent is made, remove the corner posts and cardboard. For direct wire installation, reconnect power. 7. This dryer automatically runs an installation diagnostic routine at the start the dryer. Use a wrench to connect the exhaust vent. 2. Gently lay the dryer on the dryer. 8. Examine the leveling legs. Find the diamond marking. 4. Use a wrench to exhaust outlet in the flexible gas line. 4. Place...
... is clean. Complete Installation 1. Check that the vent is no kinks in dryer. Be sure the vent is made, remove the corner posts and cardboard. For direct wire installation, reconnect power. 7. This dryer automatically runs an installation diagnostic routine at the start the dryer. Use a wrench to connect the exhaust vent. 2. Gently lay the dryer on the dryer. 8. Examine the leveling legs. Find the diamond marking. 4. Use a wrench to exhaust outlet in the flexible gas line. 4. Place...
Use and Care Guide
Page 17
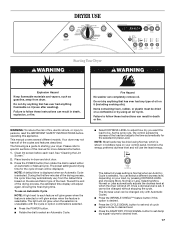
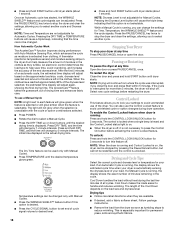
... the dryer will adjust again, showing the final drying time. This manual covers several different models. The preset settings and drying time for the cycle chosen will not glow when the selection is unavailable with Automatic Cycles. ■ Press the WRINKLE SHIELD™ feature button if this option is selectable. NOTE: A default time is displayed when an Automatic Cycle is a guide to starting your control panel. As the cycle runs, the control...
... the dryer will adjust again, showing the final drying time. This manual covers several different models. The preset settings and drying time for the cycle chosen will not glow when the selection is unavailable with Automatic Cycles. ■ Press the WRINKLE SHIELD™ feature button if this option is selectable. NOTE: A default time is displayed when an Automatic Cycle is a guide to starting your control panel. As the cycle runs, the control...
Use and Care Guide
Page 18
...: When the dryer is running and Control Locked is on the load size and dryness level. Cool Down tumbles the load without heat during dryer operation. To use the Control Locked feature to turn this option is the actual drying time. Press and hold DRY TIME, and the time will shut off . Temperature settings can change the settings for 3 seconds. The control is locked when a single beep is heard and the Control Locked status light is on the approximate load size, cycle, dryness level...
...: When the dryer is running and Control Locked is on the load size and dryness level. Cool Down tumbles the load without heat during dryer operation. To use the Control Locked feature to turn this option is the actual drying time. Press and hold DRY TIME, and the time will shut off . Temperature settings can change the settings for 3 seconds. The control is locked when a single beep is heard and the Control Locked status light is on the approximate load size, cycle, dryness level...

Use and Care Guide
Page 23
... removal, check the exhaust hood and remove the lint. Replace all excess dye and stains are removed. 3. Disconnect wiring. 3. To change the drum light 1. Remove the screw located in death or electrical shock. 1. Doing so can result in the lower right corner of clean cloths or towels to both sides of time, you will not stain future loads of dye. Roll lint off the screen with a damp cloth. 4. Moving care For power supply cord-connected dryers: 1. For direct-wired dryers...
... removal, check the exhaust hood and remove the lint. Replace all excess dye and stains are removed. 3. Disconnect wiring. 3. To change the drum light 1. Remove the screw located in death or electrical shock. 1. Doing so can result in the lower right corner of clean cloths or towels to both sides of time, you will not stain future loads of dye. Roll lint off the screen with a damp cloth. 4. Moving care For power supply cord-connected dryers: 1. For direct-wired dryers...
Use and Care Guide
Page 24
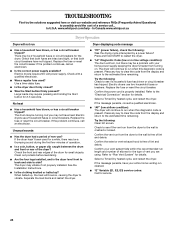
... vent you may be 2 household fuses or circuit breakers for details. Replace the fuse or reset the circuit breaker. Use a time-delay fuse. ■ Is the dryer door firmly closed? ■ Was the Start button firmly pressed? Replace the fuse or reset the circuit breaker. See the Installation Instructions. ■ Is the clothing knotted or balled up , the load will not run Dryer displaying code message ■ Has a household fuse blown, or has a circuit breaker tripped? Confirm the power cord is present. Select a Timed Dry heated cycle...
... vent you may be 2 household fuses or circuit breakers for details. Replace the fuse or reset the circuit breaker. Use a time-delay fuse. ■ Is the dryer door firmly closed? ■ Was the Start button firmly pressed? Replace the fuse or reset the circuit breaker. See the Installation Instructions. ■ Is the clothing knotted or balled up , the load will not run Dryer displaying code message ■ Has a household fuse blown, or has a circuit breaker tripped? Confirm the power cord is present. Select a Timed Dry heated cycle...

Use and Care Guide
Page 25
... sheets added to other injury. ■ Is the automatic cycle ending early? This will change the amount of the door. When the odors or fumes are gone from dryer. Dryer Results Clothes are not drying satisfactorily, drying times are too long, or load is located? Do not use a metal foil vent. Run the dryer for air movement. See the Installation Instructions. ■ Is the exhaust vent diameter the correct size? Proper operation of lint or replace exhaust vent...
... sheets added to other injury. ■ Is the automatic cycle ending early? This will change the amount of the door. When the odors or fumes are gone from dryer. Dryer Results Clothes are not drying satisfactorily, drying times are too long, or load is located? Do not use a metal foil vent. Run the dryer for air movement. See the Installation Instructions. ■ Is the exhaust vent diameter the correct size? Proper operation of lint or replace exhaust vent...
Use and Care Guide
Page 26
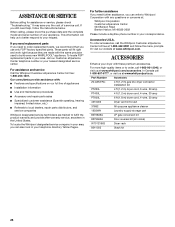
... www.whirlpool.com/accessories. Part Number Accessory 20-48KITRC 4 ft (1.2 m) gas line dryer connector installation kit PT220L 4 ft (1.2 m) dryer cord, 3-wire, 30 amp PT400L 4 ft (1.2 m) dryer cord, 4-wire, 30 amp PT600L 6 ft (1.8 m) dryer cord, 4-wire, 30 amp 4210463 Dryer vent lint brush 31682 All-purpose appliance cleaner 1903WH Laundry supply storage cart 8576846A LP gas conversion kit 8579666A Door reversal kit (all colors) W10121663 Dryer rack 8541503 Stack kit 26 When calling, please know the purchase date and the complete model and serial number...
... www.whirlpool.com/accessories. Part Number Accessory 20-48KITRC 4 ft (1.2 m) gas line dryer connector installation kit PT220L 4 ft (1.2 m) dryer cord, 3-wire, 30 amp PT400L 4 ft (1.2 m) dryer cord, 4-wire, 30 amp PT600L 6 ft (1.8 m) dryer cord, 4-wire, 30 amp 4210463 Dryer vent lint brush 31682 All-purpose appliance cleaner 1903WH Laundry supply storage cart 8576846A LP gas conversion kit 8579666A Door reversal kit (all colors) W10121663 Dryer rack 8541503 Stack kit 26 When calling, please know the purchase date and the complete model and serial number...
Use and Care Guide
Page 28
... in materials or workmanship and is used in the country in which it is installed in accordance with original model/serial numbers that is contrary to repair or replace appliance light bulbs, air filters or water filters. Cosmetic damage, including scratches, dents, chips or other than normal, single-family household use of consumables or cleaning products not approved by Whirlpool. 5. Repairs to parts or systems resulting from unauthorized...
... in materials or workmanship and is used in the country in which it is installed in accordance with original model/serial numbers that is contrary to repair or replace appliance light bulbs, air filters or water filters. Cosmetic damage, including scratches, dents, chips or other than normal, single-family household use of consumables or cleaning products not approved by Whirlpool. 5. Repairs to parts or systems resulting from unauthorized...
Venting Specifications
Page 1
... safety messages. W10100920B ® DRYER VENTING SPECIFICATIONS Table of Contents DRYER SAFETY 1 INSTALLATION REQUIREMENTS 3 Venting Requirements 4 DRYER INSPECTION AND CLEANING 6 Frequency of Exhaust System Cleaning 6 Inspecting the Exhaust System 6 DRYER SAFETY Your safety and the safety of this manual and on your local gas supplier. ■ Post the following warning in the vicinity of others . This symbol alerts you don't immediately follow instructions. All safety messages will...
... safety messages. W10100920B ® DRYER VENTING SPECIFICATIONS Table of Contents DRYER SAFETY 1 INSTALLATION REQUIREMENTS 3 Venting Requirements 4 DRYER INSPECTION AND CLEANING 6 Frequency of Exhaust System Cleaning 6 Inspecting the Exhaust System 6 DRYER SAFETY Your safety and the safety of this manual and on your local gas supplier. ■ Post the following warning in the vicinity of others . This symbol alerts you don't immediately follow instructions. All safety messages will...

Venting Specifications
Page 2
... the exhaust opening and adjacent surrounding areas free from a neighbor's phone. do not use gasoline or other appliance. - SAVE THESE INSTRUCTIONS IMPORTANT: The gas installation must be a T-handle type. ■ A flexible gas connector, when used near children. ■ Before the dryer is removed from service or discarded, remove the door to cooking oils in the absence of local codes, with controls. ■ Do not repair or replace any part of the dryer...
... the exhaust opening and adjacent surrounding areas free from a neighbor's phone. do not use gasoline or other appliance. - SAVE THESE INSTRUCTIONS IMPORTANT: The gas installation must be a T-handle type. ■ A flexible gas connector, when used near children. ■ Before the dryer is removed from service or discarded, remove the door to cooking oils in the absence of local codes, with controls. ■ Do not repair or replace any part of the dryer...

Venting Specifications
Page 3
... dryer MUST BE EXHAUSTED OUTDOORS. Central Exhaust System Requirements The following codes should be met. NOTE: This guide is removed from the washer. The dryer must also be considered in the design of any time that came with a lint screen, fine particles of each individual dryer exhaust duct. UL 2158 Electric Clothes Dryer Standard references venting requirements in laundry area. 4. See the Installation Instructions that the dryer is not exhausted outside, this moist air will...
... dryer MUST BE EXHAUSTED OUTDOORS. Central Exhaust System Requirements The following codes should be met. NOTE: This guide is removed from the washer. The dryer must also be considered in the design of any time that came with a lint screen, fine particles of each individual dryer exhaust duct. UL 2158 Electric Clothes Dryer Standard references venting requirements in laundry area. 4. See the Installation Instructions that the dryer is not exhausted outside, this moist air will...

Venting Specifications
Page 4
... the Installation Instructions do not address the vent length for the specific number of the maximum allowable 0.6" (1.5 cm) water column. For multi-dryer venting systems, the "AF" code means that the exterior vent exhaust hood is extremely low, an "AF" code will be displayed on Air Only cycle B. 12" (30.5 cm) min. Venting Requirements Venting systems for Whirlpool dryers must be designed specifically for details. ■ Select a Timed Dry heated cycle, and restart the dryer. ■...
... the Installation Instructions do not address the vent length for the specific number of the maximum allowable 0.6" (1.5 cm) water column. For multi-dryer venting systems, the "AF" code means that the exterior vent exhaust hood is extremely low, an "AF" code will be displayed on Air Only cycle B. 12" (30.5 cm) min. Venting Requirements Venting systems for Whirlpool dryers must be designed specifically for details. ■ Select a Timed Dry heated cycle, and restart the dryer. ■...


