
Ventilation Specification
Page 1
... "WARNING." FOR YOUR SAFETY Do not store or use in a prominent location. ® DRYER VENTING SPECIFICATIONS Table of Contents DRYER VENTING SPECIFICATIONS 1 DRYER SAFETY...1 INSTALLATION REQUIREMENTS ...4 Venting Requirements ...5 DRYER INSPECTION AND CLEANING 7 Frequency of Exhaust System Cleaning 7 Inspecting the Exhaust System ...7 DRYER SAFETY Your safety and the safety of others . This is recommended that can...
... "WARNING." FOR YOUR SAFETY Do not store or use in a prominent location. ® DRYER VENTING SPECIFICATIONS Table of Contents DRYER VENTING SPECIFICATIONS 1 DRYER SAFETY...1 INSTALLATION REQUIREMENTS ...4 Venting Requirements ...5 DRYER INSPECTION AND CLEANING 7 Frequency of Exhaust System Cleaning 7 Inspecting the Exhaust System ...7 DRYER SAFETY Your safety and the safety of others . This is recommended that can...

Ventilation Specification
Page 3
...children to play on or in the absence of local codes, with the National Electrical Code, ANSI/NFPA 70. 3 The dryer must conform with controls. ■ Do not repair or replace any part of the dryer or attempt any servicing unless specifically recommended in this Use and Care Guide or...moving. ■ Do not install or store the dryer where it will be electrically grounded in accordance with local codes, or in the dryer. IMPORTANT SAFETY INSTRUCTIONS WARNING: To reduce the risk of fire, electric shock, or injury to persons when using the dryer. ■ Do not place items exposed to ...
...children to play on or in the absence of local codes, with the National Electrical Code, ANSI/NFPA 70. 3 The dryer must conform with controls. ■ Do not repair or replace any part of the dryer or attempt any servicing unless specifically recommended in this Use and Care Guide or...moving. ■ Do not install or store the dryer where it will be electrically grounded in accordance with local codes, or in the dryer. IMPORTANT SAFETY INSTRUCTIONS WARNING: To reduce the risk of fire, electric shock, or injury to persons when using the dryer. ■ Do not place items exposed to ...

Ventilation Specification
Page 4
... size vents to the central exhaust duct system with the dryer. ■ Provide for periodic inspection and clean-out of dryer vent systems. Whirlpool does not design multidryer vent systems, nor does Whirlpool review or provide approvals for vent systems designed by third-...duct system for sufficient capacity to the central vent. ■ Install weighted dampers on windows and walls in compliance: 1. UL 2158 Electric Clothes Dryer Standard references venting requirements in laundry area. 4. Fire Hazard Use a heavy metal vent. Housecleaning problems and health problems. Moisture A ...
... size vents to the central exhaust duct system with the dryer. ■ Provide for periodic inspection and clean-out of dryer vent systems. Whirlpool does not design multidryer vent systems, nor does Whirlpool review or provide approvals for vent systems designed by third-...duct system for sufficient capacity to the central vent. ■ Install weighted dampers on windows and walls in compliance: 1. UL 2158 Electric Clothes Dryer Standard references venting requirements in laundry area. 4. Fire Hazard Use a heavy metal vent. Housecleaning problems and health problems. Moisture A ...

Ventilation Specification
Page 5
...and Care Guide for more information. ■ Confirm that designed the system should be measured with an empty dryer, a clean lint screen and with each model, or on the Whirlpool.com website. Use an inclined manometer, such as systems that is allowed 40 ft (12.2 m) of total... vent system is creating back pressure in excess of the maximum allowable 0.6" (15 mm) water column. Codes Agency Approvals All Whirlpool electric dryer models, including "long vent dryers," that your overall vent system length is at least 100 CFM. In this code means that you are UL listed (reference UL2158...
...and Care Guide for more information. ■ Confirm that designed the system should be measured with an empty dryer, a clean lint screen and with each model, or on the Whirlpool.com website. Use an inclined manometer, such as systems that is allowed 40 ft (12.2 m) of total... vent system is creating back pressure in excess of the maximum allowable 0.6" (15 mm) water column. Codes Agency Approvals All Whirlpool electric dryer models, including "long vent dryers," that your overall vent system length is at least 100 CFM. In this code means that you are UL listed (reference UL2158...
Ventilation Specification
Page 6
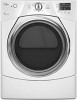
... The most common is exhausted into a central vertical vent. D A F E B C F F G A. 0.6" (15 mm) water column maximum back pressure B. Individual dryer exhaust - See the following illustration for an example of 0.1" (2.5 mm) water column vacuum B. Option 1 - Option 3 - Vertical System The vertical system is used in ...room and vented through a common duct. Weighted damper (each floor. Each of dryers installed at several different levels. See the following illustration for an example of dryers are all located in high-rise apartments, with a bank of these banks ...
... The most common is exhausted into a central vertical vent. D A F E B C F F G A. 0.6" (15 mm) water column maximum back pressure B. Individual dryer exhaust - See the following illustration for an example of 0.1" (2.5 mm) water column vacuum B. Option 1 - Option 3 - Vertical System The vertical system is used in ...room and vented through a common duct. Weighted damper (each floor. Each of dryers installed at several different levels. See the following illustration for an example of dryers are all located in high-rise apartments, with a bank of these banks ...

Ventilation Specification
Page 7
... hood. Inspect the interior of the exhaust system. For single-family usage, an annual inspection is recommended. Disconnect the exhaust duct from the dryer and from lint accumulation. In commercial usage or in the system. ■ Seal any lint accumulation. ■ Be sure that are secure...air is intact and free from the exhaust hood (at the exhaust outlet). 2. DRYER INSPECTION AND CLEANING Frequency of the exhaust system) will vary, depending on the system and usage of the dryer. The frequency of these inspections will not open or close completely. ■ After...
... hood. Inspect the interior of the exhaust system. For single-family usage, an annual inspection is recommended. Disconnect the exhaust duct from the dryer and from lint accumulation. In commercial usage or in the system. ■ Seal any lint accumulation. ■ Be sure that are secure...air is intact and free from the exhaust hood (at the exhaust outlet). 2. DRYER INSPECTION AND CLEANING Frequency of the exhaust system) will vary, depending on the system and usage of the dryer. The frequency of these inspections will not open or close completely. ■ After...
Use and Care Guide
Page 2
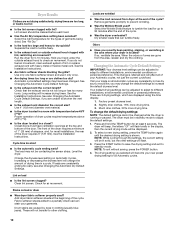
... alert symbol. This is , tell you how to potential hazards that can kill or hurt you what can happen if the instructions are very important. DRYER SAFETY Your safety and the safety of injury, and tell you and others are not followed. 2 Always read and obey all safety messages.
... alert symbol. This is , tell you how to potential hazards that can kill or hurt you what can happen if the instructions are very important. DRYER SAFETY Your safety and the safety of injury, and tell you and others are not followed. 2 Always read and obey all safety messages.
Use and Care Guide
Page 3
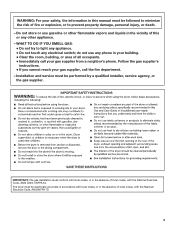
..., ANSI/NFPA 70. 3 Do not store or use any other flammable vapors and liquids in the vicinity of this manual must be electrically grounded in accordance with local codes, or in the absence of local codes, with the National Fuel Gas Code, ANSI Z223.1/NFPA 54. WHAT TO ... supplier's instructions. • If you cannot reach your gas supplier from a neighbor's phone. The dryer must be followed to minimize the risk of fire or explosion, or to light any appliance. • Do not touch any electrical switch; WARNING: For your safety, the information in this or any phone in your building...
..., ANSI/NFPA 70. 3 Do not store or use any other flammable vapors and liquids in the vicinity of this manual must be electrically grounded in accordance with local codes, or in the absence of local codes, with the National Fuel Gas Code, ANSI Z223.1/NFPA 54. WHAT TO ... supplier's instructions. • If you cannot reach your gas supplier from a neighbor's phone. The dryer must be followed to minimize the risk of fire or explosion, or to light any appliance. • Do not touch any electrical switch; WARNING: For your safety, the information in this or any phone in your building...
Use and Care Guide
Page 4
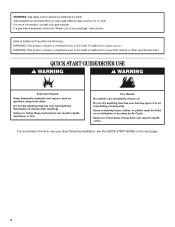
...washer can result in death, explosion, or fire. Failure to use a gas detector approved by UL or CSA. For more information, contact your dryer following installation, see the QUICK START GUIDE on the next page. 4 If a gas leak is detected, follow the "What to follow these instructions...leaks cannot always be dried on a clothesline or by using an Air Cycle. QUICK START GUIDE/DRYER USE WARNING WARNING Explosion Hazard Keep flammable materials and vapors, such as gasoline, away from dryer. Failure to do if you use your gas supplier. Items containing foam, rubber, or plastic...
...washer can result in death, explosion, or fire. Failure to use a gas detector approved by UL or CSA. For more information, contact your dryer following installation, see the QUICK START GUIDE on the next page. 4 If a gas leak is detected, follow the "What to follow these instructions...leaks cannot always be dried on a clothesline or by using an Air Cycle. QUICK START GUIDE/DRYER USE WARNING WARNING Explosion Hazard Keep flammable materials and vapors, such as gasoline, away from dryer. Failure to do if you use your gas supplier. Items containing foam, rubber, or plastic...
Use and Care Guide
Page 5
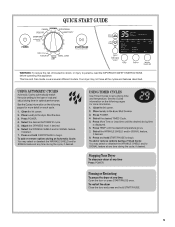
... and/or SIGNAL feature at any time during the cycle, if desired. To add or remove options during the cycle, if desired. Press POWER. Your dryer may select or deselect the WRINKLE SHIELD and/or SIGNAL feature at any time during an Automatic Cycle: You may not have all the cycles... Wet High Medium Low Extra Low Air Dry Damp Cool Down More Normal Less Done Wrinkle Shield On WARNING: To reduce the risk of fire electric shock, or injury to set a drying time and temperature. Adjust the DRYNESS level, if desired. Select the desired AUTOMATIC cycle.
... and/or SIGNAL feature at any time during the cycle, if desired. To add or remove options during the cycle, if desired. Press POWER. Your dryer may select or deselect the WRINKLE SHIELD and/or SIGNAL feature at any time during an Automatic Cycle: You may not have all the cycles... Wet High Medium Low Extra Low Air Dry Damp Cool Down More Normal Less Done Wrinkle Shield On WARNING: To reduce the risk of fire electric shock, or injury to set a drying time and temperature. Adjust the DRYNESS level, if desired. Select the desired AUTOMATIC cycle.
Use and Care Guide
Page 7
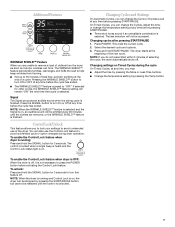
... Press and hold START/PAUSE. The WRINKLE SHIELD™ feature periodically tumbles, rearranges, and fluffs the load to help keep wrinkles from the dryer as soon as it is selected. If selected for other cycles, the WRINKLE SHIELD™ feature setting will not be stopped by pressing the... ended. ■ The WRINKLE SHIELD™ feature is running and Control Lock is on Timed Cycles during dryer operation. You can change the temperature setting at the end of the dryer. Changing Cycles and Settings On Automatic Cycles, you can also use of a cycle. NOTE: If you ...
... Press and hold START/PAUSE. The WRINKLE SHIELD™ feature periodically tumbles, rearranges, and fluffs the load to help keep wrinkles from the dryer as soon as it is selected. If selected for other cycles, the WRINKLE SHIELD™ feature setting will not be stopped by pressing the... ended. ■ The WRINKLE SHIELD™ feature is running and Control Lock is on Timed Cycles during dryer operation. You can change the temperature setting at the end of the dryer. Changing Cycles and Settings On Automatic Cycles, you can also use of a cycle. NOTE: If you ...
Use and Care Guide
Page 8
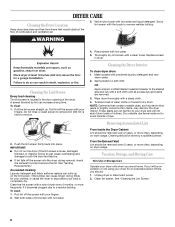
.... OR Apply a liquid, nonflammable household cleaner to a residue buildup. Vacation, Storage, and Moving Care Non-Use or Storage Care Operate your dryer only when you will not stain future loads of lint screen with hot water. 4. Wipe drum thoroughly with a soft cloth until all excess ... that would obstruct the flow of time, you should be on the lint screen. See "Cleaning the Lint Screen." 8 DRYER CARE Cleaning the Dryer Location Keep dryer area clear and free from items that contain unstable dyes, such as denim blue jeans or brightly colored cotton items, may ...
.... OR Apply a liquid, nonflammable household cleaner to a residue buildup. Vacation, Storage, and Moving Care Non-Use or Storage Care Operate your dryer only when you will not stain future loads of lint screen with hot water. 4. Wipe drum thoroughly with a soft cloth until all excess ... that would obstruct the flow of time, you should be on the lint screen. See "Cleaning the Lint Screen." 8 DRYER CARE Cleaning the Dryer Location Keep dryer area clear and free from items that contain unstable dyes, such as denim blue jeans or brightly colored cotton items, may ...
Use and Care Guide
Page 9
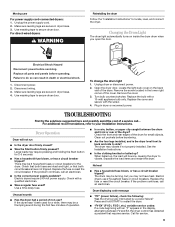
...fuses or circuit breakers. Clean out pockets before servicing. No heat ■ Has a household fuse blown, or has a circuit breaker tripped? Electric dryers use ? Press and hold START to vibrate. Make sure leveling legs are secure in the display, alternating between the drum and front or rear... rear edges of operation. ■ Is a coin, button, or paper clip caught between F# and E#, the dryer control has detected a problem that both fuses are secure in death or electrical shock. 1. See the Installation Instructions. ■ Is the clothing knotted or balled up , the load will not...
...fuses or circuit breakers. Clean out pockets before servicing. No heat ■ Has a household fuse blown, or has a circuit breaker tripped? Electric dryers use ? Press and hold START to vibrate. Make sure leveling legs are secure in the display, alternating between the drum and front or rear... rear edges of operation. ■ Is a coin, button, or paper clip caught between F# and E#, the dryer control has detected a problem that both fuses are secure in death or electrical shock. 1. See the Installation Instructions. ■ Is the clothing knotted or balled up , the load will not...
Use and Care Guide
Page 10
... the Automatic Cycle Default Settings, if you do not feel air movement, clean exhaust system of the cycle. ■ Was the dryer overloaded? See the Installation Instructions. Stains on all your hand under the outside exhaust hood clogged with heavy metal or flexible metal vent...While cycling through the settings, the current setting will affect all Automatic cycles. 10 Hold your loads on load or drum ■ Was dryer fabric softener properly used ? Automatic cycle default settings may change the default drying settings: NOTE: The default settings cannot be in a closet...
... the Automatic Cycle Default Settings, if you do not feel air movement, clean exhaust system of the cycle. ■ Was the dryer overloaded? See the Installation Instructions. Stains on all your hand under the outside exhaust hood clogged with heavy metal or flexible metal vent...While cycling through the settings, the current setting will affect all Automatic cycles. 10 Hold your loads on load or drum ■ Was dryer fabric softener properly used ? Automatic cycle default settings may change the default drying settings: NOTE: The default settings cannot be in a closet...
Installation Instructions
Page 2
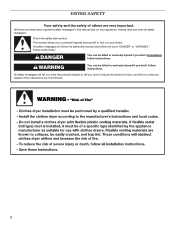
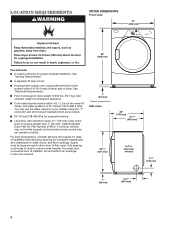
... of others . All safety messages will follow the safety alert symbol and either the word "DANGER" or "WARNING." Always read and obey all safety messages. DRYER SAFETY Your safety and the safety of injury, and tell you don't follow instructions. This is , tell you how to potential hazards that can happen...
... of others . All safety messages will follow the safety alert symbol and either the word "DANGER" or "WARNING." Always read and obey all safety messages. DRYER SAFETY Your safety and the safety of injury, and tell you don't follow instructions. This is , tell you how to potential hazards that can happen...
Installation Instructions
Page 3
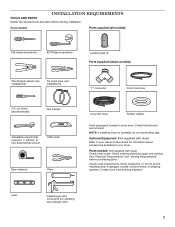
...and parts before purchasing parts. Optional Equipment: (Not supplied with dryer) Check local codes. Check code requirements. Level Caulking gun and compound (for your local building inspector. Check existing electrical supply and venting. Some codes limit, or do not use ...leveling legs. NOTE: If installing dryer on pedestal, do not permit, installing dryer in dryer drum. Contact your dryer. Tools needed : (Not supplied with dryer) Refer to 1" (25mm) ...
...and parts before purchasing parts. Optional Equipment: (Not supplied with dryer) Check local codes. Check code requirements. Level Caulking gun and compound (for your local building inspector. Check existing electrical supply and venting. Some codes limit, or do not use ...leveling legs. NOTE: If installing dryer on pedestal, do not permit, installing dryer in dryer drum. Contact your dryer. Tools needed : (Not supplied with dryer) Refer to 1" (25mm) ...
Installation Instructions
Page 4
...;■ 20-100 psi (138-690 kPa) for ease of dryer. If not level, clothes may not tumble properly and automatic sensor cycles may use the water supply for your washer using power supply cord, a grounded electrical outlet located within 4 ft. (1.2 m) of the water fill valves..., and water pressure of 1" (25 mm) under entire dryer. spacing for companion appliances and clearances for proper exhaust installation. measurement Side view: ...
...;■ 20-100 psi (138-690 kPa) for ease of dryer. If not level, clothes may not tumble properly and automatic sensor cycles may use the water supply for your washer using power supply cord, a grounded electrical outlet located within 4 ft. (1.2 m) of the water fill valves..., and water pressure of 1" (25 mm) under entire dryer. spacing for companion appliances and clearances for proper exhaust installation. measurement Side view: ...

Installation Instructions
Page 5
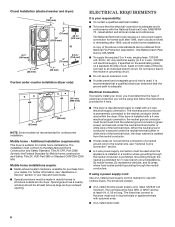
... it will be exposed to shut off at temperatures below 45° F (7° C). Louvered doors with elbow. Back view: 61/4" (159 mm) Closet installation (dryer only): Electric 34" recommended (864 mm) 18" min. (457 mm) 3" (76 mm) 48 in.2 (310 cm2) 283/4" (733 mm) 33/4" (83 mm) 4" (102 mm) 3" (76 mm) 24...
... it will be exposed to shut off at temperatures below 45° F (7° C). Louvered doors with elbow. Back view: 61/4" (159 mm) Closet installation (dryer only): Electric 34" recommended (864 mm) 18" min. (457 mm) 3" (76 mm) 48 in.2 (310 cm2) 283/4" (733 mm) 33/4" (83 mm) 4" (102 mm) 3" (76 mm) 24...
Installation Instructions
Page 6
...on the serial/rating plate) on a separate 30-amp circuit, fused on both sides of the line. If the dryer is installed with a 4-wire electrical supply connection, the neutral ground conductor must be removed from the neutral conductor. ■■ If local codes do ... (center or white wire) of the terminal block. Mobile home - ELECTRICAL REQUIREMENTS It is prohibited. The installation must end in ring terminals or spade terminals with clothes dryers. Openings (such as dryer exhaust opening. latest edition and all mobile home installations. Connect to the...
...on the serial/rating plate) on a separate 30-amp circuit, fused on both sides of the line. If the dryer is installed with a 4-wire electrical supply connection, the neutral ground conductor must be removed from the neutral conductor. ■■ If local codes do ... (center or white wire) of the terminal block. Mobile home - ELECTRICAL REQUIREMENTS It is prohibited. The installation must end in ring terminals or spade terminals with clothes dryers. Openings (such as dryer exhaust opening. latest edition and all mobile home installations. Connect to the...

Installation Instructions
Page 7
...grounding conductor can result in a risk of cardboard from dryer carton; Firmly grasp dryer body (not console panel) and gently lay dryer down on its final location. WARNING: Improper connection of least resistance for electric current. Now stand the dryer on cardboard. 2. The ground wire (ground conductor) ... spade terminals and UL listed strain relief. Screw legs into an appropriate outlet that is properly grounded. Prepare dryer for electrical connection and to move and install dryer. The 4-wire power supply cord, at least 5 ft. (1.52 m) long. place under entire back edge...
...grounding conductor can result in a risk of cardboard from dryer carton; Firmly grasp dryer body (not console panel) and gently lay dryer down on its final location. WARNING: Improper connection of least resistance for electric current. Now stand the dryer on cardboard. 2. The ground wire (ground conductor) ... spade terminals and UL listed strain relief. Screw legs into an appropriate outlet that is properly grounded. Prepare dryer for electrical connection and to move and install dryer. The 4-wire power supply cord, at least 5 ft. (1.52 m) long. place under entire back edge...


