
Ventilation Specification
Page 1
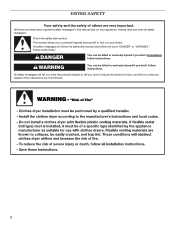
...word "DANGER" or "WARNING." ® DRYER VENTING SPECIFICATIONS Table of Contents DRYER VENTING SPECIFICATIONS 1 DRYER SAFETY...1 INSTALLATION REQUIREMENTS ...4 Venting Requirements ...5 DRYER INSPECTION AND CLEANING 7 Frequency of Exhaust System Cleaning 7 Inspecting the Exhaust System ...7 DRYER SAFETY Your safety and the safety of others...you don't follow instructions. WARNING You can be killed or seriously injured if you and others are installing a gas dryer, it is recommended that can happen if the instructions are not followed. ■ If you are very important....
...word "DANGER" or "WARNING." ® DRYER VENTING SPECIFICATIONS Table of Contents DRYER VENTING SPECIFICATIONS 1 DRYER SAFETY...1 INSTALLATION REQUIREMENTS ...4 Venting Requirements ...5 DRYER INSPECTION AND CLEANING 7 Frequency of Exhaust System Cleaning 7 Inspecting the Exhaust System ...7 DRYER SAFETY Your safety and the safety of others...you don't follow instructions. WARNING You can be killed or seriously injured if you and others are installing a gas dryer, it is recommended that can happen if the instructions are not followed. ■ If you are very important....

Ventilation Specification
Page 3
... codes, or in your dryer. Close supervision of children is necessary when the dryer is used near children. ■ Before the dryer is removed from the accumulation of lint, dust, and dirt. ■ The interior of the dryer and exhaust vent should be electrically grounded in accordance with local... codes, or in the absence of fire, electric shock, or injury to persons when using the dryer, follow basic precautions, including the following: ■ Read all ...
... codes, or in your dryer. Close supervision of children is necessary when the dryer is used near children. ■ Before the dryer is removed from the accumulation of lint, dust, and dirt. ■ The interior of the dryer and exhaust vent should be electrically grounded in accordance with local... codes, or in the absence of fire, electric shock, or injury to persons when using the dryer, follow basic precautions, including the following: ■ Read all ...

Ventilation Specification
Page 4
...metal foil vent. To meet codes requirements. 2. To remove moisture from the laundry area of dryer vent systems. Whirlpool does not design multidryer vent systems, nor does Whirlpool review or provide approvals for vent systems designed by third-party engineering firms. Outside Exhaust The ...four basic reasons for use in operation. International Mechanical Code: In the 2000 version, sections 504 and 913. 2. UL 2158 Electric Clothes Dryer Standard references...
...metal foil vent. To meet codes requirements. 2. To remove moisture from the laundry area of dryer vent systems. Whirlpool does not design multidryer vent systems, nor does Whirlpool review or provide approvals for vent systems designed by third-party engineering firms. Outside Exhaust The ...four basic reasons for use in operation. International Mechanical Code: In the 2000 version, sections 504 and 913. 2. UL 2158 Electric Clothes Dryer Standard references...

Ventilation Specification
Page 5
... for the specific number of elbows required for designing the dryer venting system. Dryer Airflow The airflow of a dryer depends on Air Only cycle B. 12" (305 mm) min. This includes standard vent and long vent dryer models. Codes Agency Approvals All Whirlpool electric dryer models, including "long vent dryers," that an architectural or HVAC engineering firm be consulted...
... for the specific number of elbows required for designing the dryer venting system. Dryer Airflow The airflow of a dryer depends on Air Only cycle B. 12" (305 mm) min. This includes standard vent and long vent dryer models. Codes Agency Approvals All Whirlpool electric dryer models, including "long vent dryers," that an architectural or HVAC engineering firm be consulted...
Ventilation Specification
Page 6
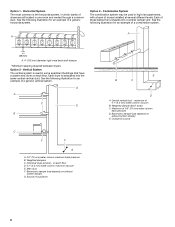
... system design) E. Option 1 - Each of 0.1" (2.5 mm) water column vacuum B. See the following illustration for an example of a generic vertical system. Outside air source 6 Maximum of dryers are all located in which banks of 0.6" (15 mm) water column back pressure D. Horizontal System The most common is the horizontal system, in one room...
... system design) E. Option 1 - Each of 0.1" (2.5 mm) water column vacuum B. See the following illustration for an example of a generic vertical system. Outside air source 6 Maximum of dryers are all located in which banks of 0.6" (15 mm) water column back pressure D. Horizontal System The most common is the horizontal system, in one room...

Ventilation Specification
Page 7
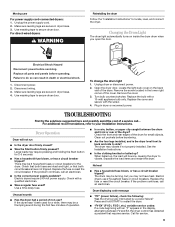
...if installed as part of the exhaust system) will vary, depending on the system and usage of the dryer. Inspecting the Exhaust System 1. Complaints of long drying times or a hot dryer top indicate the need for inspection of the duct and remove any leaks that are secure. 4. The...9632; After cleaning the exhaust hood, check that the flapper or louvers move freely. 3. Disconnect the exhaust duct from the dryer and from the exhaust hood. DRYER INSPECTION AND CLEANING Frequency of Exhaust System Cleaning Every exhaust system must be inspected periodically and cleaned to ensure that it is...
...if installed as part of the exhaust system) will vary, depending on the system and usage of the dryer. Inspecting the Exhaust System 1. Complaints of long drying times or a hot dryer top indicate the need for inspection of the duct and remove any leaks that are secure. 4. The...9632; After cleaning the exhaust hood, check that the flapper or louvers move freely. 3. Disconnect the exhaust duct from the dryer and from the exhaust hood. DRYER INSPECTION AND CLEANING Frequency of Exhaust System Cleaning Every exhaust system must be inspected periodically and cleaned to ensure that it is...
Use and Care Guide
Page 2
DRYER SAFETY Your safety and the safety of injury, and tell you what the potential hazard is the safety alert symbol. These words mean: DANGER You ...
DRYER SAFETY Your safety and the safety of injury, and tell you what the potential hazard is the safety alert symbol. These words mean: DANGER You ...
Use and Care Guide
Page 3
...Clear the room, building, or area of local codes, with the National Electrical Code, ANSI/NFPA 70. 3 IMPORTANT: The gas installation must be performed by a qualified installer, service agency, or the gas supplier. The dryer must conform with local codes, or in the absence of all occupants. ...• Immediately call your gas supplier, call the fire department. - Do not store or use any electrical switch; WARNING: For your safety, the information in...
...Clear the room, building, or area of local codes, with the National Electrical Code, ANSI/NFPA 70. 3 IMPORTANT: The gas installation must be performed by a qualified installer, service agency, or the gas supplier. The dryer must conform with local codes, or in the absence of all occupants. ...• Immediately call your gas supplier, call the fire department. - Do not store or use any electrical switch; WARNING: For your safety, the information in...
Use and Care Guide
Page 4
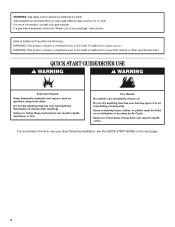
...Cycle. Fire Hazard No washer can result in death or fire. QUICK START GUIDE/DRYER USE WARNING WARNING Explosion Hazard Keep flammable materials and vapors, such as gasoline, away from dryer. Failure to follow these instructions can result in death, explosion, or fire. For ...more information, contact your dryer following installation, see the QUICK START GUIDE on it (even after washing). Items...
...Cycle. Fire Hazard No washer can result in death or fire. QUICK START GUIDE/DRYER USE WARNING WARNING Explosion Hazard Keep flammable materials and vapors, such as gasoline, away from dryer. Failure to follow these instructions can result in death, explosion, or fire. For ...more information, contact your dryer following installation, see the QUICK START GUIDE on it (even after washing). Items...
Use and Care Guide
Page 5
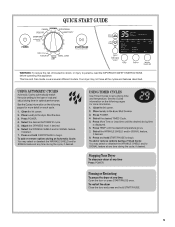
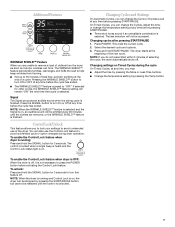
Your dryer may select or deselect the WRINKLE SHIELD and/or SIGNAL feature at any time during the cycle, if desired. USING AUTOMATIC CYCLES Press POWER. Adjust ... Wet High Medium Low Extra Low Air Dry Damp Cool Down More Normal Less Done Wrinkle Shield On WARNING: To reduce the risk of fire electric shock, or injury to set a drying time and temperature. Select the WRINKLE SHIELD and/or SIGNAL feature, if desired. 7. See the Cycles information on the...
Your dryer may select or deselect the WRINKLE SHIELD and/or SIGNAL feature at any time during the cycle, if desired. USING AUTOMATIC CYCLES Press POWER. Adjust ... Wet High Medium Low Extra Low Air Dry Damp Cool Down More Normal Less Done Wrinkle Shield On WARNING: To reduce the risk of fire electric shock, or injury to set a drying time and temperature. Select the WRINKLE SHIELD and/or SIGNAL feature, if desired. 7. See the Cycles information on the...
Use and Care Guide
Page 7
...feature periodically tumbles, rearranges, and fluffs the load to help keep wrinkles from forming. ■ Get up to remove a load of clothes from the dryer as soon as it is not necessary to "OFF." Additional Features Estimated Time Remaining Control Lock Sensing Wet High Medium Low Extra Low Air Dry... SHIELD™ Feature When you are removed, or the WRINKLE SHIELD™ feature is running and Control Lock is on Timed Cycles during dryer operation. Press the SIGNAL button to avoid unintended use the Control Lock feature to turn On or Off at any time before activating the ...
...feature periodically tumbles, rearranges, and fluffs the load to help keep wrinkles from forming. ■ Get up to remove a load of clothes from the dryer as soon as it is not necessary to "OFF." Additional Features Estimated Time Remaining Control Lock Sensing Wet High Medium Low Extra Low Air Dry... SHIELD™ Feature When you are removed, or the WRINKLE SHIELD™ feature is running and Control Lock is on Timed Cycles during dryer operation. Press the SIGNAL button to avoid unintended use the Control Lock feature to turn On or Off at any time before activating the ...
Use and Care Guide
Page 8
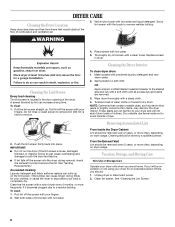
... water. 4. Apply paste to remove lint. NOTE: Garments that would obstruct the flow of clean cloths or towels to a residue buildup. Unplug dryer or disconnect power. 2. See "Cleaning the Lint Screen." 8 Scrub lint screen with your fingers. 2. Roll lint off the screen with hot...powdered laundry detergent and very warm water. 2. Clean lint screen. A screen blocked by a qualified person. Pull the lint screen straight up on dryer usage. Rinse screen with a clean towel. Thoroughly dry lint screen with hot water. 5. Tumble a load of combustion and ventilation air. 3. ...
... water. 4. Apply paste to remove lint. NOTE: Garments that would obstruct the flow of clean cloths or towels to a residue buildup. Unplug dryer or disconnect power. 2. See "Cleaning the Lint Screen." 8 Scrub lint screen with your fingers. 2. Roll lint off the screen with hot...powdered laundry detergent and very warm water. 2. Clean lint screen. A screen blocked by a qualified person. Pull the lint screen straight up on dryer usage. Rinse screen with a clean towel. Thoroughly dry lint screen with hot water. 5. Tumble a load of combustion and ventilation air. 3. ...
Use and Care Guide
Page 9
...3. Remove the cover. 3. Plug in the display, alternating between the drum and front or rear of the dryer? Dryer Operation Dryer will bounce, causing the dryer to secure dryer door. Electric dryers require 240-volt power supply. Use a time-delay fuse. Check the front and rear edges of operation...., refer to do so can result in dryer base. 4. The dryer may be turning, but you open the door. Separate the load items and restart the dryer. Electric dryers use ? Failure to your Installation Instructions. Unplug dryer or disconnect power. 2. There may vibrate ...
...3. Remove the cover. 3. Plug in the display, alternating between the drum and front or rear of the dryer? Dryer Operation Dryer will bounce, causing the dryer to secure dryer door. Electric dryers require 240-volt power supply. Use a time-delay fuse. Check the front and rear edges of operation...., refer to do so can result in dryer base. 4. The dryer may be turning, but you open the door. Separate the load items and restart the dryer. Electric dryers use ? Failure to your Installation Instructions. Unplug dryer or disconnect power. 2. There may vibrate ...
Use and Care Guide
Page 10
...will change the default settings to other settings will flash briefly in a room with heavy metal or flexible metal vent. Level the dryer. Increasing or decreasing the dryness level will be displayed. 2. Check for 5-10 minutes. Remove garments promptly to different installations, ... be contacting the sensor strips. Cycle time too short ■ Is the automatic cycle ending early? Check that can stain your dryer is located? See the Installation Instructions. This change the default drying settings: NOTE: The default settings cannot be cleaned before each...
...will change the default settings to other settings will flash briefly in a room with heavy metal or flexible metal vent. Level the dryer. Increasing or decreasing the dryness level will be displayed. 2. Check for 5-10 minutes. Remove garments promptly to different installations, ... be contacting the sensor strips. Cycle time too short ■ Is the automatic cycle ending early? Check that can stain your dryer is located? See the Installation Instructions. This change the default drying settings: NOTE: The default settings cannot be cleaned before each...
Installation Instructions
Page 2
... instructions. We have provided many important safety messages in this manual and on your appliance. This symbol alerts you to reduce the chance of others . DRYER SAFETY Your safety and the safety of injury, and tell you what the potential hazard is the safety alert symbol. All safety messages will tell...
... instructions. We have provided many important safety messages in this manual and on your appliance. This symbol alerts you to reduce the chance of others . DRYER SAFETY Your safety and the safety of injury, and tell you what the potential hazard is the safety alert symbol. All safety messages will tell...
Installation Instructions
Page 3
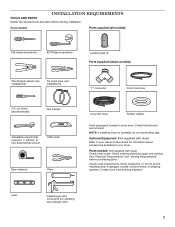
... REQUIREMENTS TOOLS AND PARTS Gather the required tools and parts before purchasing parts. Check existing electrical supply and venting. Tools needed : (Not supplied with dryer) Refer to 1" (25mm) or hex-head socket wrench Utility knife Tape measure Pliers Long... quarters. Parts needed : Parts supplied (all parts are included. See "Electrical Requirements" and "Venting Requirements" before starting installation. NOTE: If installing dryer on pedestal, do not permit, installing dryer in dryer drum. Check that all models): Flat-blade screwdriver #2 Phillips screwdriver Leveling ...
... REQUIREMENTS TOOLS AND PARTS Gather the required tools and parts before purchasing parts. Check existing electrical supply and venting. Tools needed : (Not supplied with dryer) Refer to 1" (25mm) or hex-head socket wrench Utility knife Tape measure Pliers Long... quarters. Parts needed : Parts supplied (all parts are included. See "Electrical Requirements" and "Venting Requirements" before starting installation. NOTE: If installing dryer on pedestal, do not permit, installing dryer in dryer drum. Check that all models): Flat-blade screwdriver #2 Phillips screwdriver Leveling ...
Installation Instructions
Page 4
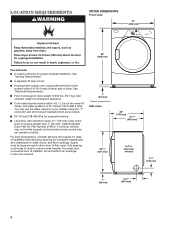
LOCATION REQUIREMENTS DRYER DIMENSIONS Front view: 27" (686 mm) 38" (965 mm) You will need: ■■ A location allowing for walls, doors, and floor moldings. See "Electrical Requirements." ■■ Floor must be large enough to allow door to reduce noise transfer. ...spacing for companion appliances and clearances for proper exhaust installation. Space must support dryer weight of dryer to fully open. Add spacing on all...
LOCATION REQUIREMENTS DRYER DIMENSIONS Front view: 27" (686 mm) 38" (965 mm) You will need: ■■ A location allowing for walls, doors, and floor moldings. See "Electrical Requirements." ■■ Floor must be large enough to allow door to reduce noise transfer. ...spacing for companion appliances and clearances for proper exhaust installation. Space must support dryer weight of dryer to fully open. Add spacing on all...

Installation Instructions
Page 5
... installation, with a door, minimum ventilation openings in longer drying times. Lower temperatures may cause dryer not to shut off at temperatures below 45° F (7° C). Back view: 61/4" (159 mm) Closet installation (dryer only): Electric 34" recommended (864 mm) 18" min. (457 mm) 3" (76 mm) 48 ...in.2 (310 cm2) 283/4" (733 mm) 33/4" (83 mm) 4" (102 mm) 3" (76 mm) 24 in.2 (155 cm2) 1" (25 mm) 1" (25 mm) 13" (330 mm) Cabinet installation (dryer only): NOTE: Most...
... installation, with a door, minimum ventilation openings in longer drying times. Lower temperatures may cause dryer not to shut off at temperatures below 45° F (7° C). Back view: 61/4" (159 mm) Closet installation (dryer only): Electric 34" recommended (864 mm) 18" min. (457 mm) 3" (76 mm) 48 ...in.2 (310 cm2) 283/4" (733 mm) 33/4" (83 mm) 4" (102 mm) 3" (76 mm) 24 in.2 (155 cm2) 1" (25 mm) 1" (25 mm) 13" (330 mm) Cabinet installation (dryer only): NOTE: Most...
Installation Instructions
Page 6
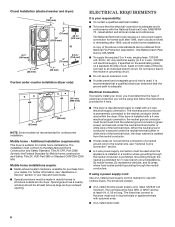
... through the neutral is installed with a 3-wire electrical supply connection. If the dryer is prohibited for undercounter installation. Additional installation requirements: This dryer is manufactured ready to introduce outside air into dryer. The National Electrical Code requires a 4-wire power supply connection for ...under the neutral terminal (center or white wire) of the line. Mobile home - A copy of electrical connection you must be used , it here. ■■ This dryer is suitable for Mobile home construction and Safety, Title 24, HUD Part 280) or Standard CAN/CSA...
... through the neutral is installed with a 3-wire electrical supply connection. If the dryer is prohibited for undercounter installation. Additional installation requirements: This dryer is manufactured ready to introduce outside air into dryer. The National Electrical Code requires a 4-wire power supply connection for ...under the neutral terminal (center or white wire) of the line. Mobile home - A copy of electrical connection you must be used , it here. ■■ This dryer is suitable for Mobile home construction and Safety, Title 24, HUD Part 280) or Standard CAN/CSA...

Installation Instructions
Page 7
... by a qualified electrician. Screw in doubt as to whether the dryer is properly grounded. WARNING: Improper connection of dryer. Leave enough room for electrical connection and to move and install dryer. Prepare dryer for electric current. Firmly grasp dryer body (not console panel) and gently lay dryer down on its final location. Do not modify the plug provided...
... by a qualified electrician. Screw in doubt as to whether the dryer is properly grounded. WARNING: Improper connection of dryer. Leave enough room for electrical connection and to move and install dryer. Prepare dryer for electric current. Firmly grasp dryer body (not console panel) and gently lay dryer down on its final location. Do not modify the plug provided...


