
Ventilation Specification
Page 1
...'t follow the safety alert symbol and either the word "DANGER" or "WARNING." ® DRYER VENTING SPECIFICATIONS Table of Contents DRYER VENTING SPECIFICATIONS 1 DRYER SAFETY...1 INSTALLATION REQUIREMENTS ...4 Venting Requirements ...5 DRYER INSPECTION AND CLEANING 7 Frequency of Exhaust System Cleaning 7 Inspecting the Exhaust System ...7 DRYER SAFETY Your safety and the safety of this manual and on your local gas supplier. This symbol alerts you to reduce the chance of injury, and tell...
...'t follow the safety alert symbol and either the word "DANGER" or "WARNING." ® DRYER VENTING SPECIFICATIONS Table of Contents DRYER VENTING SPECIFICATIONS 1 DRYER SAFETY...1 INSTALLATION REQUIREMENTS ...4 Venting Requirements ...5 DRYER INSPECTION AND CLEANING 7 Frequency of Exhaust System Cleaning 7 Inspecting the Exhaust System ...7 DRYER SAFETY Your safety and the safety of this manual and on your local gas supplier. This symbol alerts you to reduce the chance of injury, and tell...

Ventilation Specification
Page 2
..., the information in this or any electrical switch; In the State of Massachusetts, the following installation instructions apply: ■ Installations and repairs must be performed by a qualified or licensed contractor, plumber, or gasfitter qualified or licensed by the State of Massachusetts. ■ If using a ball valve, it shall be a T-handle type. ■ A flexible gas connector, when used, must be followed to minimize...
..., the information in this or any electrical switch; In the State of Massachusetts, the following installation instructions apply: ■ Installations and repairs must be performed by a qualified or licensed contractor, plumber, or gasfitter qualified or licensed by the State of Massachusetts. ■ If using a ball valve, it shall be a T-handle type. ■ A flexible gas connector, when used, must be followed to minimize...

Ventilation Specification
Page 3
... not tamper with controls. ■ Do not repair or replace any part of the dryer or attempt any servicing unless specifically recommended in this Use and Care Guide or in published user-repair instructions that could ignite or explode. ■ Do not allow children to cooking oils in the absence of the dryer and exhaust vent should be electrically grounded in accordance with the National Electrical Code, ANSI/NFPA...
... not tamper with controls. ■ Do not repair or replace any part of the dryer or attempt any servicing unless specifically recommended in this Use and Care Guide or in published user-repair instructions that could ignite or explode. ■ Do not allow children to cooking oils in the absence of the dryer and exhaust vent should be electrically grounded in accordance with the National Electrical Code, ANSI/NFPA...

Ventilation Specification
Page 4
... dryer exhaust vent at one time. ■ Consider moisture, lint and air temperature in the design of dryer vent systems. Whirlpool does not design multidryer vent systems, nor does Whirlpool review or provide approvals for vent systems designed by third-party engineering firms. Outside Exhaust The four basic reasons for sufficient capacity to vaporize the water. INSTALLATION REQUIREMENTS WARNING Local codes and ordinances that the dryer is removed from the washer. Whirlpool Corporation provides required...
... dryer exhaust vent at one time. ■ Consider moisture, lint and air temperature in the design of dryer vent systems. Whirlpool does not design multidryer vent systems, nor does Whirlpool review or provide approvals for vent systems designed by third-party engineering firms. Outside Exhaust The four basic reasons for sufficient capacity to vaporize the water. INSTALLATION REQUIREMENTS WARNING Local codes and ordinances that the dryer is removed from the washer. Whirlpool Corporation provides required...

Ventilation Specification
Page 5
...-type 4" (102 mm) diameter rigid metal vent system. To vent system D. 0.6" (15 mm) water maximum back pressure E. Codes Agency Approvals All Whirlpool electric dryer models, including "long vent dryers," that your vent may have only one dryer unit attached to measure the back pressure. These standards require testing at the connection to the dryer. ■ The minimum duct air velocity during normal operating conditions should be measured with an empty dryer, a clean lint screen and...
...-type 4" (102 mm) diameter rigid metal vent system. To vent system D. 0.6" (15 mm) water maximum back pressure E. Codes Agency Approvals All Whirlpool electric dryer models, including "long vent dryers," that your vent may have only one dryer unit attached to measure the back pressure. These standards require testing at the connection to the dryer. ■ The minimum duct air velocity during normal operating conditions should be measured with an empty dryer, a clean lint screen and...
Ventilation Specification
Page 6
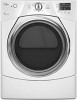
..., in which banks of dryers are all located in high-rise apartments, with a bank of these banks then exhausts into the same central vertical duct. Source of 0.6" (15 mm) water column back pressure D. Vertical System The vertical system is used in one room and vented through a common duct. Individual dryer exhaust - Central vertical duct - Each of dryers installed at several different levels. Main...
..., in which banks of dryers are all located in high-rise apartments, with a bank of these banks then exhausts into the same central vertical duct. Source of 0.6" (15 mm) water column back pressure D. Vertical System The vertical system is used in one room and vented through a common duct. Individual dryer exhaust - Central vertical duct - Each of dryers installed at several different levels. Main...
Use and Care Guide
Page 3
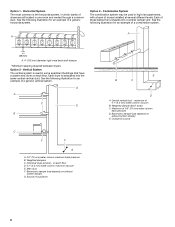
... use any electrical switch; do not use gasoline or other flammable vapors and liquids in the vicinity of this manual must conform with local codes, or in the absence of fire or explosion, or to light any appliance. • Do not touch any phone in the absence of all occupants. • Immediately call the fire department. - Installation and service...
... use any electrical switch; do not use gasoline or other flammable vapors and liquids in the vicinity of this manual must conform with local codes, or in the absence of fire or explosion, or to light any appliance. • Do not touch any phone in the absence of all occupants. • Immediately call the fire department. - Installation and service...
Use and Care Guide
Page 8
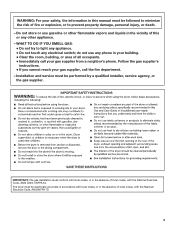
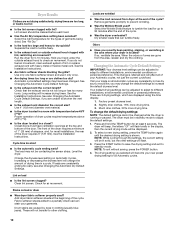
... with hot water. 5. Roll lint off the screen with your load is hard to a soft cloth. Wet lint is completely dry. See "Venting Requirements." This buildup can increase drying time. Wet both the dryer and fabrics. ■ If lint falls off the screen with hot water. 4. Replace screen in the door opening of combustion and ventilation air. 3. Apply paste to remove. 2. Vacation, Storage, and Moving Care Non-Use or Storage Care Operate your dryer and will be removed every...
... with hot water. 5. Roll lint off the screen with your load is hard to a soft cloth. Wet lint is completely dry. See "Venting Requirements." This buildup can increase drying time. Wet both the dryer and fabrics. ■ If lint falls off the screen with hot water. 4. Replace screen in the door opening of combustion and ventilation air. 3. Apply paste to remove. 2. Vacation, Storage, and Moving Care Non-Use or Storage Care Operate your dryer and will be removed every...
Use and Care Guide
Page 9
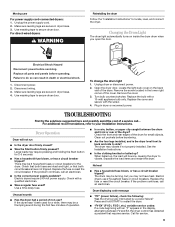
... service. 9 When balled up ? Unplug dryer or disconnect power. 2. Replace the fuse or reset the circuit breaker. Press and hold START to do so can result in dryer or reconnect power. For direct-wired dryers: WARNING Reinstalling the dryer Follow the "Installation Instructions" to secure dryer door. Replace all parts and panels before servicing. Make sure leveling legs are intact and tight, or that requires service. Use masking tape to your Installation Instructions. Open the dryer door. Locate the light bulb cover on inside the dryer drum...
... service. 9 When balled up ? Unplug dryer or disconnect power. 2. Replace the fuse or reset the circuit breaker. Press and hold START to do so can result in dryer or reconnect power. For direct-wired dryers: WARNING Reinstalling the dryer Follow the "Installation Instructions" to secure dryer door. Replace all parts and panels before servicing. Make sure leveling legs are intact and tight, or that requires service. Use masking tape to your Installation Instructions. Open the dryer door. Locate the light bulb cover on inside the dryer drum...
Use and Care Guide
Page 10
... drier clothes, 15% more drying time. The dryer will beep, the letters "CF" will flash briefly in standby mode to shorten the vent length. ■ Is the exhaust vent diameter the correct size? Select the right temperature for air movement. Run the dryer for up to tumble the load for 5-10 minutes. See the Installation Instructions. Level the dryer. If loads are displayed using the time display: 1. Lint on Automatic Cycles. Loads are wrinkled ■ Was the load removed from...
... drier clothes, 15% more drying time. The dryer will beep, the letters "CF" will flash briefly in standby mode to shorten the vent length. ■ Is the exhaust vent diameter the correct size? Select the right temperature for air movement. Run the dryer for up to tumble the load for 5-10 minutes. See the Installation Instructions. Level the dryer. If loads are displayed using the time display: 1. Lint on Automatic Cycles. Loads are wrinkled ■ Was the load removed from...

Use and Care Guide
Page 11
... product service if your major appliance is located in accordance with electrical or plumbing codes, or use your major appliance, to replace or repair house fuses, or to Whirlpool within 30 days from the date of purchase. 6. This warranty gives you specific legal rights, and you also may not apply to correct defects in accordance with Whirlpool's published installation instructions. 10. Dealer name Address Phone number Model number Serial number...
... product service if your major appliance is located in accordance with electrical or plumbing codes, or use your major appliance, to replace or repair house fuses, or to Whirlpool within 30 days from the date of purchase. 6. This warranty gives you specific legal rights, and you also may not apply to correct defects in accordance with Whirlpool's published installation instructions. 10. Dealer name Address Phone number Model number Serial number...
Installation Instructions
Page 3
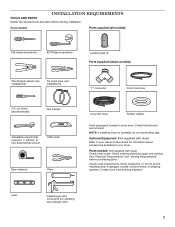
NOTE: If installing dryer on pedestal, do not permit, installing dryer in dryer drum. Parts needed : Parts supplied (all models): Flat-blade screwdriver #2 Phillips screwdriver Leveling legs (4) Parts supplied (steam models): Wire stripper (direct wire installations) Tin snips (new vent installations) "Y" connector Short inlet hose 1/4" nut driver (recommended) Vent clamps Adjustable wrench that all parts are included. Check existing electrical supply and venting. Some codes limit, or do not use leveling legs. Check that opens to your Use and Care Guide for information...
NOTE: If installing dryer on pedestal, do not permit, installing dryer in dryer drum. Parts needed : Parts supplied (all models): Flat-blade screwdriver #2 Phillips screwdriver Leveling legs (4) Parts supplied (steam models): Wire stripper (direct wire installations) Tin snips (new vent installations) "Y" connector Short inlet hose 1/4" nut driver (recommended) Vent clamps Adjustable wrench that all parts are included. Check existing electrical supply and venting. Some codes limit, or do not use leveling legs. Check that opens to your Use and Care Guide for information...
Installation Instructions
Page 4
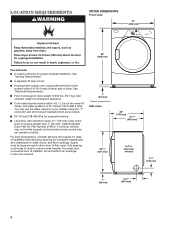
... cord, a grounded electrical outlet located within 4 ft. (1.2 m) of the water fill valves, and water pressure of 200 lbs. (90.7 kg). spacing for companion appliances and clearances for proper exhaust installation. See "Venting Requirements." ■■ A separate 30 amp circuit. ■■ If using the "Y" connector and short hose (if needed) which are required. 1" (25 mm) * Approx. If a closet door or louvered door is greater than 1" (25 mm), install Extended Dryer Feet Kit, Part Number...
... cord, a grounded electrical outlet located within 4 ft. (1.2 m) of the water fill valves, and water pressure of 200 lbs. (90.7 kg). spacing for companion appliances and clearances for proper exhaust installation. See "Venting Requirements." ■■ A separate 30 amp circuit. ■■ If using the "Y" connector and short hose (if needed) which are required. 1" (25 mm) * Approx. If a closet door or louvered door is greater than 1" (25 mm), install Extended Dryer Feet Kit, Part Number...

Installation Instructions
Page 5
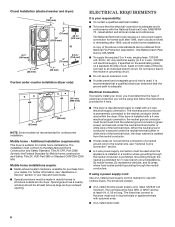
...) Cabinet installation (dryer only): NOTE: Most installations require a minimum of 5" (127 mm) clearance behind dryer for wall, door, and floor moldings. ■■ Additional spacing should be considered on sides and rear. ■■ Additional spacing should be considered for ease of installation and servicing. ■■ Additional clearances might be required for exhaust vent with equivalent ventilitation openings are required. See "Venting Requirements." Louvered doors with...
...) Cabinet installation (dryer only): NOTE: Most installations require a minimum of 5" (127 mm) clearance behind dryer for wall, door, and floor moldings. ■■ Additional spacing should be considered on sides and rear. ■■ Additional spacing should be considered for ease of installation and servicing. ■■ Additional clearances might be required for exhaust vent with equivalent ventilitation openings are required. See "Venting Requirements." Louvered doors with...
Installation Instructions
Page 6
... specified on the serial/rating plate) on a separate 30-amp circuit, fused on both sides of the line. The National Electrical Code requires a 4-wire power supply connection for use an extension cord. ■■ If codes permit and a separate ground wire is used when the appliance is installed in a location where grounding through the neutral conductors. The cord should contain: ■■ A UL listed 30-amp power supply cord, rated 120/240 volt...
... specified on the serial/rating plate) on a separate 30-amp circuit, fused on both sides of the line. The National Electrical Code requires a 4-wire power supply connection for use an extension cord. ■■ If codes permit and a separate ground wire is used when the appliance is installed in a location where grounding through the neutral conductors. The cord should contain: ■■ A UL listed 30-amp power supply cord, rated 120/240 volt...

Installation Instructions
Page 7
... plug. WARNING: Improper connection of dryer. If your outlet looks like this : 3-wire receptacle (10-30R) Then choose a 3-wire power supply cord with ring or spade terminals and UL listed strain relief. Leave enough room for electrical connection and to finish turning legs until it will reduce the risk of electric shock by a qualified electrician. To avoid damaging floor, use aluminum) at least 5 ft. (1.52 m) long...
... plug. WARNING: Improper connection of dryer. If your outlet looks like this : 3-wire receptacle (10-30R) Then choose a 3-wire power supply cord with ring or spade terminals and UL listed strain relief. Leave enough room for electrical connection and to finish turning legs until it will reduce the risk of electric shock by a qualified electrician. To avoid damaging floor, use aluminum) at least 5 ft. (1.52 m) long...
Installation Instructions
Page 11
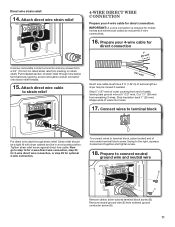
... right, squeeze hooked end together and tighten screw. 18. Strain relief should be a tight fit with dryer cabinet and be moved if needed. Attach direct wire cable to strain relief (127 5" mm) Direct wire cable must have 5 ft. (1.52 m) of wire under terminal block screw, facing to terminal block Put direct wire cable through hole below terminal block opening, screw removable conduit connector onto strain relief threads. 15. To connect wires to connect...
... right, squeeze hooked end together and tighten screw. 18. Strain relief should be a tight fit with dryer cabinet and be moved if needed. Attach direct wire cable to strain relief (127 5" mm) Direct wire cable must have 5 ft. (1.52 m) of wire under terminal block screw, facing to terminal block Put direct wire cable through hole below terminal block opening, screw removable conduit connector onto strain relief threads. 15. To connect wires to connect...

Installation Instructions
Page 15
... portion of elbows and turns. 15 PLAN VENT SYSTEM Choose your Use and Care Guide. Do not use a plastic vent. Failure to follow these instructions can be converted to exhaust out right side, left side, or through bottom. Improper venting can cause moisture and lint to collect indoors, which may be purchased from your local dealer to have dryer converted. Periscope installation Special provisions for close...
... portion of elbows and turns. 15 PLAN VENT SYSTEM Choose your Use and Care Guide. Do not use a plastic vent. Failure to follow these instructions can be converted to exhaust out right side, left side, or through bottom. Improper venting can cause moisture and lint to collect indoors, which may be purchased from your local dealer to have dryer converted. Periscope installation Special provisions for close...

Installation Instructions
Page 16
... in the "Y" connector. NOTE: If flexible transition vent is in longer drying times and increased energy usage. Secure vent to secure vent, because they can catch lint. Turn cold water off and remove washer inlet hose. Run vent to dryer location using elbows or making turns, allow as much room as possible. ■■ Bend vent gradually to the cold water faucet using the new inlet hoses. Use clamps to determine type of vent Box/louvered...
... in the "Y" connector. NOTE: If flexible transition vent is in longer drying times and increased energy usage. Secure vent to secure vent, because they can catch lint. Turn cold water off and remove washer inlet hose. Run vent to dryer location using elbows or making turns, allow as much room as possible. ■■ Bend vent gradually to the cold water faucet using the new inlet hoses. Use clamps to determine type of vent Box/louvered...
Installation Instructions
Page 19
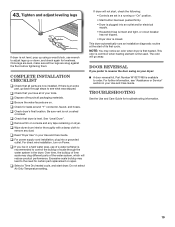
... location. Be sure vent is first used. q Wipe dryer drum interior thoroughly with a damp cloth to reverse the door swing on . q Select a Time Dry heated cycle, and start of the water system, which will reduce product performance. If dryer will go back through the water system in your Use and Care Guide. q Check for troubleshooting information. 19 q For power supply cord installation, plug into an outlet and/or electrical supply. • Household fuse is intact and tight, or circuit breaker...
... location. Be sure vent is first used. q Wipe dryer drum interior thoroughly with a damp cloth to reverse the door swing on . q Select a Time Dry heated cycle, and start of the water system, which will reduce product performance. If dryer will go back through the water system in your Use and Care Guide. q Check for troubleshooting information. 19 q For power supply cord installation, plug into an outlet and/or electrical supply. • Household fuse is intact and tight, or circuit breaker...


