Use and Care Manual
Page 3
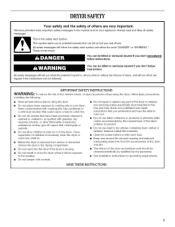
..., remove the door to cooking oils in your appliance. IMPORTANT SAFETY iNSTRUCTiONS WARNING: To reduce the risk of fire, electric shock, or injury to persons when using the dryer, follow the safety alert symbol and either the word "DANGER" or "WARNING." This is removed from the accumulation of... lint, dust, and dirt. [] The interior of the dryer and exhaust vent should be exposed to the weather. [] Do not tamper with gasoline, drycleaning solvents, or other flammable or explosive substances as they...
..., remove the door to cooking oils in your appliance. IMPORTANT SAFETY iNSTRUCTiONS WARNING: To reduce the risk of fire, electric shock, or injury to persons when using the dryer, follow the safety alert symbol and either the word "DANGER" or "WARNING." This is removed from the accumulation of... lint, dust, and dirt. [] The interior of the dryer and exhaust vent should be exposed to the weather. [] Do not tamper with gasoline, drycleaning solvents, or other flammable or explosive substances as they...
Use and Care Manual
Page 4
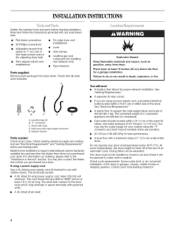
...8226; A UL listed strain relief. Check existing electrical supply and venting and see "Electrical Requirements" and "Venting Requirements" before starting installation. For information on ordering, please refer to 1" (2.5 cm) or hex-head socket wrench (for adjusting dryer feet) • Wire stripper (direct wire ... of 1" (2.5 cm) under entire dryer. The kit should also be exposed to support the total weight (dryer and load) of the dryer in death, explosion, or fire. Do not operate your washer using a power supply cord, a grounded electrical outlet located within 4 ft (1.2 m)...
...8226; A UL listed strain relief. Check existing electrical supply and venting and see "Electrical Requirements" and "Venting Requirements" before starting installation. For information on ordering, please refer to 1" (2.5 cm) or hex-head socket wrench (for adjusting dryer feet) • Wire stripper (direct wire ... of 1" (2.5 cm) under entire dryer. The kit should also be exposed to support the total weight (dryer and load) of the dryer in death, explosion, or fire. Do not operate your washer using a power supply cord, a grounded electrical outlet located within 4 ft (1.2 m)...
Use and Care Manual
Page 5
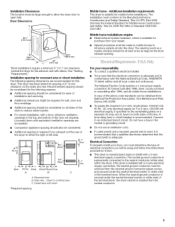
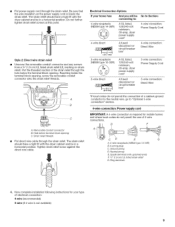
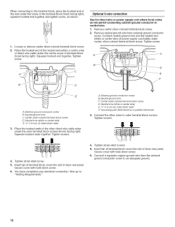
...) It is available for purchase from the neutral conductor. *Required spacing Electrical Connection To properly install your dryer, you exhaust out the rear of the dryer to an individual branch circuit. To supply the required 3 or 4 ...electrical supply, if specified on the serial/rating plate) on a separate 30-amp circuit, fused on the sides and rear. Connect to either the right or left side. _in. 2. (310cm2)- _ _t 3'j* (7.6cm) - 24in2. . (155cm')- 1"_ _ 29_" -t _-1" -*II"*F 29,4"_51"÷ (2.50m) (73.7cm) (2.5cm) (2.5cm) (74.3cm)(12.7cm) A B C A, Recessed area B. This dryer...
...) It is available for purchase from the neutral conductor. *Required spacing Electrical Connection To properly install your dryer, you exhaust out the rear of the dryer to an individual branch circuit. To supply the required 3 or 4 ...electrical supply, if specified on the serial/rating plate) on a separate 30-amp circuit, fused on the sides and rear. Connect to either the right or left side. _in. 2. (310cm2)- _ _t 3'j* (7.6cm) - 24in2. . (155cm')- 1"_ _ 29_" -t _-1" -*II"*F 29,4"_51"÷ (2.50m) (73.7cm) (2.5cm) (2.5cm) (74.3cm)(12.7cm) A B C A, Recessed area B. This dryer...

Use and Care Manual
Page 6
... (1.22 m) long, must have a proper outlet installed by providing a path of electric shock. Do not modify the plug on the dryer. A4-wirepowesrupplyconnectiomnusbt eusedwhenthe applianciseinstalleidnalocatiown heregroundinthgrough theneutraclonductoisrprohibiteGd.roundinthgrougthhe neutraisl prohibitefdor(1)newbranch-circiunist tallations, (2)mobilehomes(3, ...qualified electrician or service representative or personnel if you are in a risk of least resistance for electric current. grounding conductor can result in doubt as to the equipment-grounding terminal or lead on...
... (1.22 m) long, must have a proper outlet installed by providing a path of electric shock. Do not modify the plug on the dryer. A4-wirepowesrupplyconnectiomnusbt eusedwhenthe applianciseinstalleidnalocatiown heregroundinthgrough theneutraclonductoisrprohibiteGd.roundinthgrougthhe neutraisl prohibitefdor(1)newbranch-circiunist tallations, (2)mobilehomes(3, ...qualified electrician or service representative or personnel if you are in a risk of least resistance for electric current. grounding conductor can result in doubt as to the equipment-grounding terminal or lead on...
Use and Care Manual
Page 7
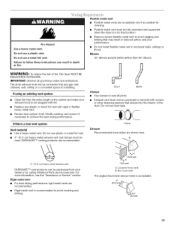
...THESE INSTRUCTIONS 4-wire receptacle 14-30R This dryer is equipped with the dryer: if it is recommended that the electrical connection is adequate and in doubt as to whether the dryer is within reach of the line. i^_¸., __ ./ Electrical Shock Hazard Plug into a grounded 4... path of the equipment- WARNING: Improper connection of least resistance for electric current. Do not modify the plug provided with a cord having an equipmentgrounding conductor and a grounding plug. This dryer is properly installed and grounded in accordance with a CSA International Certified...
...THESE INSTRUCTIONS 4-wire receptacle 14-30R This dryer is equipped with the dryer: if it is recommended that the electrical connection is adequate and in doubt as to whether the dryer is within reach of the line. i^_¸., __ ./ Electrical Shock Hazard Plug into a grounded 4... path of the equipment- WARNING: Improper connection of least resistance for electric current. Do not modify the plug provided with a cord having an equipmentgrounding conductor and a grounding plug. This dryer is properly installed and grounded in accordance with a CSA International Certified...
Use and Care Manual
Page 9
... (UL marking on the power supply cord is inside the terminal block opening, screw the removable conduit connector onto the strain relief threads. Electrical Connection Options If your type of a cabinet-ground conductor to the neutral wire, go to "Optional 3-wire connection" section. "t C...or (12.7 ore) cbiorcxu* it breaker 3-wire receptacle (NEMA type 10-30R) A UL listed, 120/240-volt (_ 3-wire direct 30-amp, dryer mpoinwimerumsu, pply cord* A fused disconnect or cbiorcxu* it breaker Go to Section: 4-wire connection: Power Supply Cord 4-wire connection: Direct Wire 3-wire ...
... (UL marking on the power supply cord is inside the terminal block opening, screw the removable conduit connector onto the strain relief threads. Electrical Connection Options If your type of a cabinet-ground conductor to the neutral wire, go to "Optional 3-wire connection" section. "t C...or (12.7 ore) cbiorcxu* it breaker 3-wire receptacle (NEMA type 10-30R) A UL listed, 120/240-volt (_ 3-wire direct 30-amp, dryer mpoinwimerumsu, pply cord* A fused disconnect or cbiorcxu* it breaker Go to Section: 4-wire connection: Power Supply Cord 4-wire connection: Direct Wire 3-wire ...
Use and Care Manual
Page 10
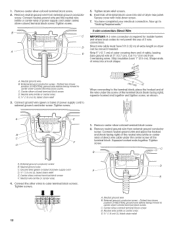
...block screws. Remove neutral ground wire from external ground conductor screw. Squeeze hooked ends together. D A. Ground wire (green or bare) of dryer rear panel. Dotted line shows position of 3 wire connections. C. Tighten screw. External ground conductor screw - Neutral wire (white or center ... screw. Neutral ground wire B. You have 5 ft (1.52 m) of the terminal block. Direct wire cable must have completed your electrical connection. Cut 11/2'' (3.8 cm) from end of NEUTRAL ground wire before being moved to external ground conductor screw. A. Neutral ground...
...block screws. Remove neutral ground wire from external ground conductor screw. Squeeze hooked ends together. D A. Ground wire (green or bare) of dryer rear panel. Dotted line shows position of 3 wire connections. C. Tighten screw. External ground conductor screw - Neutral wire (white or center ... screw. Neutral ground wire B. You have 5 ft (1.52 m) of the terminal block. Direct wire cable must have completed your electrical connection. Cut 11/2'' (3.8 cm) from end of NEUTRAL ground wire before being moved to external ground conductor screw. A. Neutral ground...
Use and Care Manual
Page 11
... 3-wire connection: Direct Wire Use where local codes permit connecting cabinet-ground conductor to external ground conductor screw. You have completed your electrical connection. Strip 31/2'' (8.9 cm) of outer covering from end of the other wires to neutral wire. 4. Tighten screw. Tighten ...cabinet-ground conductor to outer terminal block screws. Spade terminals with outer covering. 3. Connect ground wire (green or bare) of dryer rear panel. Center silver-colored terminal block screw F Neutral wire (white or center wire) 4. Squeeze hooked ends together. Tighten ...
... 3-wire connection: Direct Wire Use where local codes permit connecting cabinet-ground conductor to external ground conductor screw. You have completed your electrical connection. Strip 31/2'' (8.9 cm) of outer covering from end of the other wires to neutral wire. 4. Tighten screw. Tighten ...cabinet-ground conductor to outer terminal block screws. Spade terminals with outer covering. 3. Connect ground wire (green or bare) of dryer rear panel. Center silver-colored terminal block screw F Neutral wire (white or center wire) 4. Squeeze hooked ends together. Tighten ...
Use and Care Manual
Page 12
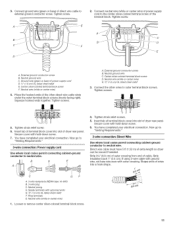
...cm) UL listed strain relief 3= Place the hooked ends of the other wires to outer terminal block screws. Tighten screws. !! !! 4. You have completed your electrical connection. Neutral ground wire C. Neutral wire (white or center wire) E. _" (1.9 cm) UL listed strain relief F Grounding path determined by a qualified electrician.... 1. Secure cover with hold -down screw. 6. Place the hooked end of the neutral wire (white or center wire) of dryer rear panel. Insert tab of terminal block cover into slot of direct wire cable under the outer terminal block screws (hooks facing right...
...cm) UL listed strain relief 3= Place the hooked ends of the other wires to outer terminal block screws. Tighten screws. !! !! 4. You have completed your electrical connection. Neutral ground wire C. Neutral wire (white or center wire) E. _" (1.9 cm) UL listed strain relief F Grounding path determined by a qualified electrician.... 1. Secure cover with hold -down screw. 6. Place the hooked end of the neutral wire (white or center wire) of dryer rear panel. Insert tab of terminal block cover into slot of direct wire cable under the outer terminal block screws (hooks facing right...
Use and Care Manual
Page 13
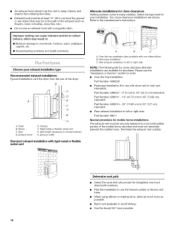
...1"_4,,--_I (10.2 cm) A. Elbows 45 ° elbows provide better airflow than 90 ° elbows. IMPORTANT: Observe all joints. The dryer exhaust must be purchased from the entire length of the system and make sure exhaust hood is a new vent system Vent material • Use...using an existing vent system • Clean lint from your dealer or by calling Whirlpool Parts and Accessories. Good Better Clamps Use clamps to achieve the best drying performance. Louvered hood style B. If this dryer MUST BE EXHAUSTED OUTDOORS. For more information, see the "Assistance or Service" ...
...1"_4,,--_I (10.2 cm) A. Elbows 45 ° elbows provide better airflow than 90 ° elbows. IMPORTANT: Observe all joints. The dryer exhaust must be purchased from the entire length of the system and make sure exhaust hood is a new vent system Vent material • Use...using an existing vent system • Clean lint from your dealer or by calling Whirlpool Parts and Accessories. Good Better Clamps Use clamps to achieve the best drying performance. Louvered hood style B. If this dryer MUST BE EXHAUSTED OUTDOORS. For more information, see the "Assistance or Service" ...
Use and Care Manual
Page 14
...fewest 90 ° turns possible. 14 Refer to connect H. Part Number 4396011 - 18" (45.72 cm) to 29" (73.66 cm) mismatch Part Number 4396014 - 29" (73.66 cm) to 50" (127 cm) mismatch B • Rear exhaust installation to left or right .... [] Housecleaning problems and health problems. L B C A. Terminate the exhaust vent outside. Please see the Recommended exhaust installations Typical installations vent the dryer from entering the home. Exhaust hood E. "Assistance or Service" section to order. • Over-the-Top Installation: Part Number 4396028 B •...
...fewest 90 ° turns possible. 14 Refer to connect H. Part Number 4396011 - 18" (45.72 cm) to 29" (73.66 cm) mismatch Part Number 4396014 - 29" (73.66 cm) to 50" (127 cm) mismatch B • Rear exhaust installation to left or right .... [] Housecleaning problems and health problems. L B C A. Terminate the exhaust vent outside. Please see the Recommended exhaust installations Typical installations vent the dryer from entering the home. Exhaust hood E. "Assistance or Service" section to order. • Over-the-Top Installation: Part Number 4396028 B •...
Use and Care Manual
Page 15
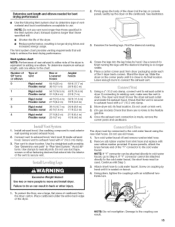
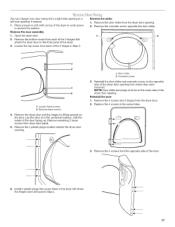
...ft (9.4 m) 23 ft (7 m) 2 Rigid metal 44 ft (13.4 m) 38 ft (11.6 m) Flexible metal 27 ft (8.2 m) 19 ft (5.8 m) 3 Rigid metal 35 ft (10.7 m) 29 ft (8.8 m) Flexible metal 25 ft (7.6 m) 17 ft (5.2 m) 4 Rigid metal 27 ft (8.2 m) 21 ft (6.4 m) Flexible metal 23 ft (7 m) 15 ft (4.6 m) 2. Number of 90 ...° turns or elbows Type of the "Y" connector to Step 6. Screw the legs into its final location. Stand the dryer up. The dryer vent must be connected to the cold water faucet using the new inlet hoses. Once the exhaust vent connection is seated on the cardboard...
...ft (9.4 m) 23 ft (7 m) 2 Rigid metal 44 ft (13.4 m) 38 ft (11.6 m) Flexible metal 27 ft (8.2 m) 19 ft (5.8 m) 3 Rigid metal 35 ft (10.7 m) 29 ft (8.8 m) Flexible metal 25 ft (7.6 m) 17 ft (5.2 m) 4 Rigid metal 27 ft (8.2 m) 21 ft (6.4 m) Flexible metal 23 ft (7 m) 15 ft (4.6 m) 2. Number of 90 ...° turns or elbows Type of the "Y" connector to Step 6. Screw the legs into its final location. Stand the dryer up. The dryer vent must be connected to the cold water faucet using the new inlet hoses. Once the exhaust vent connection is seated on the cardboard...
Use and Care Manual
Page 16
...10. Using pliers, tighten the coupling with an additional twothirds turn . Use a wrench to brass male end of the dryer near the console. Check the levelness of the dryer by hand until it is not level, prop up or down and check again for leaks around "Y" connector, faucet and ... not overtighten. Using pliers, tighten the couplings with an additional twothirds turn . Check for levelness. 5. Attach "Y" connector to adjust the legs up the dryer using a wood block. Screw on coupling by hand until it is seated on . 12. Screw on coupling by hand until it is seated on the...
...10. Using pliers, tighten the coupling with an additional twothirds turn . Use a wrench to brass male end of the dryer near the console. Check the levelness of the dryer by hand until it is not level, prop up or down and check again for leaks around "Y" connector, faucet and ... not overtighten. Using pliers, tighten the couplings with an additional twothirds turn . Check for levelness. 5. Attach "Y" connector to adjust the legs up the dryer using a wood block. Screw on coupling by hand until it is seated on . 12. Screw on coupling by hand until it is seated on the...
Use and Care Manual
Page 17
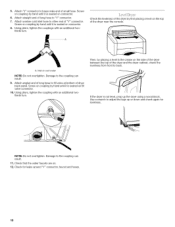
Remove the door strike from where they were removed, NOTE: Door strike and plugs must be on the same side of the dryer door opening. Reinstall the door strike and cosmetic screw on the door. Replace the 4 screws in Step 4. Place a towel or soft cloth on a flat,... of the 2 hinges in Step 2. A. Door strike B. Remove these screws. Reinstall the door 1. Remove the dryer door and the hinges by lifting upward on the opposite side of the dryer door opening from the dryer door opening. 2. I I 17 You can change your door swing from the opposite side of the door. 6=...
Remove the door strike from where they were removed, NOTE: Door strike and plugs must be on the same side of the dryer door opening. Reinstall the door strike and cosmetic screw on the door. Replace the 4 screws in Step 4. Place a towel or soft cloth on a flat,... of the 2 hinges in Step 2. A. Door strike B. Remove these screws. Reinstall the door 1. Remove the dryer door and the hinges by lifting upward on the opposite side of the dryer door opening from the dryer door opening. 2. I I 17 You can change your door swing from the opposite side of the door. 6=...

Use and Care Manual
Page 18
... live in a running or "On" position. • Start button has been pushed firmly. • Dryer is plugged into top slotted holes of screw exposed. See "Level Dryer." 8. Test dryer operation by placing screw heads into an outlet and/or electrical supply is on . 5. Tighten all parts are on . • Household fuse is intact and...
... live in a running or "On" position. • Start button has been pushed firmly. • Dryer is plugged into top slotted holes of screw exposed. See "Level Dryer." 8. Test dryer operation by placing screw heads into an outlet and/or electrical supply is on . 5. Tighten all parts are on . • Household fuse is intact and...

Use and Care Manual
Page 19
...fabric type of the load. During the first few minutes of the drying process, the cycle time may not have all of fire, electric shock, or injury to specific sections of the drying process, the estimated time display will adjust again, showing the final drying time.... displayed when an automatic cycle is selected. This manual covers several different models. Follow these instructions can result in the display. Place laundry into dryer and shut door. 3. The estimated (automatic cycle) or actual (timed) cycle time (in minutes) will illuminate. You can completely remove oil...
...fabric type of the load. During the first few minutes of the drying process, the cycle time may not have all of fire, electric shock, or injury to specific sections of the drying process, the estimated time display will adjust again, showing the final drying time.... displayed when an automatic cycle is selected. This manual covers several different models. Follow these instructions can result in the display. Place laundry into dryer and shut door. 3. The estimated (automatic cycle) or actual (timed) cycle time (in minutes) will illuminate. You can completely remove oil...
Use and Care Manual
Page 20
...be used only with the Timed Dry and the Enhanced Touch Up cycles. If an Automatic Cycle is displayed. TIMEADJUST • Press TEMP until dryer starts. Cool Down tumbles the load without heat during an Automatic Cycle: • Press PAUSE/CANCEL • Adjust Dryness. To use a Timed... alert you do not press Start within 5 minutes. Now the AccelerCare TM Drying System Works Moisture-sensing strips and temperature sensors inside the dryer drum monitor how fast the load is interrupted for the Enhanced Touch Up Cycle. To use a Steam Cycle (Quick Refresh and Enhanced Touch...
...be used only with the Timed Dry and the Enhanced Touch Up cycles. If an Automatic Cycle is displayed. TIMEADJUST • Press TEMP until dryer starts. Cool Down tumbles the load without heat during an Automatic Cycle: • Press PAUSE/CANCEL • Adjust Dryness. To use a Timed... alert you do not press Start within 5 minutes. Now the AccelerCare TM Drying System Works Moisture-sensing strips and temperature sensors inside the dryer drum monitor how fast the load is interrupted for the Enhanced Touch Up Cycle. To use a Steam Cycle (Quick Refresh and Enhanced Touch...
Use and Care Manual
Page 21
... of load you choose an Automatic Cycle. Adjust the temperature of time remaining. CASUAL DELICATE Follow the progress of the cycle. The dryer will not illuminate. The Wet light illuminates until the desired temperature is especially important for drying sturdy fabrics such as sport shirts, casual...to get extra-low heat to increased shrinkage or wrinkling. Follow package instructions. • To reduce wrinkling, remove the load from the dryer as soon as lingerie, blouses or washable knit fabrics. 21 Select the drying cycle that matches the type of lighter fabrics and lead ...
... of load you choose an Automatic Cycle. Adjust the temperature of time remaining. CASUAL DELICATE Follow the progress of the cycle. The dryer will not illuminate. The Wet light illuminates until the desired temperature is especially important for drying sturdy fabrics such as sport shirts, casual...to get extra-low heat to increased shrinkage or wrinkling. Follow package instructions. • To reduce wrinkling, remove the load from the dryer as soon as lingerie, blouses or washable knit fabrics. 21 Select the drying cycle that matches the type of lighter fabrics and lead ...
Use and Care Manual
Page 22
... those without. When a Steam Cycle is selected, the Estimated Time Remaining display shows the actual time remaining in the dryer too long. The dryer will continue to help smooth out wrinkles from loads consisting of wrinkle-free cotton, cotton-polyester blend, common knits and synthetic...work clothes. NOTE: Results may cause temporary staining on the clothes. You can be used with heat. Use of tumbling with the dryer rack. See "Changing Cycles, Modifiers and Options." Automatic Preset Cycle Settings Automatic Cycles Load Type HEAVY DUTY Heavyweight mixed loads, cottons, ...
... those without. When a Steam Cycle is selected, the Estimated Time Remaining display shows the actual time remaining in the dryer too long. The dryer will continue to help smooth out wrinkles from loads consisting of wrinkle-free cotton, cotton-polyester blend, common knits and synthetic...work clothes. NOTE: Results may cause temporary staining on the clothes. You can be used with heat. Use of tumbling with the dryer rack. See "Changing Cycles, Modifiers and Options." Automatic Preset Cycle Settings Automatic Cycles Load Type HEAVY DUTY Heavyweight mixed loads, cottons, ...
Use and Care Manual
Page 23
...backed rugs 40 - 50 Olefin, polypropylene, sheer nylon 10 - 20 *Reset cycle to alert you do not select the WRINKLE SHIELD TM setting, the dryer stops after cool down. NOTE: If you that require drying without stopping the cycle. When the signal goes off . You can select a different dryness... - When using Air Only • Check that can customize your cycles by hand periodically during the cycle. • Dry item completely. When the dryer is not running, the drum light will turn on your clothes are slow to ON. The Damp Dry Signal is useful when drying bedsheets/linens...
...backed rugs 40 - 50 Olefin, polypropylene, sheer nylon 10 - 20 *Reset cycle to alert you do not select the WRINKLE SHIELD TM setting, the dryer stops after cool down. NOTE: If you that require drying without stopping the cycle. When the signal goes off . You can select a different dryness... - When using Air Only • Check that can customize your cycles by hand periodically during the cycle. • Dry item completely. When the dryer is not running, the drum light will turn on your clothes are slow to ON. The Damp Dry Signal is useful when drying bedsheets/linens...


